В этом руководстве рассмотрим, как установить Google Play Store на ПК с Windows 11 с помощью подсистемы Windows для Android.
В Windows 11 с помощью подсистемы Windows для Android (WSA) вы можете установить магазин Google Play Store, загружать и устанавливать любые приложения Android на свой компьютер с помощью определенных действий, которые включает в себя множество шагов.
Это был просто вопрос времени, теперь вы можете устанавливать Android приложения из Play Store в Windows 11, но не официально. Пользователь твиттера — ADeltaX, разработал процедуру, позволяющую обойти подсистему Windows для Android и установить приложение Google Play Store, что дает вам доступ в Windows 11 ко всему каталогу приложений для Android.
Пока, неясно, как это повлияет на будущие обновления. Другими словами, данный способ вполне может быть только временным решением, поскольку до сих пор не понятно, что произойдет после того, как WSA получит обновление через Магазин Microsoft. Вероятно, любому, кто использует этот метод, придется повторить весь процесс настройки. Конечно, если вы не отключите автоматическое обновление приложений в параметрах приложения Магазин Microsoft.
Этот способ установки магазина Google Play Store в Windows 11 является сокращением инструкций ADeltaX, но, если есть желание, вы можете следовать полной инструкции из репозитория Github.
Следуйте шагам ниже, чтобы установить магазин приложений Google и иметь возможность устанавливать приложения для Android в Windows 11.
Подготовка компьютера с Windows 11 для установки WSA
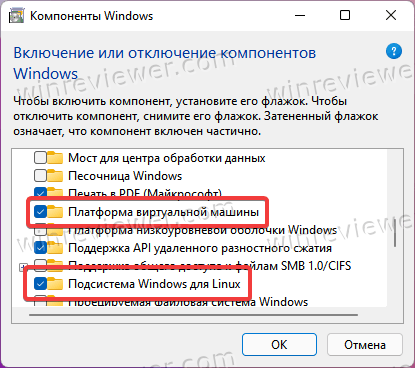
Прежде чем перейти к загрузке и установке, необходимо убедиться, что на вашем компьютере включены дополнительные функции Hyper-V и Virtual Machine Platform.
Шаг 1: Для этого, нажмите сочетание клавиш Win R , чтобы открыть диалоговое окно «Выполнить».
Шаг 2: Введите или скопируйте и вставьте:
OptionalFeatures
Шаг 3: Здесь в окне «Компоненты Windows» для «Hyper-V» и «Платформа виртуальной машины» установите флажок, чтобы включить его.
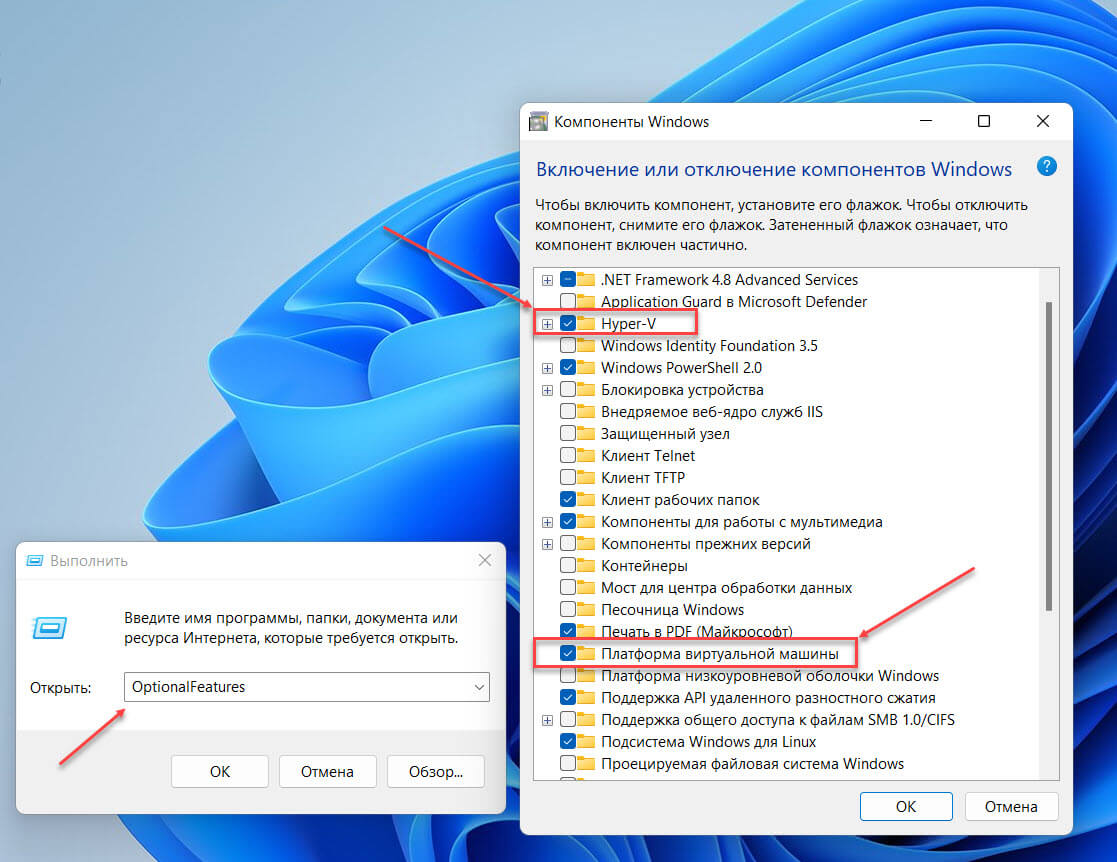
Шаг 4: Нажмите кнопку «ОК», чтобы установить эти дополнительные функции на свой компьютер с Windows.
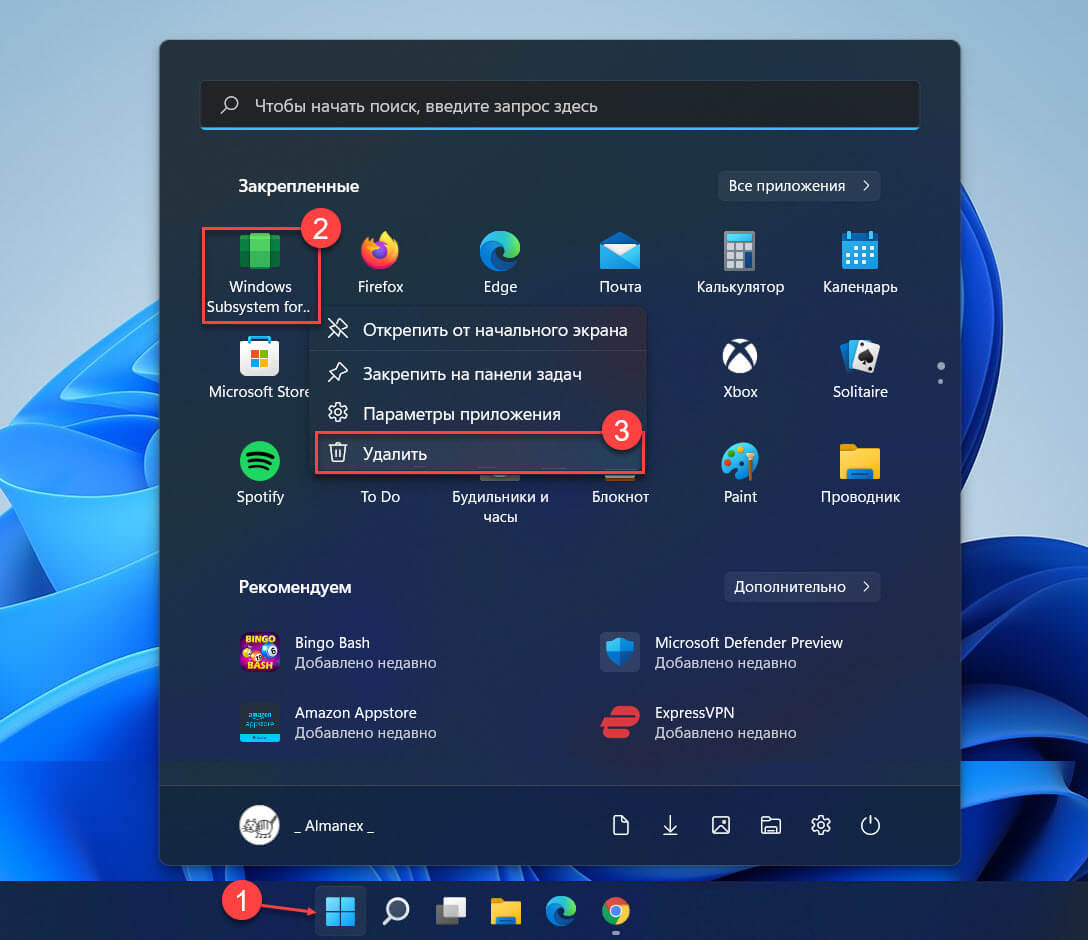
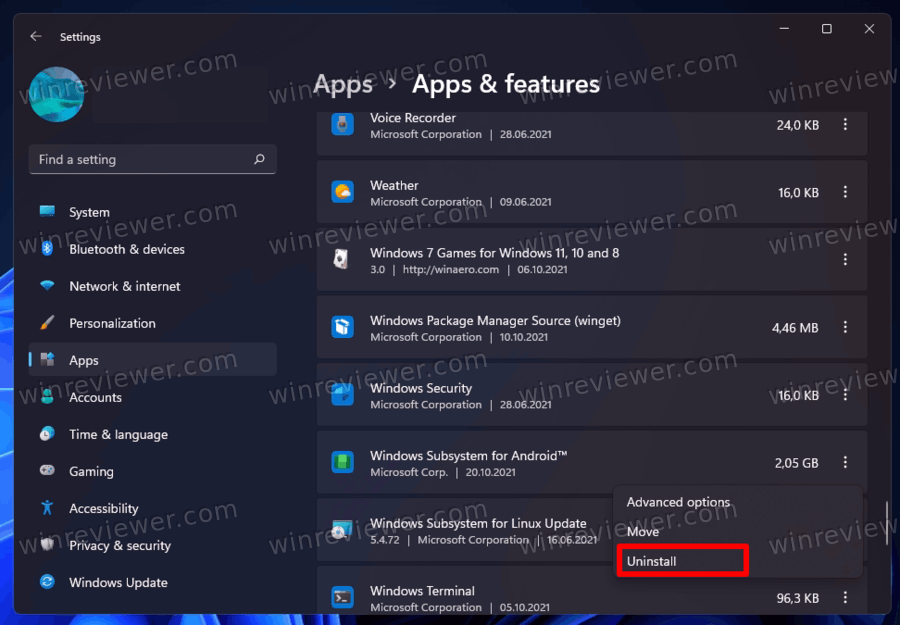
Удалите любой ранее установленный пакет WSA
Удалите подсистему Windows для Android, если она уже установлена. Это связано с тем, что мы будем устанавливать новую подсистему Windows для Android, в которой существует интеграция Google Apps.
Шаг 5: Для этого, откройте меню «Пуск», найдите и кликните на подсистему «Windows Subsystem for Android» правой кнопкой мыши и выберите в контекстном меню пункт «Удалить». Затем следуйте инструкциям на экране, чтобы завершить процесс удаления.
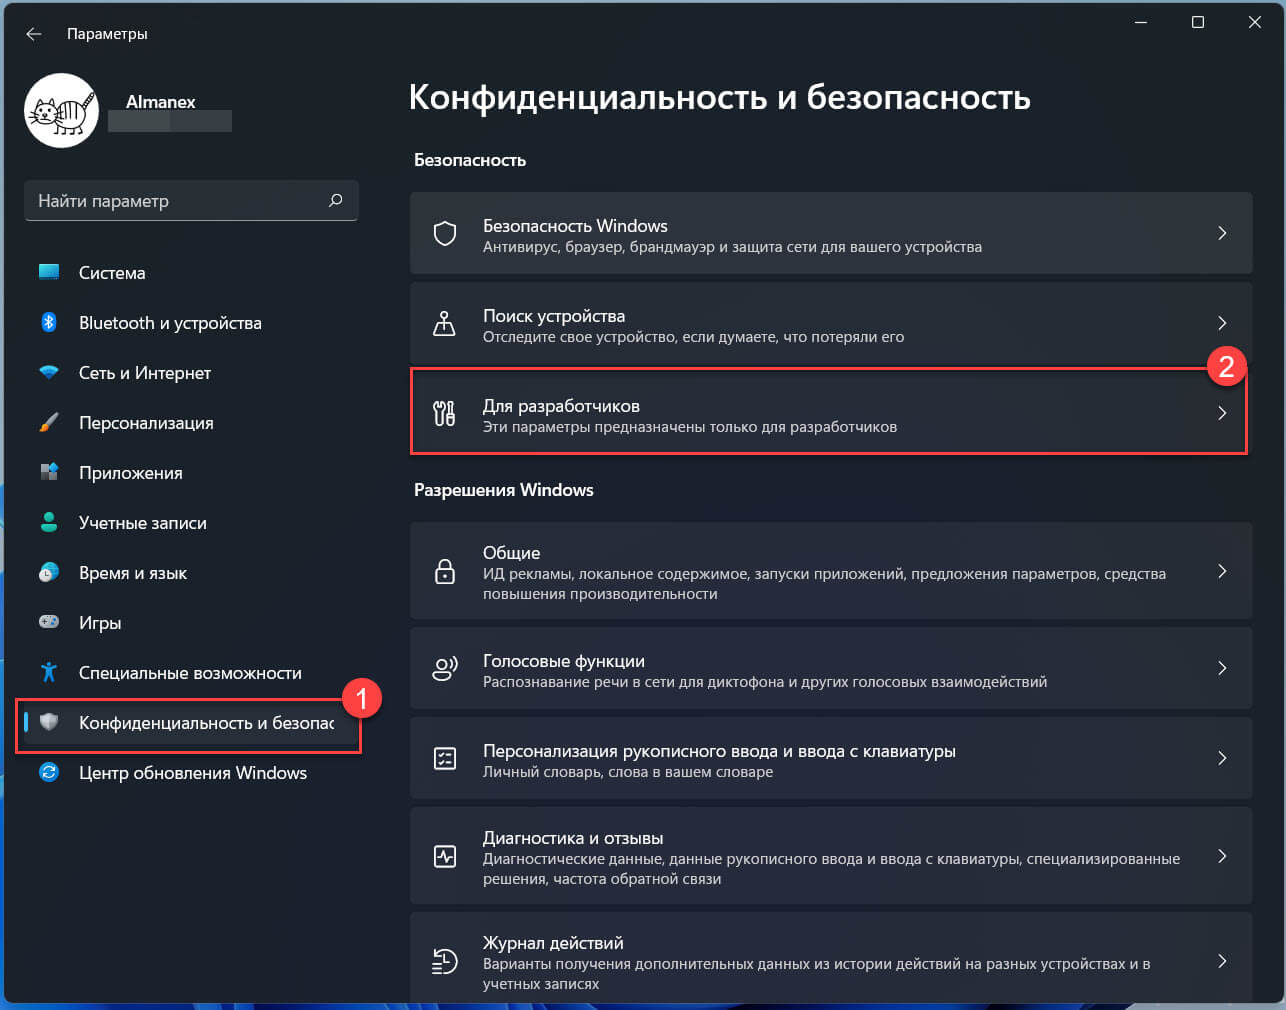
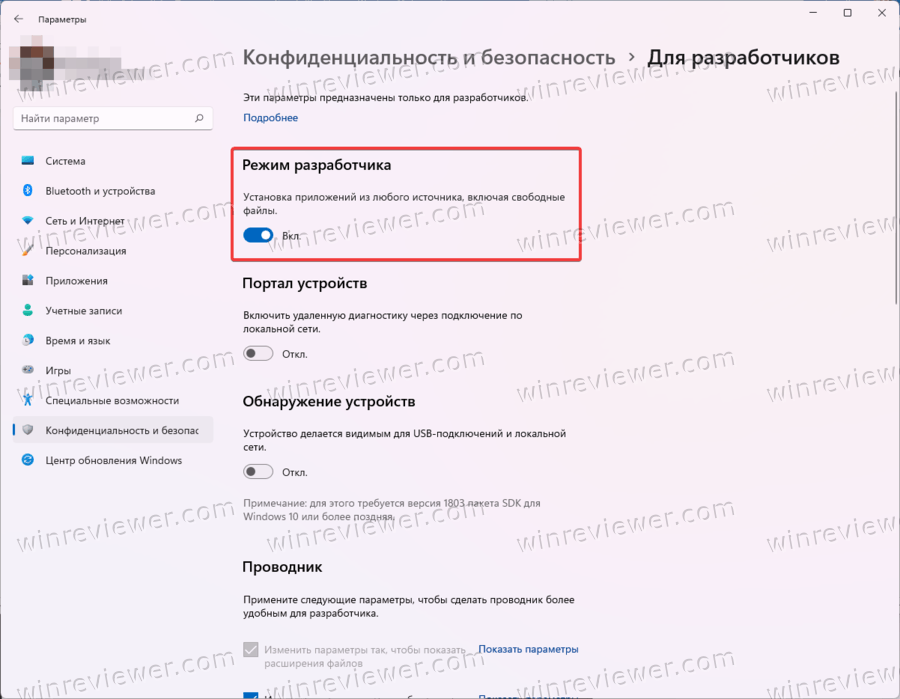
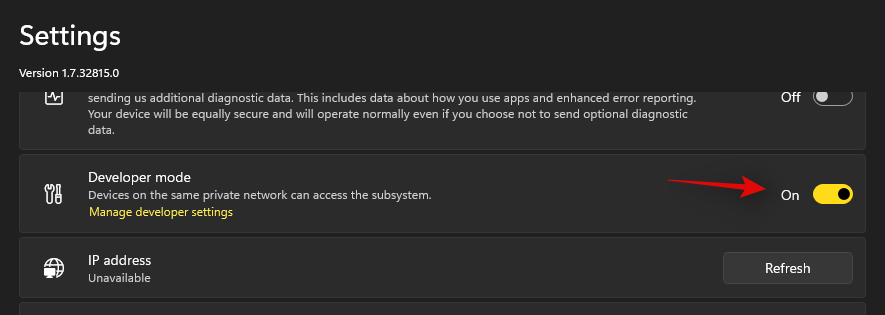
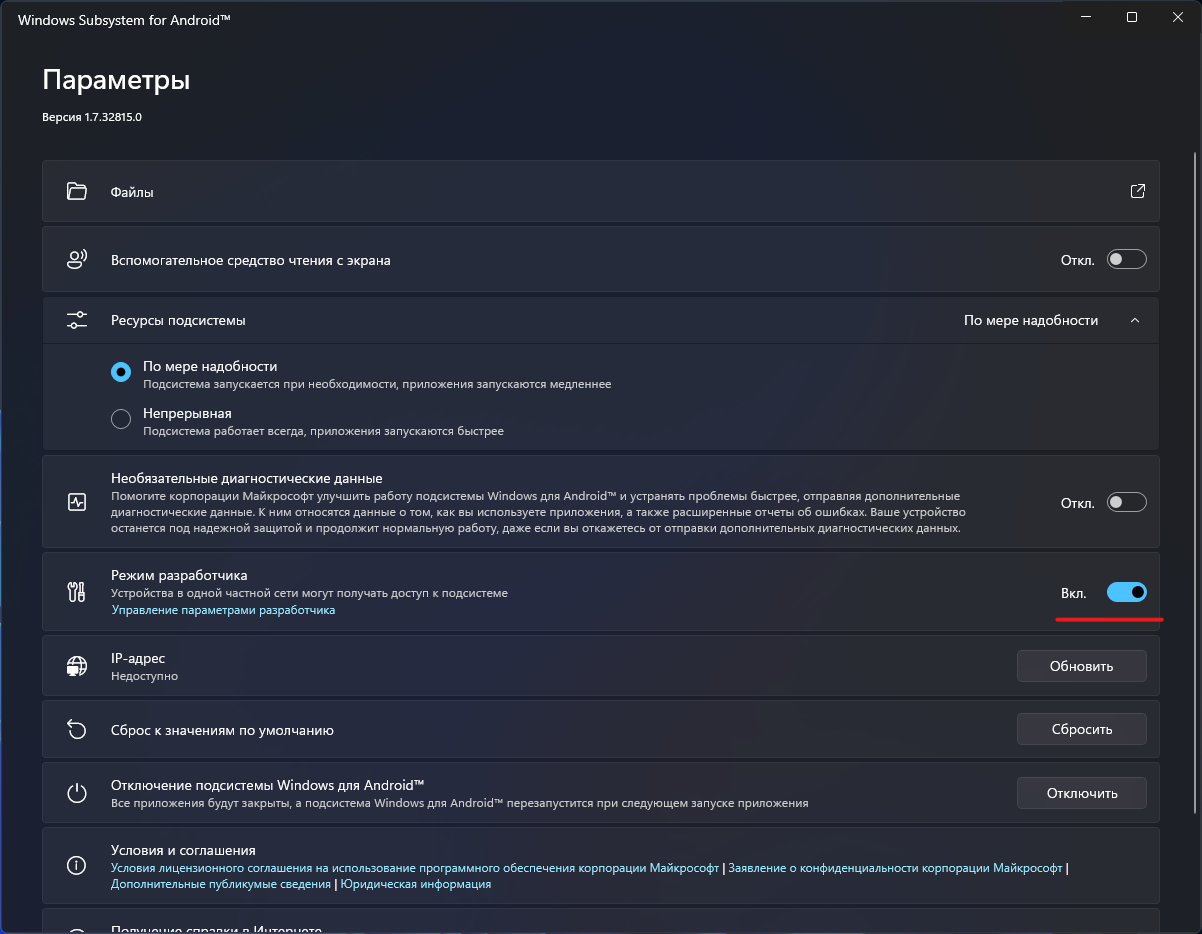
Включите параметры разработчика в Windows 11.
Вам нужно будет включить параметры разработчика в Windows (в Windows 11, а не в WSA!).
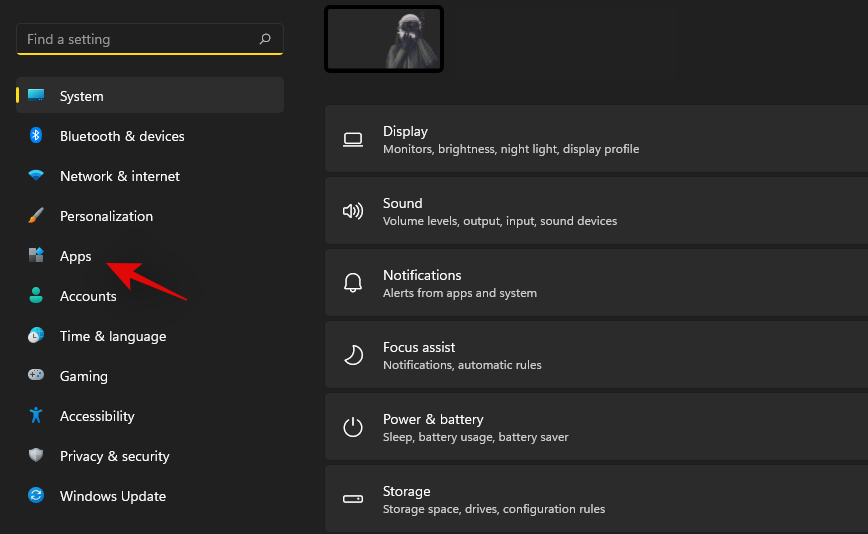
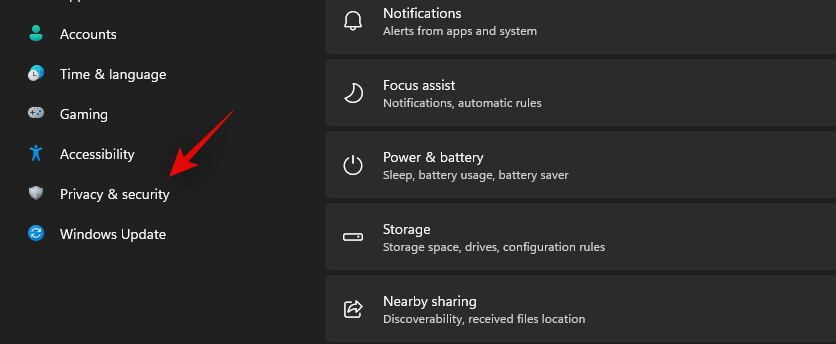
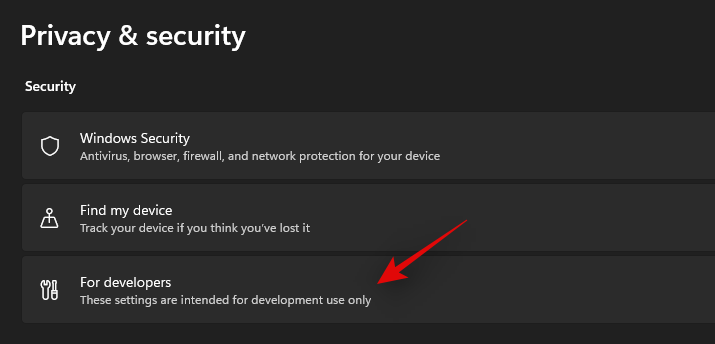
Шаг 6: Откройте параметры Windows 11, перейдите в раздел «Конфиденциальность и безопасность» → «Для разработчиков».
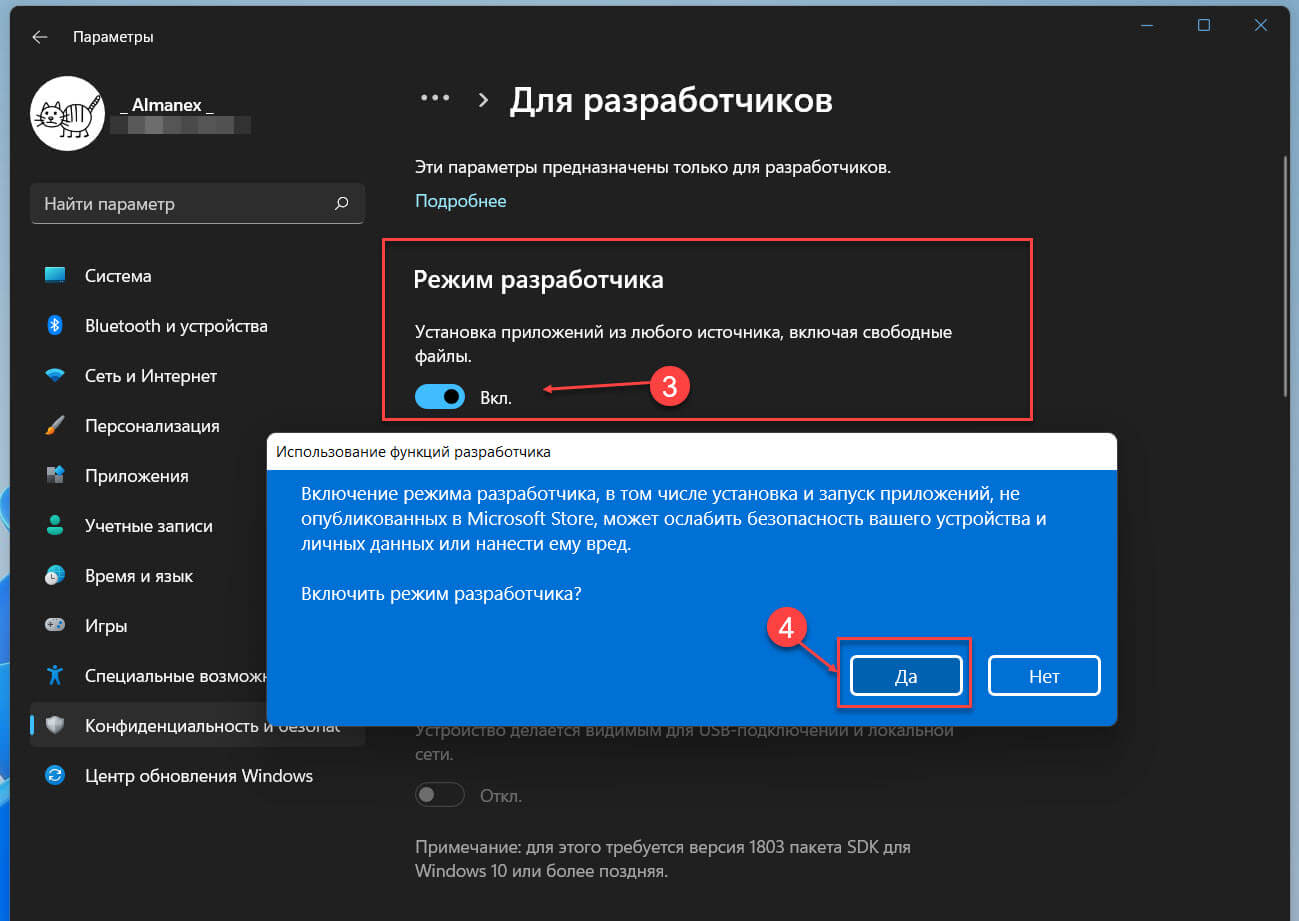
Шаг 7: В разделе режим разработчика передвиньте ползунок переключателя в положение «Вкл.»
Шаг 8: В следующем всплывающем окне подтвердите свои действия нажав кнопку «Да».
Загрузите WSA + GApps пакет MSIX:
Выберите для загрузки файл в зависимости от вашего устройства.
Шаг 9: Это модифицированная версия – «Windows Subsystem for Android (WSA-x86 64-бит + GApps)».
Модифицированная версия файл MSIX для 64-разрядных компьютеров ARM, таких как Surface Pro X.
Обновление: Благодаря новому методу от LSPposed у нас теперь есть WSA со встроенной поддержкой Magisk.
Вам понадобится приложение Magisk после установки одного из пакетов ниже.
- Модифицированная версия 64-разрядной версии WSA x86, в нее встроены приложения Google и поддержка Magisk.
- Модифицированная версия 64-разрядной версии WSA ARM, в нее встроены приложения Google и поддержка Magisk.
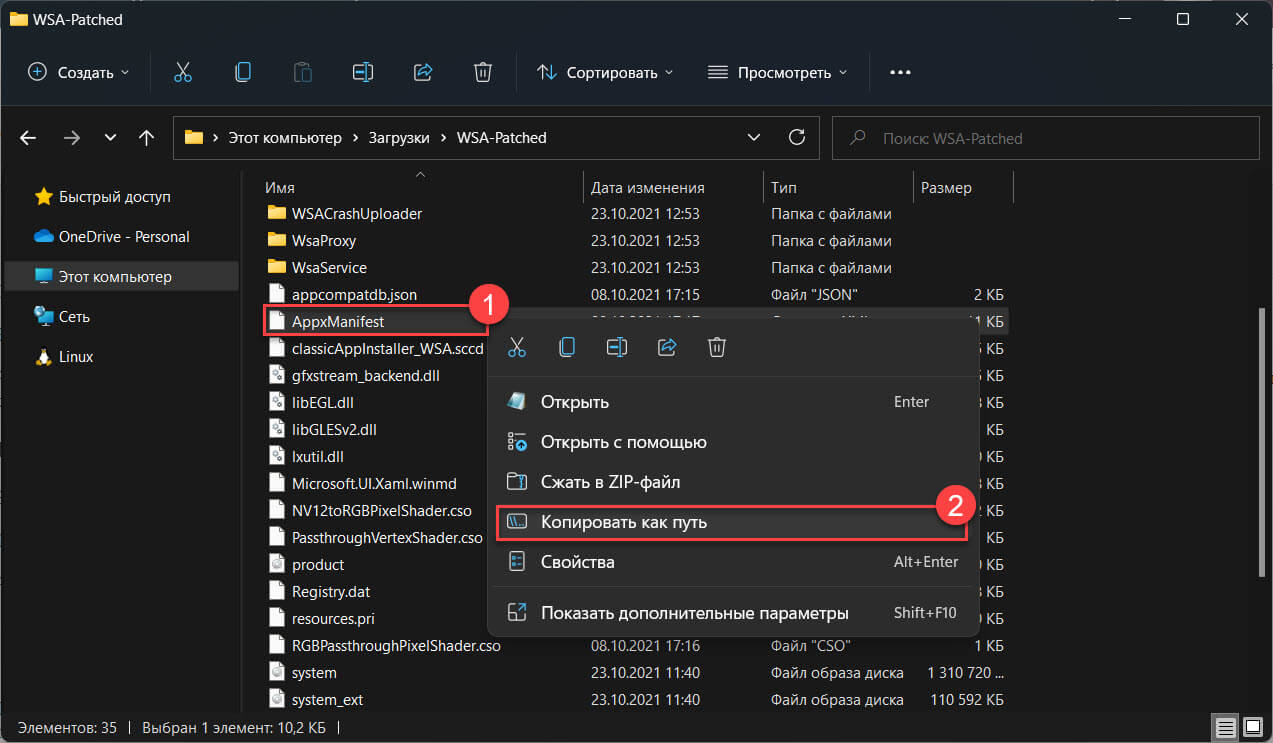
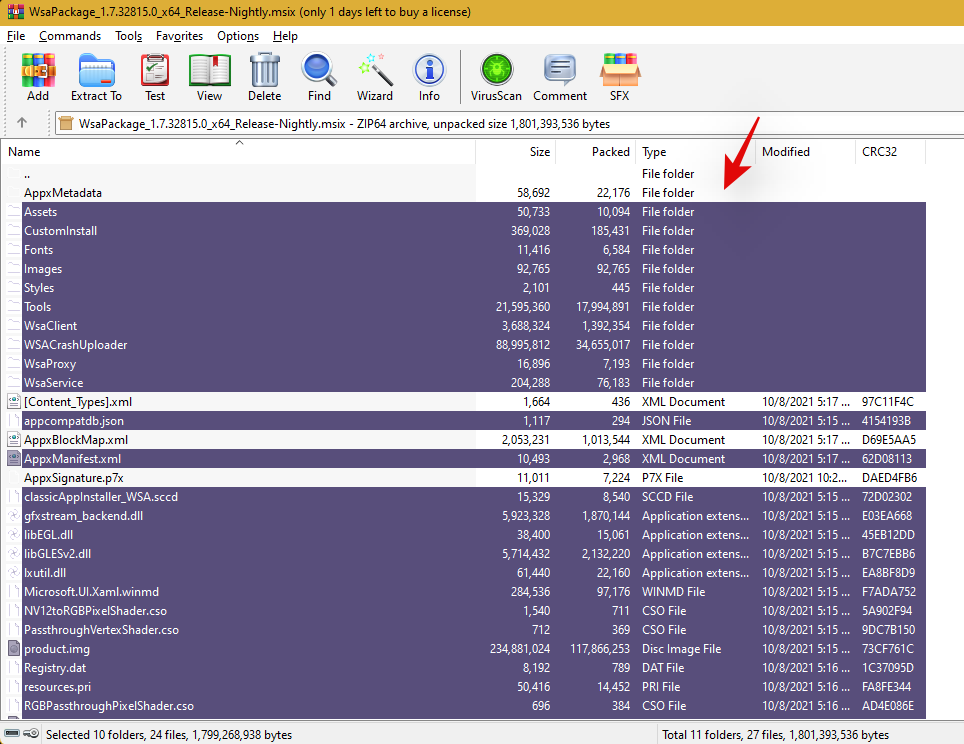
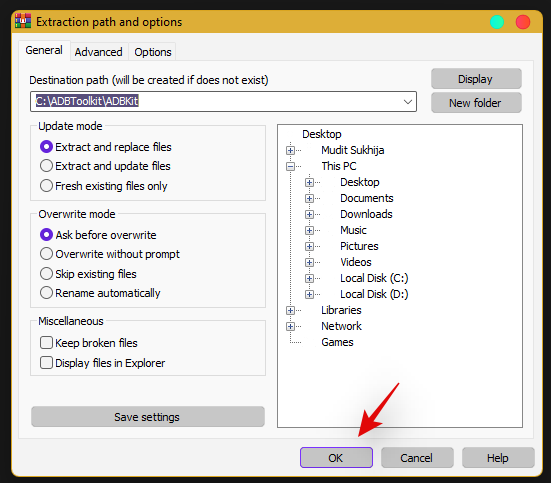
Шаг 10: Распакуйте загруженный Zip-архив в любое расположение, в дальнейшем нам потребуется указать путь к файлу AppxManifest.xml из этой папки.
Чтобы быстро получить путь к расположению файла, кликните на AppxManifest.xml правой кнопкой мыши и выберите «Копировать как путь», чтобы скопировать путь к файлу в буфер обмена ПК с Windows 11.
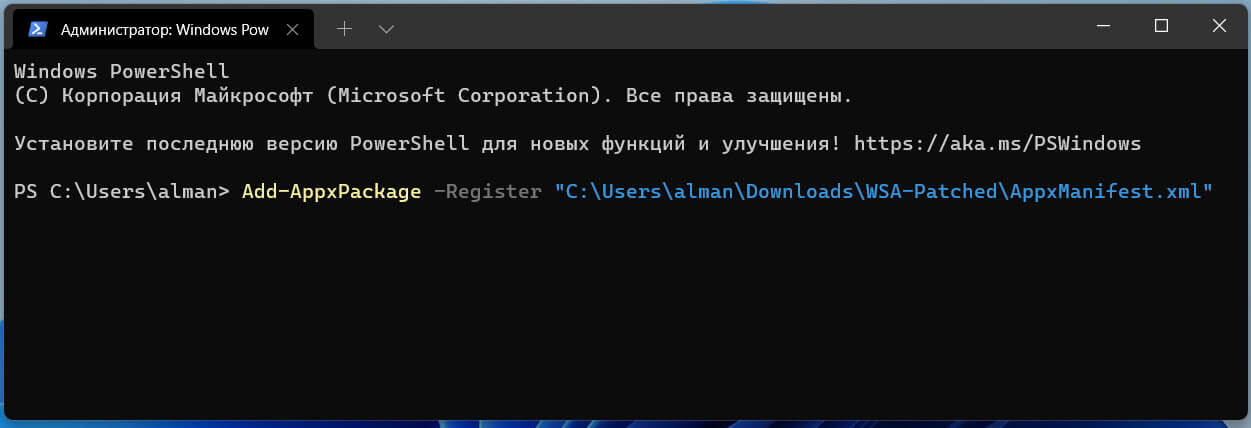
Зарегистрируйте пакет WSA + GApps:
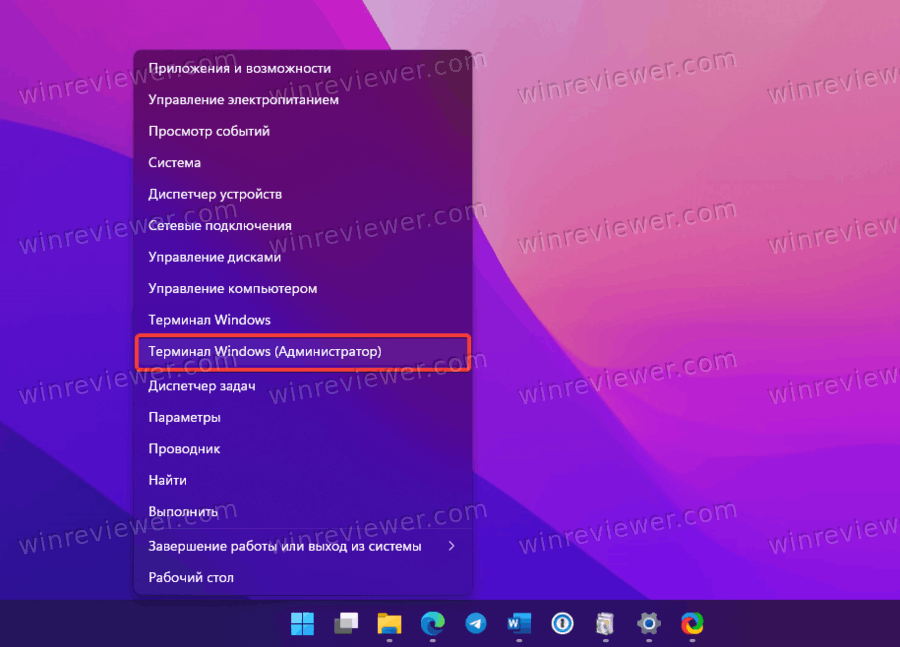
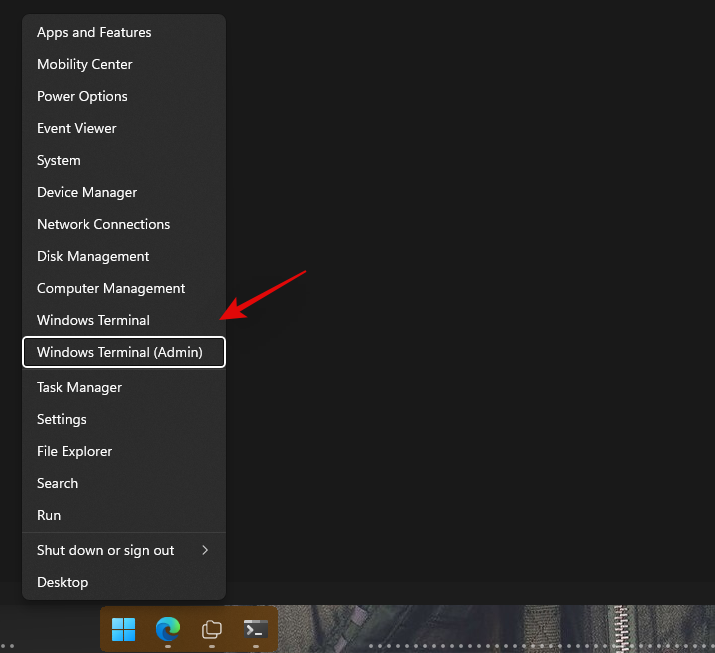
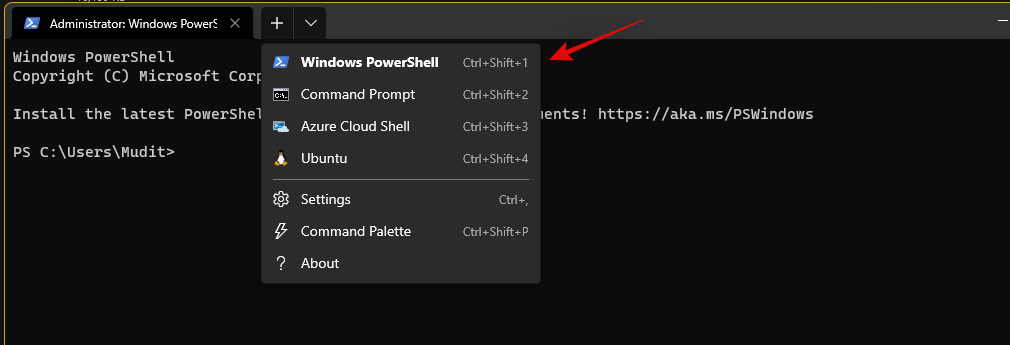
Шаг 11: Запустите Powershell от имени администратора с помощью Терминала или любым другим удобным вам способом.
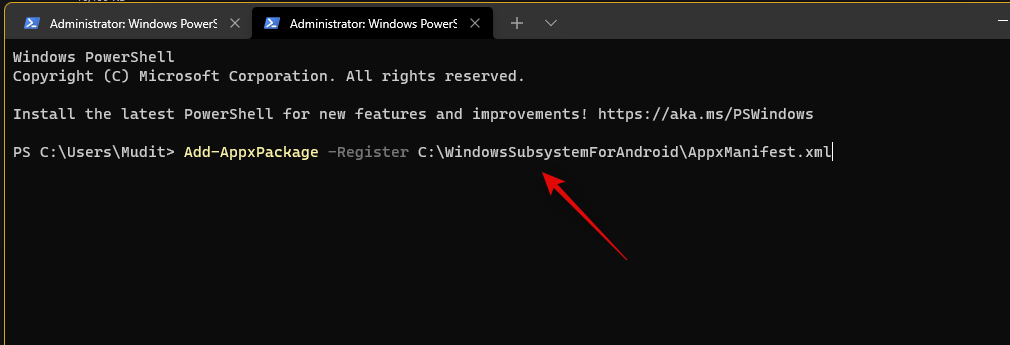
Шаг 12: Измените команду Powershell, указав расположение извлеченного Zip-файла
Add-AppxPackage -Register "Путь_к_папке_с_WSAAppxManifest.xml"
В моем случае команда выглядит так:
Add-AppxPackage -Register "C:UsersalmanexDownloadsWSA-PatchedAppxManifest.xml"
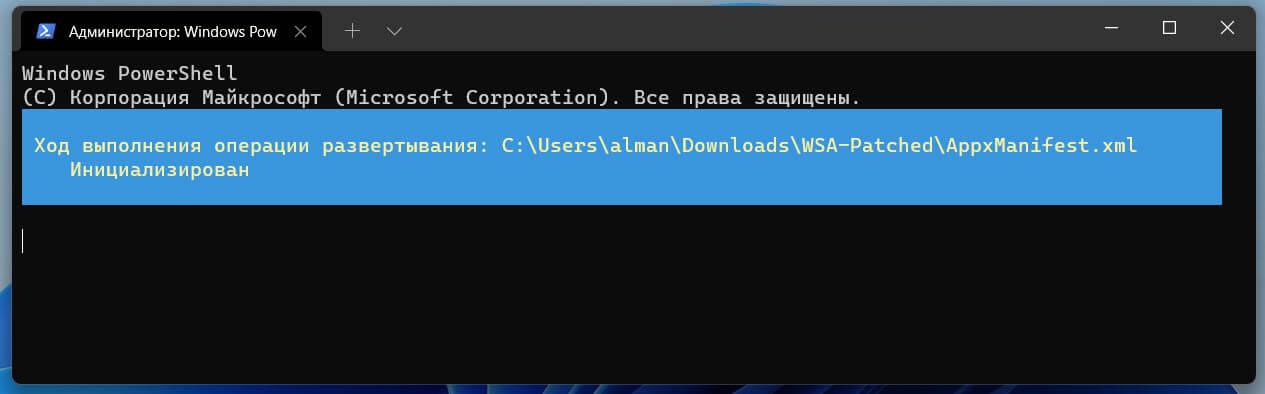
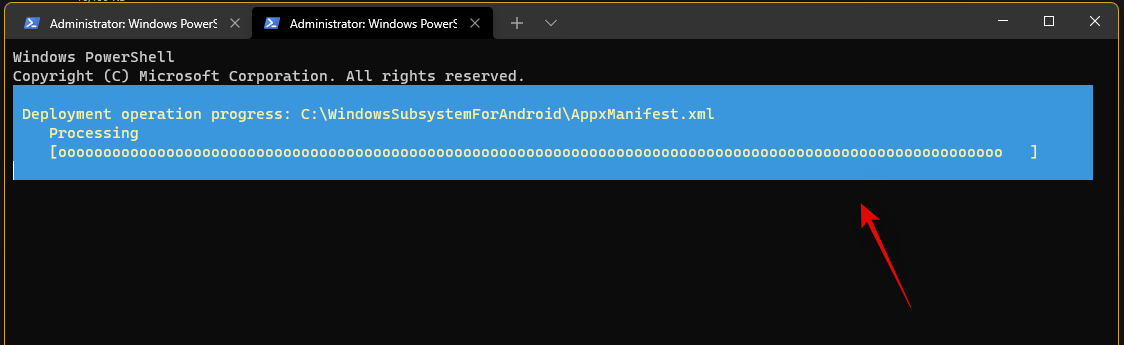
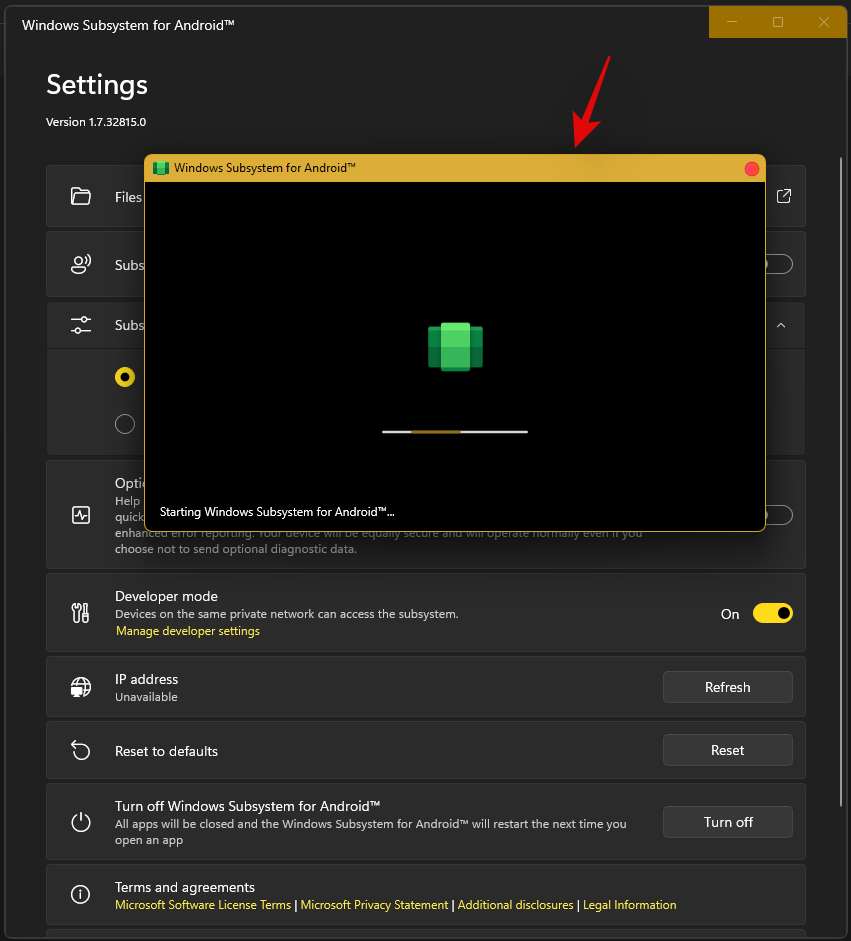
Приложение WSA будет установлено на ваше устройство в фоновом режиме. Если вы получите сообщение об ошибке, убедитесь, что все шаги были выполнены правильно.
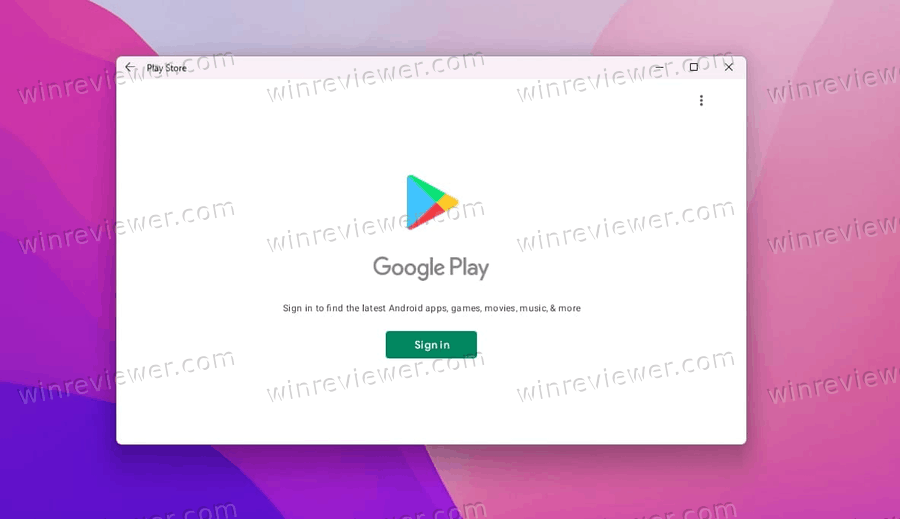
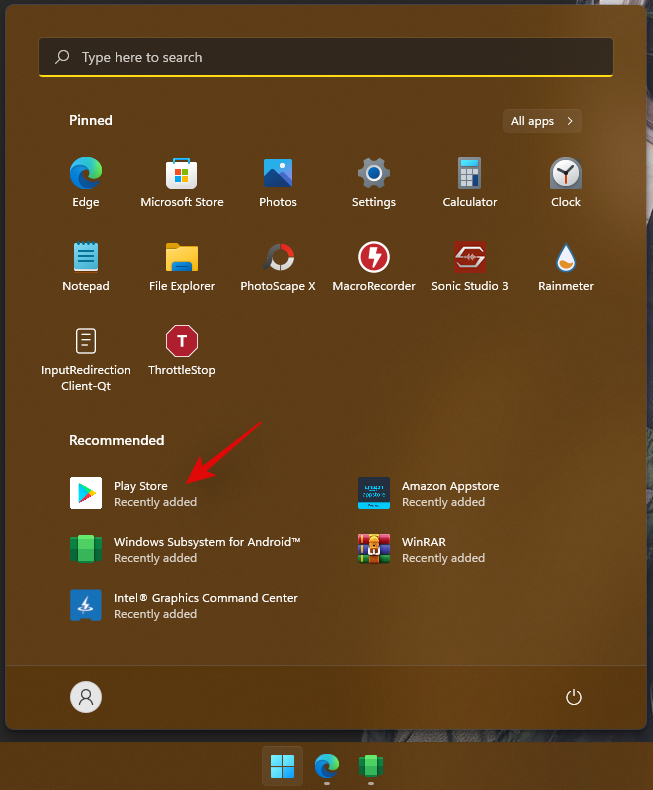
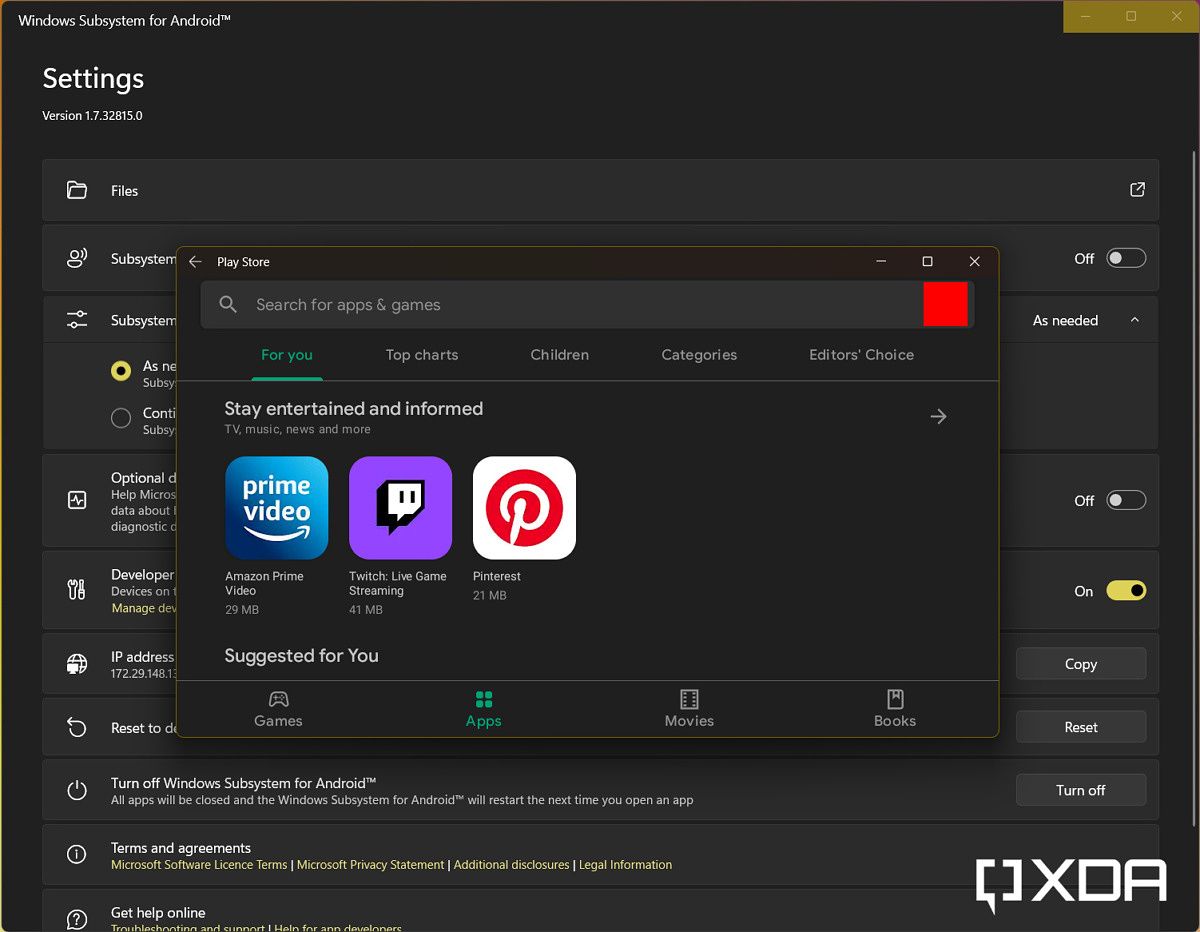
После регистрации WSA, магазин Google Play должен быть доступен в меню «Пуск».
И последнее, что нужно сделать, прежде чем вы сможете войти в свою учетную запись Google.
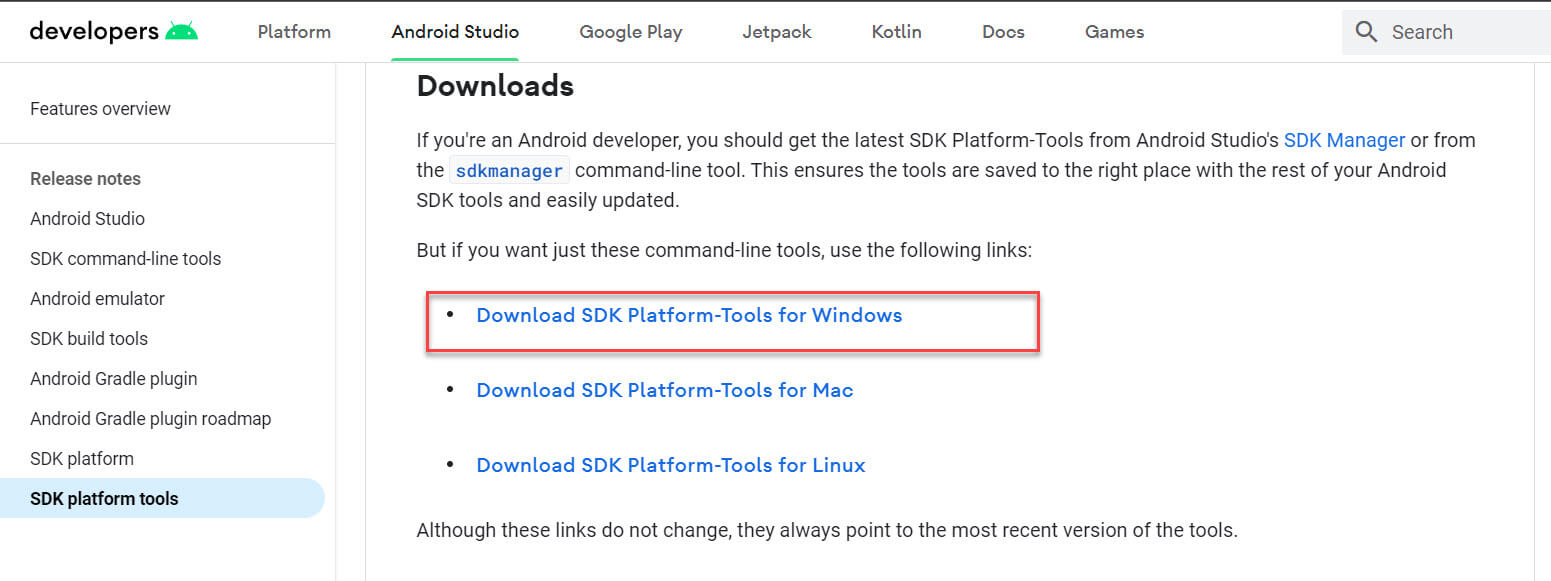
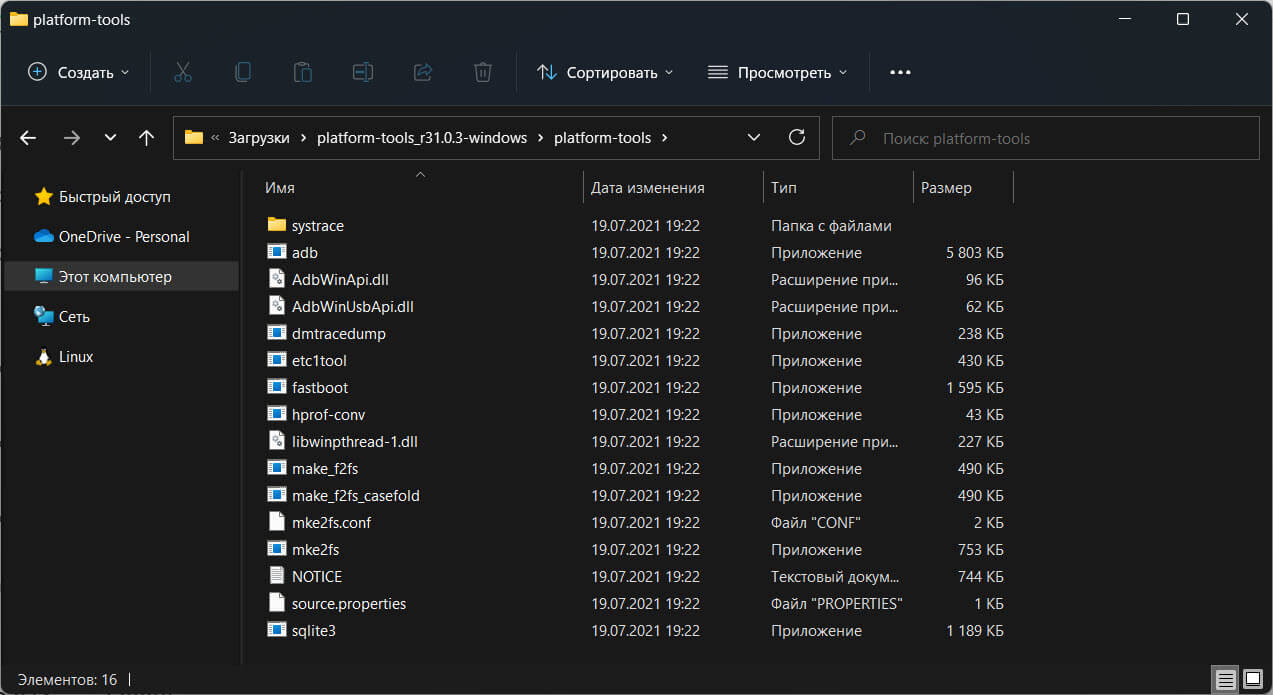
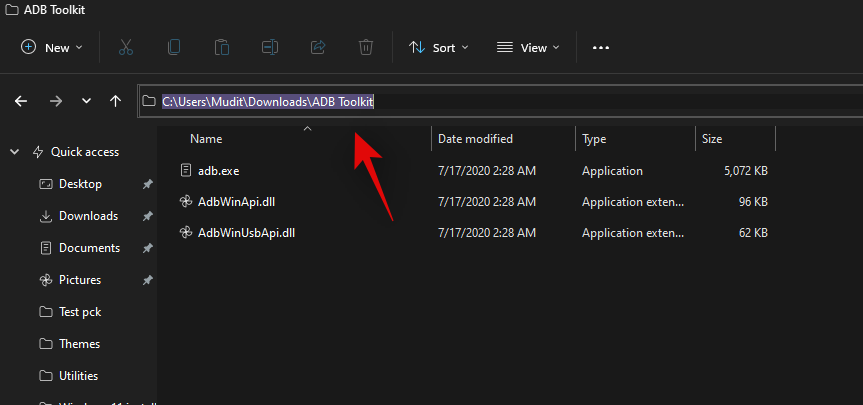
Загрузите ADBKit:
Шаг 13: На странице developer.android.com загрузите «SDK Platform-Tools for Windows» .
Шаг 14: Pаспакуйте zip-архив в любую папку.
Настройка WSA
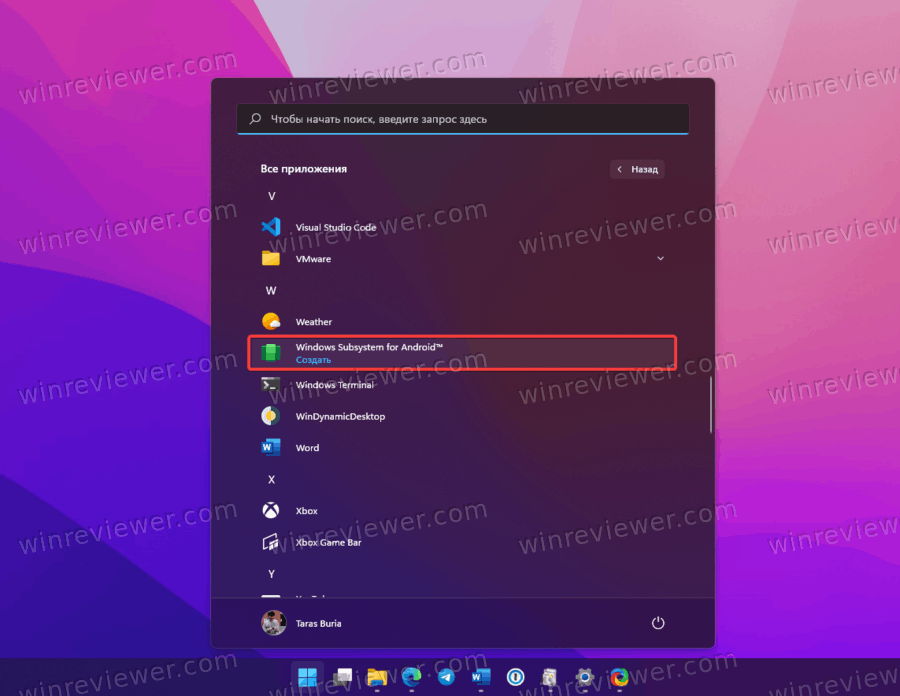
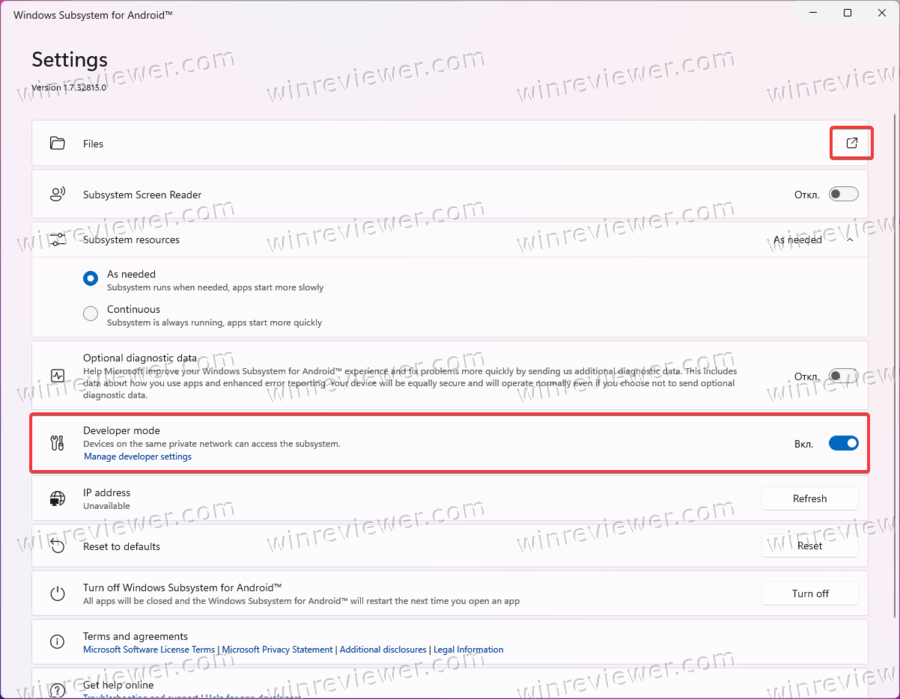
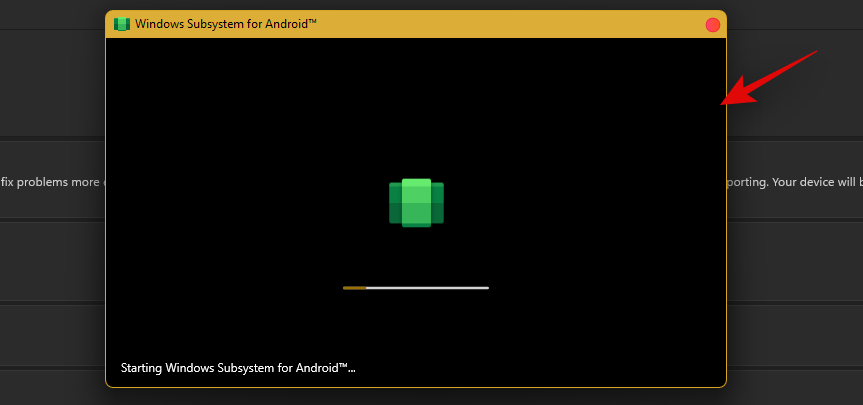
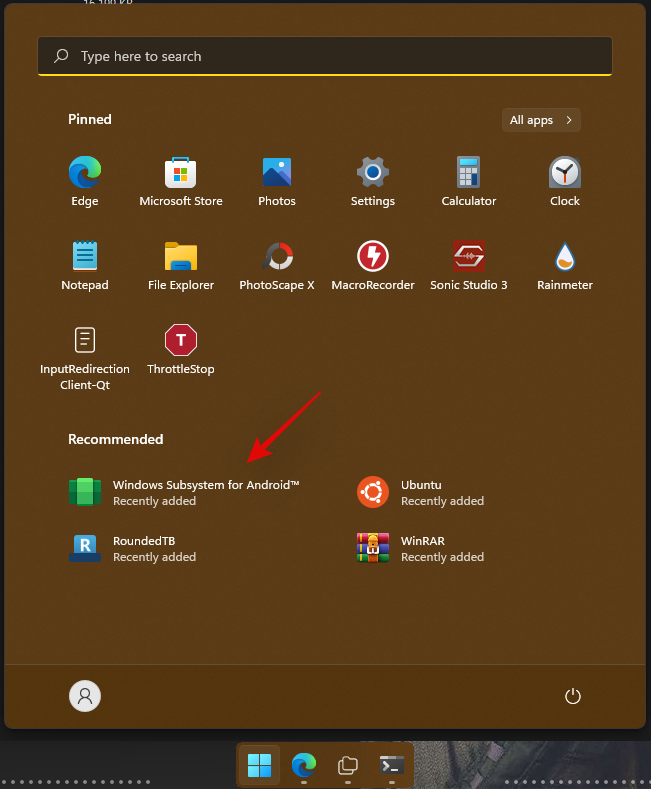
Шаг 15: С помощью меню «Пуск» откройте приложение «Windows Subsystem for Android».
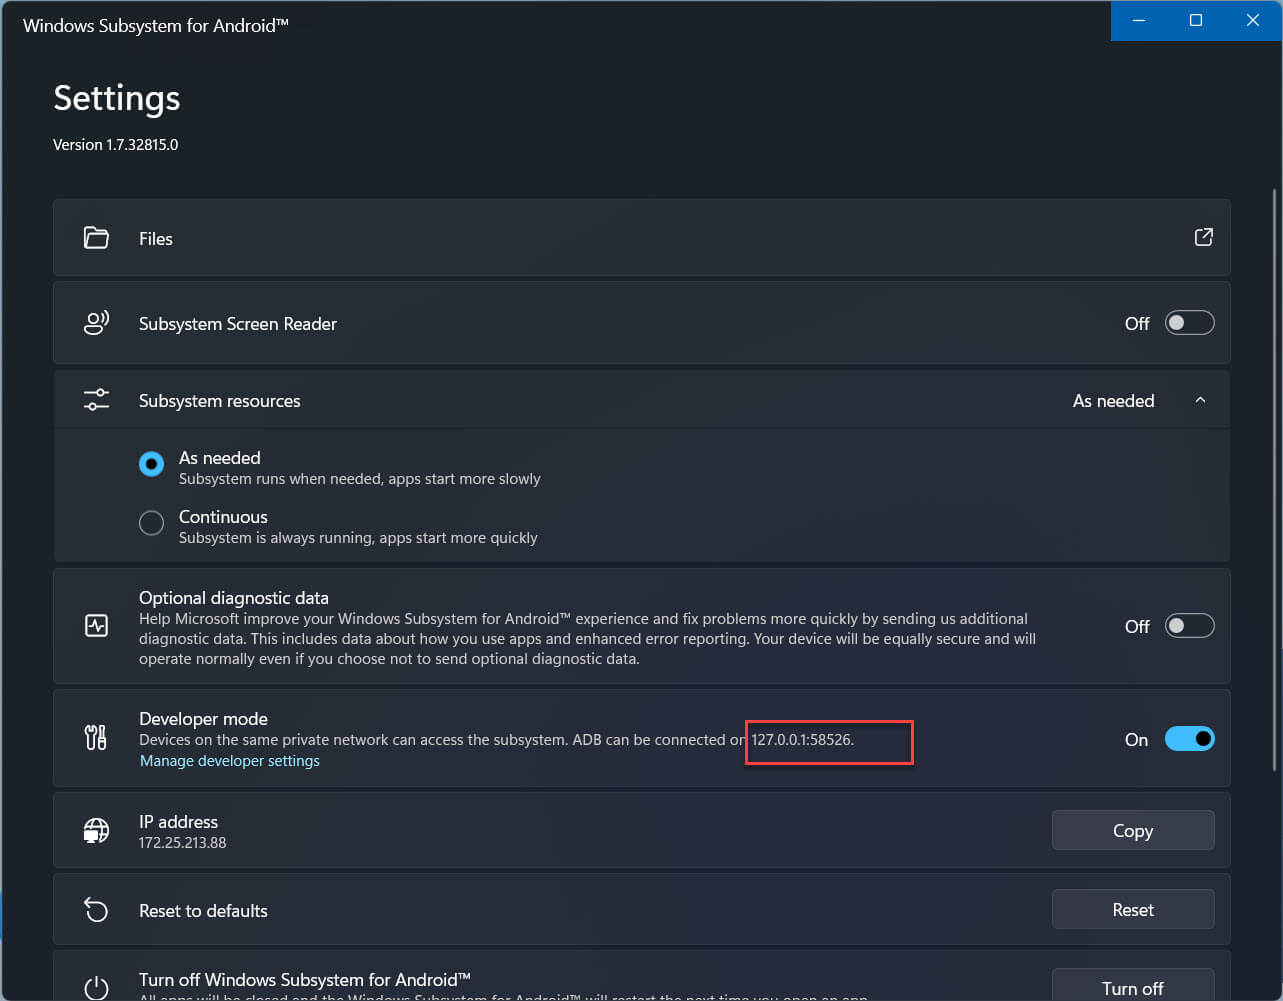
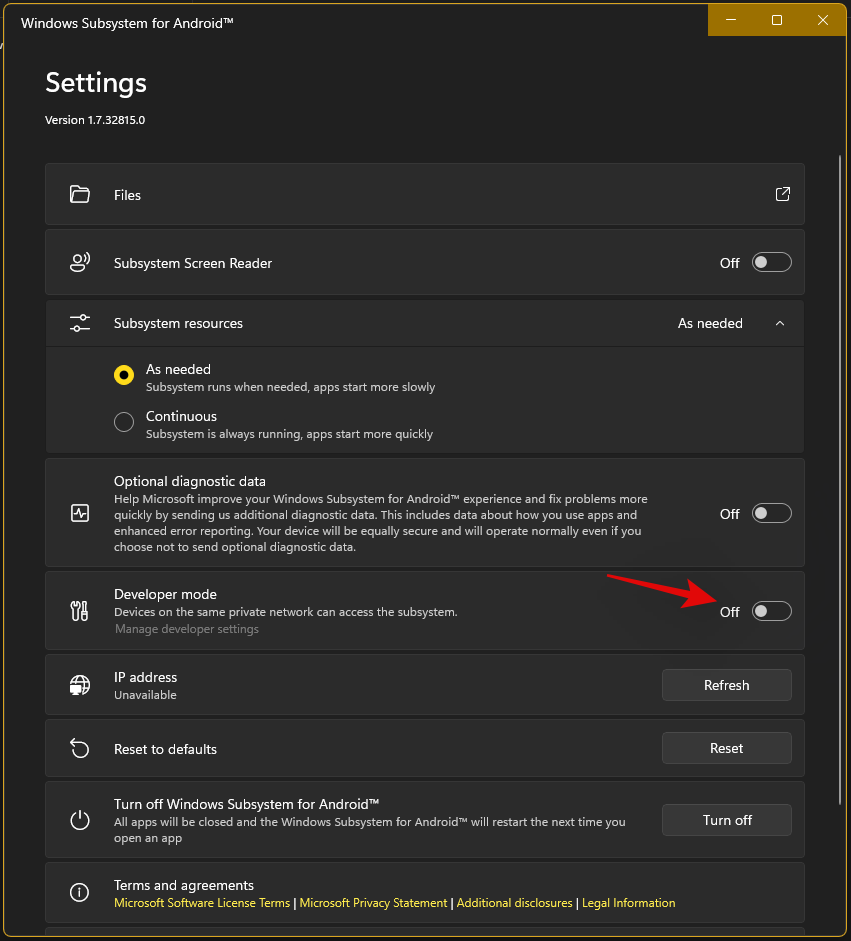
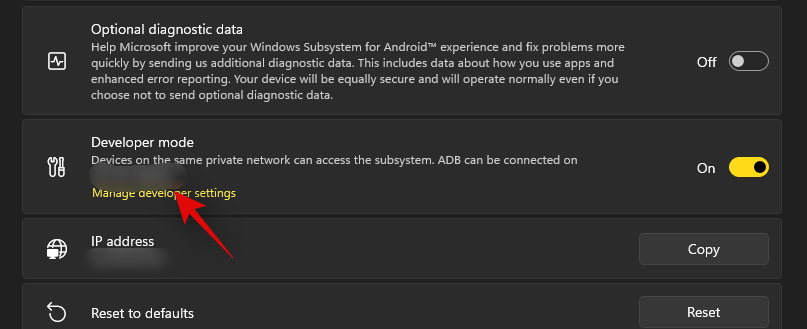
Шаг 16: В разделе «Режим разработчика» передвиньте ползунок переключателя в положение «Вкл.», как показано на экране ниже.
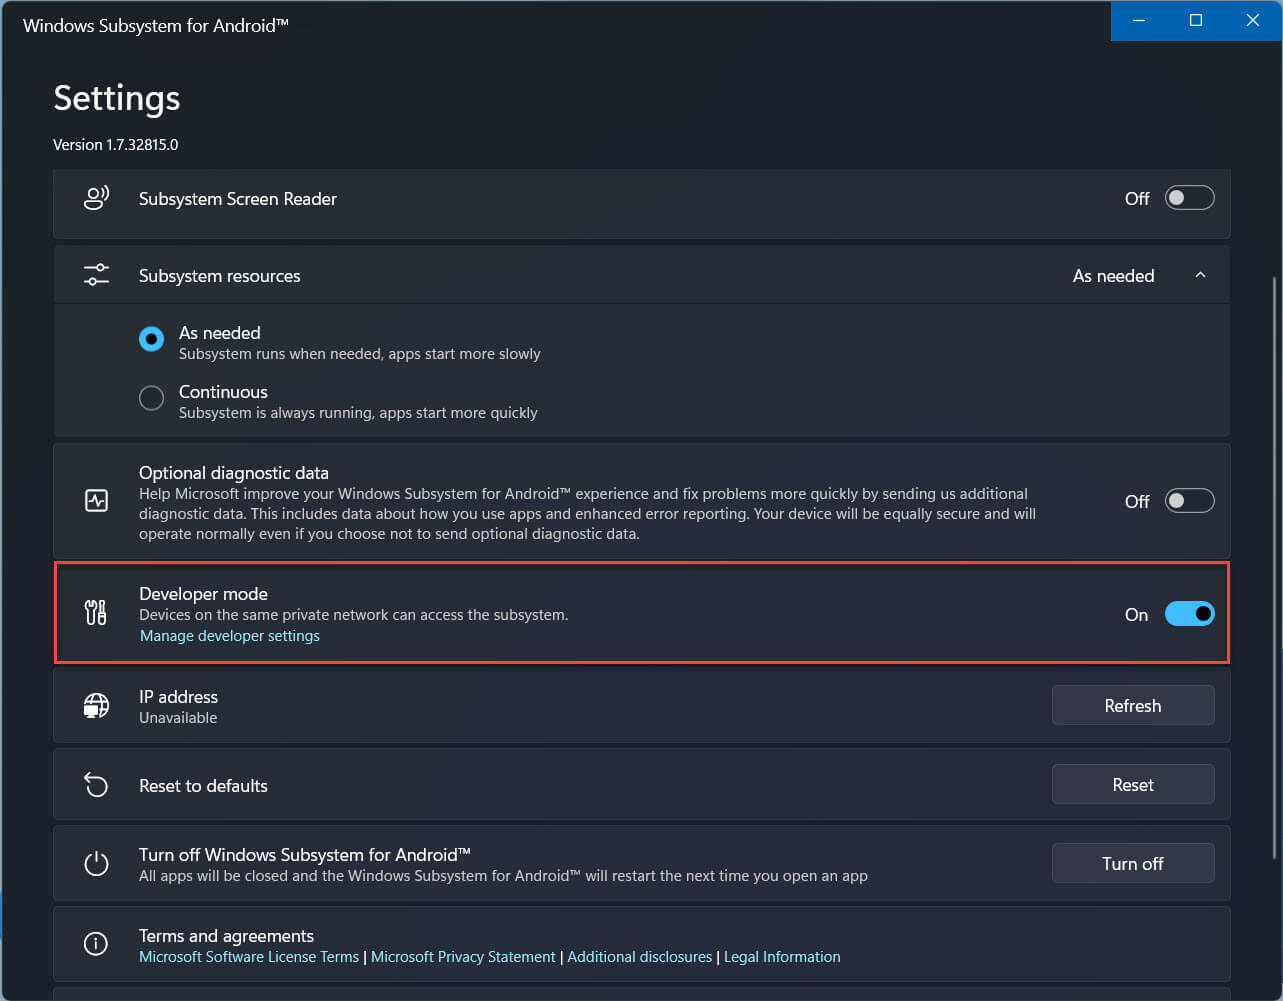
При появлении запроса брандмауэра разрешите доступ ADB.
Скопируйте IP-адрес
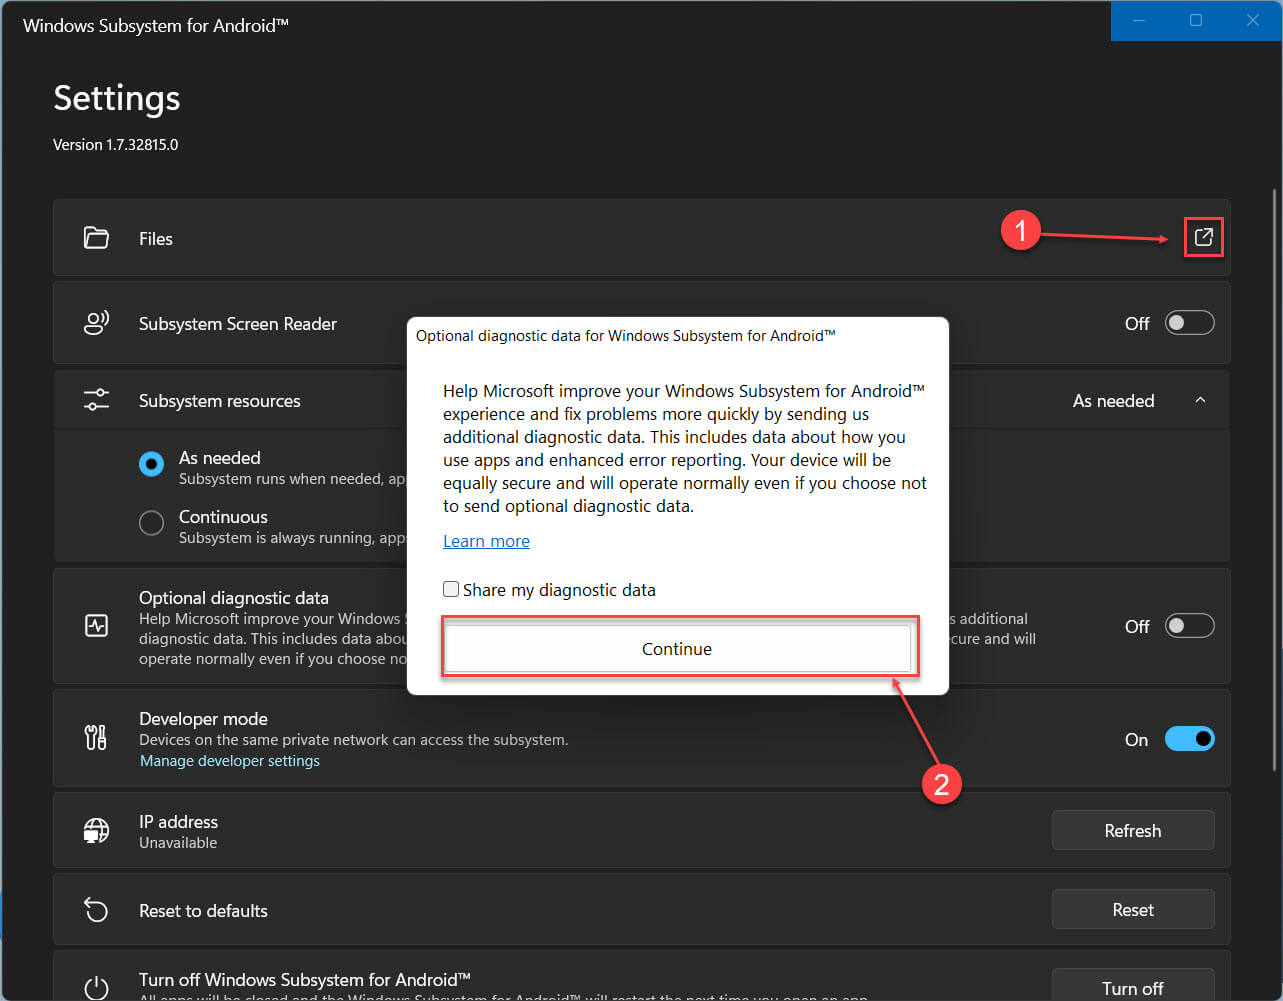
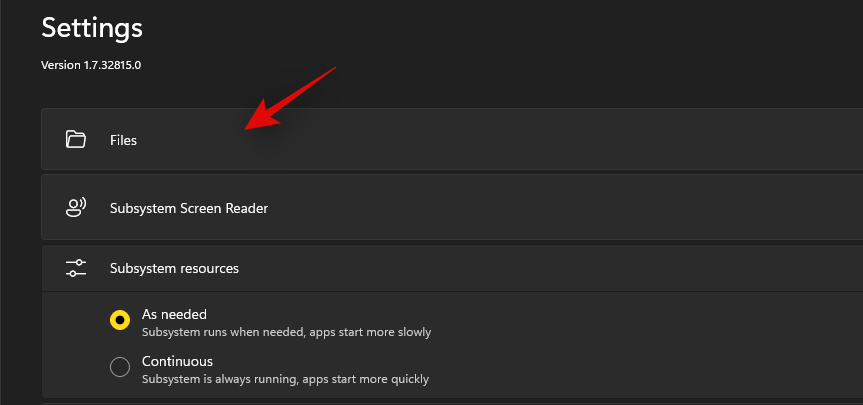
Шаг 17: Теперь в верхней части страницы параметров WSA откройте опцию «Файлы», в появившемся диалоговом окне нажмите «Продолжить».
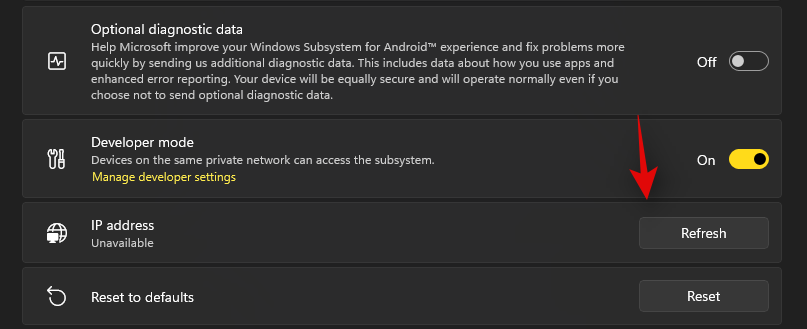
Шаг 18: Затем нажмите кнопку «Обновить» напротив опции IP-адрес.
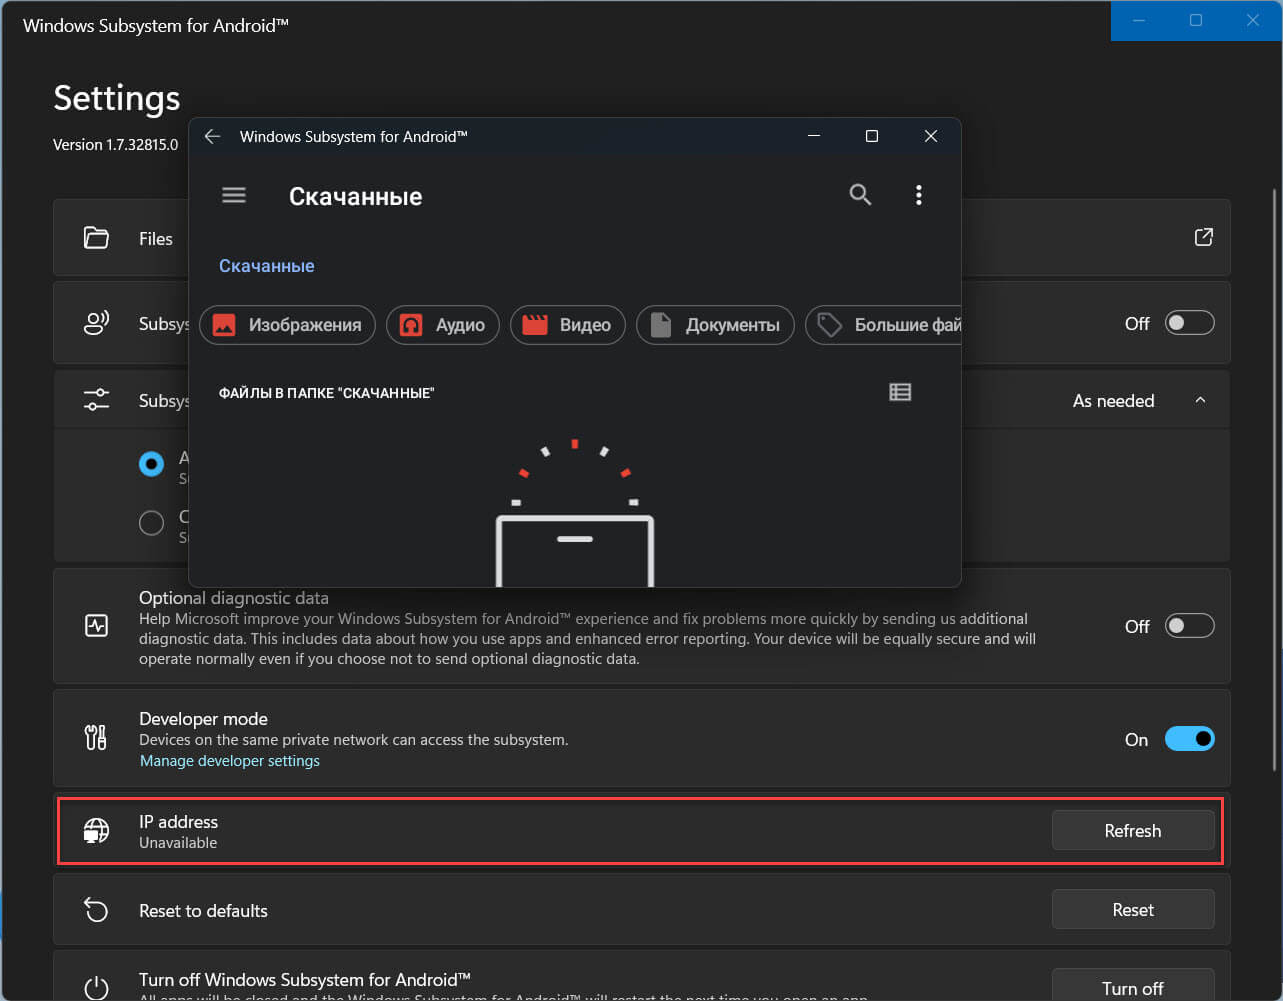
Шаг 19: Обратите внимание на адрес ADB, в разделе «Developer mode» отображается как 127.0.0.1:58526 (он должен быть таким же для вас)
Установите соединение
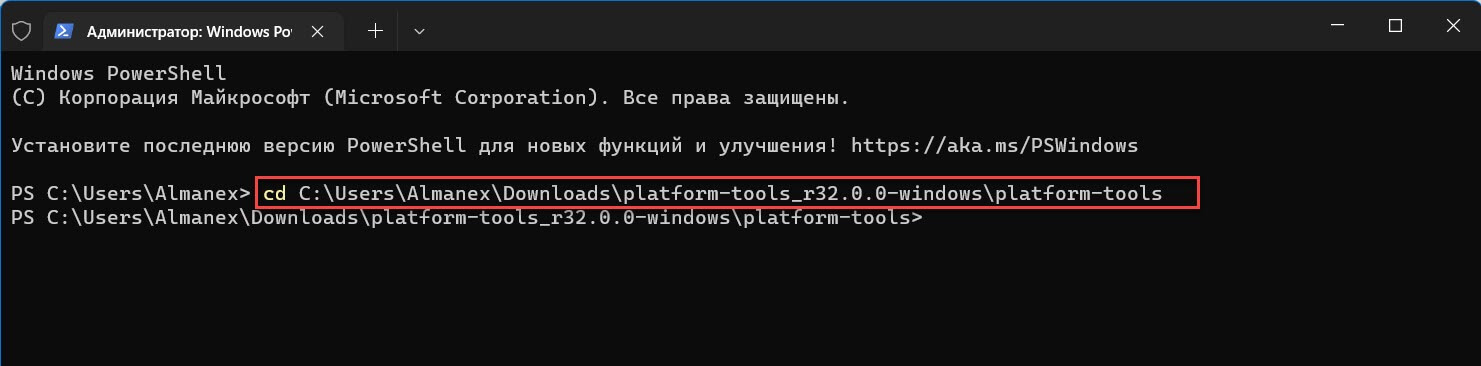
Шаг 20: Откройте Powershell от имени администратора и перейдите в папку «C:UsersAlmanexDownloadsplatform-tools_r32.0.0-windowsplatform-tools» для этого можно использовать команду, предварительно заменив Имя_пользователя:
cd C:UsersИмя_пользователяDownloadsplatform-tools_r32.0.0-windowsplatform-tools
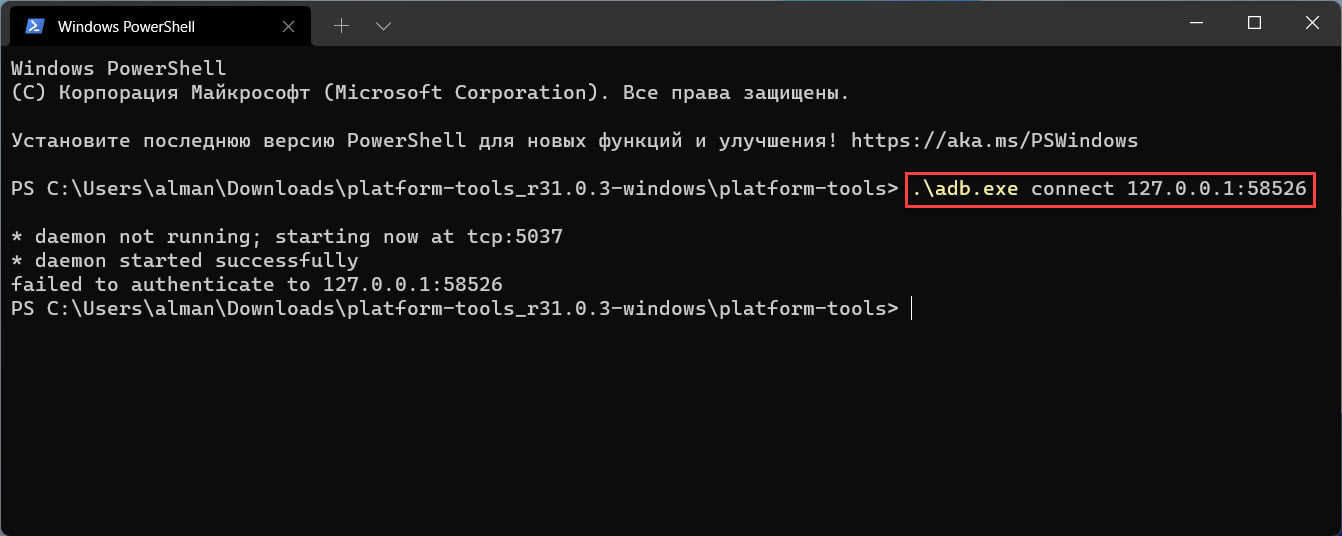
Теперь, выполните команду:
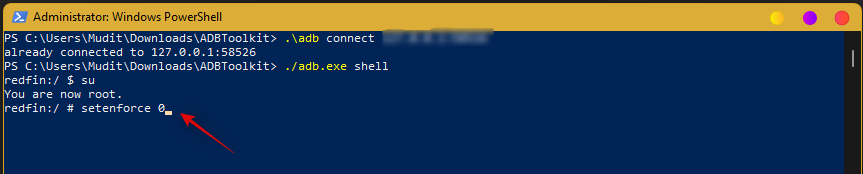
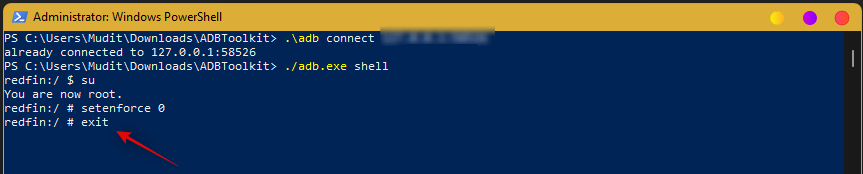
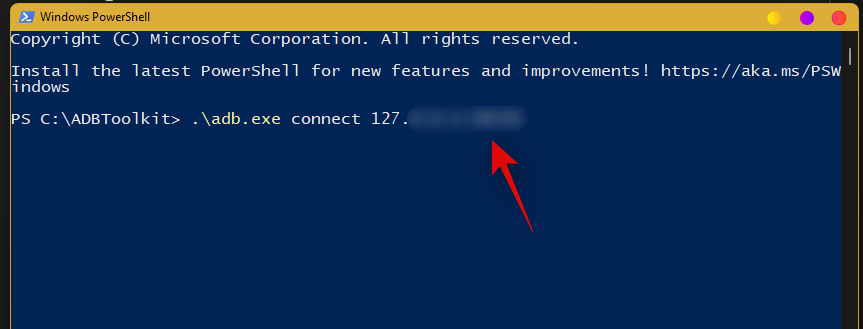
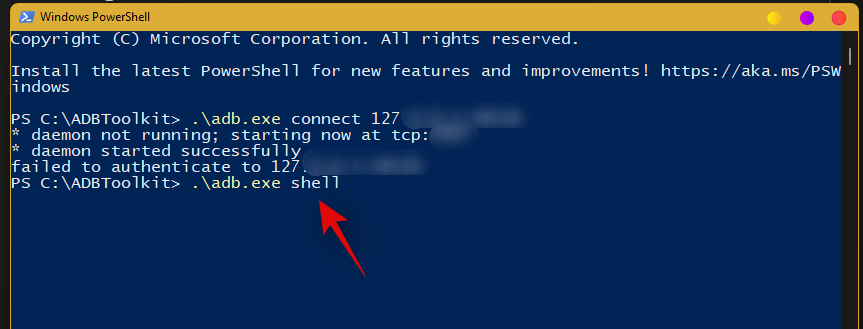
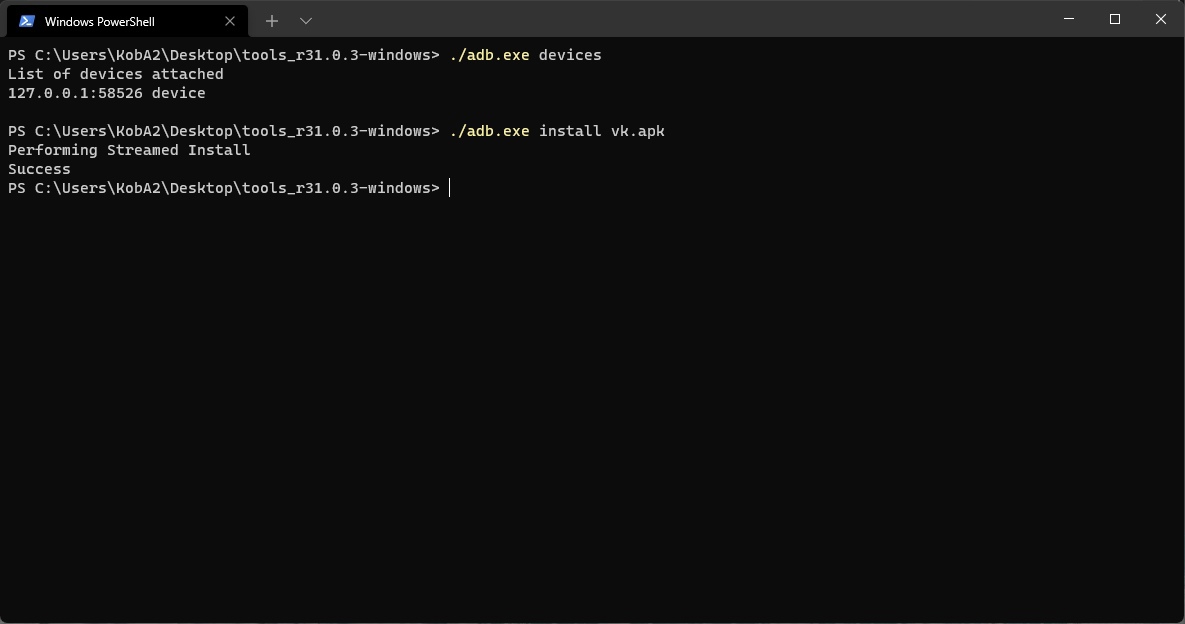
.adb.exe connect 127.0.0.1:58526
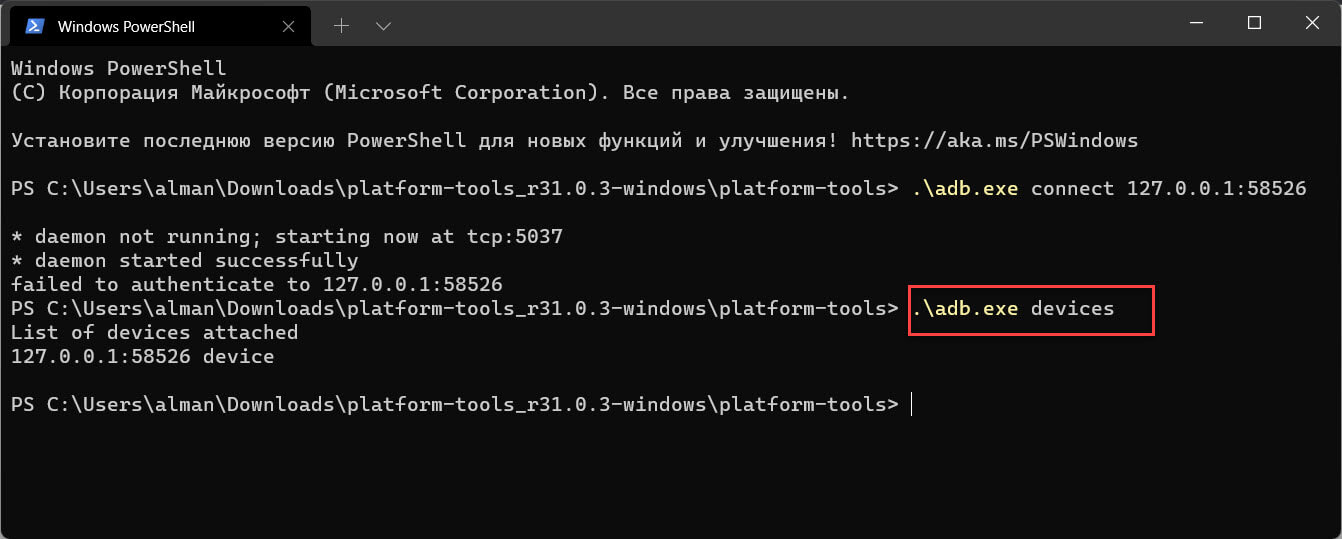
Шаг 21: Убедитесь, что adb подключен, выполнив:
.adb.exe devices
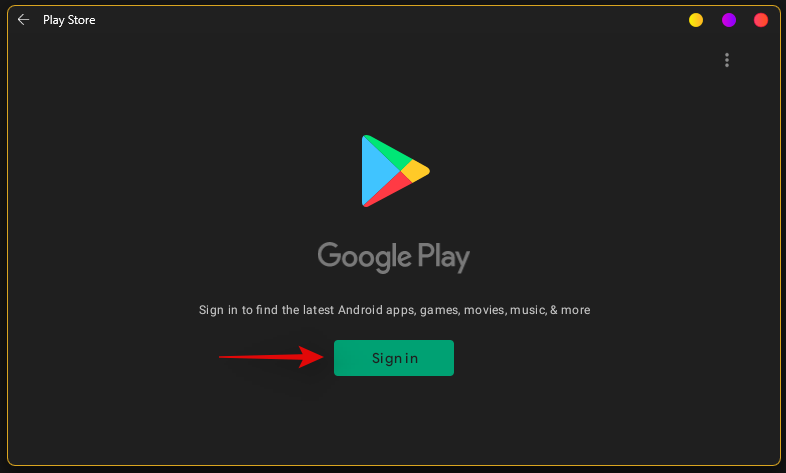
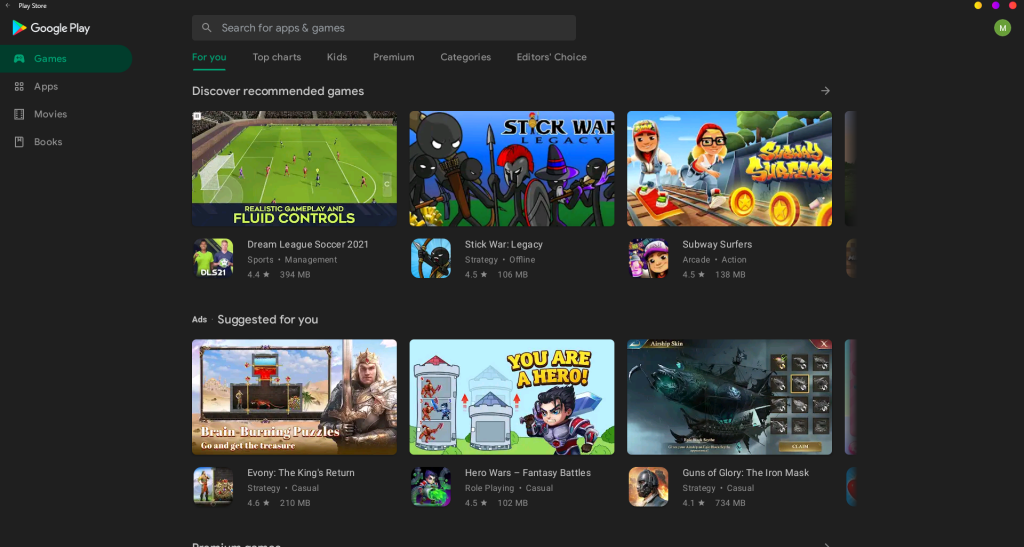
Установите Google Play Store в Windows 11
Шаг 22: Чтобы иметь возможность авторизироваться в магазине Google Play, выполните по очереди три команды:
.adb.exe shell
setenforce 0
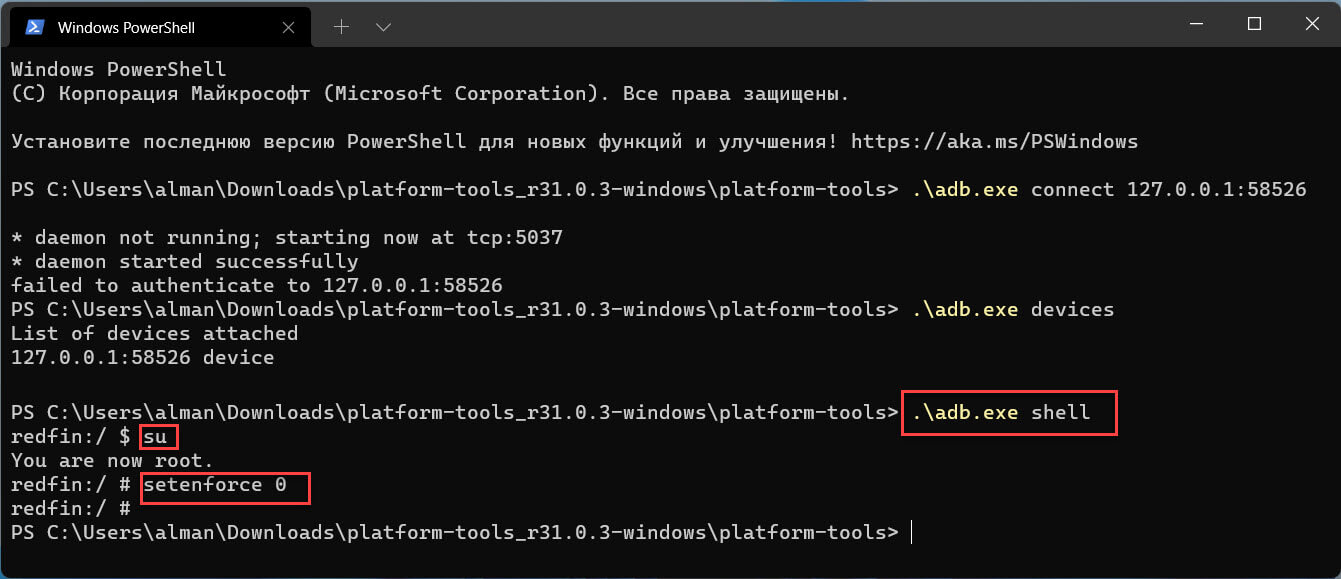
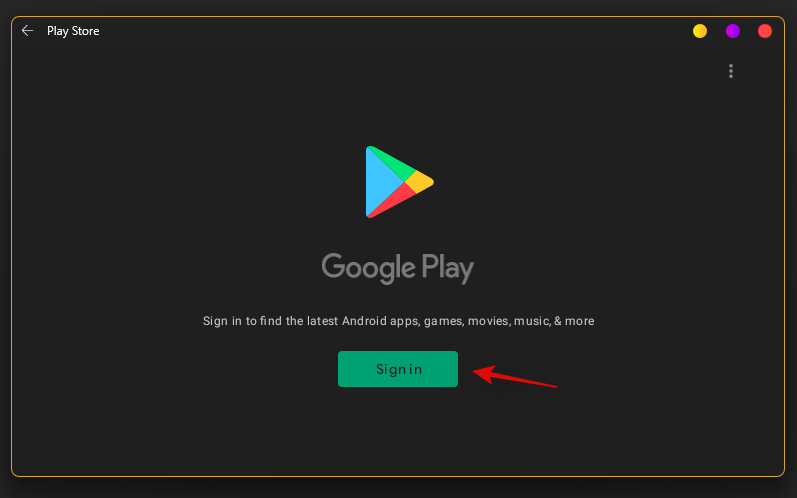
Если вы все сделали правильно, вы сможете войти в Google Play Store со своей учетной записью Google.
Теперь вы можете пользоваться полным набором приложений Google Play на наших компьютерах с Windows 11.
Большое спасибо ADeltaX, благодаря которому это стало возможным!
На этом мы завершаем руководство о том, как установить Google Play Store на ПК с Windows 11 с помощью подсистемы Windows для Android. Play Маркет, вероятно, лучший вариант, потому что он может похвастаться большим каталогом приложений и обеспечивает безопасную и надежную экосистему.
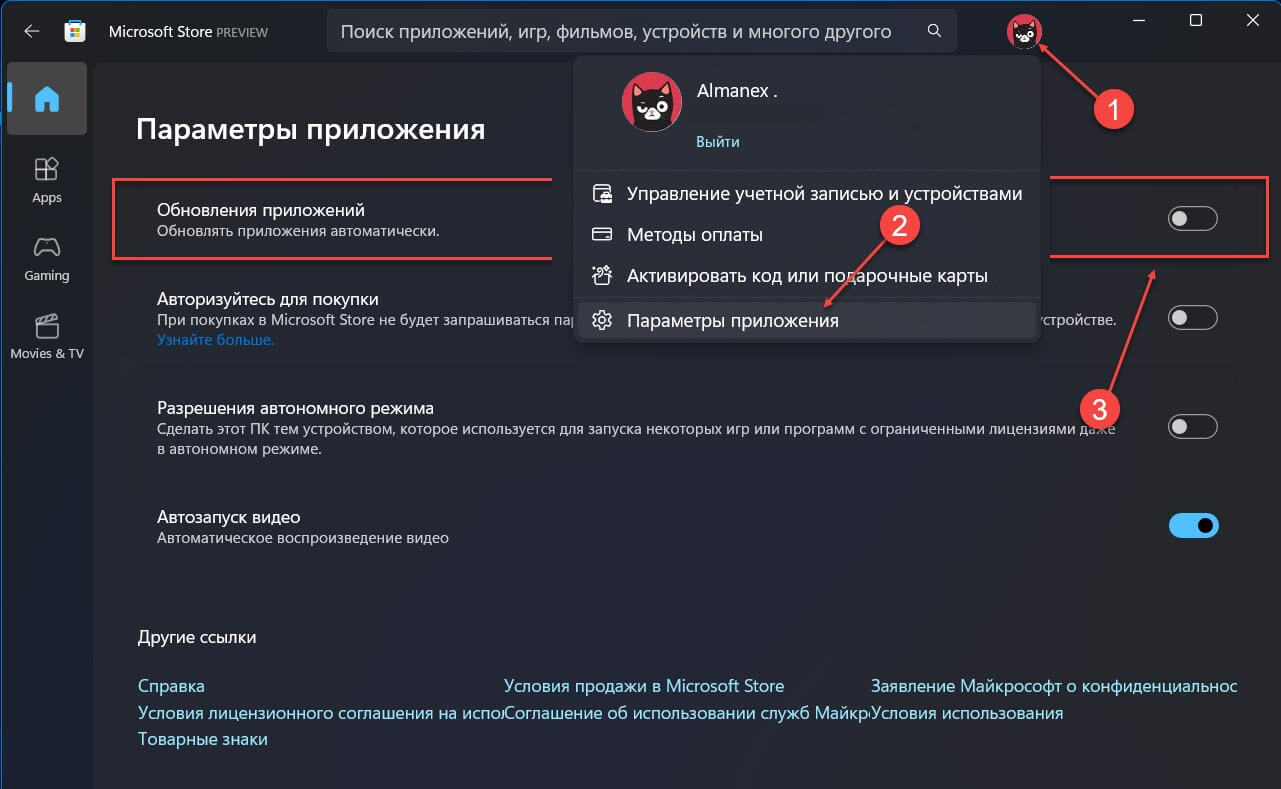
Если вы хотите, чтобы будущие обновления для подсистемы Windows для Android не сбросили выполненный вами процесс, вы можете отключить автоматические обновления для приложений в Магазине Microsoft: перейдите в меню «Профиль» → «Параметры приложения» и отключите автоматическое «Обновление приложений». Если вы хотите обновить другие приложения, вам необходимо обновить их вручную.
Вопросы.
- Могу ли я использовать Google Play Store для установки приложений в Windows 11? Да, Google Play Store полностью работает в Windows 11. Спасибо пользователю Twitter ADeltaX.
- Нужен ли мне канал Windows Beta для запуска приложений Android в Windows 11? Официально да. Но вы можете установить модифицированный пакет Msixbundle, чтобы он работал в любой сборке Windows 11.
- Как удалить приложение Android из Windows 11? Чтобы удалить приложение Android из Windows 11, откройте меню «Пуск» найдите приложение, которое хотите удалить. кликните приложение правой кнопкой мыши и выберите «Удалить».
Эта статья расскажет, как установить Google Play Store на Windows 11 и GApps в подсистему Windows для Android. В октябре 2021 года Microsoft наконец-таки запустила тестирование подсистемы Android на Windows 11, благодаря чему у пользователей появилась возможность устанавливать приложения Android на свои компьютеры. Официально тестирование проходит только в США (Microsoft часто обходит вниманием другие страны при тестировании) и только в паре с магазином Amazon App Store, где выбор приложений, мягко говоря, не самый богатый. Обойти проблему можно установкой APK-файлов, но многие из них не будут работать из-за отсутствия Play Store и соответствующих сервисов.
Обратите внимание: эта статья описывает неофициальный способ установить Google Play Store на Windows 11, поэтому действуйте на свой страх и риск. Также стоит отметить, что вам не нужно регистрироваться в программе предварительной оценки Windows и скачивать ранние версии Windows 11. В процессе написания этой инструкции нам удалось запустить Google Play Store на стабильной версии Windows 11.
Чтобы установить Google Play в подсистему Windows для Android на Windows 11, вам надо выполнить следующие шаги.
- Удалить существующую подсистему Windows для Android.
- Включить подсистему Windows для Linux и платформу виртуальных машин.
- Добавить GApps в подсистему Windows для Android и модифицировать ядро WSA.
- Установить Google Play Store в подсистему Windows 11 для Android.
- Восстановить исходное ядро для подсистемы Windows для Android.
Рассмотрим каждый шаг подробно.
Удалите существующую подсистему Windows для Android
- Откройте приложение «Параметры» сочетанием Win + I .
- Щелкните Приложения.
- Нажмите на кнопку «Приложения и функции» справа.
- Выберите «магазин приложений Amazon«.
- Нажмите кнопку меню с тремя точками справа и выберите кнопку Удалить.

- Снова нажмите кнопку «Удалить» для подтверждения.
- Поищите в списке оставшихся программ подсистему Windows для приложений Android. Если она там есть — тоже удалите её.

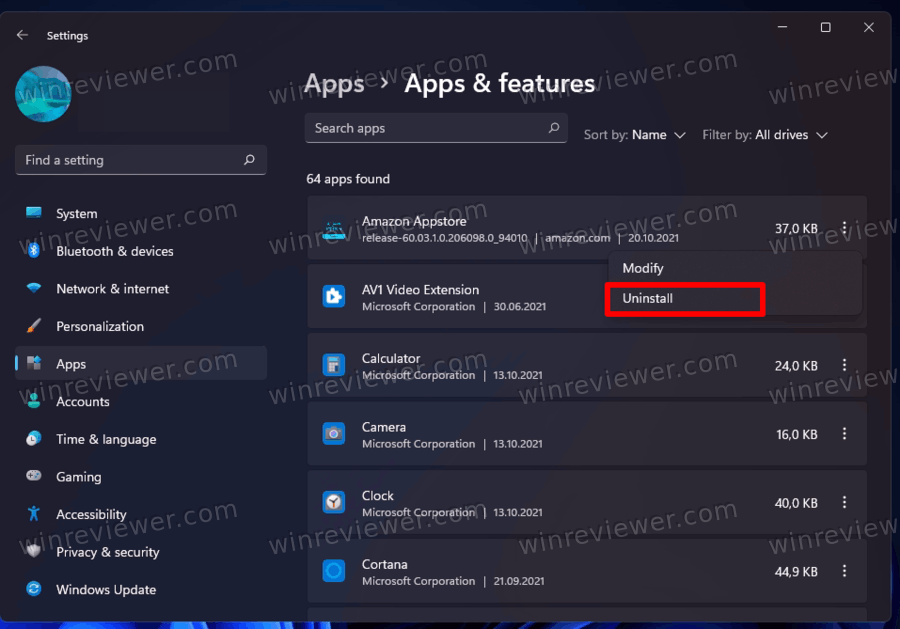
Готово, можно приступать к следующему шагу.
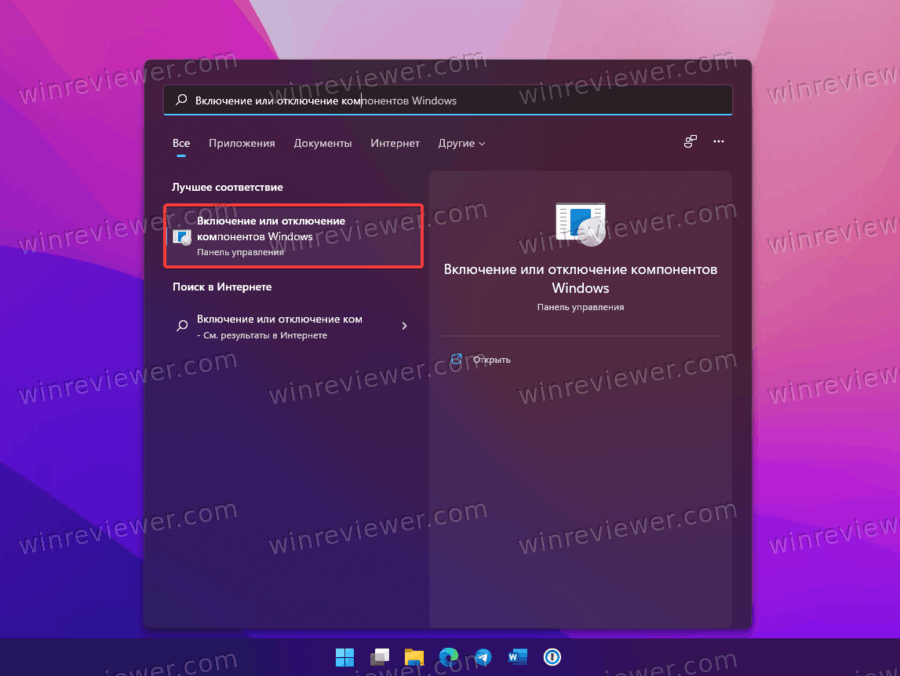
Включите подсистему Windows для Linux и платформу виртуальных машин
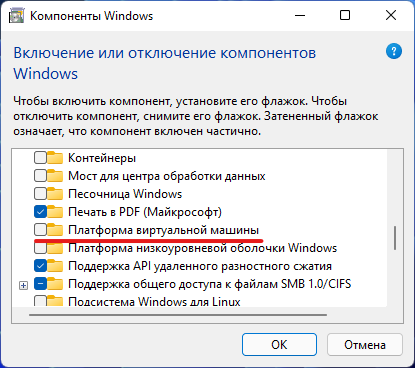
- Откройте меню Пуск и введите Включение или отключение компонентов Windows, затем нажмите Enter .

- В новом окне установите отметку возле пункта Платформа виртуальной машины, а затем Подсистема Windows для Linux.

- Нажмите Ок и подождите, пока Windows скачает необходимые компоненты.
- Перезагрузите компьютер для применения изменений.
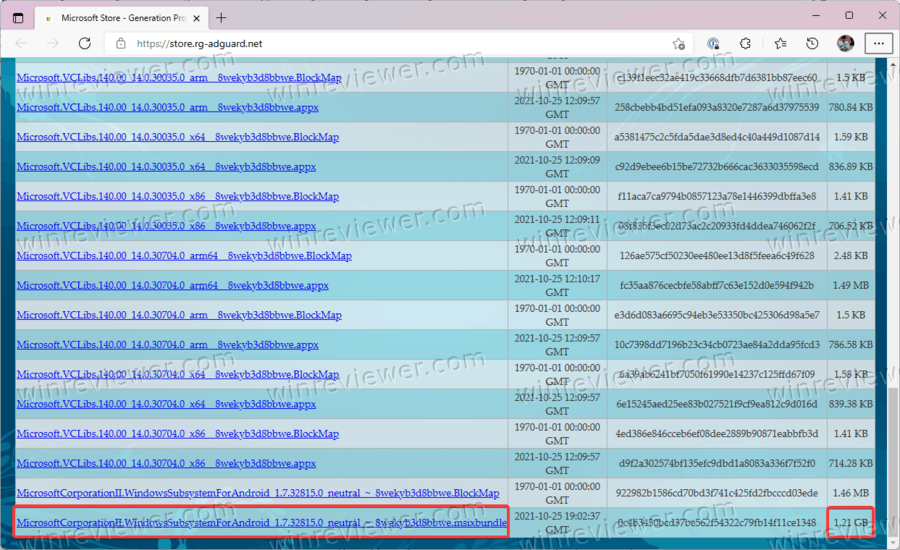
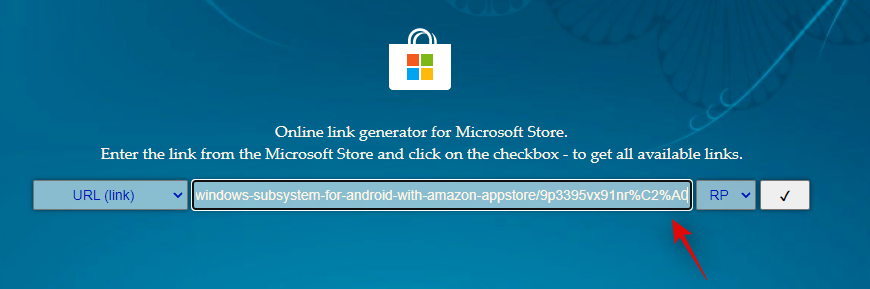
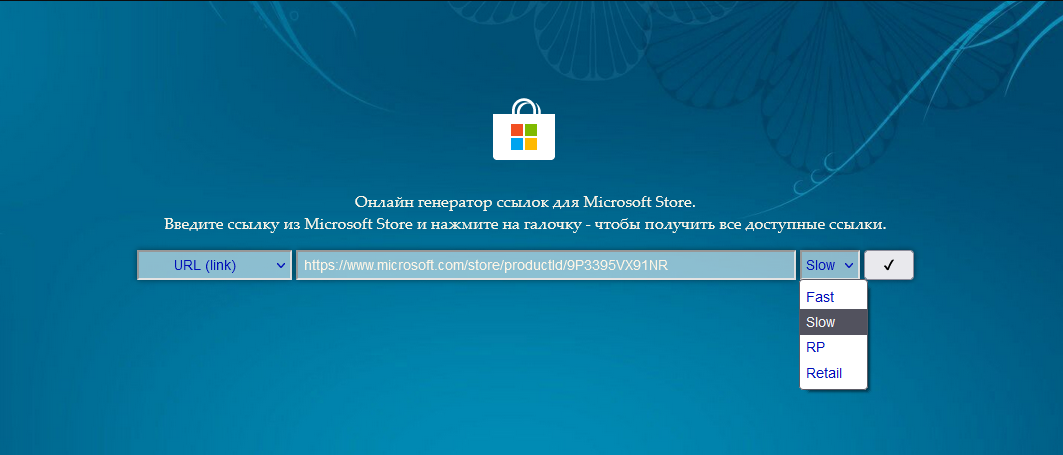
- После включения компьютера откройте любой браузер и перейдите по ссылке store.rg-adguard.net. На этом этапе вам надо скачать файлы подсистемы Android для последующей модификации и интеграции сервисов Google.
- В первом выпадающем списке выберите ProductID.
- В поисковую строку на странице (не в браузере) введите 9P3395VX91NR.
- В последнем выпадающем списке выберите Slow.
- Нажмите на кнопку с галочкой для поиска нужных компонентов.

- Пролистайте список и найдите самый большой файл размером 1.2Гб. Скачайте его.

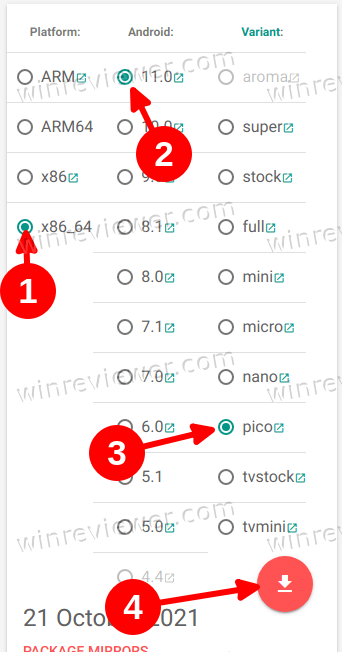
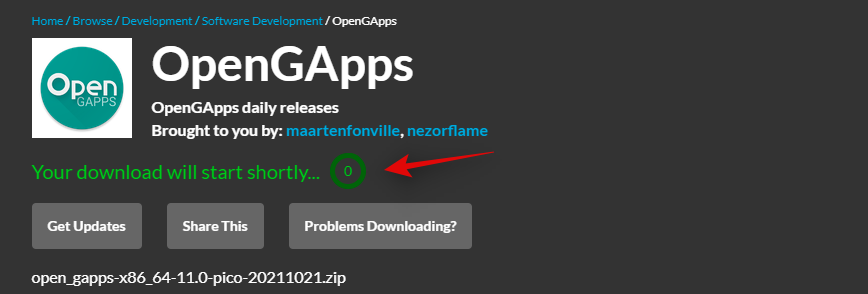
- Перейдите на сайт OpenGapps и установите платформу x86_64, Android 11, а затем выберите вариант Pico. Для загрузки выбранного набора нажмите на большую красную кнопку со стрелкой.

- Пока вы ждете загрузки подсистемы и сервисов Google, перейдите в магазин Microsoft Store по ссылке для загрузки и установки Ubuntu. Если Ubuntu в WSL уже установлена, пропустите этот шаг.

На этом этапе у вас есть все файлы, необходимые для объединения GApps и WSA. Теперь вам нужно распаковать оба пакета и выборочно объединить их компоненты.
Распаковка файлов
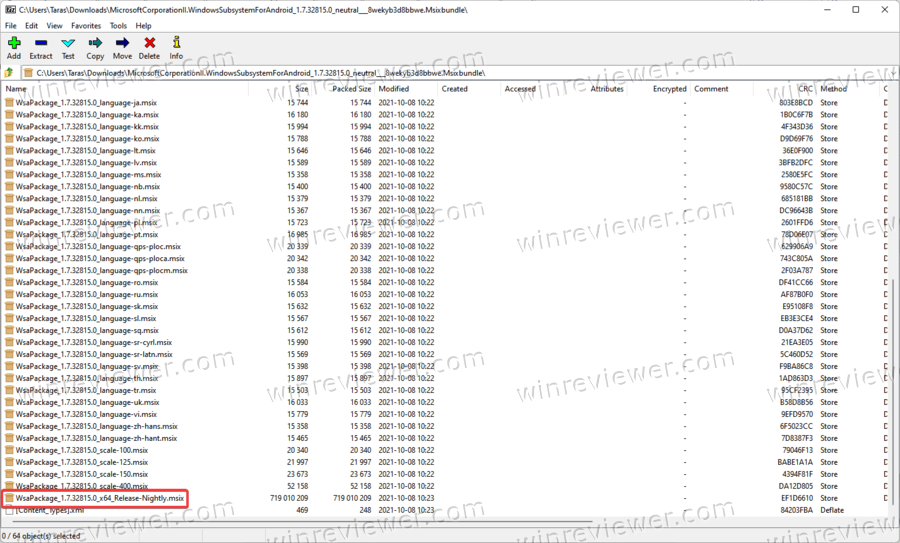
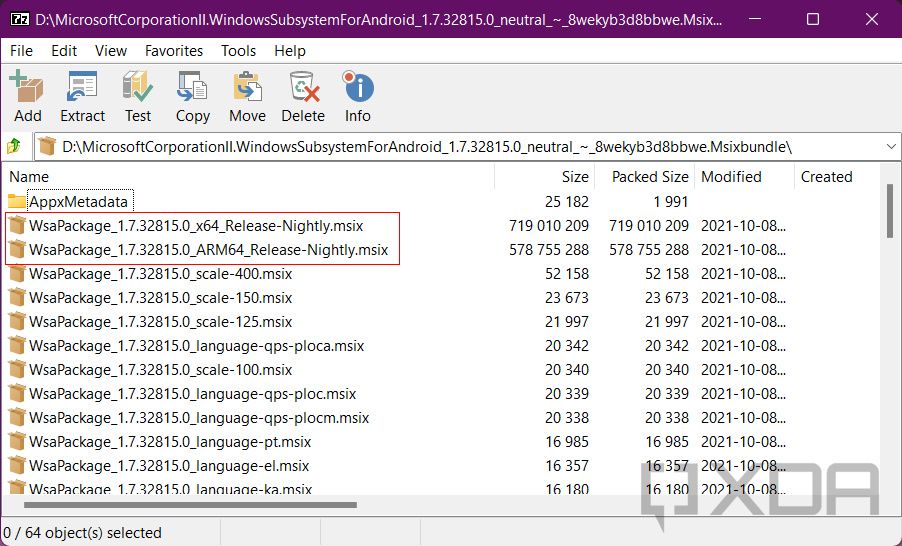
- Теперь откройте ранее скачанный msixbundle файл с помощью любого удобного вам архиватора. Например, 7Zip.
- Внутри файла найдите файл WsaPackage_1.7.32815.0_x64_Release-Nightly.msix. Он занимает приблизительно 700 Мб.

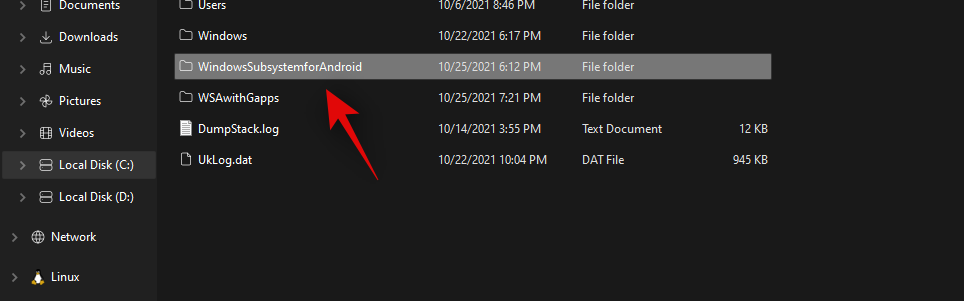
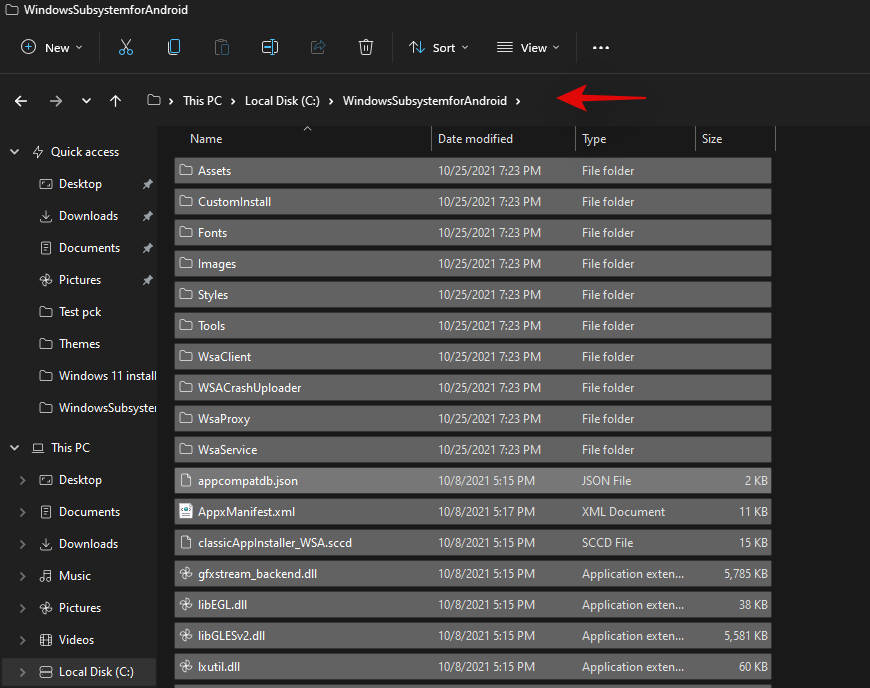
- Откройте Проводник и перейдите на диск С. Создайте папку WindowsSubsystemAndroid.
- Скопируйте в созданную папку все файлы из msix-файла в архиваторе.
- После копирования файлов удалите следующее: папку AppxMetadata и файлы AppxBlockMap.xml, AppxSignature.p7x и [Content_Types].xml.
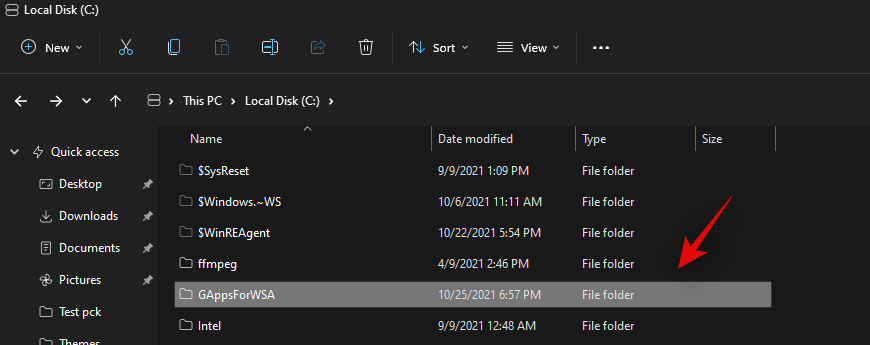
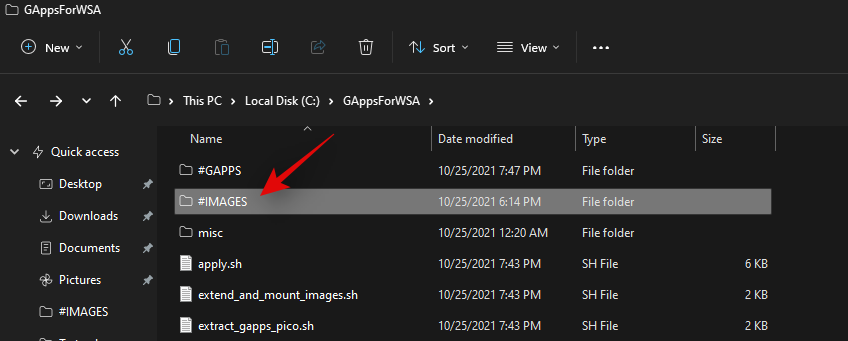
- Вернитесь в корень диска С и создайте папку GAppsWSA.
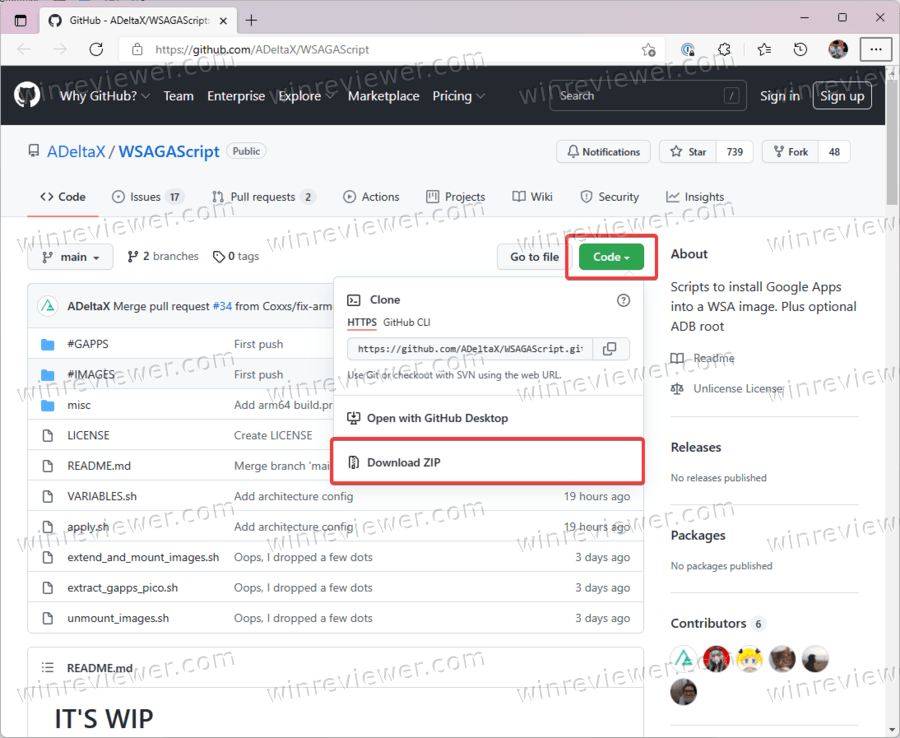
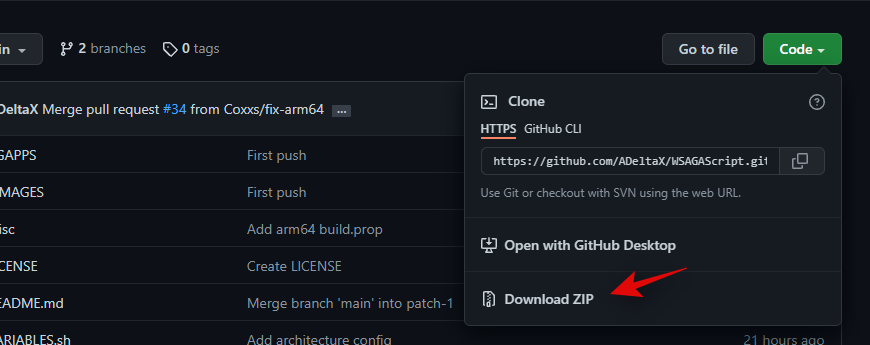
- Откройте браузер и перейдите по ссылке на страницу репозитория проекта, с помощью которого стало возможным установить Google Play Store на Windows 11.
- Нажмите Code > Download ZIP.(прямая ссылка на архив)

- Откройте загруженный архив, а затем папку внутри него. Скопируйте все содержимое папки в ранее созданную папку GAppsWSA.
- Теперь скопируйте ранее скачанный архив с сервисами Google (GAPPS) и скопируйте его в папку C:GAppsWSA#GAPPS.
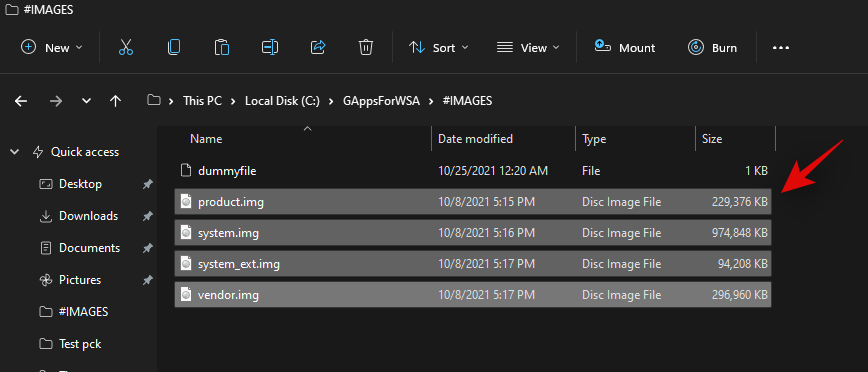
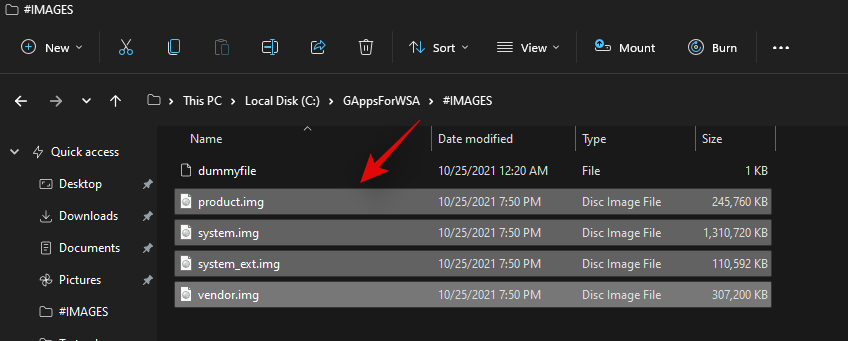
- Перейдите в папку WindowsSubsystemAndroid и скопируйте следующие файлы: product.img, system.img, system_ext.img, vendor.img.
- Скопируйте файлы в папку C:GAppsWSA#IMAGES.
Готово. Теперь выполним пересборку ядра и включим GApps в состав WSA.
Пересборка ядра WSA
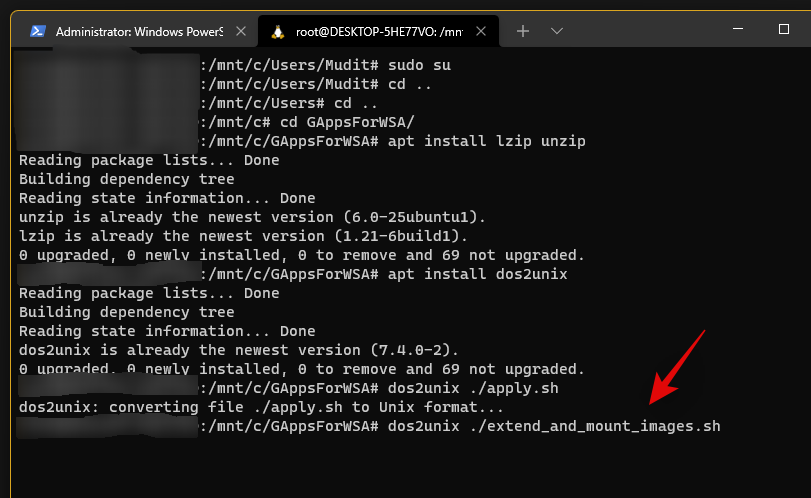
- Запустите Ubuntu в Терминале Windows и введите команду sudo su для получения рут-прав.
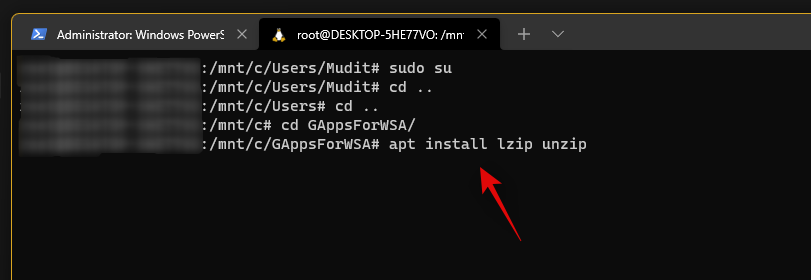
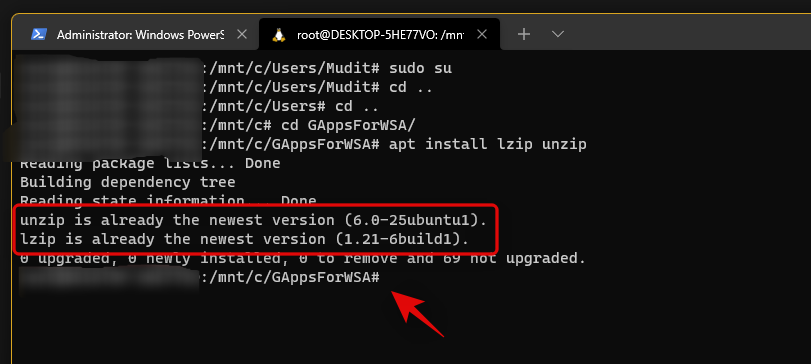
- Введите команду cd /mnt/c/GAppsWSA/ и нажмите Enter .
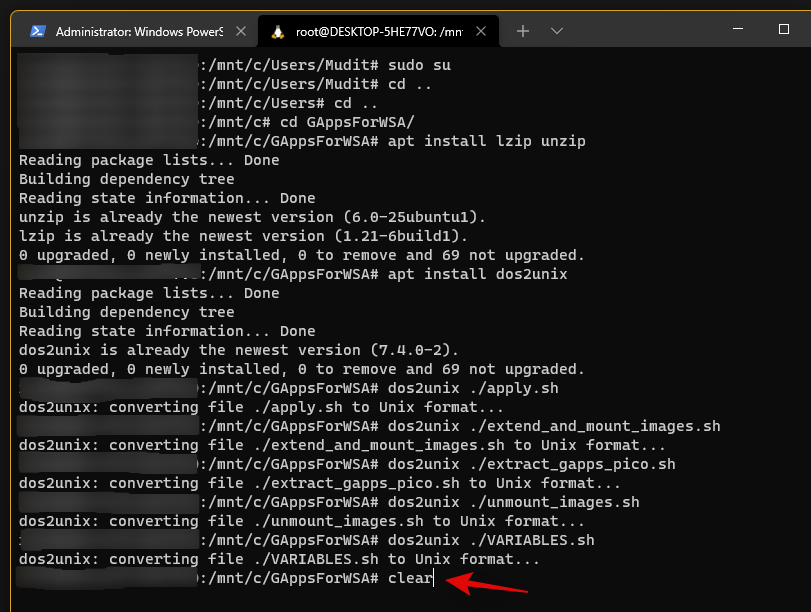
- Теперь надо установить lzip и unzip. Для этого воспользуйтесь следующими командой apt install lzip unzip. Нажмите Y для подтверждения действия.
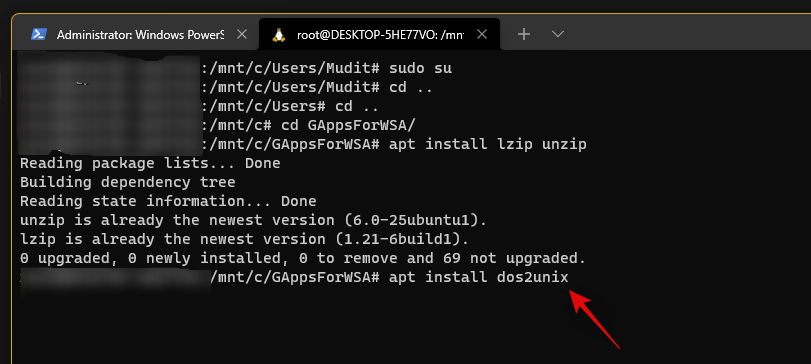
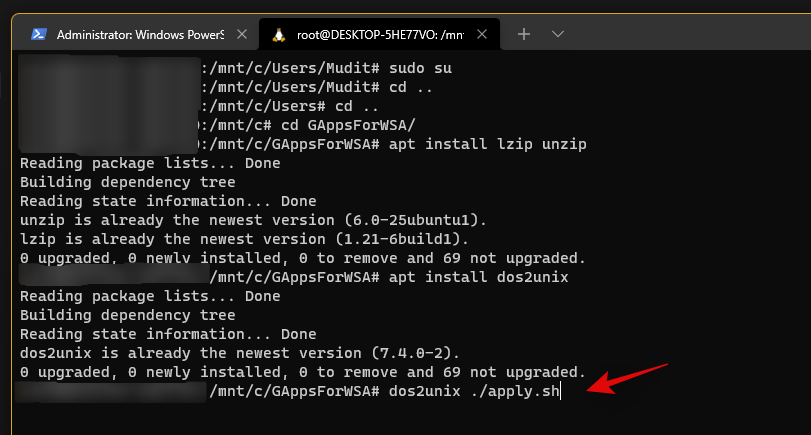
- Теперь надо установить dos2unix. Для этого используйте команду apt install dos2unix.
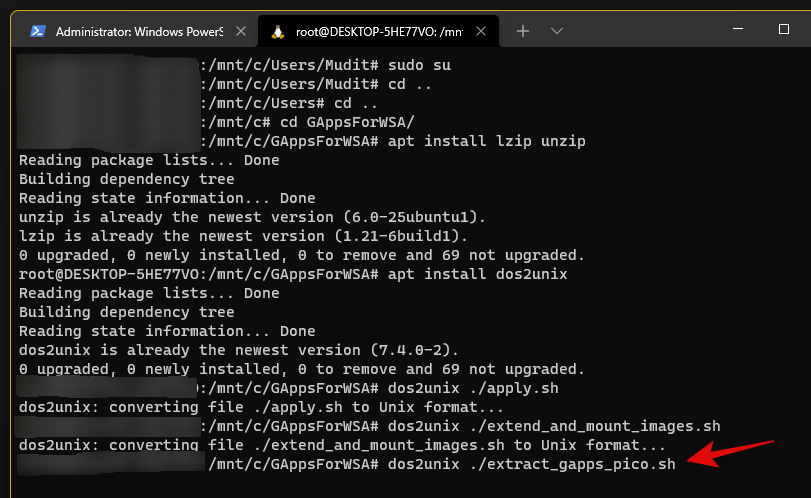
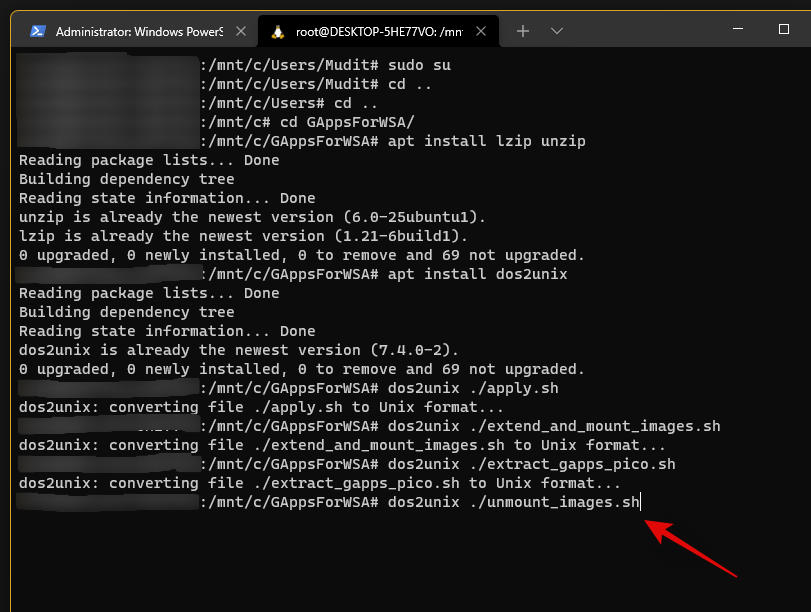
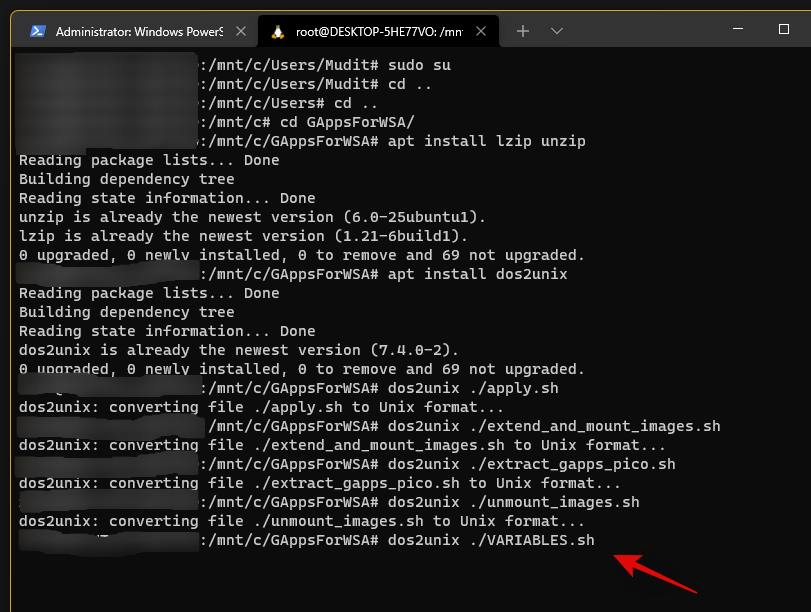
- Выполните следующие команды одна за другой:
- dos2unix ./appli.sh,
- dos2unix ./extend_and_mount_images.sh,
- dos2unix ./extract_gapps_pico.sh,
- dos2unix ./unmount_images.sh, и
- dos2unix ./VARIABLES.sh.
- Введите команду clear для удобства в дальнейшей работе с консолью.
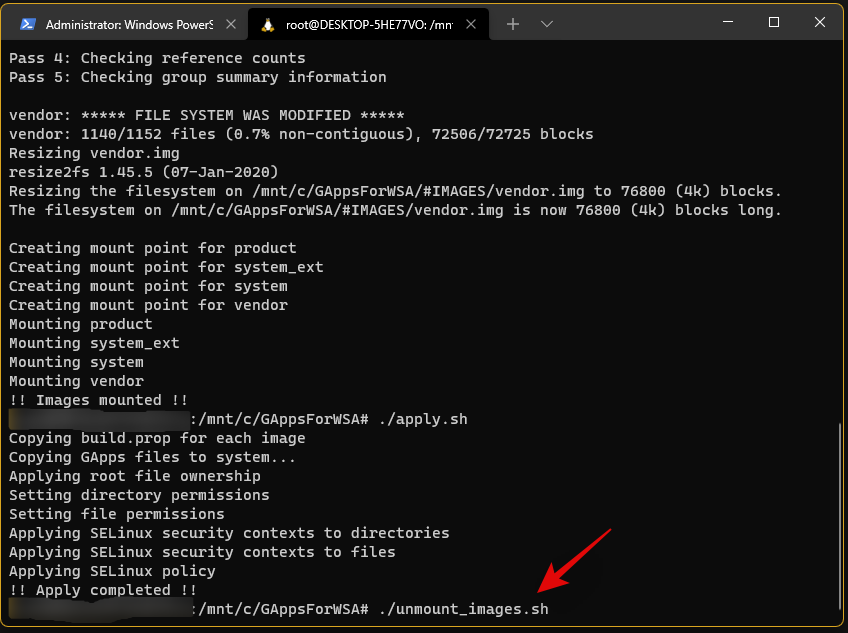
- Теперь вводите следующие команды последовательно одна за другой, каждый раз нажимая Enter для выполнения. Обратите внимание, что Терминал должен возвращать сообщения об успешном выполнении команд. Команды:
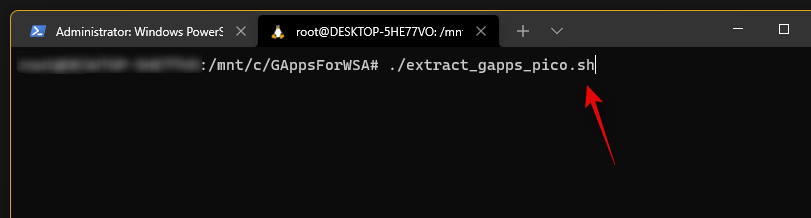
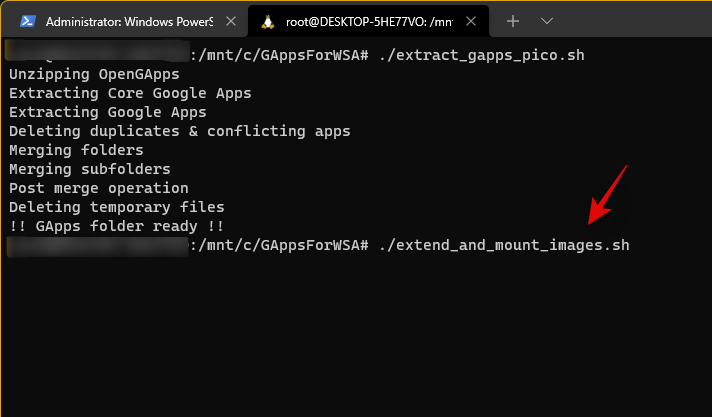
- ./extract_gapps_pico.sh,
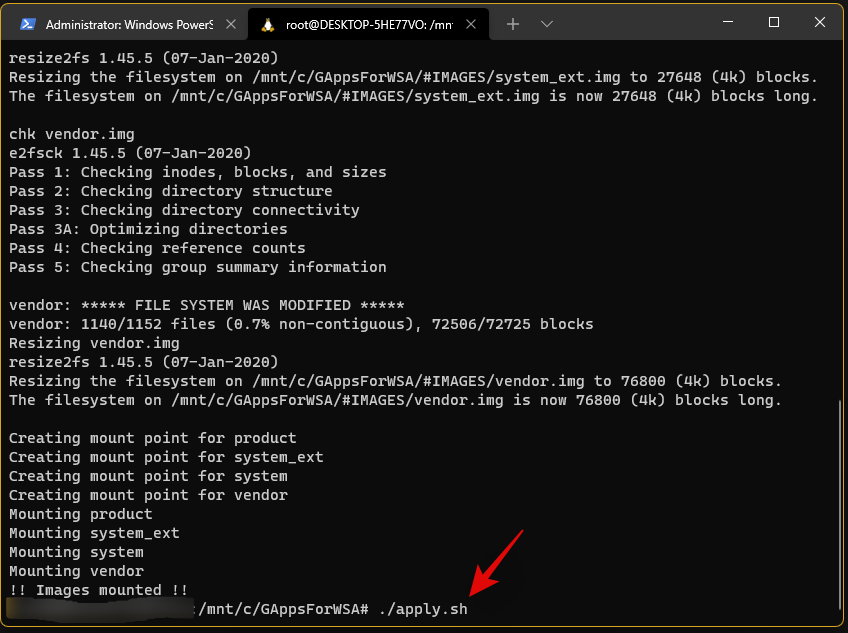
- ./extend_and_mount_images.sh,
- ./apply.sh
- ./unmount_images.sh.
Теперь соберем все файлы вместе и установим Google Play в Windows 11.
Установка Google Play и GApps в Windows 11
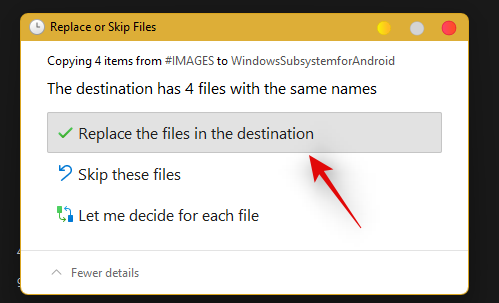
- Перейдите в папку c:GAppsWSA#IMAGES и скопируйте файлы product.img, system.img, syste_ext.img и vendor.img.
- Вставьте скопированные файлы в папку WindowsSubsystemAndroid.
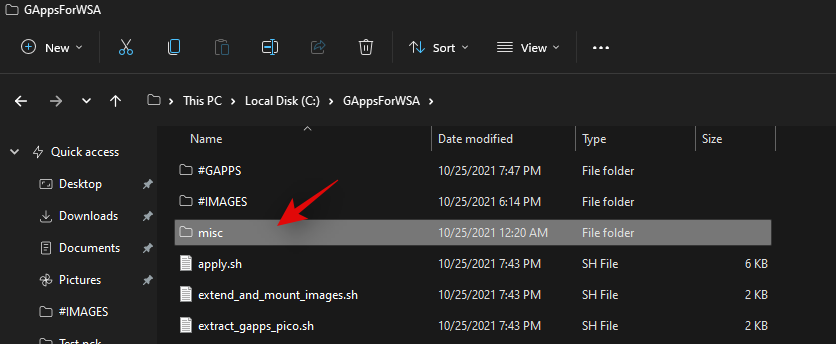
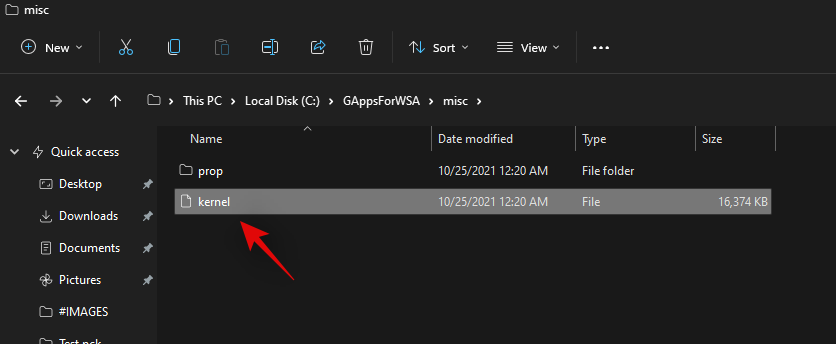
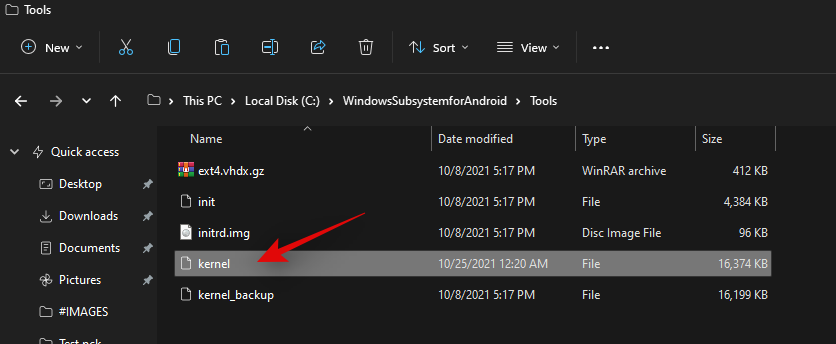
- Перейдите в C:GAppsWSAmisc и скопируйте файл kernel.
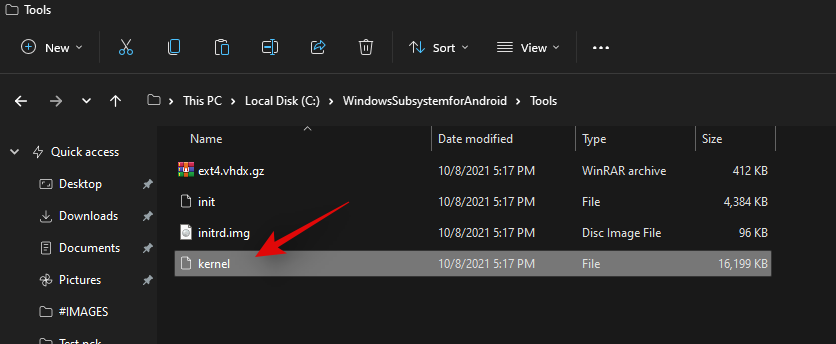
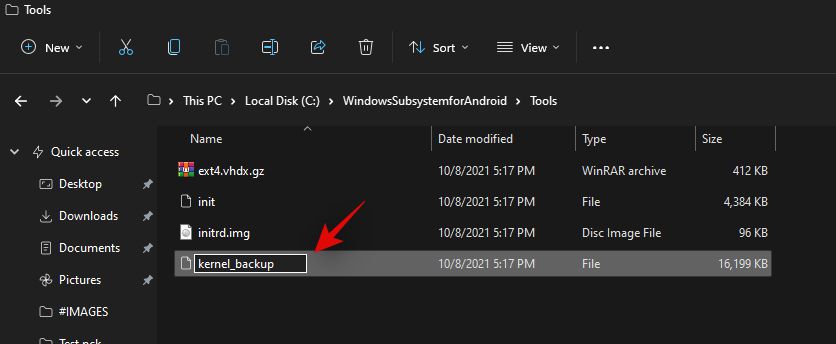
- Перейдите в папку WindowsSubsystemAndroid > Tools и переименуйте файл kernel в kernel_bak.
- Вставьте сюда ранее скопированный файл kernel.
- Откройте Параметры Windows и перейдите в раздел Конфиденциальность и безопасность > Для разработчиков. Включите режим разработчика.

- Запустите Терминал Windows с правами Администратора и откройте профиль PowerShell (запускается по умолчанию).

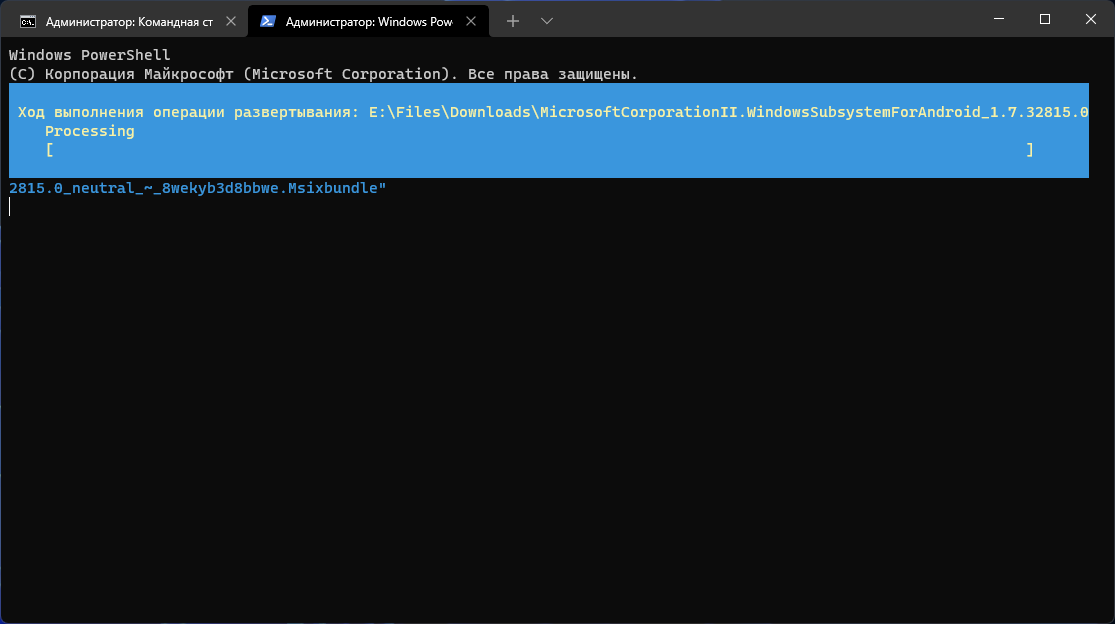
- В Терминале вставьте следующую команду: Add-AppxPackage -Register C:WindowsSubsystemAndroidAppxManifest.xml
- Откройте меню Пуск и запустите Windows Subsystem for Android.

- Включите режим разработчика.
- Нажмите на кнопку со стрелкой возле Files.
- Снимите отметку возле пункта делиться диагностическими данными (в этом нет смысла, так как используется модифицированная подсистема).
- Закройте приложение Файлы и подождите минуту-две.
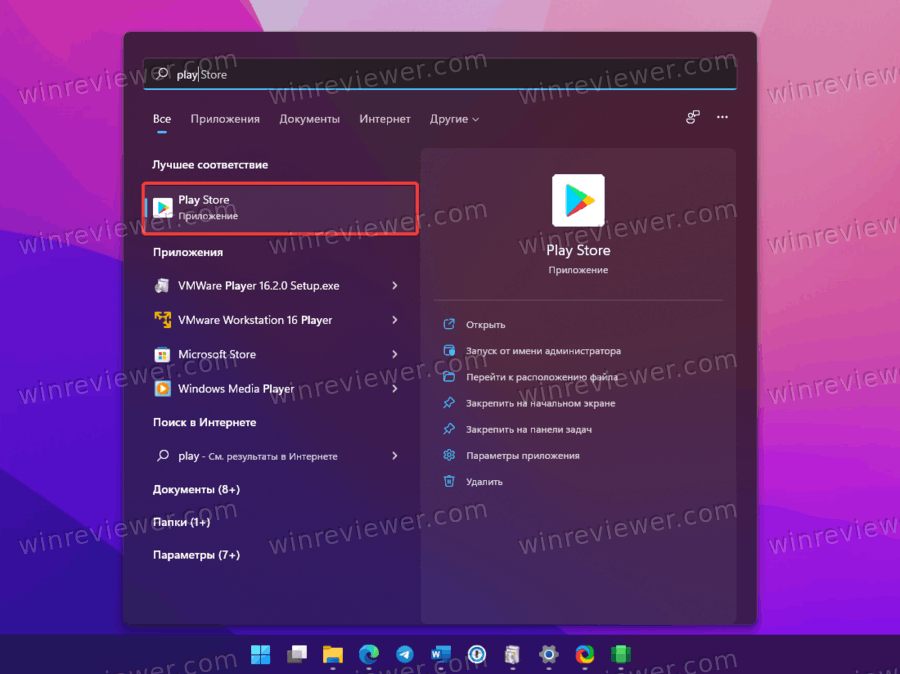
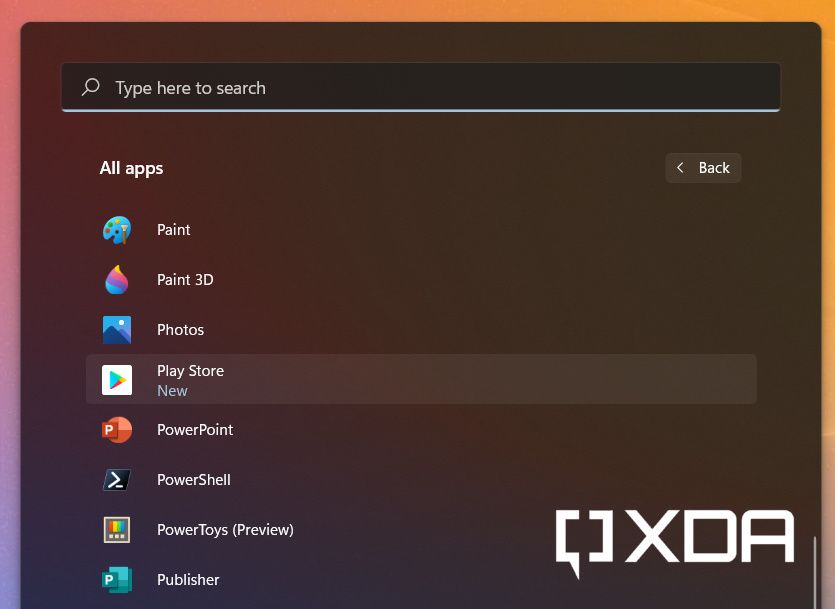
- Откройте меню Пуск и введите Google Play. Windows отобразит магазин Google Play Store в поисковой выдаче. Запустите магазин.

Готово! Теперь вы можете войти в свою учетную запись, после чего откроется главная страница магазина.
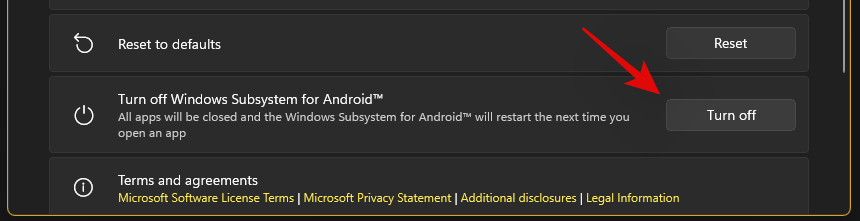
Однако, мы настойчиво рекомендуем на этом этапе закрыть магазин Google Play и вернуть на место оригинальный файл ядра в WSA.
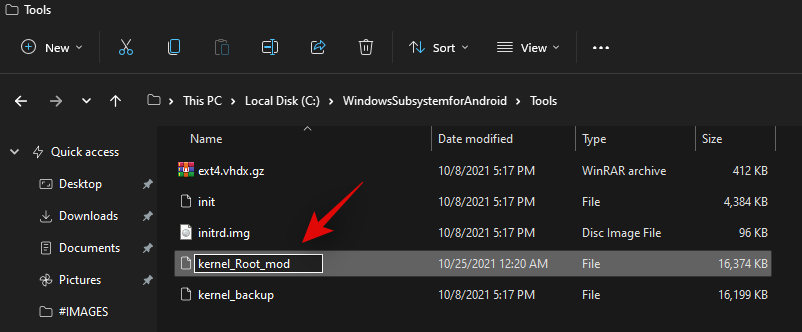
Восстанавливаем оригинальный файл ядра
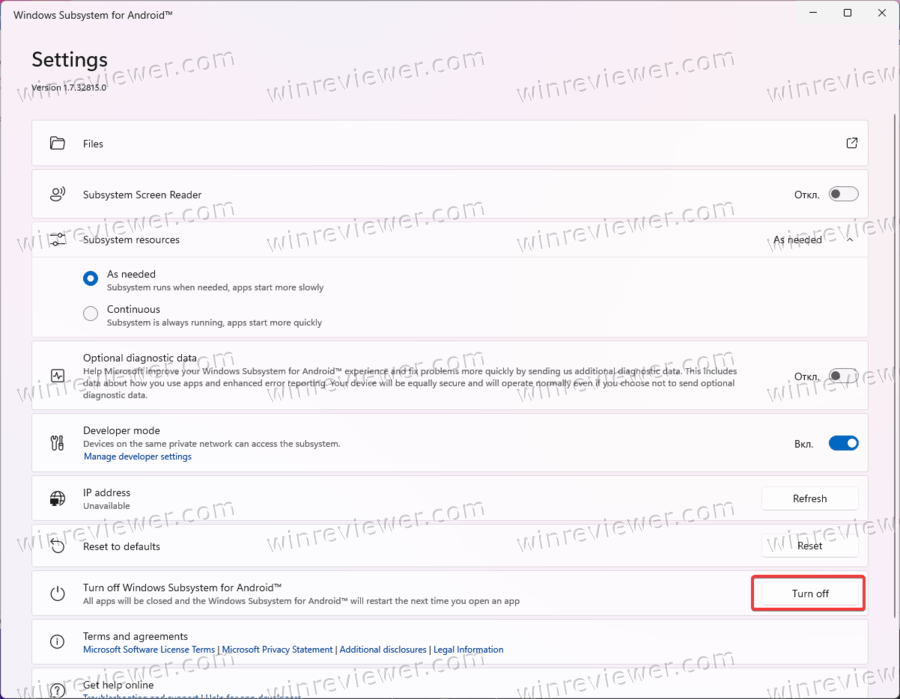
- Откройте Windows Subsystem for Android и нажмите кнопку Выключить. Подождите, пока не исчезнет анимация загрузки.
- Перейдите в C:WindowsSubsystemAndroidTools и переименуйте файл kernel в kernel_root.
- Наконец, переименуйте kernel_bak в kernel.
Готово. Теперь вы можете запустить магазин Google Play на Windows 11 и устанавливать любые необходимые вам приложения. Обратите внимание, что не все из них могут работать корректно, но подавляющее большинство популярных программ все же работают без особых проблем.
💡Узнавайте о новых статьях быстрее. Подпишитесь на наши каналы в Telegram и Twitter.
Судя по тому, что вы читаете этот текст, вы дочитали эту статью до конца. Если она вам понравилась, поделитесь, пожалуйста, с помощью кнопок ниже. Спасибо за вашу поддержку!
When Windows 11 announced the ability to install and use Android apps, everybody was over the moon. People were excited to run social media apps, games, and more directly from their PC. Sadly this excitement was cut short when Microsoft revealed that they would be using the Amazon App Store instead of the Google Play Store.
For comparison, the Amazon apps store only has around 460,000 while the Google alternative has 3.48 million apps in total. This is one of the reasons many users have been looking to install Google Play Services and Store manually. Are you in the same boat? Then we have the perfect guide for you!
Use the methods below to get and use Google Play Store and Gapps on your Windows 11 PC.
Related: How to Ungroup Icons on Windows 11 Taskbar With a Registry Hack
Method #1: Install custom WSA with Gapps and Play Store pre-installed
A simpler way to get Google Apps and Google Play Store with WSA is by using a pre-modified WSA that has the Gapps pre-installed. This WSA was shared by a Redditor called Rageman666 (see here). Once downloaded, you can use the mod given below to sign in to Google Play Store with your Google account. (However, if you want to install WSA officially only and then take on the complex method of installing Gapps yourself, then look at Method 2 below.)
What do you need
- Modified WSA | Download Link (Mirror | Mirror 2)
- ADBToolkit | Download Link
- Important: You will need to uninstall the original WSA from your system in case you have it installed before proceeding with this guide.
Step-by-step guide
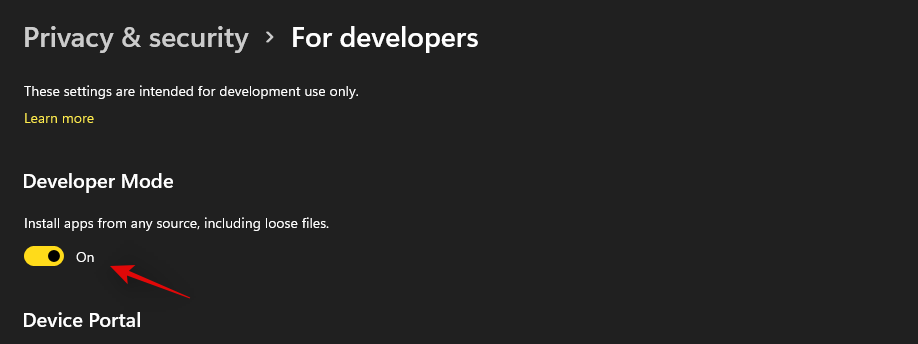
We will first need to enable developer mode on your installation of Windows 11. Press Windows + i on your keyboard and select ‘Privacy & security’ from the left sidebar.
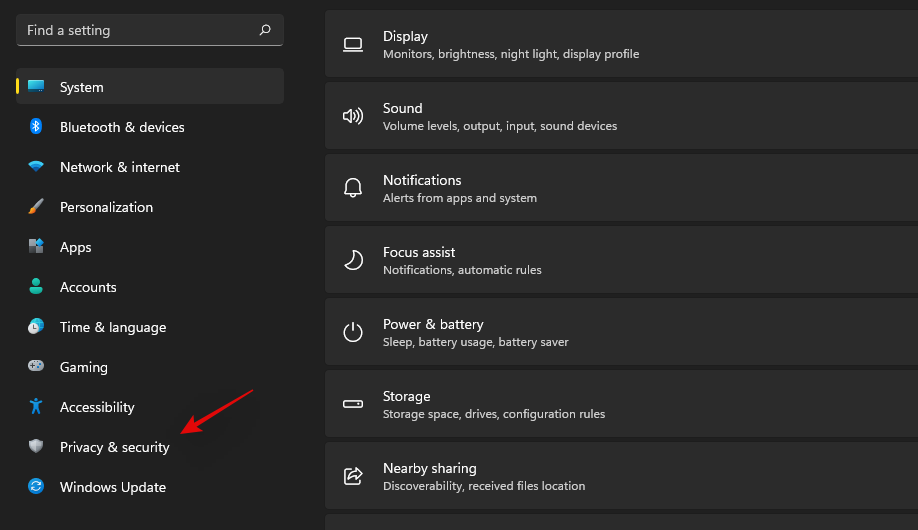
Click on ‘For developers’ on your right.

Click and turn on the toggle for ‘Developer Mode’. Click on ‘Yes’ to confirm your choice.
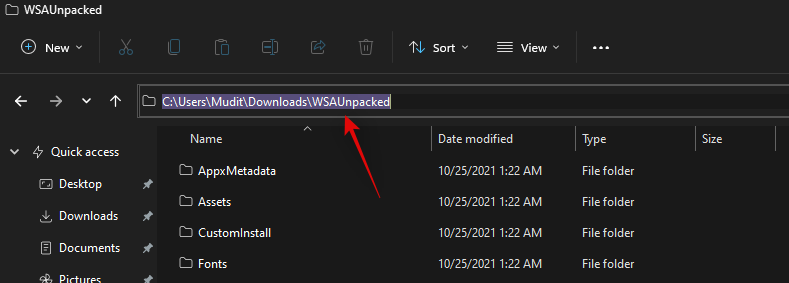
Now download the WSA linked above to a convenient location on your local storage. Unzip the files to a new folder named ‘WSAUnpacked’. Click on the address bar in the ‘WSAUnpacked’ folder and copy the path to your clipboard.
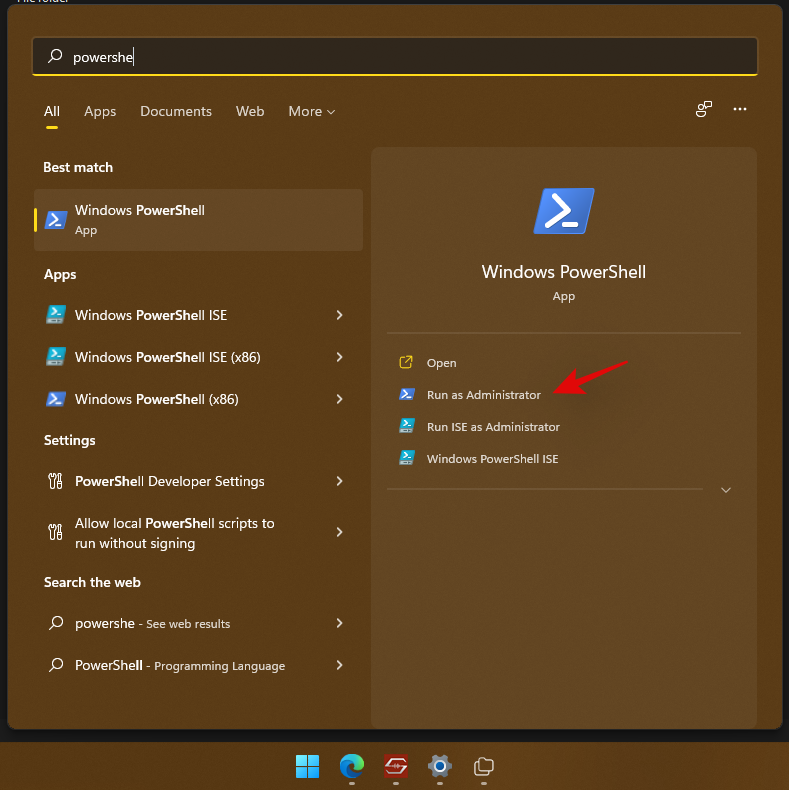
Press Windows + S on your keyboard, search for ‘Powershell’ and click on ‘Run as administrator’ once it shows up in your search results.
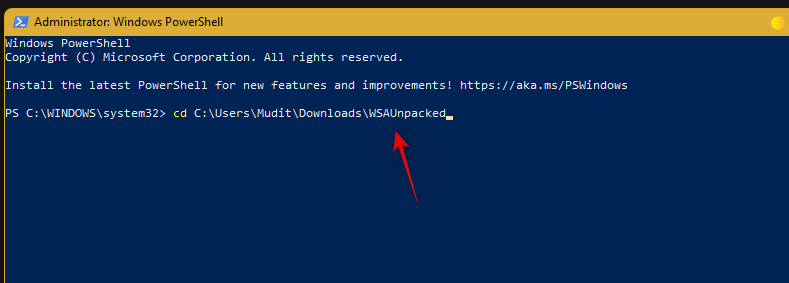
Type in the following command and replace PATH with the path we copied to your clipboard. Ensure that you remove the quotes from the pasted path.
Now type in and execute the following command.
Add-AppxPackage -Register .AppxManifest.xml

The modified WSA will now be installed on your system. Press the Windows key and launch the same from your Start menu.

Once the Subsystem launches, click and enable ‘Developer Mode’.
Now click on ‘Files’ at the top so that it launches Windows Subsystem for Android on your system.
Close the Files app. We now need to use a workaround to sign in to the Play Store.
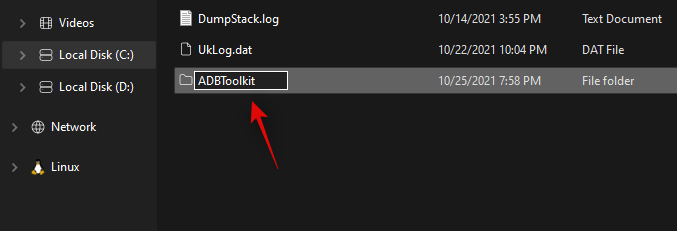
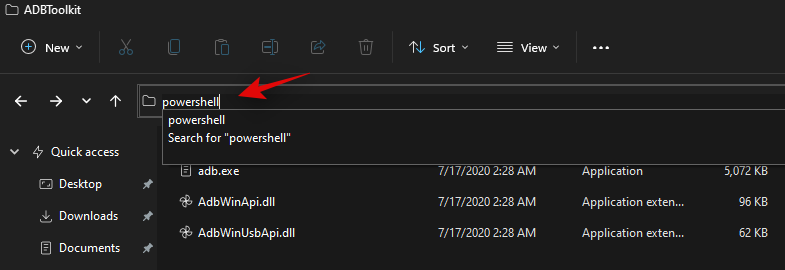
Download ADBToolkit linked above and extract it to a new folder on your desktop named ‘ADBToolkit’. Once extracted, click on the address bar at the top and copy the address to your clipboard.
Press Windows + S on your keyboard and search for Powershell. Click on ‘Run as administrator’ once Powershell shows up in your search results.
Type in the following command and replace PATH with the path to ADBToolkit we copied earlier.
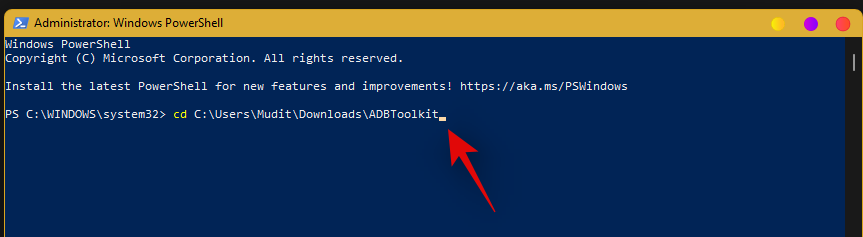
Note: Ensure that you remove the quotes from the pasted path to ADBToolkit.
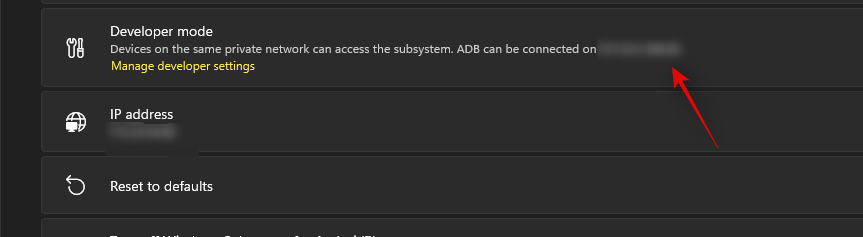
Now switch back to the subsystem window and copy the address given below ‘Developer Mode’.
Execute the command given below to launch and connect ADB. Replace ‘ADDRESS’ with the address copied to your clipboard (from above).
.adb.exe connect ADDRESS

Type in the following command to launch ADB shell.
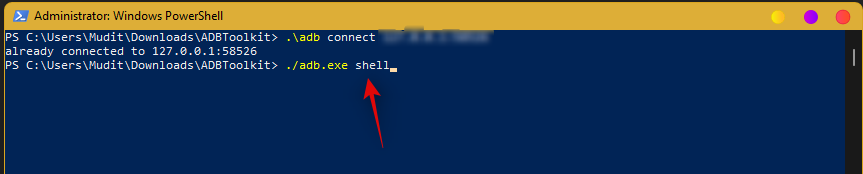
Now use the following command to gain root access.
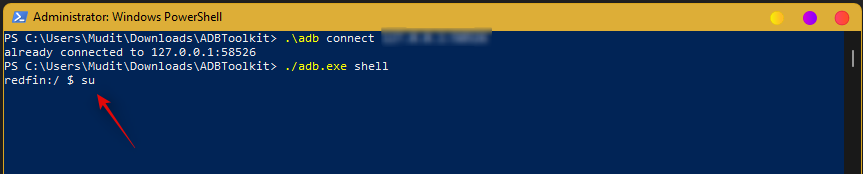
Now type in the following command.
Type in ‘Exit’ to exit PowerShell.
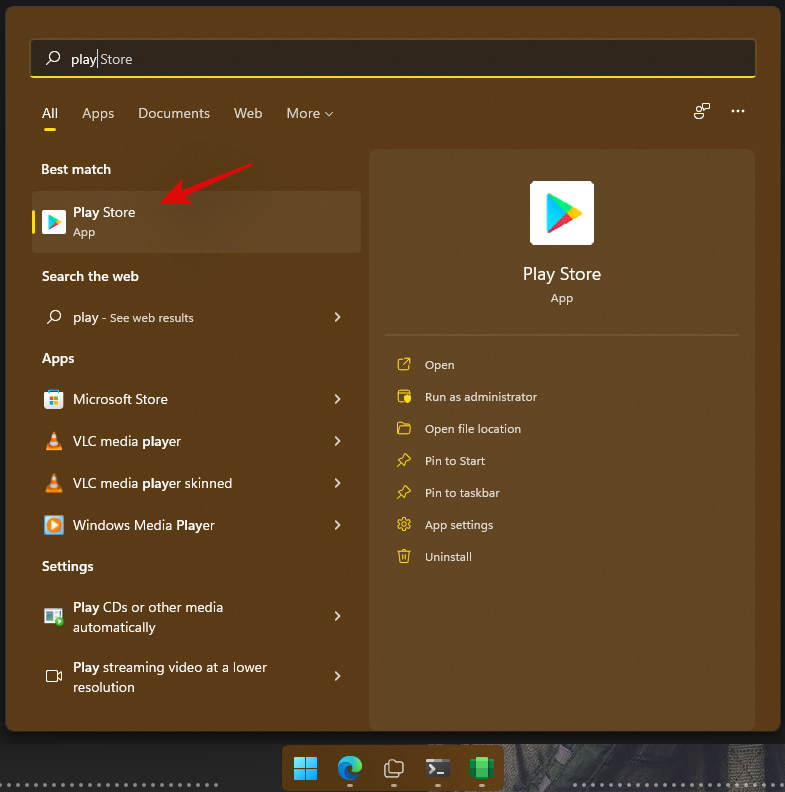
You can now close all the windows open on your desktop. Press Windows + S and search for ‘Play Store’ now. Click and launch the app once it shows up in your search results.
Now click on ‘Sign in’ and sign in with your Google account.
You will now be signed in with your Google Account and you should now be able to use Google Play Store on your Windows 11 PC.

And that’s it! You can now download and install the desired Android apps on your system directly from the Google Play Store.
Related: Sideload APK on Windows 11 using ADB manually | Automatically with a script
Method #2: Install WSA and then install Gapps yourself
The method above is much easier and thus easy to go with even though not exactly recommendable, as it’s a pre-modified (custom) WSA package. But if you want an official WSA package from Microsoft and want to install Gapps yourself over this, then this is the method for you. It’s quite complex btw, so may often wonder whether simply installing a custom WSA package that comes with Gapps pre-installed is worth it, which we’d say, is.
Getting Google Apps and Play Store on your PC on official WSA by installing Gapps package yourself is recommended as you wouldn’t need a pre-modified WSA which helps if you are concerned about the security of a custom WSA package under method 1.
What do you need
- WSGA script | Download Link (Gapps script for Windows Subsystem for Android)
- Windows Subsystem For Android | Link
- Store Adguard | Link
- OpenGApps | Link
- ADBToolkit | Download Link
- WinRAR | Download Link
- WSL: Windows Subsystem for Linux
- Ubuntu: Download Link
- Important: Uninstall the original Windows Subsystem For Android if you already have it installed on your PC before proceeding with this guide.
Step-by-step guide
Visit the WSA link above and copy and paste the following link given below or above in the text box.
Now click on the drop-down menu beside the text box and click on ‘Slow’.
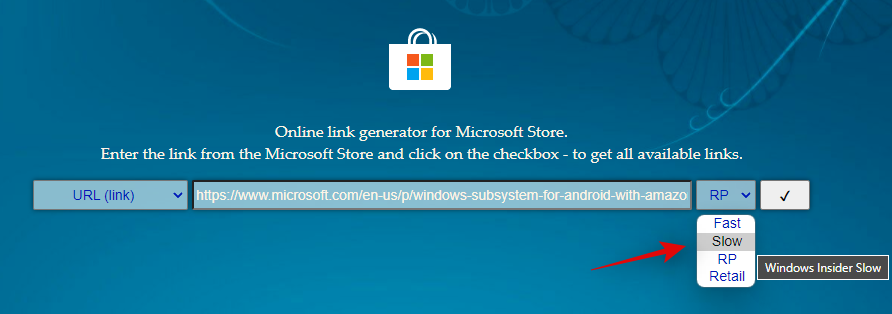
Click on the ‘Check Mark’ to process the given link.
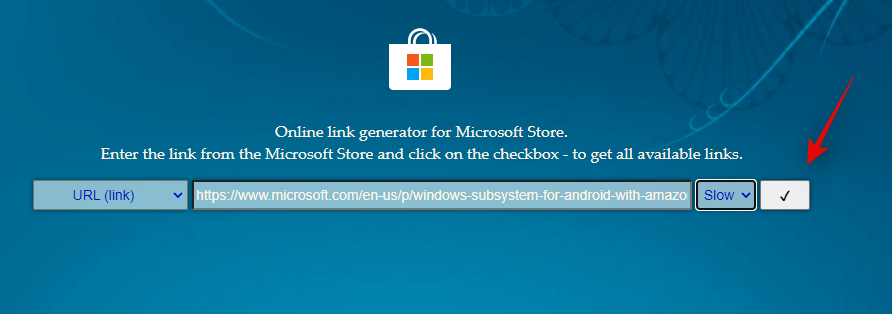
Once processed, all the linked download files will now be available on your screen. Scroll to the bottom and click on the .msix bundle at the bottom and download it to a convenient location on your local storage.

Now go to the downloaded file, right-click on it and open it with WinRAR. If you do not have WinRAR on your PC then use the link above to download and install the same.

Once the bundle is open in WinRAR, scroll to the bottom and check the architecture of the .msix bundle. It should match your CPU architecture, if not, you can select the desired version from the list and proceed with the guide.

Double click and open the same bundle in WinRAR. Once you are done, go to your C/boot drive and create a new folder named ‘WindowsSubsystemForAndroid’.
Switch back to Winrar and select all the files except the following folders and files.
- AppxMetadata (folder)
- AppxBlockMap.xml (file)
- AppxSignature.p7x (file)
- [Content Types].xml (file)
Copy all the selected files to the new ‘WindowsSubsystemForAndroid’ folder we created earlier.
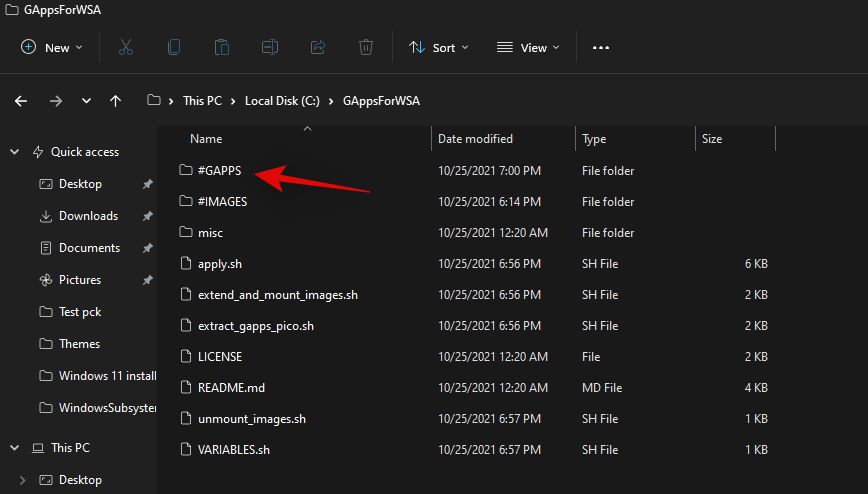
Once copied, create another new folder on your boot drive named ‘GAppsForWSA’.
Open the link for the WSGA script at the top and download the same as a .zip to your local storage.
Extract the .zip to the new ‘GAppsForWSA’ folder that we created in your boot drive.
Note: Extract the contents of the ‘WSGAScript-main’ folder contents inside the archive.
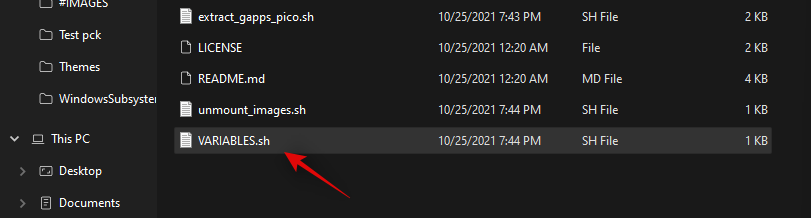
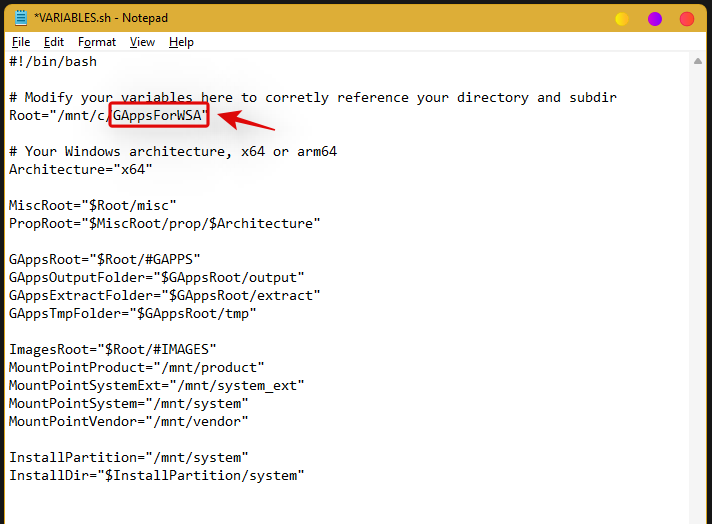
With the contents archived, right-click on ‘VARIABLEs.sh’ and open it with Notepad.
Replace ‘GAppsWSA’ with ‘GAppsForWSA’.
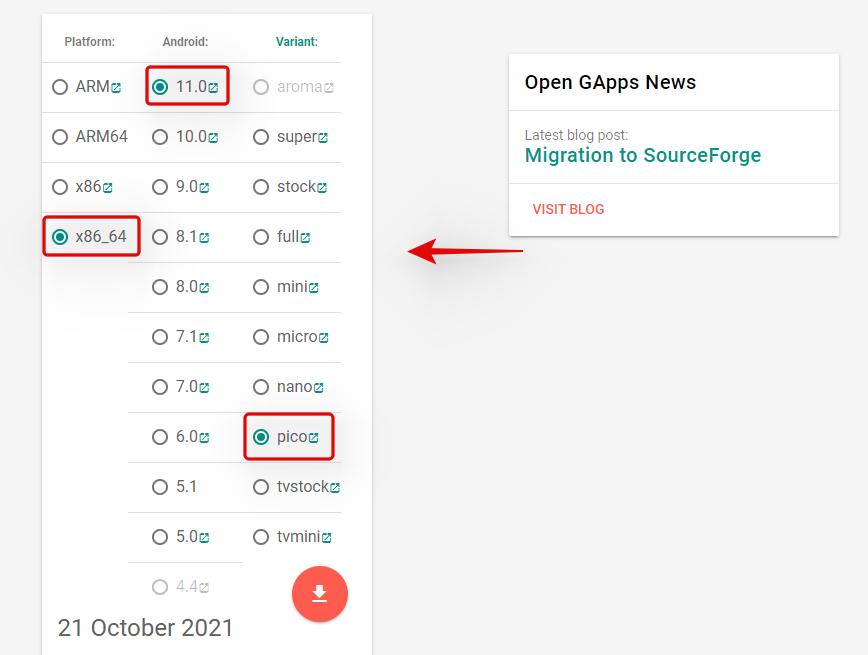
Press Ctrl + S on your keyboard to save the changes. We will now download GApps for your WSA installation. Visit the link for OpenGApps at the top and select the following options given below.
Click on the ‘Download icon’.

You will now be redirected to Sourceforge, wait a few seconds and the download should automatically be initiated for you.
Download and store the archive in the following location in the ‘GAppsForWSA’ folder on your boot drive.

Now go back to your boot drive and open the ‘WindowsSubsystemForAndroid’. Copy the following 4 files.
- vendor.img
- system_ext.img
- system.img
- product.img
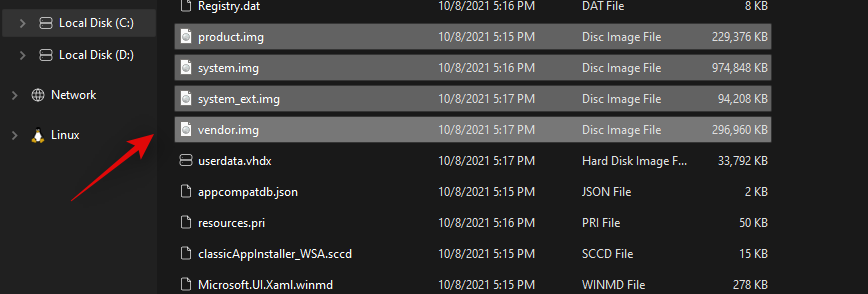
Navigate to the following location and paste all your copied files.
We will now install WSL for your system. WSL is a Linux Subsystem that will allow you to use executables and scripts developed for Linux. Press Windows + i on your keyboard to open the Settings app and then click on ‘Apps’ on your left.
Now click on ‘Optional Features’.

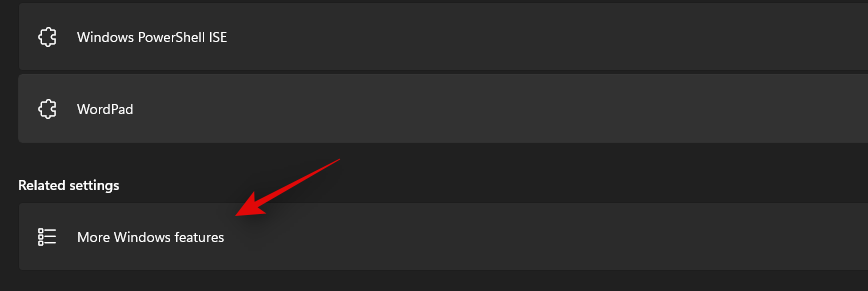
Scroll down and click on ‘More Windows features’.
A new window for available features will now open on your screen. Scroll to the bottom and check the box for ‘Windows Subsystem for Linux’.
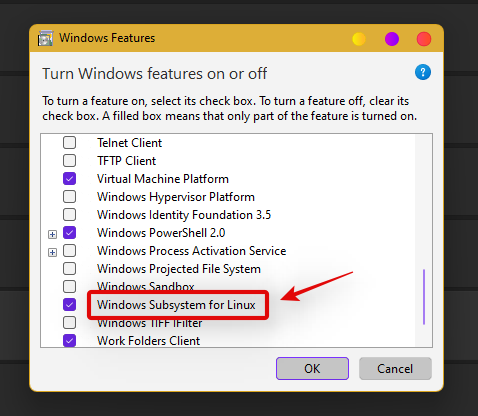
Click on ‘Ok’ once you are done. The Linux Subsystem will now be installed on your PC. You will now be prompted to restart your PC. We recommend you restart your PC at this point even if you are not prompted.
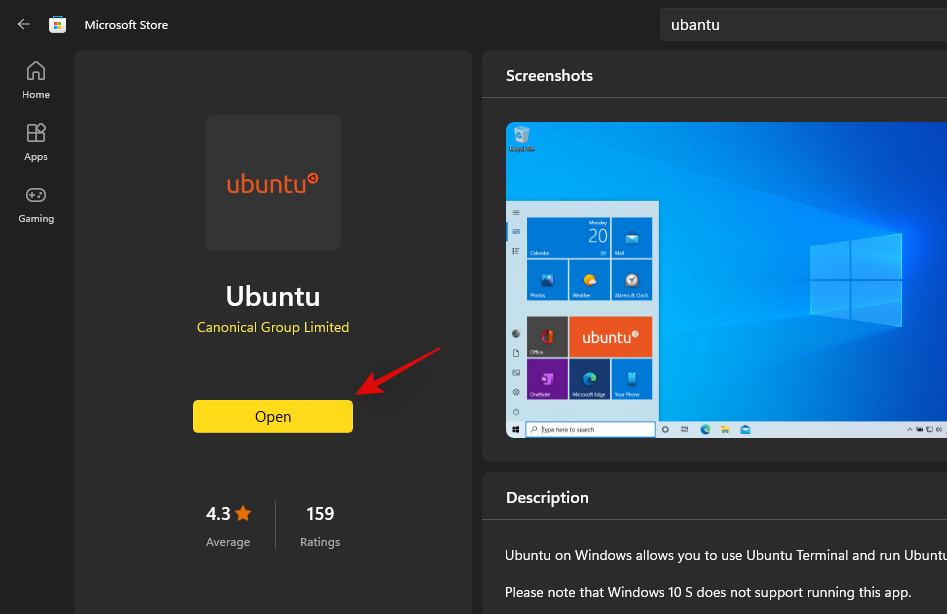
We will now install a distro that will help us during this setup. We recommend you use Ubuntu available on the Microsoft Store as it is easily downloaded and removed from your system. Use the link below to visit and download Ubuntu in the Microsoft Store.
- Ubuntu | Microsoft Store Link
Click on ‘Open’ once the app is installed to configure your installation. You can also launch the app from your Start menu depending on your preference.
Ubuntu will now be installed on your system. Once installed, proceed to set a Username to protect your installation. Subsequently, enter a password to protect root access on your system.
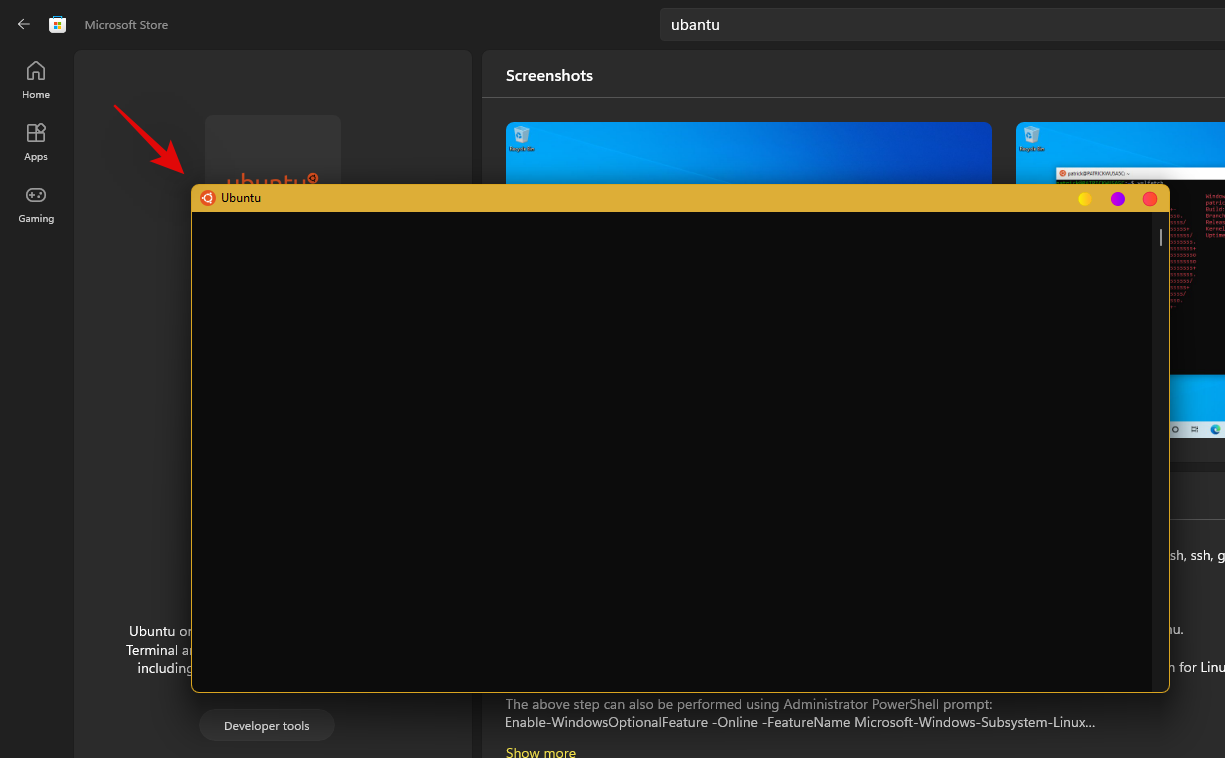
The Distro has now been setup on your system, you can close the current window and press Windows + X instead. Select ‘Windows Terminal (admin)’.
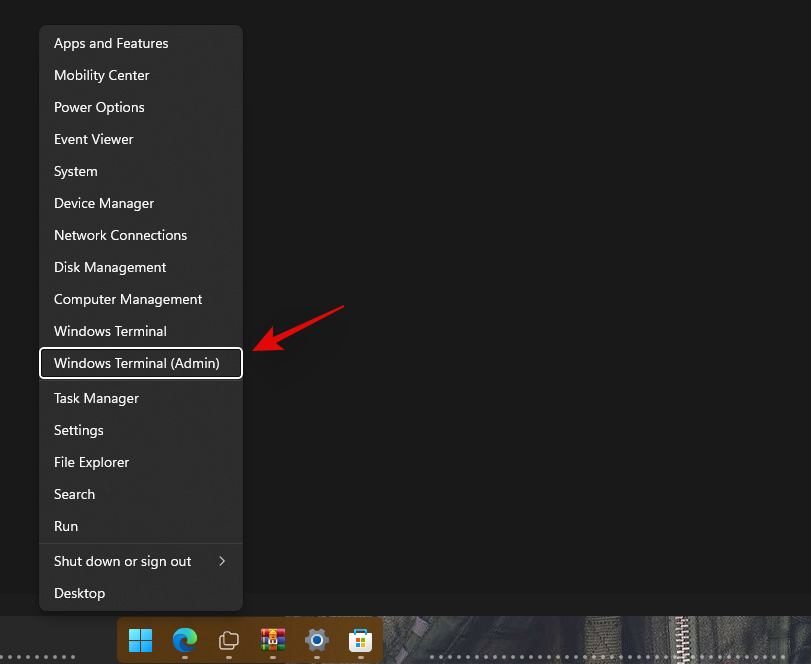
Click on the drop-down arrow at the top and select the same to launch a WSL terminal in the new tab. We’ll now need root access to modify your WSA with GApps. Type in the following command and press Enter on your keyboard. If you did not set a username or password then you should already have root access in the terminal. You can skip this step and move to the next one instead.
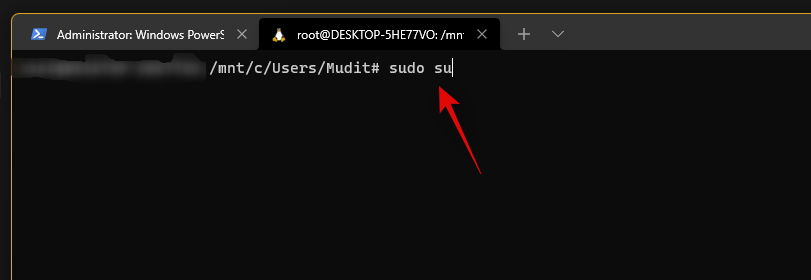
Enter your password to grant root access (if applicable). Now type in the following commands one by one.

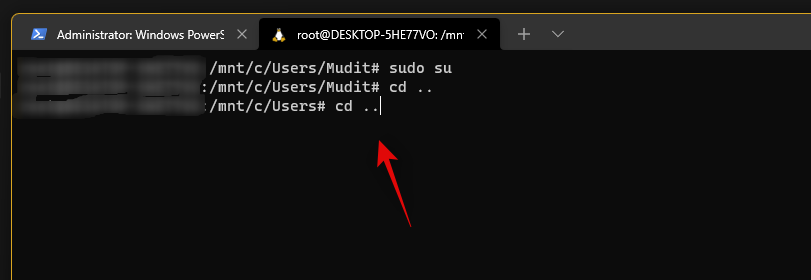
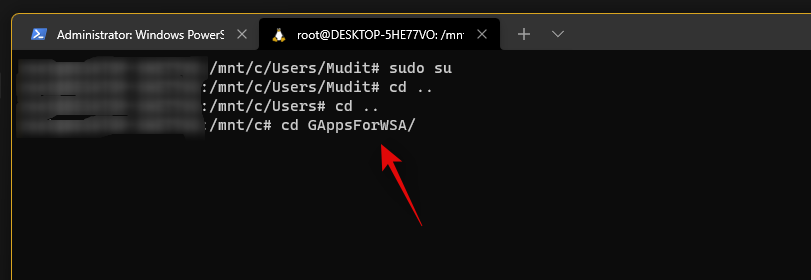
Finally use the command below to navigate to ‘GAppsForWSA’.
Now type in the following command to install ‘lzip’ and ‘unzip’ which will be needed for this process.
apt install lzip unzip
Note: If you are unable to get lzip or unzip setup, then run apt-get update -y to update your repositories and packages.
Confirm your choice by typing in ‘ Y ‘.
We will now install ‘dos2unix’ which will also be needed for this modification. Use the command below to install the same on your PC.
apt install dos2unix
Now it’s time to modify your WSA image. Type in and execute the following commands in the terminal one by one in the same order.
- Command 2: dos2unix ./extend_and_mount_images.sh
- Command 3: dos2unix ./extract_gapps_pico.sh
- Command 4: dos2unix ./unmount_images.sh
- Command 5: dos2unix ./VARIABLES.sh
Once the process completes, type in the following to clear up your terminal for better management.
Now that we have our scripts, let’s execute them. Type in and execute the commands given below one by one in the same order.
- Command 1: ./extract_gapps_pico.sh
- Command 2: ./extend_and_mount_images.sh
We are now done with the console, for now, you can close the same. Go to your boot drive and navigate to the following location.
Copy the following files to your clipboard.
- product.img
- system.img
- system_ext.img
- vendor.img
Now navigate to the ‘WindowsSubsystemForAndroid’ folder on your boot drive and paste all the copied images in the same location. Choose to replace the files when prompted.
We’re almost done with the modification now. Navigate to your ‘GAppsForWSA’ folder on your boot drive and double click and open the ‘misc’ folder.
Copy ‘kernel’ to your clipboard.
Navigate to the following location.
Rename ‘kernel’ to ‘kernel_backup’.
Now paste the kernel file we copied to your clipboard earlier in the same location.
We will now need to enable developer mode for your installation of Windows 11. Press Windows + i to open the Settings app and then click on ‘Privacy and Security’ on your right.
Click on ‘For developers’.
Enable the toggle for ‘Developer Mode’ at the top.
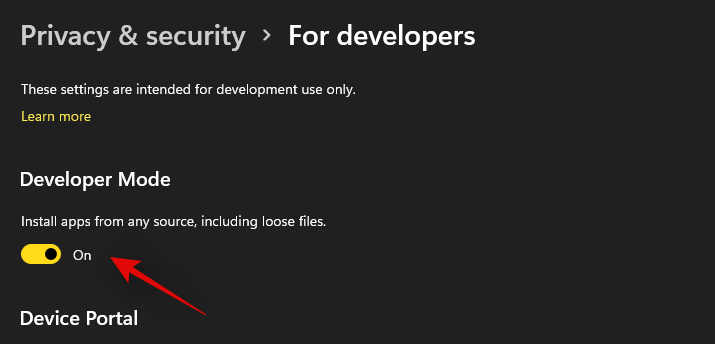
Click on ‘Yes’ to confirm your choice. Now press Windows + X and select ‘Windows Terminal (admin)’.
Click on the drop-down arrow at the top and select ‘Windows Powershell’.
Note: Do not select ‘Powershell’, ensure that you select ‘Windows Powershell’.
Now run the following command.
Add-AppxPackage -Register C:WindowsSubsystemForAndroidAppxManifest.xml
The modified subsystem will now be installed on your PC.
Press the Windows key and launch the same once the process completes.
Enable the toggle for ‘Developer mode’ in the Android Subsystem.
Click on ‘Files’ at the top to launch the Subsystem on your PC. You might have to wait a few minutes now depending on your PC.
Close the Files app once it opens and download the ADBToolkit linked above.
Now create a new folder on your boot drive and name it ‘ADBToolkit’.
Extract the archive in the same location, and delete the archive and the original folder.
Press the Windows key, search for Play Store and launch it on your system. Do not click ‘Sign-in’ yet.
Go back to the ‘ADBToolkit’ folder and click on the address bar at the top, type in ‘Powershell’ and press Enter on your keyboard.
Go back to the Android Subsystem and note down the address shown below ‘Developer Mode’.
Note: If the address does not show up, simply click on ‘Refresh’ beside IP address.
Type in and execute the following command. Replace ADDRESS with the address shown in the ‘Developer Mode’ section in the Android Subsystem.
.adb.exe connect ADDRESS
Once you are connected, execute the following command.
Type in the following command to gain root access.

Execute the following command next.

Now go back to the Play Store and click on ‘Sign-in’.
Sign in with your desired Google account now.
Note: This will also enable Google Sync, which by default will sync your Google data to Windows including things like Contacts, Calendar events, Browser history, and more.
Once you are signed in, close the Play Store. We now need to restore your original kernel. Open the Windows Subsystem for Android window and click on ‘Turn off’.
The Subsystem will now stop running in the background on your PC. Navigate to the ‘WindowsSubsystemForAndroid’ folder on your boot drive and open the ‘Tools’ folder.

Rename the ‘kernel’ file to ‘kernel_Root_mod’.
Similarly, rename ‘kernel_backup’ to ‘kernel’.

You can now close everything. We recommend you restart your system at this point. Once restarted, you should now be able to use the Play Store on your system while signed in with your Google account.
We hope you were able to easily set up and use GApps and Play Store on your PC using the guide above. If you face any issues or have any questions, feel free to reach out using the comments section below.
Related:
- How to Remove Appraiserres.dll to Bypass Requirements When Using Windows 11 Setup
- How to Install WSA Manually Using Msixbundle
- How to Fix ‘Virtualization Not Enabled’ Error for WSA on Windows 11
- How to Change Refresh Rate on Windows 11
- Windows 11 Start Menu Not Working: How to Fix
- Fix VAN 1067 Valorant Issue on Windows 11
- How to Disable CSM to install Windows 11
- How To Remove Language Switcher on Windows 11
- Right Click Menu Not working on Windows 11? How to Fix
WSA GApps Script
Required Warnings •
YouTube Tutorial •
Installation procedure •
Uninstallation procedure •
Gaining Root Access •
Telegram Group
Required Warnings
This project is Work-In-Progress
This project is being updated without schedule (though frequently). This README might not be completely clear right now, it will be fixed ASAP.
As for potential questions — please open Discussions instead of Issues.
Issues are needed in cases if you have an actual issue that prevents you from using this project.
Legal Warnings
By using the tools (scripts, but not limited to) provided by this project, you agree with the terms of Unlicense License, which states that «THE SOFTWARE IS PROVIDED «AS IS»».
To end user this serves as a warning, though we currently don’t have any explicit confirmations — such way of installing Google Services and Google Play Store may potentially be in a legal gray area.
Copyright notices
Any product or trademark referenced in this document (or project as whole) belongs to their respective owners. No copyright infringement is intended.
YouTube Tutorial
As a temporary measure and additional information (especially if README remains unclear, @ADeltaX provides a video-tutorial hosted on YouTube
Click on the image to see the video
Installation procedure
Install Windows Subsystem for Linux (Version 2)
Q & A for WSL Installation
If you have never used WSL, please do check the following:
- You must be running Windows 10 version 2004 and higher (Build 19041 and higher) or Windows 11
Fastest way to check your build version is to run winver command in Windows Search or via «Run…» (Right-click the Start button to access «Run…»)
- Why do I need that «WSL»?
Because of the way Android as an operating system is built — specific tools to do the modifications that we are doing are only available on Linux-based OSes. The fastest way to get access to these tools is via WSL.
How to install WSL
- Open Windows PowerShell as an Administrator
- Run wsl —install : this will install Ubuntu 20.04 LTS in WSL (Version 2) and all necessary components required to run as it is default (this is recommended)
Your PC may restart several times when downloading and installing required components.
After that — follow installation wizard instructions to proceed. If you have any questions, official documentation from Microsoft for WSL will help you.
- Check with wsl —list —verbose to be sure that you have a Linux Distro installed with WSL2 version. If for some reason you have receieved WSL1 kernel (or you have trouble running this command in general) — follow instructions in the section below to perform conversion.
Microsoft Docs: Installing WSL
Microsoft Docs: Set up and best practices
How to convert WSL1 to WSL2 (and manual installation)
If you have trouble installing WSL2 with wsl —install in general — follow this instruction from Microsoft.
Microsoft Docs: Manual installation steps for older versions of WSL
If you have already used WSL, have trouble installing with wsl —install or for some reason have received a WSL1 version installation, this section is for you.
Follow these steps:
- Download WSL2 kernel for manual installation. Use the Microsoft Docs link above (Manual Installation) and check Step 4 to receive the kernel package.
- Open Windows PowerShell as Administrator and run:
- wsl —shutdown to stop all WSL related processes (if any are running).
- wsl —list —verbose to get your installed distribution name. In case of Ubuntu, it most likely will look like Ubuntu-20.04 .
- wsl —set-version 2 , replace with the one that you have.
- Optional: if you would like to automatically install only WSL2 version builds in future. wsl —set-default-version 2 . To be sure about the difference, check Microsoft Docs: WSL — Compare versions
Install unzip, lzip
For now, we are assuming that you have went with default installation (Ubuntu), terminal commands will be provided for Ubuntu. Commands provided for the most part will work for other Linux Distributions but there may be some that use other package managers. Check how to correctly install applications for your chosen distribution on the internet.
Run following in the WSL Terminal (If you are unsure what is WSL Terminal, refer to the video, Microsoft Docs, or search Ubuntu in your start menu to be sure):
Attention! For new users who have never used Linux Terminals — when you are being asked for your password (which you’ve set up when installed WSL) — it will NOT be displayed in the terminal as part of security measures. You should enter it blindly and then press enter. If password was entered incorrectly system will give you two more attempts, after which you will need to run the command again and try entering password again.
sudo apt update sudo apt install unzip lzipWe have checked availability of updates and requested installation of two packages which are required for execution of scripts provided by this project. They may be already present at your installation, but it is better to check anyway.
Prepare folder structure
For the sake of simplicity, create a folder in the root of C Drive, so you will have C:WSA . You may use other location if you would like, be sure to adjust commands below for new location.
Attention! The folder where you will place the files which we will be downloading is going to become an installation folder. DO NOT delete that folder!
Attention! At the time of last update for this README, attempt to run scripts if they are located in path that contains spaces (like «Zulu Storage» in D:Zulu StorageWSA ) will result in an error. Be sure to use paths with no spaces as long as fix have not been implemented.Hint: You can also open any folder (even those that are located within Linux WSL Filesystem, by typing explorer.exe . (Yes, with the dot) in the WSL Terminal, to move files around.
Download Windows Subsystem for Android™️ Installation Package
Download
As we need to modify installation files, we cannot download WSA from the Microsoft Store. To download it directly we will use this service
- ProductID: 9P3395VX91NR
- Ring: Fast
Click the checkmark, and locate file which has size of approx. ~1.3GB (usually at the bottom of the page) and has .msixbundle extension.
Click the filename to begin downloading (or copy the download link). You may be warned by your web-browser that «The file cannot be downloaded securely». Disregard the warning and force the download (use buttons like «Keep anyway» or similar, depending on your web-browser)
Save the file at our prepared directory C:WSA
Extract
- Download 7zip or a similar archival program and use it to extract downloaded file. Do not mind that this file does not bear any archival extensions (like .zip).
- After extraction open C:WSAMicrosoftCorporationII.WindowsSubsystemForAndroid_versionnumber_neutral___identifier . This folder will contain a lot of .msix files, use «Sort by size» to locate two biggest files.
- Extract the one that is valid for your architecture, like this one WsaPackage_1.8.32822.0_x64_Release-Nightly.msix
- Open the extracted folder
- Locate and delete files AppxBlockMap.xml , AppxSignature.p7x and [Content_Types].xml
- Locate and delete AppxMetadata folder
Do not close this folder — we will return here to collect *.img files.
Download «GApps» via OpenGApps Project
To install Play Store, we need to get it from somewhere. Use OpenGApps.
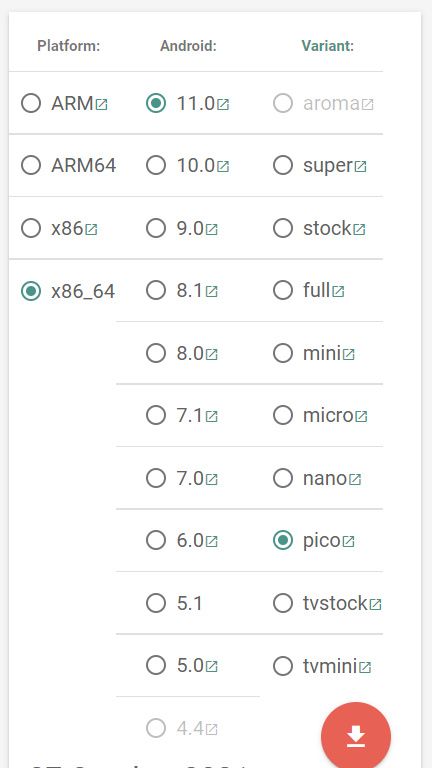
- Platform: x86_64 if you are running Windows on a traditional laptop/PC, otherwise choose ARM64
- Android: 11.0
- Variant: Pico (at the time of writing this README, only minimal functionality with Pico variant have been confirmed working).
For the time being save the .zip file at C:WSAgapps-zip-file-name.zip . Do not extract it.
Clone this repository and populate the directories
As we have used C:WSA , you will be able to use Windows Explorer to move files around.
Reminder: commands provided are for Ubuntu
Attention! To be sure that you can access your Windows filesystem from inside of WSL, you can run cd FolderName to change to another directory and ls to list what files and folders you have there. Typically, Windows Filesystem is available by «/mnt/$DriveLetter/», so /mnt/c/Users will be your Windows C:Users
cd /mnt/c/WSA git clone https://github.com/WSA-Community/WSAGAScriptWait for the command to finish running.
At the Extract step (in Download Windows Subsystem for Android™️ Installation Package) of this Guide we have got a folder that contains four *.img files which are product, system, system_ext and vendor. Move those files into C:WSAWSAGAScript#IMAGES
Then issuing ls /mnt/c/WSA/WSAGAScript/#IMAGES via WSL terminal should give the list of the following files:
product.img system_ext.img system.img vendor.imgWe also have C:WSAgapps-zip-file-name.zip . Copy this .zip file into C:WSAWSAGAScript#GAPPS . Do not extract it, just move the file.
Issuing ls /mnt/c/WSA/WSAGAScript/#GAPPS via WSL terminal, you should get something similar to the following:
open_gapps-x86_64-11.0-pico-20220503.zip output product_outputFinal preparations
Change architecture
If you are using this project on a device with ARM architecture (e.g., Qualcomm Snapdragon), please edit VARIABLES.sh and set the correct architecture. Hint is in the file.
Set executable permissions for the scripts
You should still be in the same directory within the WSL Terminal, if not use cd /mnt/c/WSA/WSAGAScript to get back.
Set executable permissions for the scripts:Verify that your scripts are executable by running ls -l and checking that you have -rwxrwxrwx at the start of lines that contain files: VARIABLES.sh , apply.sh , extend_and_mount_images.sh , extract_gapps_pico.sh , unmount_images.sh .
Running the scripts
Make sure you’re in the same directory as in the step before, the run:
./extract_gapps_pico.sh sudo ./extend_and_mount_images.sh sudo ./apply.sh sudo ./unmount_images.sh
Copy the edited images
After successful execution, you can now copy edited images from C:WSAWSAGAScript#IMAGES back to C:WSAMicrosoftCorporationII.WindowsSubsystemForAndroid_1.8.32822.0_neutral___8wekyb3d8bbweWsaPackage_1.8.32822.0_x64_Release-Nightly (example, the folder from where you have taken the images).
Registering the edited Windows Subsystem for Android™️ Installation Package
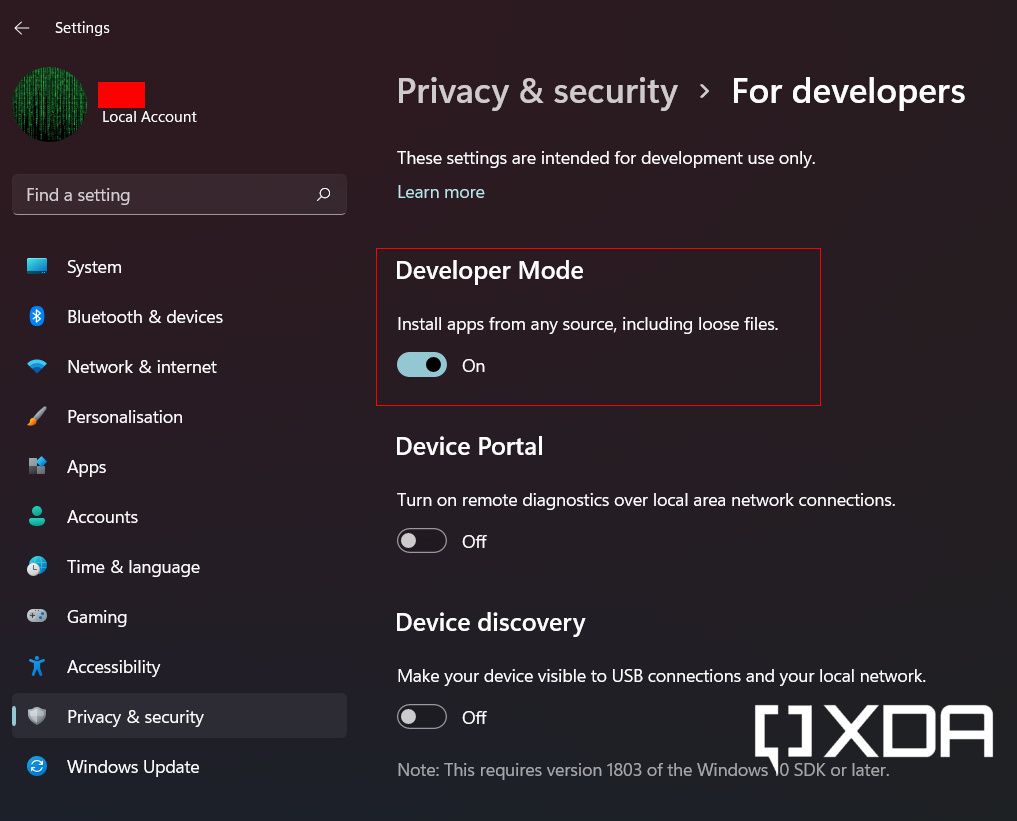
- Use Windows Search to find «Developer Settings», when PC Settings app opens, enable «Developer Mode» on that page.
- Uninstall any other installed versions of WSA (if you had any, uninstall exactly the main WSA app, all Android apps that have been added to Start Menu will be removed automatically)
- Open Windows PowerShell as Administrator and run Add-AppxPackage -Register path-to-extracted-msixAppxManifest.xml
Where path-to-extracted-msix , use path from «Copy the edited images» section (right above) as example.
WSA will install with GApps, make sure to sign in to Play Store and install «Android System WebView» or most apps will crash without that component.
Uninstallation procedure
- Locate Windows Subsystem for Android™️ in your Start Menu, right-click, uninstall. This will uninstall Android and all Android Apps will vanish from Start as they are just shortcuts wired in from the WSA. You don’t need to uninstall all Android Apps one-by-one beforehand.
- Locate the directory where you have placed the files (in the example of this README it would be C:WSA ) — remove it.
Gaining Root Access
You can get root access by replacing the kernel. (This step is no longer required to sign in GApps.)
(ADB SHELL ROOT WITH su)
Copy the kernel file from this repo (in misc folder) and replace the kernel file inside the Tools folder of your extracted msix (make sure WSA is not running, use Stop button inside WSA Settings, and close settings).
Kernel files inside misc are named for their respective architectures, do not forget to rename the file you took to kernel before placing it back into Tools .
This will allow you to use su inside the adb shell .
Enter into the adb shell and run the following commands:You are now root.
Procedure to add files to WSA
It is possible to add files to WSA (Windows Sybsystem for Android) through WSL. As an example, we will install busybox and bash.
First, turn off WSA:
- Open Windows Sybsystem for Android Settings
- Turn off Windows Sybsystem for Android (press Turn off)
Then open a WSL terminal:
cd /mnt/d/WSA/. MicrosoftCorporationII.WindowsSubsystemForAndroid_versionnumber_neutral___identifier. # Temporarily extend the "system" filesystem to allow adding things e2fsck -f system.img sudo resize2fs system.img 1280M # Mount "system" in read-write sudo mount system.img /mnt/system
Example to add busybox and bash
Check the most recent binaries for x86_64-linux; at the time of writing: https://busybox.net/downloads/binaries/1.35.0-x86_64-linux-musl/
cd /mnt/system/system sudo mkdir xbin cd xbin sudo wget https://busybox.net/downloads/binaries/1.35.0-x86_64-linux-musl/busybox sudo chmod 755 busybox for i in `./busybox --list`; do sudo ln busybox "$i"; done # We will use the debian bash executable sudo mkdir temp cd temp sudo wget http://http.us.debian.org/debian/pool/main/b/bash/bash-static_5.1-2+b3_i386.deb sudo dpkg-deb -R bash-static_5.1-2+b3_i386.deb tmp sudo chmod 755 tmp/bin/bash-static sudo cp tmp/bin/bash-static .. cd .. sudo rm -r temp # Yet another bash executable. sudo wget https://github.com/robxu9/bash-static/releases/download/5.1.016-1.2.3/bash-linux-x86_64 sudo chmod 755 bash-linux-x86_64 # Unmount system filesystem cd sudo umount /mnt/system # Shrink the system filesystem to minimize its size as much as possible e2fsck -f system.img sudo resize2fs -M system.img
Testing the installation
Start Windows Sybsystem for Android (e.g., open Windows Sybsystem for Android Settings and press the button close to Files).
Open a CMD with path to adb.
adb connect 127.0.0.1:58526 adb shell su export PATH=$PATH:/system/xbin type viKernel source
- WSA-Community/WSA-Linux-Kernel
Currently known issues

Несколько дней назад Microsoft начала тестирование подсистемы Windows Subsystem for Android (WSA), которая позволяет запускать Android-приложения в Windows 11.
Сейчас функция доступна только участникам программы Windows Insider на канале Beta, что несколько удивительно, так как обычно все новшества вначале появляются на канале Dev. Но даже если вы используете канал Beta, то для установки подсистемы из Microsoft Store потребуется сменить регион на США в самой Windows 11.
Microsoft обещает, что инсайдеры на канале Dev также вскоре получат доступ к Windows Subsystem for Android, но какие-либо конкретные сроки не называются. Если вы не хотите ждать, то можете установить подсистему вручную. Для этого вам потребуются прямые руки и небольшие навыки работы в PowerShell.
Важно! Все действия вы делаете на свой страх и риск.
Благодарим aleks242007 и участников чата Community в Telegram за помощь в составлении инструкции.
Инструкция
Установка Windows Subsystem for Android
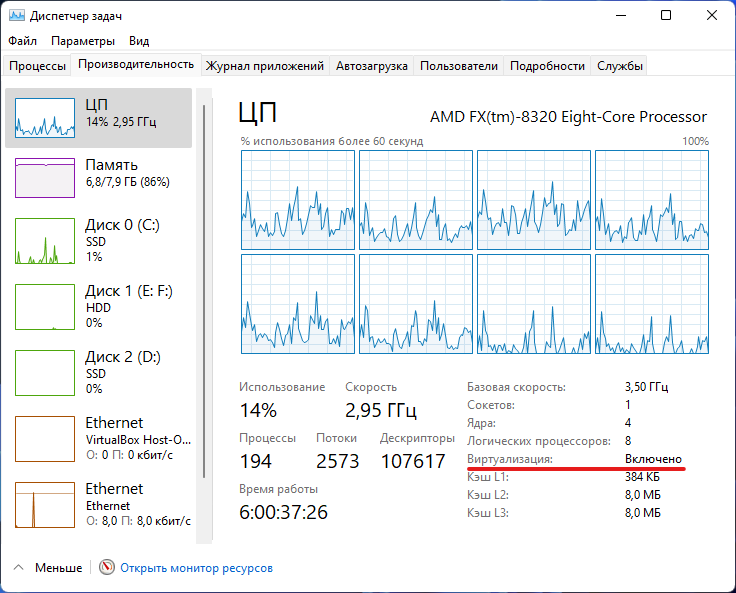
- Для начала убедитесь, что ваш компьютер поддерживает виртуализацию. Для этого откройте «Диспетчер задач», перейдите на вкладку «Производительность», выберите CPU и посмотрите текст под графиком. Там должно было указано: «Виртуализация: Включено».
- Если виртуализация отключена, то вам необходимо включить её в BIOS. У разных производителей настройка может располагаться в разных разделах и называться по-разному, так что можно поискать информацию в Google для вашего конкретного устройства.
- Если в BIOS настройка отсутствует или значение в «Диспетчере задач» не меняется, то вы вряд ли сможете запустить Windows Subsystem for Android на своём компьютере.
- Следом откройте меню «Пуск», введите в поле поиска «Включение или отключение компонентов Windows» и выберите соответствующий результат.
- В открывшемся окне установите галочку напротив пункта «Платформа виртуальной машины», нажмите «ОК», дождитесь применения изменений и перезагрузите ПК.
- Далее нам потребуется скачать установщик Windows Subsystem for Android в формате MSIXBUNDLE с сервера Microsoft Store:
- Перейдите на сайт Microsoft Store — Generation Project (от rgadguard) по этой ссылке.
- В поле на сайте вставьте следующую ссылку:
https://www.microsoft.com/store/productId/9P3395VX91NR - Справа от поля в выпадающем меню выберите Slow и нажмите на галочку.
- В появившемся списке найдите файл с примерно таким названием (номер версии может отличаться):
MicrosoftCorporationII.WindowsSubsystemForAndroid_1.7.32815.0_neutral_~_8wekyb3d8bbwe.msixbundleAdd-AppxPackage -Path "C:Usersuser1DesktopMyApp.msix"- «C:Usersuser1DesktopMyApp.msix» — путь к файлу MSIXBUNDLE, сохранённому на шаге 4. Чтобы быстро его получить, вы можете нажать правой кнопкой мыши по файлу в «Проводнике» и выбрать пункт «Копировать как путь».
- Решение ошибки:
Add-AppxPackage: The ‘Add-AppxPackage’ command was found in the module ‘Appx’, but the module could not be loaded. For more information, run ‘Import-Module Appx’.
Если вы увидели такое сообщение в PowerShell, то введите следующую команду:
Import-Module Appx -UseWindowsPowerShellПосле этого вновь введите команду Add-AppxPackage из шага 6.
Установка APK-файлов
Теперь подсистема Windows Subsystem for Android работает, однако с установкой приложений есть некоторые сложности. Как вы уже знаете, вместо Google Play здесь используется Amazon Appstore. Причём отображаются там лишь приложения, которые Microsoft и Amazon протестировали на работоспособность в подсистеме.
Правда воспользоваться Amazon Appstore всё равно не получится. Приложение не только требует учётную запись Amazon, но и проверяет ваше местоположение. Можно, конечно, подключить VPN, но есть ли в этом смысл?
К счастью, Windows Subsystem for Android поддерживает установку приложений с помощью APK-файлов. Вы можете воспользоваться либо утилитой WSATools, о которой мы рассказали в статье по этой ссылке, либо устанавливать вручную с помощью командной строки по инструкции ниже.
- Скачайте SDK Platform Tools для Windows с сайта Android, перейдя по этой ссылке.
- Извлеките папку platform-tools , например, в корень диска C (рядом с папками Windows, Program Files и т. д.)
- Откройте приложение Windows Subsystem for Android и включите «Режим разработчика».
- Нажмите на кнопку рядом с элементом «Файлы». Начнётся запуск подсистемы Windows Subsystem for Android.
- Нажмите на кнопку «Обновить» рядом с элементом «IP-адрес».
- В описании для элемента «Режим разработчика» появится IP-адрес, который мы будем использовать для подключения к подсистеме с помощью ADB.
- Откройте командную строку (или Windows Terminal) и перейдите в папку с установленным SDK Platform Tools, подставив нужный путь к папке:
cd C:platform-toolsadb.exe connect 127.0.0.1:58526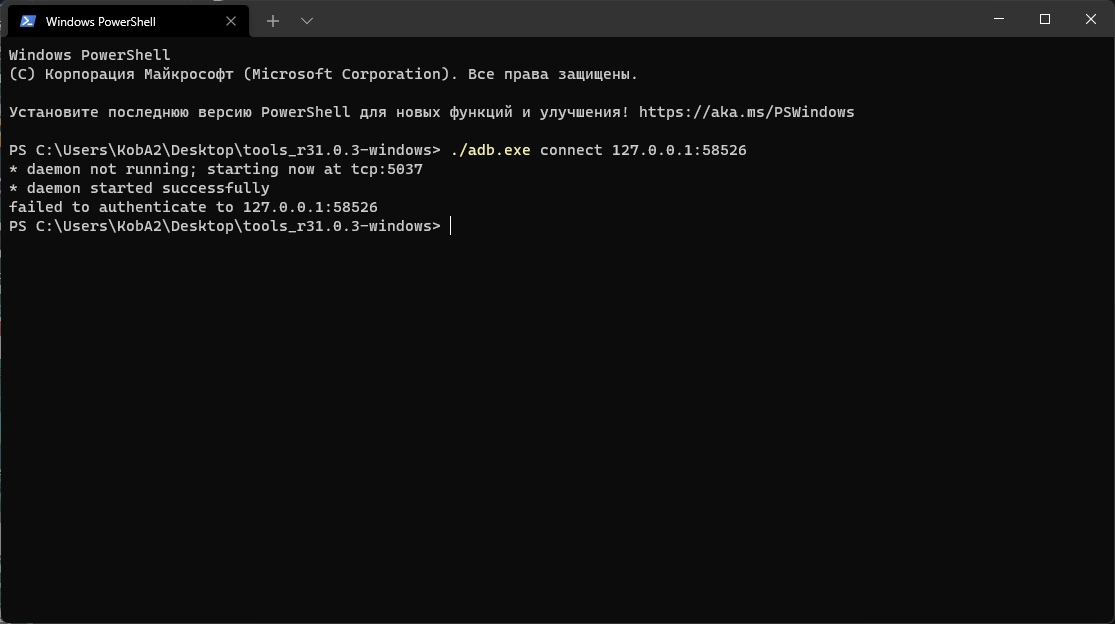
Примечание. Если выполнять команды через PowerShell, то перед ADB следует прописать ./
adb.exe install edge.apkЧтобы быстро скопировать путь к файлу, нажмите по нему правой кнопкой мыши и выберите «Копировать как путь». Затем вставьте его после adb.exe install и нажмите Enter.
Поделиться впечатлениями о работе Windows Subsystem for Android и обсудить сценарии её использования вы можете в нашем чате в Telegram. Там же можете задавать вопросы, если возникли какие-либо сложности с установкой подсистемы или Android-приложений.
Поскольку далеко не все Android-приложения корректно работают в подсистеме, пользователи решили составить таблицу с информацией о работоспособности приложений в WSA. Найти и внести свой вклад вы можете на GitHub.
Достоинства, проблемы и просто особенности субсистемы, а также рекомендации по поводу того как использовать её более приятно.
В предыдущей статье рассматривался способ установки Windows Subsystem for Android (далее — WSA) на сборках, отличных от Windows 11 Beta. Если вы не знаете как это сделать, то милости прошу. В данной статье будет сказано немного слов про особенности системы, способы установки приложений и не только.
Предисловие: Особенности использования приложений в субсистеме
Помни, что WSA не идеален
Задачи, которые телефон мог тянуть нормально, могут сильно нагружать компьютер. По потребляемым ресурсам в диспетчере задач видно, что со стороны Microsoft и Intel была проведена колоссальная работа по оптимизации, но проблемы всё ещё имеются.
Проблема файловой системы
Microsoft буквально полностью закрыла доступ к внутреннему хранилищу Android как для приложений, так и для пользователя. Не удивляйтесь, если некоторые приложения (например, лаунчеры) будут неожиданно вылетать или вообще не запускаться. Причина именно в этом.
Взаимодействие клавиатуры/мыши компьютера и WSA
Клавиатуры поддерживаются со стороны Android нативно, так что здесь никаких неожиданностей. Стандартные комбинации клавиш по типу CTRL + C/V работают нормально.
Официальный клиент Telegram и неофициальные альтернативы на его основе поддерживают прямую вставку фото из буфера обмена Windows.
С мышью же ситуация другая. ЛКМ/ПКМ назначены на нажатие, что совершенно нормально и проблем нет. Но вот колёсико мыши скорее не поддерживается, чем поддерживается. Заработает оно или нет в WSA — дело случайности.
Игры работают хорошо, но проблема в управлении. WSA не предполагает никаких макросов для назначения клавиш клавиатуры для нажатия на различные места экрана, что мы могли видеть, например, в Bluestacks. Так что единственный способ поиграть на WSA нормально — играть в однокнопочные казуалки.
Запуск стандартного системного приложения «Настройки»
Производится через ADB, об установке которого пойдёт речь далее.
Команда: adb shell am start com.android.settings/.Settings
Как устанавливать любые .apk файлы
1) Включаем Developer mode в настройках Windows Subsystem for Android:
2) Скачиваем SDK Platform-Tools for Windows по ссылке ниже:
3) Распаковываем файлы в любую удобную папку
4) Нажимаем SHIFT + ПКМ в папке и выбираем Открыть окно Powershell
5) Запускаем Files в настройках WSA, чтобы запустить субсистему в целом.
6) В открытой консоли вводим:
.adb.exe connect localhost:58526
Теперь мы можем установить любые .apk файлы, которые можно найти на всем известных форумах и сайтах. Когда вы скачали нужный пакет, в той же консоли необходимо ввести .adb.exe install . Вот и всё, теперь установленные приложения появятся в меню Windows.
Магазины приложений, работающие без сервисов Google
Предустановленный и бесполезный для всех, кроме жителей США, магазин приложений, так как при регистрации он требует указать американский номер телефона.
Ссылка на скачивание: Отсутствует
Созданная под гнётом экспортных ограничений наиболее известная альтернатива Google Play Store. Но популярность не равна качеству. Навигация в приложении крайне странная — отсутствует возможность нормально менять размер окна. А также в магазине много рекламы.
Для использования требуется установка Huawei Mobile Services (HMS), которые вам предложат установить при первом запуске магазина.
Ссылка на скачивание:
Позволяет скачивать и обновлять любые приложения, доступные в Google Play Store. Из неприятного: баги при загрузке приложений (загрузка стартует 50/50, всегда не видно прогресса скачивания), которые создаются из-за ограниченности хранилища.
Официальный канал разработчиков в Telegram, в котором доступны все версии приложения: https://t.me/AuroraOfficial
Ссылка на скачивание (зеркало):
Бессмертная классика. Позволяет скачивать различные nonprofit приложения. Багов не заметил, скачивание работает отлично.
Ссылка на скачивание:
Удобный и простой лаунчер приложений, который не вылетает
Ранее было упомянуто, что просто так лаунчер не поставить — большинство из них будет вылетать из-за отсутствия доступа к файловой системе. Здесь нам поможет Discreet Launcher.
Надеюсь, что данные статьи помогли вам разобраться с Windows Subsystem for Android.
Google Play Store on Windows 11 is now possible via Windows Subsystem for Android with Gapps.
Microsoft just announced the Windows Subsystem for Android (WSA) for Windows 11 beta builds. While it is only for the Windows 11 Insider Preview beta channel, we posted a way to install Windows Subsystem for Android onto the dev channel and also the final Windows 11 21H2 22000 build or later. However, because it comes Amazon, you do not get Google Play Store or Play Services with WSA. As ana alternatively, you can download Windows Subsystem For Android with Google Play Store and Play Services pre-installed. Get WSA with Gapps!
Windows Subsystem for Android comes into existance with the collaboration between Amazon’s App Store for Android and Microsoft’s Windows 11. So basically, you can download and install Android apps onto Windows 11 via WSA. As it comes from Amazon, it naturally does not feature Google Play Services and Play Store; which is quite important to run Google apps like YouTube, Gmail, etc. Also, some third-party apps will refuse to run without Google Play Services.
Thankfully, someone managed to install Magisk, Riru, and LSPosed onto WSA! If you don’t already know, Magisk is the most popular exploit to gain root access on the Android operating system. However, the developer did not mention on instruction to gain it.
While we wait for the exploit, another developer ADeltaX managed to install Google Play Services or Play Store onto Windows Subsystem for Android. So now you can also install apps directly from Google Play Store. You can check it out on the Github project WSAGAScript.
You can also download the Linux kernel source code of WSA from here.
Update: How to Root Windows Subsystem for Android using Magisk | Download WSA with Magisk and Gapps
However, the installation procedure is quite complicated. Here is an easier way to install Google Play Services or Play Store onto Windows Subsystem for Android on Windows 11. We go about doing this by installing a modded WSA package consisting of Google Play Store. You can also sign in with your Google account. Thanks to u/Sm0g3R.
- Windows Subsystem For Android (WSA) with Gapps:|
- Telegram channel link | Download (Mediafire) | Mirror link (MegaNZ)
Download WSA with Gapps
Thanks to ahaan for the latest WSA with Gapps for x86 64 bit devices (Intel or AMD chipset) as well as the ARM64 based laptops and computers like Surface Pro X.
Windows Subsystem for Android x86 64-Bit with Gapps (Play Store)
- Download | Telegram channel link | MegaNZ link (open on desktop)
Download Windows Subsystem for Android ARM 64-bit with Gapps (Play Store)
This includes an MSIX file for ARM 64-bit computers such as the Surface Pro X.
- Download | Telegram channel link | MegaNZ link (open on desktop)
How to install WSA with Google Play Store for Windows 11
- Download Windows Subsystem For Android (WSA) with Gapps from above.
- Setup ADB for Windows OS. OR download the Android SDK Tools by Google.
- Delete any existing WSA instances from Windows 11. (WIN+X -> Apps And Features -> Windows Subsystem for Android -> Uninstall)
- Extract WSA zip files downloaded in step 1 to a location where you want to install WSA.
- Make sure to enable Developer mode in Windows (Search -> developer settings -> developer mode)
- Go to Win+X -> Terminal (Admin) -> paste the following this:
Add-AppxPackage -Register "AppxManifest.xml"
Note: replace with the actual location where you extracted WSA files. For example:
Add-AppxPackage -Register D:WSAAppxManifest.xml
Alternative: Go to the path where all the files are and hold Shift key + Right click and choose Open Powershell window here.
Add-AppxPackage -Register .AppxManifest.xml
- This should install WSA onto Windows 11.
- Launch WSA -> enable developer mode; refresh IP address ; Copy IP Address
- Ensure you have ADB setup o Windows 11.
- If you have downloaded the files step 2, extract it to a location. (Used to sideload Android Apps)
- Enter the folder.
- Hold Shift key + Right click -> Open PowerShell window here.
- Enter the following in the terminal
adb connect
(Replace with IP address you copied earlier) (A more precise tutorial is here)
adb shell
setenforce 0
- You should now be able to sign into the Play Store on WSA
- Launch WSA from start menu.
WSAGAScript is a brand new tool that lets you easily patch the Windows Subsystem for Android to install the Google Play Store. Read on!
Windows Subsystem for Android is finally here. What’s more interesting is that you can unofficially try it right now — even if you’re not enrolled in the Beta channel of Windows 11. In case you’re not happy with the mandatory Amazon Appstore integration, you should be happy to hear that the app sideloading process isn’t difficult either. It is also possible to install a third-party Google Play Store client, but the lack of Google services in the Windows Subsystem for Android makes it a bit hard to use apps that are dependent on them.
Hands-on with Android apps on Windows 11
Unlike traditional Android devices, the Windows Subsystem for Android doesn’t come with a user-accessible recovery environment. As a result, an end-user can’t simply compile a custom recovery like TWRP for the Android Subsystem and straightaway install one of those popular GApps (short for Google Apps) packages. But what if you can directly patch the underlying system image with the necessary suite of Google apps and libraries to get the Play Store working? XDA Senior Member ADeltaX has now come with a solution named WSAGAScript that does exactly so.
How to install Google Play Store on the Windows Subsystem for Android
Step 1: Install Windows Subsystem for Linux
- Open the Windows Features tool by executing the optionalfeatures command from the Run prompt or a Terminal window. You can also click on the Start menu and search for the term «Turn Windows features on or off» to do the same.
- In the new window, place checkmarks for the Virtual Machine Platform and the Windows Subsystem for Linux entries.

You should skip this step if you have already installed Ubuntu on WSL.
Step 2: Preparing Windows Subsystem for Android for patching
- Download the installer package of the Windows Subsystem for Android. You can refer to the first step of this tutorial if you need any help.
- Once you have the MSIXBUNDLE file, extract the architecture-specific installer using 7-Zip.
- If you have a regular x86-64 PC, then extract the file named WsaPackage_x.x.x.x_x64_Release-Nightly.msix .
- If you have a Windows on ARM device, then extract the file named WsaPackage_x.x.x.x_ARM64_Release-Nightly.msix .
Step 3: Patching Windows Subsystem for Android with GApps
- Download a GApps package. The developer recommends the «Pico» variant of OpenGApps.
- If you have a regular x86-64 PC, then opt for the x86_64 platform.
- If you have a Windows on ARM device, then opt for the ARM64 platform.
OpenGApps package selection for x86-64 Windows Subsystem for Android
sudo apt-get update
sudo apt-get install unzip lzip
git clone https://github.com/ADeltaX/WSAGAScript - Remember to adjust the paths in the commands according to where you extracted the MSIX file in the previous step.
Step 4: Installing the GApps-patched Windows Subsystem for Android
Make sure you’ve uninstalled the official Windows Subsystem for Android package before attempting this step. You can easily do so by locating the corresponding shortcut in the Start menu, right-clicking on it, and finally selecting the «Uninstall» option. Keep in mind that the Amazon Appstore will be automatically uninstalled alongside.
-
Open the Settings app and navigate to Privacy and Security => For Developers. Then turn on Developer Mode.
Add-AppxPackage -Register path-to-the-extracted-MSIX-folder>AppxManifest.xml For example, if you originally extracted the contents of the MSIX file to D:WSA and subsequently patched them, then the command should be:
Add-AppxPackage -Register D:WSAAppxManifest.xml -
Optionally, you can sideload a launcher app in the Android Subsystem and access the Play Store icon.
That’s it! You just installed the Google Play Store and a set of necessary Google Services required for running many popular apps in the Windows Subsystem for Android. Now you should be able to install Android apps on your Windows 11 PC right from the Play Store. Let us know which apps you’re planning to install on the Windows Subsystem for Android using the Google Play Store!