Что делать, если после обновления до Windows 10, установки драйверов видеокарты или просто после выключения и повторного включения компьютера в видите черный экран с указателем мыши или без оного.

Если после обновления или установки Windows 10, а также после перезагрузки уже успешно установленной системы вас встречает черный экран с указателем мыши (а возможно, и без него), в статье ниже я расскажу о возможных способах исправить проблему, не прибегая к переустановке системы.
Проблема обычно связана с неправильной работой драйверов видеокарт NVidia и AMD Radeon, однако это не единственная причина. В рамках этой инструкции будет рассматриваться тот случай (наиболее распространенный в последнее время), когда, судя по всем признакам (звуки, работа компьютера), Windows 10 загружается, однако на экране ничего не отображается (кроме, возможно, указателя мыши), также возможен вариант, когда черный экран появляется после сна или гибернации (или после выключения и повторного включения компьютера). Дополнительные варианты этой проблемы в инструкции Не запускается Windows 10. Для начала несколько быстрых способов решения для распространенных ситуаций.
- Если при последнем выключении Windows 10 вы видели сообщение Подождите, не выключайте компьютер (идет установка обновлений), а при включении видите черный экран — просто подождите, иногда так устанавливаются обновления, это может занять вплоть до получаса, особенно на медленных ноутбуках (Еще один признак того, что дело именно в этом — высокая нагрузка на процессор, вызываемая Windows Modules Installer Worker).
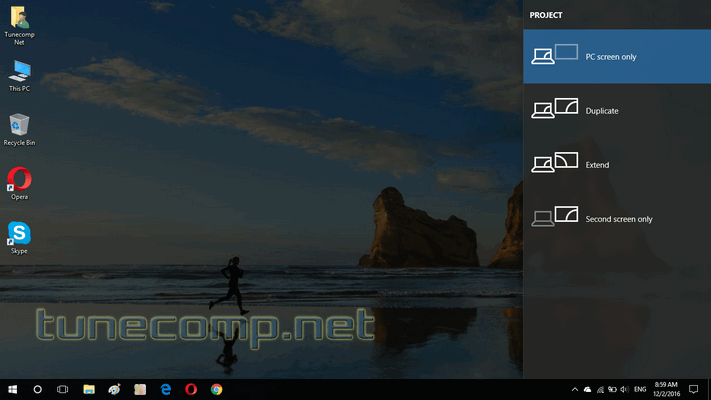
- В некоторых случаях проблема может быть вызвана подключенным вторым монитором. В этом случае попробуйте его отключить, а если это не сработало, то зайти в систему вслепую (описано ниже, в разделе про перезагрузку), после чего нажать клавиши Windows+P (английская), один раз клавишу вниз и Enter.
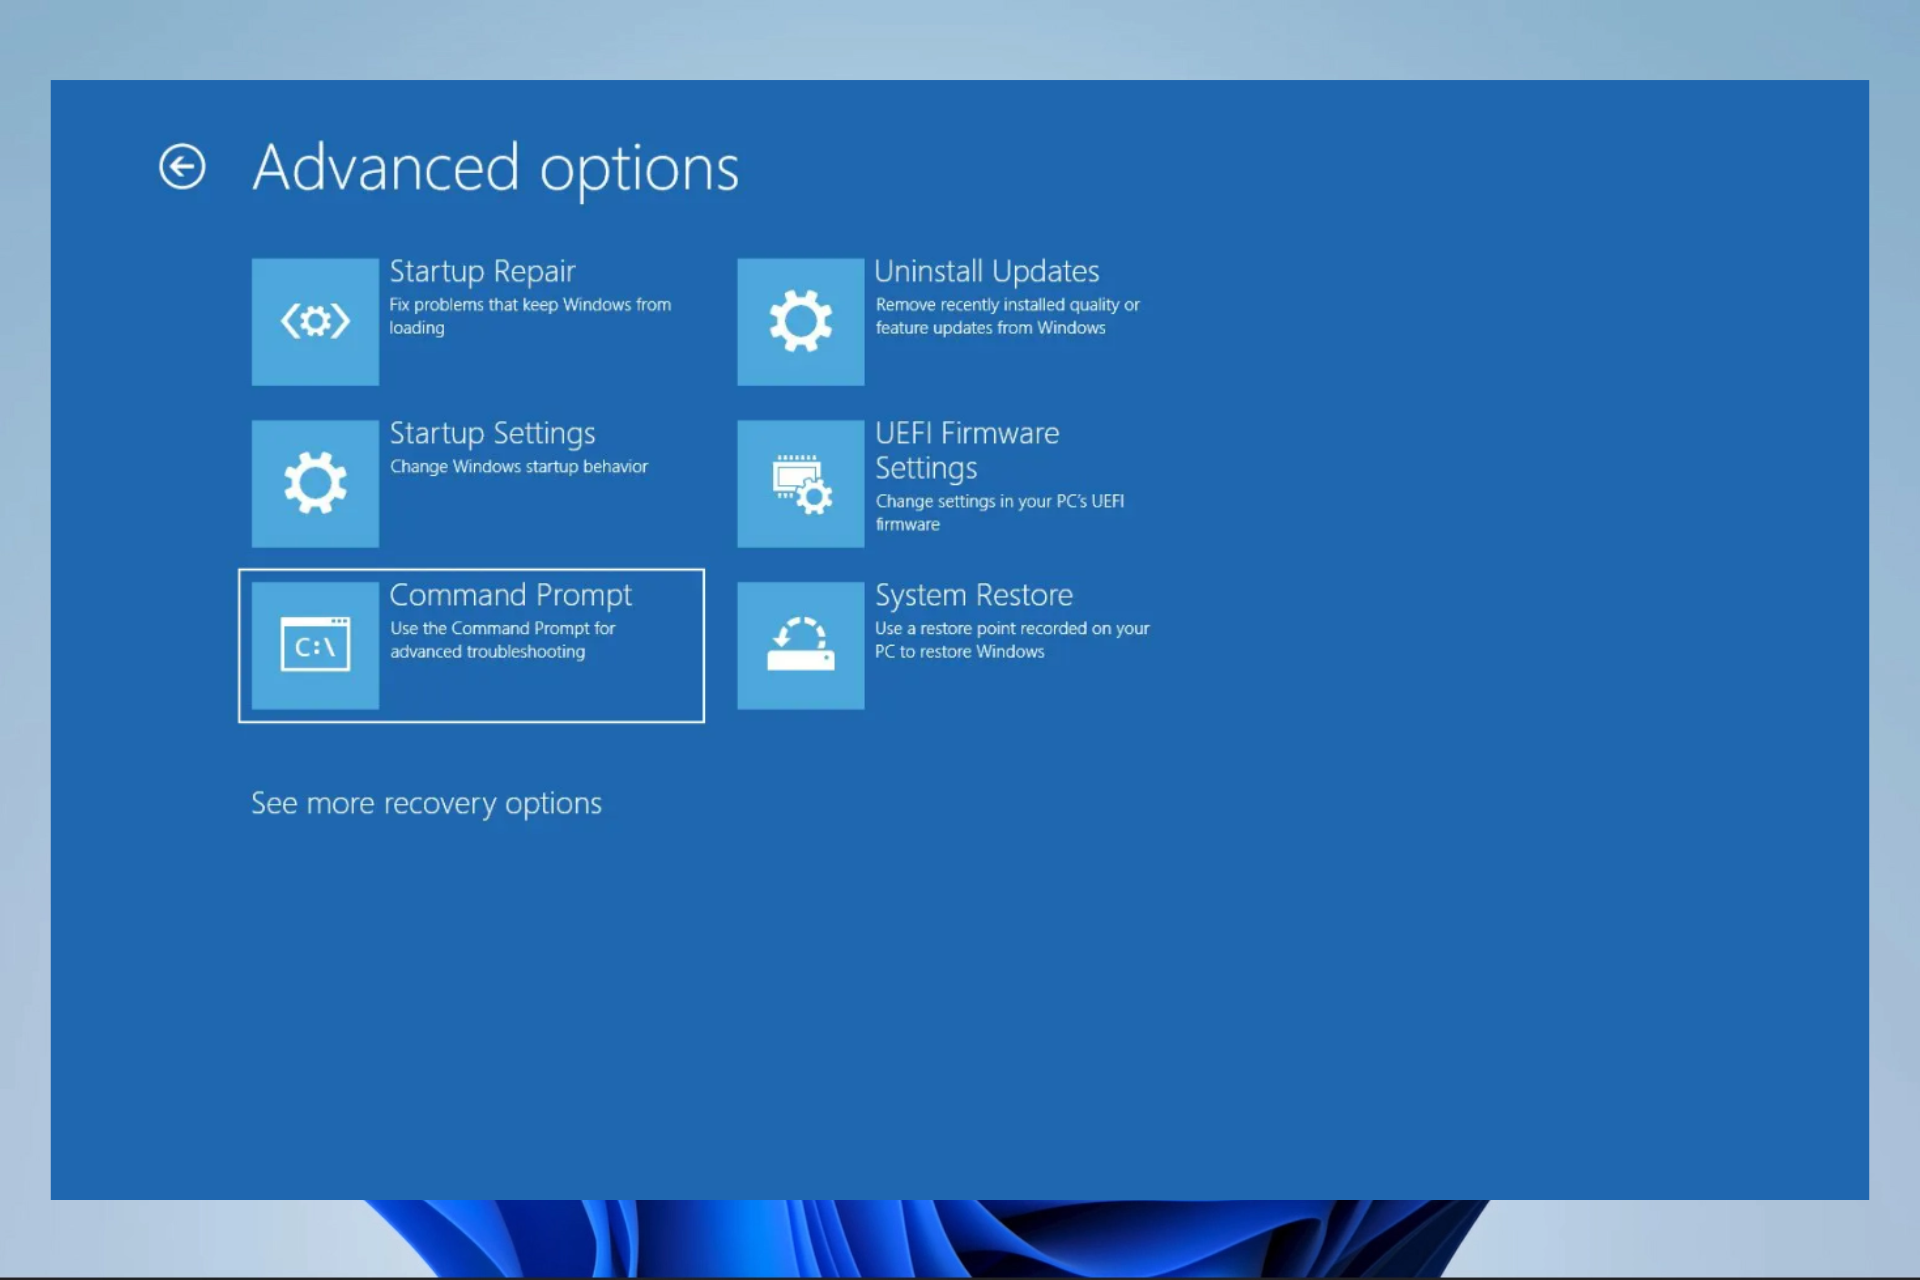
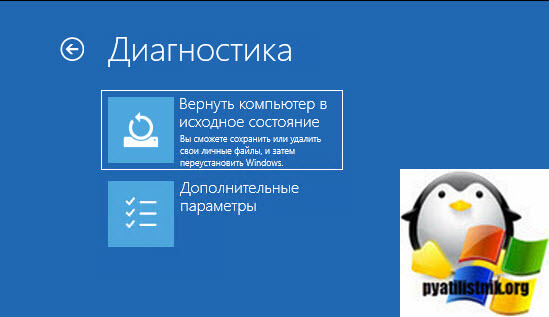
- Если вы видите экран входа, а после входа появляется черный экран, то попробуйте следующий вариант. На экране входа нажмите по кнопке вкл-выкл справа внизу, а затем, удерживая Shift, нажмите «Перезагрузка». В открывшемся меню выберите Диагностика — Дополнительные параметры — Восстановление системы.
Если вы столкнулись с описываемой проблемой после удаления какого-либо вируса с компьютера, а на экране видите указатель мыши, то вам с большей вероятностью поможет следующее руководство: Не загружается рабочий стол — что делать. Есть еще один вариант: если проблема появилась после изменения структуры разделов на жестком диске или после повреждений HDD, то черный экран сразу после логотипа загрузки, без всяких звуков может быть признаком недоступности тома с системой. Подробнее: Ошибка Inaccessible_boot_device в Windows 10 (см. раздел про изменившуюся структуру разделов, несмотря на то, что текст ошибки у вас не показывается, это может быть ваш случай).
Перезагрузка Windows 10
Один из работающих способов исправить проблему с черным экраном после повторного включения Windows 10, судя по всему, вполне работоспособный для владельцев видеокарт AMD (ATI) Radeon — полностью перезагрузить компьютер, после чего отключить быстрый запуск Windows 10.
Для того, чтобы сделать это вслепую (будет описано два способа), после загрузки компьютера с черным экраном несколько раз нажмите на клавишу Backspace (стрелка влево для удаления символа) — это уберет заставку экрана блокировки и удалит любые символы из поля ввода пароля, если вы их туда случайно ввели.
После этого, переключите раскладку клавиатуры (если требуется, по умолчанию в Windows 10 обычно русский, переключить почти гарантированно можно клавишами Windows + Пробел) и введите свой пароль учетной записи. Нажмите Enter и подождите, пока система загрузится.
Следующий шаг — перезагрузка компьютера. Для этого, нажмите на клавиатуре клавиши Windows (клавиша с эмблемой) + R, подождите 5-10 секунд, введите (опять же, может потребоваться переключить раскладку клавиатуры, если по умолчанию в системе у вас русский): shutdown /r и нажмите Enter. Через несколько секунд еще раз нажмите Enter и подождите около минуты, компьютер должен будет перезагрузиться — вполне возможно, в этот раз вы увидите изображение на экране.
Второй способ перезагрузки Windows 10 при черном экране — после включения компьютера несколько раз нажать клавишу Backspace (а можно пробел или любой символ), затем — пять раз нажать клавишу Tab (это переведет нас к иконке включения-выключения на экране блокировки), нажать Enter, затем — клавишу «Вверх» и еще раз Enter. После этого компьютер перезагрузится.
Если ни один из этих вариантов не позволяет перезагрузить компьютер, вы можете попробовать (потенциально опасно) принудительное выключение компьютера долгим удерживанием кнопки питания. А затем снова включить его.
Если в результате вышеописанного изображение на экране появилось, значит дело именно в работе драйверов видеокарты после быстрого запуска (который по умолчанию используется в Windows 10) и для исключения повторения ошибки.
Отключение быстрого запуска Windows 10:
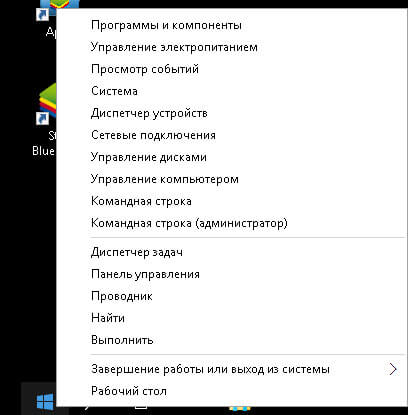
- Кликните правой кнопкой мыши по кнопке Пуск, выберите Панель управления, а в ней — Электропитание.
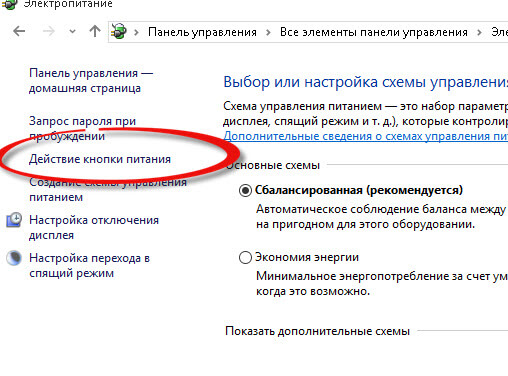
- Слева выберите «Действия кнопок питания».
- Вверху нажмите «Изменение параметров, которые сейчас недоступны».
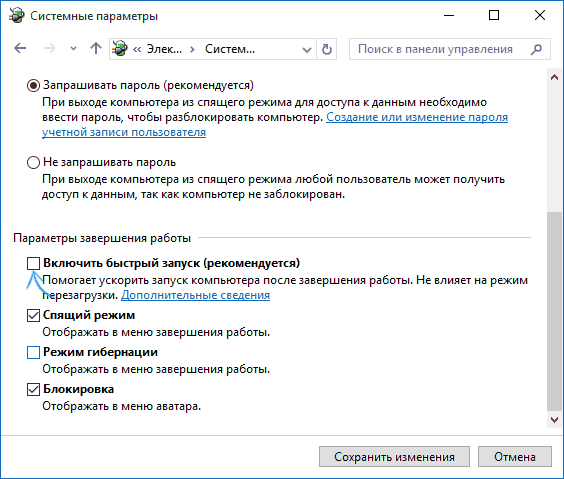
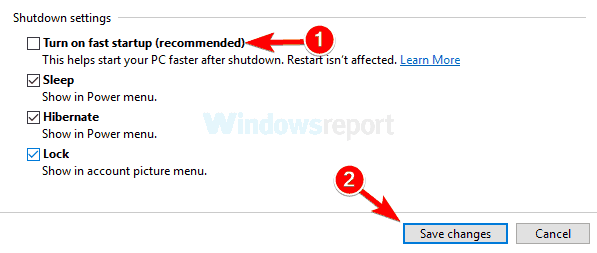
- Пролистайте окно вниз и снимите отметку с пункта «Включить быстрый запуск».
Сохраните сделанные изменения. Проблема в дальнейшем повториться не должна.
Использование интегрированного видео
Если у вас имеется выход для подключения монитора не от дискретной видеокарты, а на материнской плате, попробуйте выключить компьютер, подключить монитор к данному выходу и снова включить компьютер.
Есть немалая вероятность (если интегрированный адаптер не отключен в UEFI), что после включения, вы увидите изображение на экране и сможете выполнить откат драйверов дискретной видеокарты (через диспетчер устройств), установить новые или же использовать восстановление системы.
Удаление и переустановка драйверов видеокарты
Если предыдущий способ не сработал, следует попробовать удалить драйвера видеокарты из Windows 10. Сделать это можно в безопасном режиме или в режиме с низким разрешением экрана, а о том, как в него попасть, видя только черный экран, я сейчас расскажу (два способа для разных ситуаций).
Первый вариант. На экране входа (черном) несколько раз нажмите Backspace, затем — 5 раз Tab, нажмите Enter, потом — один раз вверх и, удерживая Shift, снова Enter. Подождите около минуты (загрузится меню диагностики, восстановления, отката системы, которое вы, вероятно, тоже не увидите).
- Три раза вниз – Enter — два раза вниз — Enter – два раза влево.
- Для компьютеров с BIOS и MBR — один раз вниз, Enter. Для компьютеров с UEFI — два раза вниз – Enter. Если вы не знаете, какой у вас вариант — нажмите «вниз» один раз, а если попадете в настройки UEFI (BIOS), то используйте вариант с двумя нажатиями.
- Еще раз нажмите Enter.
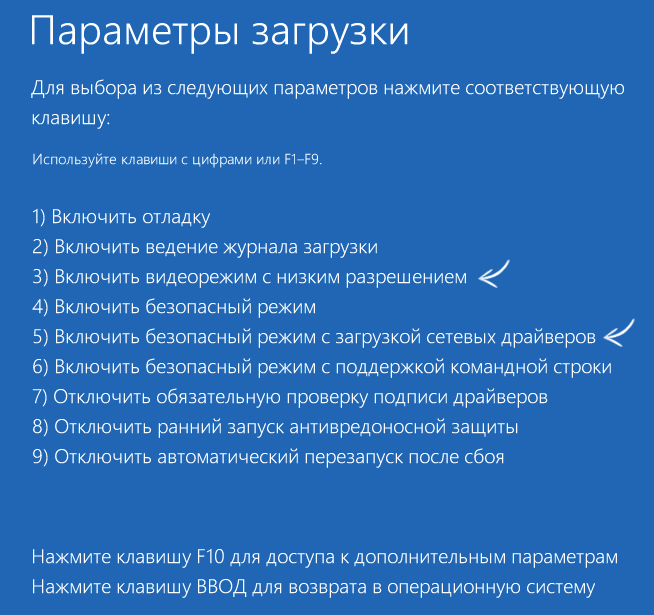
Компьютер перезагрузится и покажет вам особые варианты загрузки. Используя числовые клавиши 3 (F3) или 5 (F5) для того, чтобы запустить режим с низким разрешением экрана или безопасный режим с поддержкой сети. Загрузившись, вы можете либо попробовать запустить восстановление системы в панели управления, либо удалить имеющиеся драйвера видеокарты, после чего, перезапустив Windows 10 в обычном режиме (изображение должно появиться), установить их заново. (см. Установка драйверов NVidia для Windows 10 — для AMD Radeon шаги будут почти теми же самыми)
Если такой способ загрузить компьютер по какой-то причине не срабатывает, можно попробовать следующий вариант:
- Зайти в Windows 10 с паролем (так как это описывалось в начале инструкции).
- Нажать клавиши Win+X.
- 8 раз нажать вверх, а затем — Enter (откроется командная строка от имени администратора).
В командной строке введите (должна быть английская раскладка): bcdedit /set safeboot network и нажмите Enter. После этого введите shutdown /r нажмите Enter, через 10-20 секунд (или после звукового оповещения)— еще раз Enter и подождите, пока компьютер не перезагрузится: он должен загрузиться в безопасном режиме, где можно будет удалить текущие драйвера видеокарты или запустить восстановление системы. (Для того, чтобы в дальнейшем вернуть обычную загрузку, в командной строке от имени администратора используйте команду bcdedit /deletevalue safeboot )
Дополнительно: если у вас имеется загрузочная флешка с Windows 10 или диск восстановления, то вы можете воспользоваться ими: Восстановление Windows 10 (можно попробовать использовать точки восстановления, в крайнем случае — сброс системы).
Если проблема сохраняется и разобраться не получается, пишите (с подробностями о том, что, как и после каких действий произошло и происходит), правда не обещаю, что смогу дать решение.
We’ll look at some things that can cause a black or blank screen:
- Connection problems with your monitor or screen
- Display adapter driver update issues
- Issues with recent system updates or installations
Let’s go through some troubleshooting steps and check your hardware and software. The steps on this page might look complicated at first, but follow them in order, step by step, and we’ll try to get you back on track. You’ll use safe mode for many of the steps because that will start Windows with a limited set of files and drivers to help you narrow down the problems. You can learn more about safe mode, or keep reading and we’ll provide details when you need them.
Need more help?
Windows 10 is booting to a black screen – I think every 5 people have already encountered such an issue at least once. The problem can manifest itself in different ways: it can be just a black screen or black screen with a mouse cursor; you can face it before login as well as after you sign in to your user account; you may face it after installing updates or spontaneously etc.
As you understand, Windows 10 can show you a black screen due to various reasons. Respectively there is no universal solution to resolve the problem and recover your system to a working state.
On this page you will find 8 solutions and some extra info that hopefully will help you to fix the issue of a Windows 10 PC booting to a black screen.
Before you make an attempt to fix a black screen – wait!
If you know that the last time you saw your PC working normally it was rebooting with the message like “Working on updates” or “Do not power off or unplug your machine”, and now you face a black screen right after the reboot – wait! Leave your machine alone for a half an hour – your Windows 10 may be finishing to install its updates. You may be quite surprised when you see Windows 10 have coupled with updates and loaded the desktop after a few minutes. If no success – continue reading about our solutions.
Solution 1: Win+P
Win+P combination serves for switching the display modes. And in some cases due to a glitch the video signal may be switched to another (often non-existent) display. So, when you booted to a black screen:
- Wait for two minutes
- Then press Win+P consequently for several times to check it out:
Solution 2: Blind login
As we mentioned above a bug in the graphics driver can cause creation of a virtual monitor while your real monitor is assigned to the secondary display. Users often encounter the issue of a black screen with cursor right after the upgrade to Windows 10. Try the blind login method:
- Wait for 5 minutes until the mouse cursor appears.
- Hit the Space-bar.
- Enter your login password or pin (in blind mode).
- If the desktop does not appear in 1 minute then press Win+P keys, down arrow keys twice, and enter to extend display.
Solution 3: Try switching to integrated video
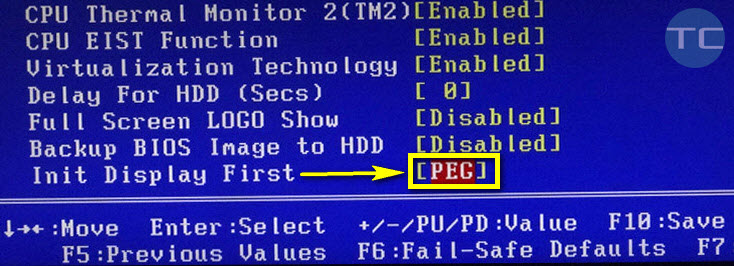
Unplug your HDMI, DVI or VGA from your external graphics card and plug in to your motherboard. Reboot your machine. If you see your desktop after th reboot, try to select external graphics card to be initialised first in UEFI/BIOS:
Solution 4: Try to fix drivers issues
First, visit the official website of your graphics card and search for a new version of the driver. Be attentive and search for the driver compatible with your current version of Windows 10.
For this purpose you may use another PC or just boot to Safe mode with networking. By the way, if you have working display in Safe Mode it means that you most likely have issues with drivers.
- try to install on older version of the graphics driver;
- try to uninstal video driver and search for driver update in the Microsoft Update. To do so head to Device Manager, right-lick your graphics card and select Update Driver Software.
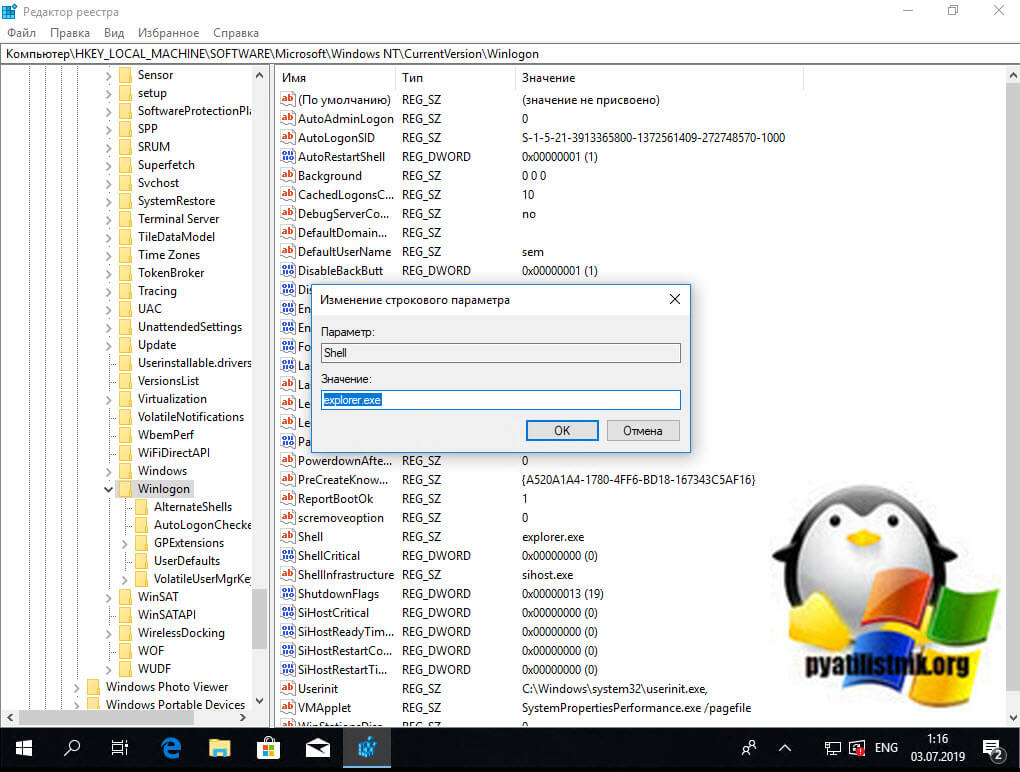
Solution 5. Fix the ‘shell’ parameter in the registry
In most cases the shell value is altered by malware. So try to do the following:
- Run the registry editor (Win+R, regedit, Enter).
- Head to HKEY_LOCAL_MACHINESOFTWAREMicrosoftWindows NTCurrentVersionWinlogon
- Ensure the Shell value contains explorer.exe :

Solution 6. Restore your system to the restore point
If your Windows 10 is still booting to a black screen you can create Windows 10 bootable media, boot from it and try to recover your operating system using the system restore. Read our full guide on how to restore Windows to a previously created restore point.
Solution 7. Resolve hardware issue to fix black screen on boot in Windows 10
Windows 10 can also boot to a black screen because of some hardware problems. So we advise you to:
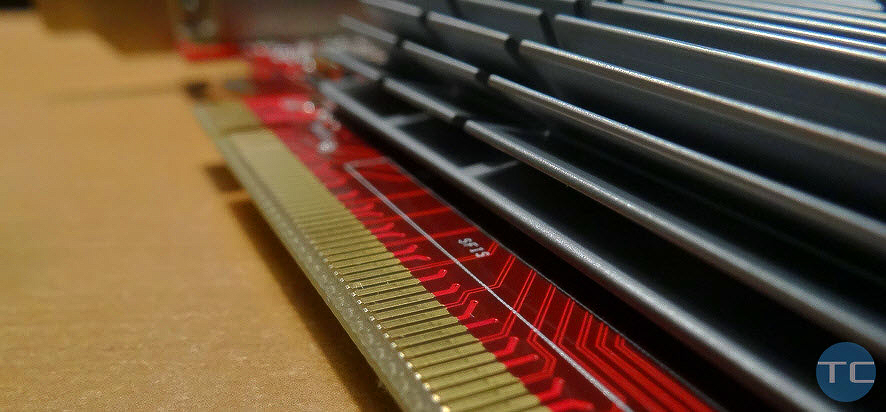
- Clean the contact plates on your graphics card:
 Clean the contacts of your graphics card
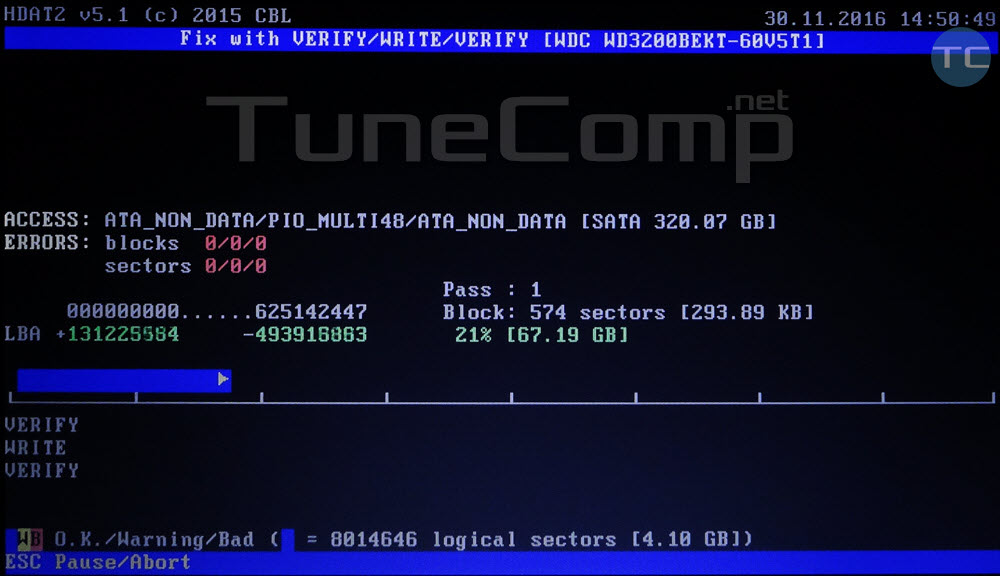
 - Check your HDD for bad sectors using HDAT2 or MHDD:
 HDAT2: scan for bad sectors
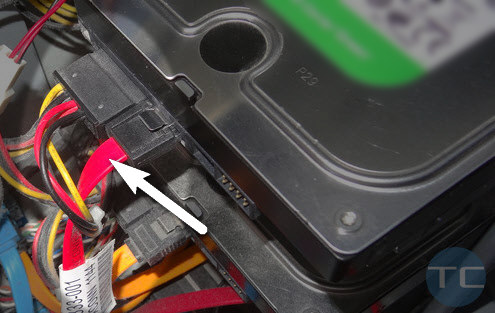
 - Replace SATA cable.

- Replace the CMOS battery.
Solution 8. The last hope: reset Windows 10
If you have tried all solutions but your Windows 10 is still booting to a black screen with cursor the best solution is to reset Windows 10. This is also recommended if you encountered the issue on boot right after you removed malware. So, download all the latest drivers and store them on a flash disk or on a non-system disk. Then, read our step-by-step guide on how to reset Windows 10 when it doesn’t boot.
Boot from Windows 10 bootable flash and reset Windows 10
Some workarounds if your Windows 10 Boots to a black screen
If you have done everything except Windows reset but your Windows 10 still shows you a black screen on boot stubbornly you can use the following temporary solutions. They may help you to boot your WIndows 10 and apply the solutions described above – for instance, scan your PC for malware, fix the shell options in the registry, replace drivers, use the system restore without booting from recovery media, etc.
Disable Fast Startup
If you success to load the desktop using one of the mentioned methods:
- Go to Power Options by pressing Win+X:

- Click on Choose what the power buttons do:

- Click Change settings that are currently unavailable:

- Unset the checkbox Turn on fast startup (recommended):
- Click Save changes.


Launch explorer.exe manually if you see a black screen with cursor
If you face a black screen with a cursor for a few minutes but the desktop does not load try the following workaround:
If you know other working solutions that helped you to fix the black screen on boot in Windows 10 tell us in the comments.
Booting in safe mode may be an option
by Madalina Dinita
Madalina has been a Windows fan ever since she got her hands on her first Windows XP computer. She is interested in all things technology, especially emerging technologies… read more
Published on September 8, 2022
Reviewed by
Vlad Turiceanu
Passionate about technology, Windows, and everything that has a power button, he spent most of his time developing new skills and learning more about the tech world. Coming… read more
- The Windows 10 black screen after login usually occurs after upgrading your OS.
- The solutions for fixing the black screen after login starts with installing dedicated repair software.
- If the computer screen goes black after login, you can also try to log in without seeing what you type.
- Another solution is to tweak some start-up options in Windows 10.
X INSTALL BY CLICKING THE DOWNLOAD FILE
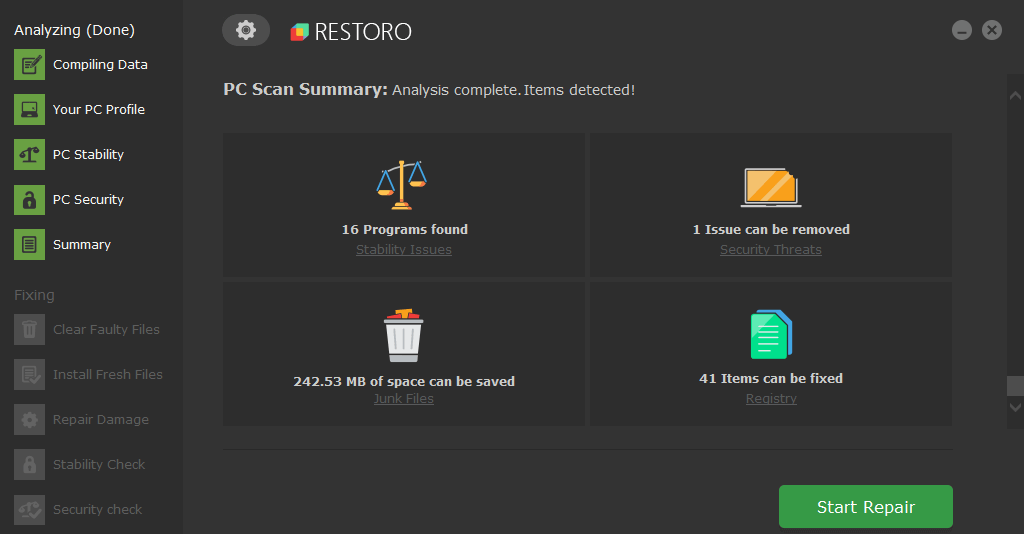
To fix various PC problems, we recommend Restoro PC Repair Tool:
This software will repair common computer errors, protect you from file loss, malware, hardware failure and optimize your PC for maximum performance. Fix PC issues and remove viruses now in 3 easy steps:
- Download Restoro PC Repair Tool that comes with Patented Technologies (patent available here) .
- Click Start Scan to find Windows issues that could be causing PC problems.
- Click Repair All to fix issues affecting your computer’s security and performance
- Restoro has been downloaded by 0 readers this month.
You have found this guide because you are experiencing the Windows 10 or 11 black screen after login in. We will show you how to fix it.
A free upgrade for your Windows is quite possibly the best thing that Microsoft could give you – and that is exactly what they did with Windows 10 and 11.
However, the free upgrade did not go smoothly for every. As you would expect, Microsoft software does not always work as intended for all the thousands of different hardware combinations.
Today we attempt to fix one such problem, which might have been caused by the massive diversity of hardware components Windows operates.
Why is my screen black after I log in?
You upgraded your Windows 10, and it worked brilliantly – until you restarted and hit the login screen.
All you can see is a black screen with your cursor, there are multiple causes for this problem, but the most common reason involves you having an Intel on-chip GPU and a standalone AMD/Nvidia GPU combination. Such combinations are usually found in laptops due to their battery-saving advantages.
In other cases, it is a problem with your Windows OS preventing your desktop and icons from loading if you get a black screen after logging in. Typically, it’s a program that starts up automatically.
Additionally, it’s possible that the crucial procedures required to load the computer’s display are not loaded properly at startup.
Furthermore, it may occur if your computer is short on storage space or malware has compromised the firmware.
Here are a few variations to this error:
- Windows 10 black screen after login no desktop show up – In this case, you will not be able to view your desktop after logging in. you should drain the battery and restart the computer.
- Computer screen goes black but computer still running – If it does not come up after a few minutes, press the power key for about 10 seconds, then restart the computer.
- Windows 10 black screen for 5 minutes after login – You may wait it out in this case. Then try and update all your drivers as soon as the screen turns on.
- Windows 10 black screen with cursor after login – In case of this issue, try restarting the computer after disconnecting all non-critical peripherals and try disabling the startup apps.
- Windows 10 black screen before login – When getting a black screen before login, booting into Safe Mode will allow you to fix things.
Let us now show you some of the best resolutions.
How do I fix a black screen on Windows 10 after login?
1. Use a third-party repair solution
Black screen errors are less common and dangerous than blue screen errors but have similar behavior and manifestation.
You can treat and troubleshoot them with the same tools and procedures. That is why you can use the following solution, even though it’s meant for fixing Blue screen issues.
Restoro is powered by an online database that features the latest functional system files for Windows 10 PCs, allowing you to easily replace any elements that can cause a BSoD error.
This software can also help you by creating a restore point before starting the repairs, enabling you to easily restore the previous version of your system if something goes wrong.
This is how you can fix registry errors using Restoro:
- Download and install Restoro.
- Launch the application.
- Wait for the software to identify stability issues and possible corrupted files.
- Press Start Repair.
- Restart your PC for all the changes to take effect.
As soon as the fixing process is completed, your PC should work without problems, and you will not have to worry about BSoD errors or slow response times ever again.
⇒ Get Restoro
Disclaimer: This program needs to be upgraded from the free version in order to perform some specific actions.
2. Try to log in blindly
- When you are on the black screen, wait for your mouse cursor to appear.
- Once you have the cursor, press Control on your keyboard – this will put the focus on the login password field.
- Now type your password. You can’t see it, but you must do it anyway.
- Once typed, hit Enter , and voila, you are logged into Windows.
- If your desktop does not appear after 30 seconds, try pressing Windows Key + P , press the Down Arrow key twice, and hit Enter .
After that, you should be logged in to Windows, and your screen should appear.
3. Disable Fast Boot on your PC
3.1 Enter Safe Mode
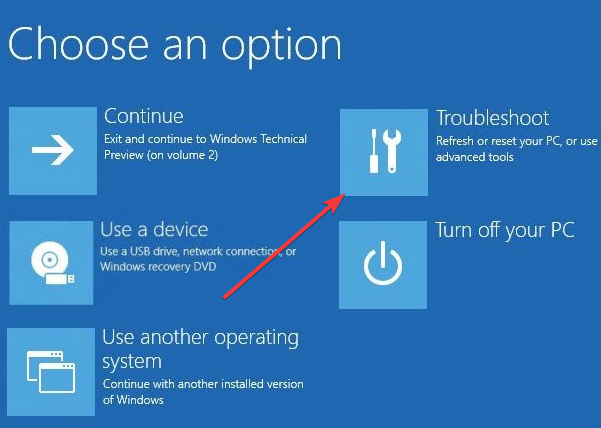
- Restart your PC several times during the boot sequence.
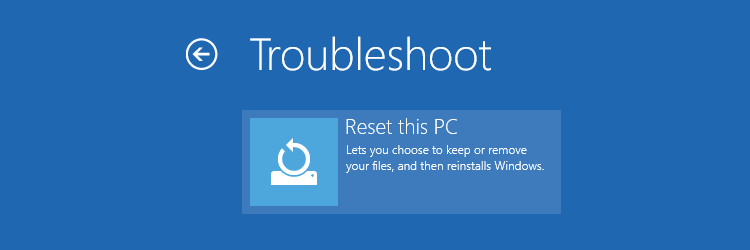
- Now choose Troubleshoot.

- Select Advanced options, click on Startup Settings, and click Restart.
- Once your PC restarts, you’ll be presented with options. Select any version of Safe Mode by pressing the appropriate key.

3.2 Disable Fast Boot
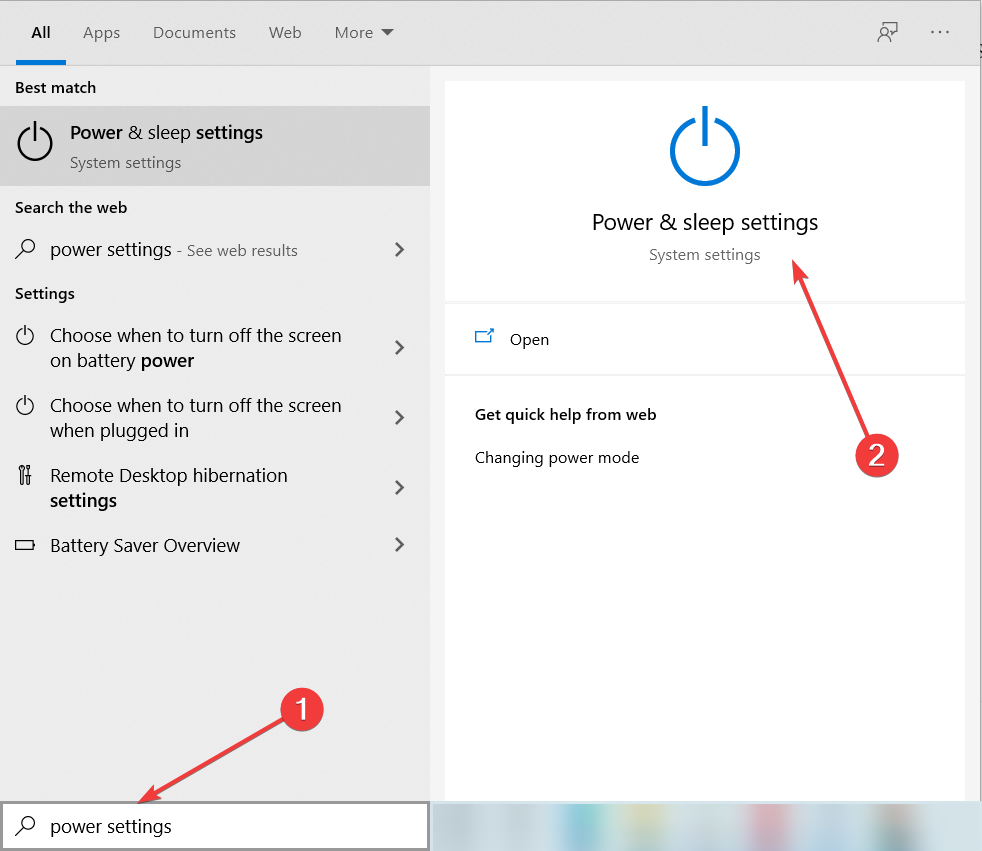
- Press Windows Key + S and type power settings.
- Now select Power & sleep settings from the list.
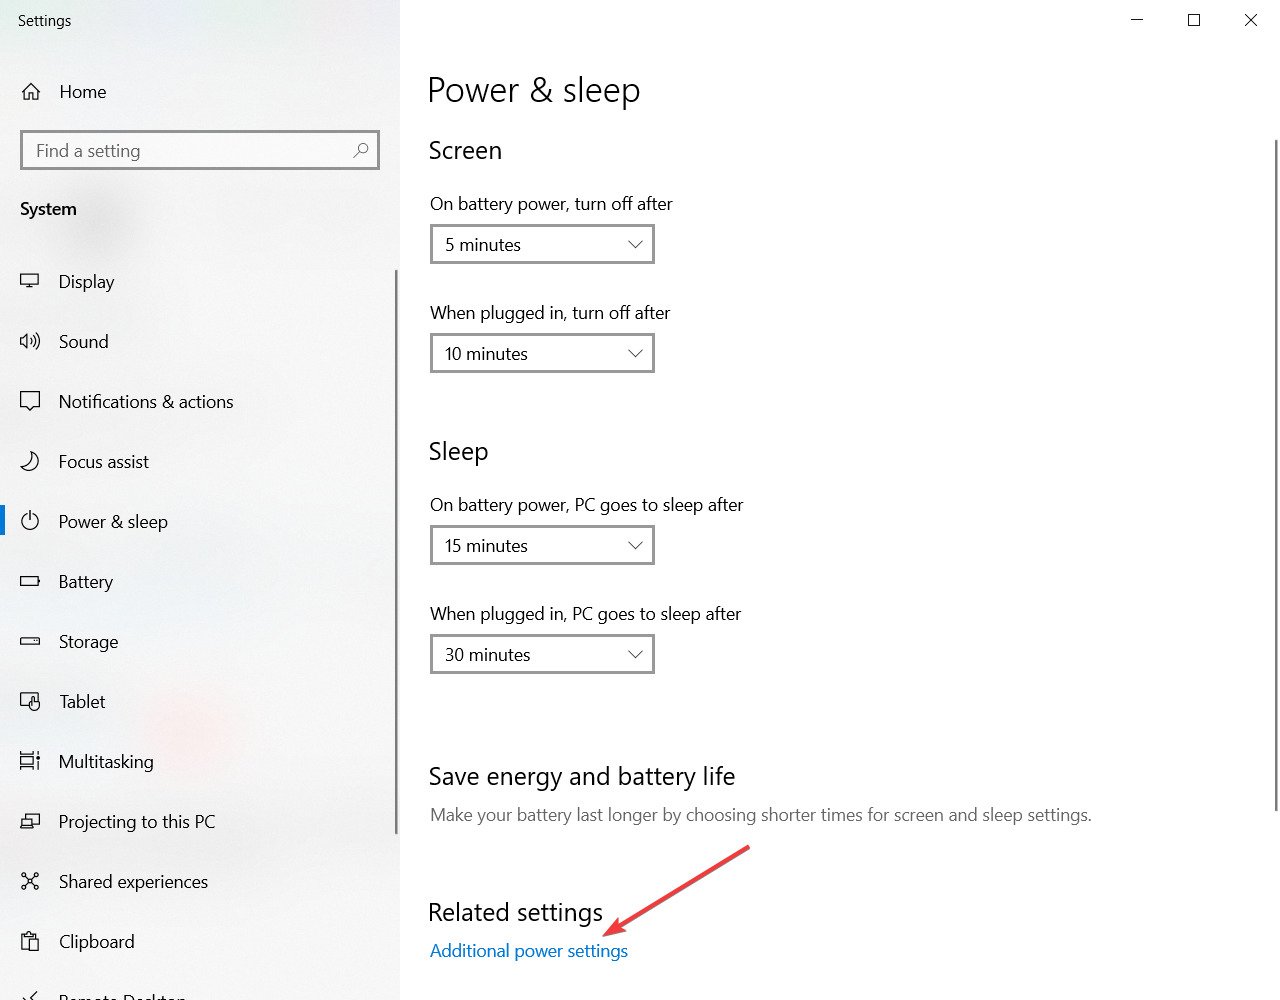
- Scroll down to the Related settings section and click Additional power settings.
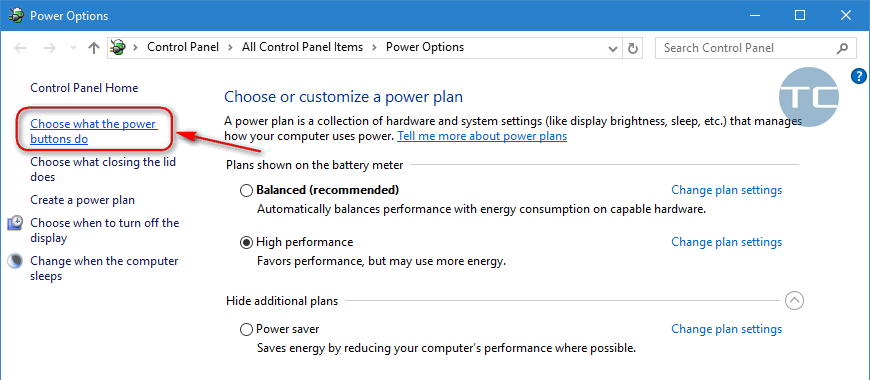
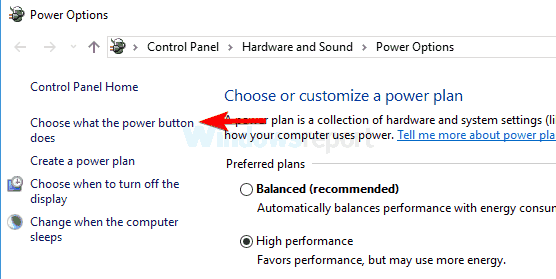
- When the Power Options window appears, click Choose what the power button does option from the left pane.

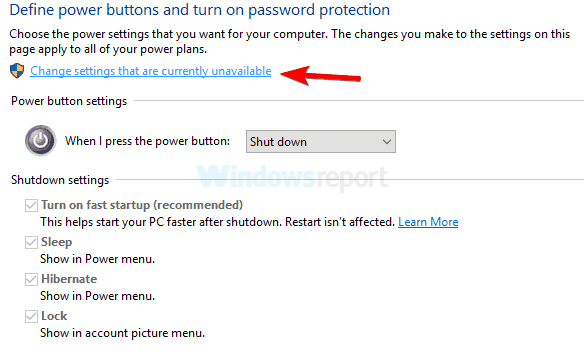
- Now click Change settings that are currently unavailable.

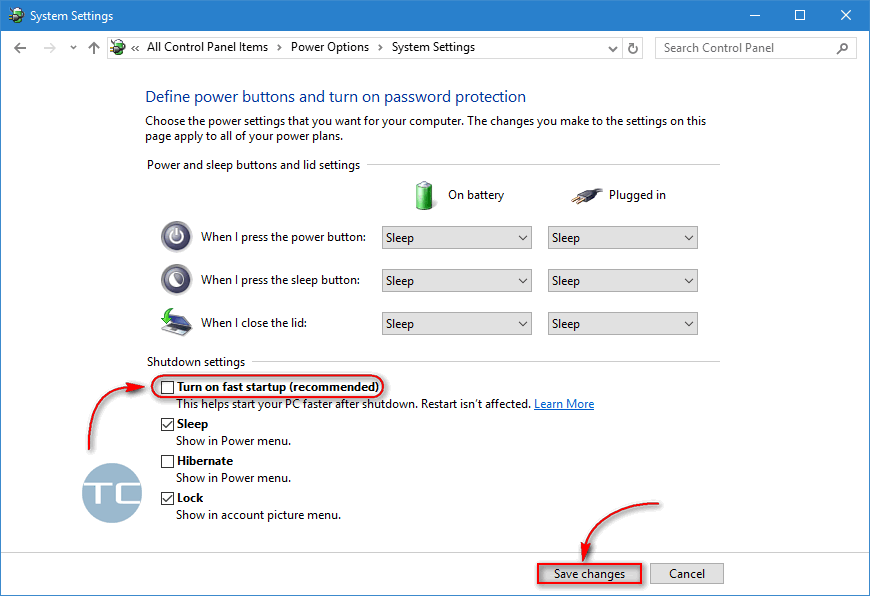
- Uncheck Turn on fast startup (recommended) option and click Save changes.

After disabling this feature, restart your PC and check if the problem is still there. Remember that disabling Fast Startup might cause your PC to boot slightly slower, but at least the issue should be resolved.
The issue might be the Fast Boot feature if you get a black screen after sign-in on Windows 10. This is a valuable feature since it will allow you to start your PC faster, but sometimes this feature can cause problems.
To fix the issue, you need to disable Fast Startup. However, since you can’t access Windows, you’ll have to do that from Safe Mode.
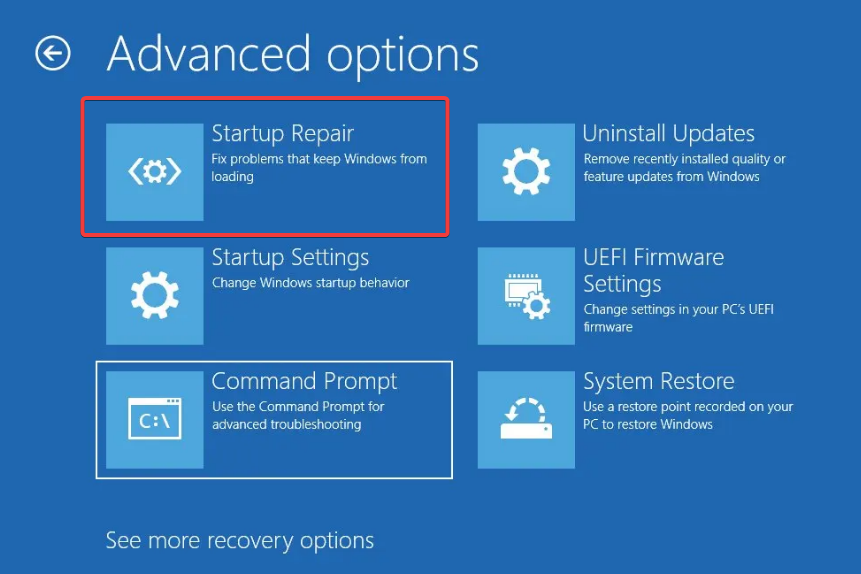
4. Try your hand at Startup Repair
- Restart your PC a couple of times during the boot sequence.
- Go to Troubleshoot, select Advanced options and click on Startup Repair.
- Follow the instructions on the screen to complete the process.
Once the process is finished, the problem should be resolved.
Some PC issues are hard to tackle, especially when it comes to corrupted repositories or missing Windows files. If you are having troubles fixing an error, your system may be partially broken.
We recommend installing Restoro, a tool that will scan your machine and identify what the fault is.
Click here to download and start repairing.
If you’re stuck on a black screen after sign-in in, you might be able to solve the problem simply by performing a Startup Repair, so follow the steps above.
5. Disable App Readiness service
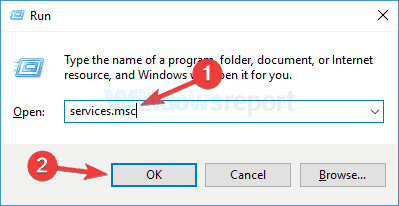
- Press Windows Key + R , and enter services.msc, then press Enter , or click OK.

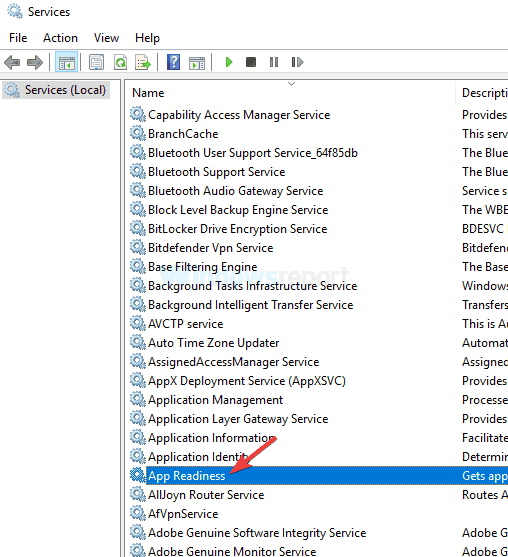
- Locate the App Readiness service on the list and double-click it to open its properties.

- Set Startup type to Disabled and click Apply and OK to save the changes.

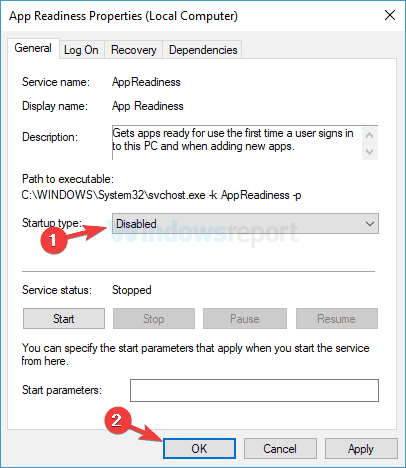
After disabling this service, restart your PC and check if the problem is still there. Remember that this is just a workaround, so you’ll probably have to enable this service someday.
As you know, Windows uses various services to work correctly, but sometimes certain services can cause a black screen after sign-in.
Usually, the App Readiness service is the culprit, and to fix the problem, you need to disable it.
6. Remove your laptop battery (if possible)
- Disconnect your laptop from the adapter and remove the battery. Check the laptop manual if you don’t know how to remove the battery.
- Once the battery is removed, hold down the power button for 30-60 seconds, or even more.
- Now put the battery back in your laptop and start it again.
Several users reported a black screen after signing in on their laptops, but you can quickly fix this annoying issue. According to users, you must remove your laptop battery and drain the remaining power.
This is a relatively simple procedure, and several users claim it works, so try it out. But, of course, this is only if your laptop has a removable battery.
7. Remove the problematic update
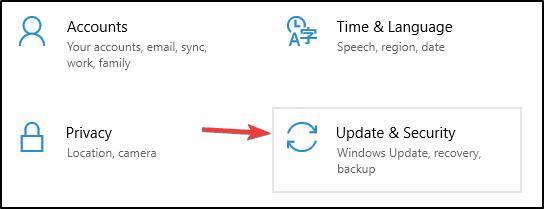
- Use Windows Key + I shortcut to open the Settings app.
- Go to the Update & Security section.
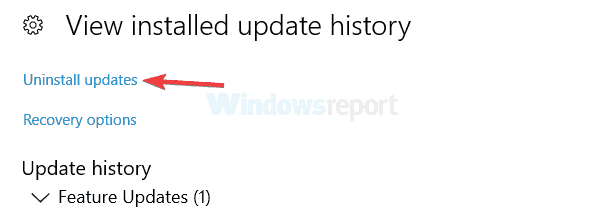
- Now select View update history.
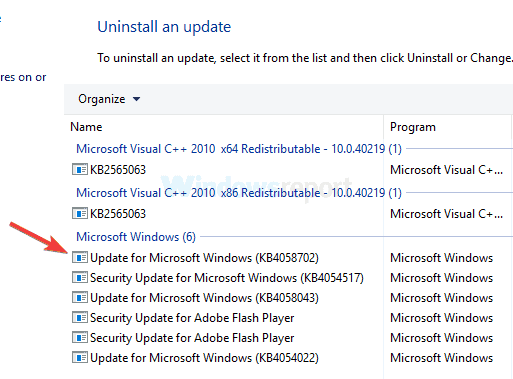
- A list of recent updates will appear. Memorize a couple of recent updates and click Uninstall updates.

- Double-click the update you want to uninstall and follow the instructions on the screen to complete the process.

After you remove the problematic update, check if the problem is still there.
If this issue started after a Windows Update, the update is likely causing a black screen after sign-in.
To fix this issue, you must go to Safe Mode and remove the problematic update.
Keep in mind that Windows tends to install the missing updates automatically, so if the update was the problem, be sure to block Windows from installing the automatic updates.
Read more about this topic
- WHEA Internal Error: Fix it Using These 9 Quick Methods
- Windows Update Error 80200053: 4 Quick Fixes
- Your Computer Could Not Connect to Another Console Session [Fixed]
- Video Dxgkrnl Fatal Error: What Is It & How to Fix It [9 Tips]
How can I fix Windows 11 black screen after login?
We recommend starting in safe mode and trying a Startup repair. However, most of the solutions that work in Windows 10 will fix a Windows 11 black screen after the login issue.
The UI may differ slightly in a few cases, but generally, it should be about the same process. So pick what solution you prefer from those mentioned above and try on Windows 11.
How do I fix a black screen on startup?
Remove your laptop battery following the steps in solution six above.
Alternatively, you should shut down your computer and unplug any external devices. This applies to your mouse, keyboard, external hard drive, and other devices. Check if you still receive the black screen after restarting your computer. If not, try plugging every device individually until you identify the issue.
Also, note that before exploring anything complicated, you should verify that the monitor is responsive since you may not have powered it on in the first place.
Finally, if you have a PC, ensure the monitor cables are connected since this could easily be overlooked while powering up your computer.
Sometimes, your monitor may be damaged, and you will need a new monitor.
The black screen can be a big problem on your PC since it will prevent you from accessing Windows. However, we hope that you managed to solve this issue by using one of our solutions.
In the comments section below, let us know what worked for you (not necessarily from our list).
![]()
Newsletter
Windows 10 black screen
(Image credit: Future)
On Windows 10, a black screen is one of the most challenging problems because it won’t give an error code or message you can use to determine the root of the cause to fix it quickly.
Although a black screen could appear due to many problems, it’s usually related to a graphics driver or compatibility issues with a new feature update. It could also happen when the computer installs a buggy update. Or it could end up being a hardware-related problem with the video adapter, display, or physical connection.
Whatever the reason, Windows 10 provides several ways to check and solve this problem, whether you have access to the desktop or the system doesn’t start correctly.
This guide will walk you through the instructions to troubleshoot and fix black screen problems on Windows 10.
Checking connection problems
When a black screen appears, there are many things to consider, including issues with hardware or software. These instructions outline the steps to troubleshoot and resolve the most common problems on Windows 10.
Check connection issues
If the problem occurs before signing into Windows 10, it’s likely a problem with the connection between the computer and the display.
You can resolve this issue by double-checking the physical connection, ensuring that both ends of the video signal cable are correctly connected in the correct in and out ports. Disconnecting and reconnecting the video cable and shaking the mouse can also help wake up the display.
While it might be evident for many people, recheck the monitor to ensure it’s receiving power. (You may need to check your manufacturer support website for more specific details.)
If the video card has multiple outputs, try to use a different port, shake the mouse, or press any key on the keyboard to wake up the monitor. Although this rarely happens, a driver update could sometimes change the video signal to a different port (DisplayPort, HDMI, DVI, Thunderbolt, VGA) in the adapter.
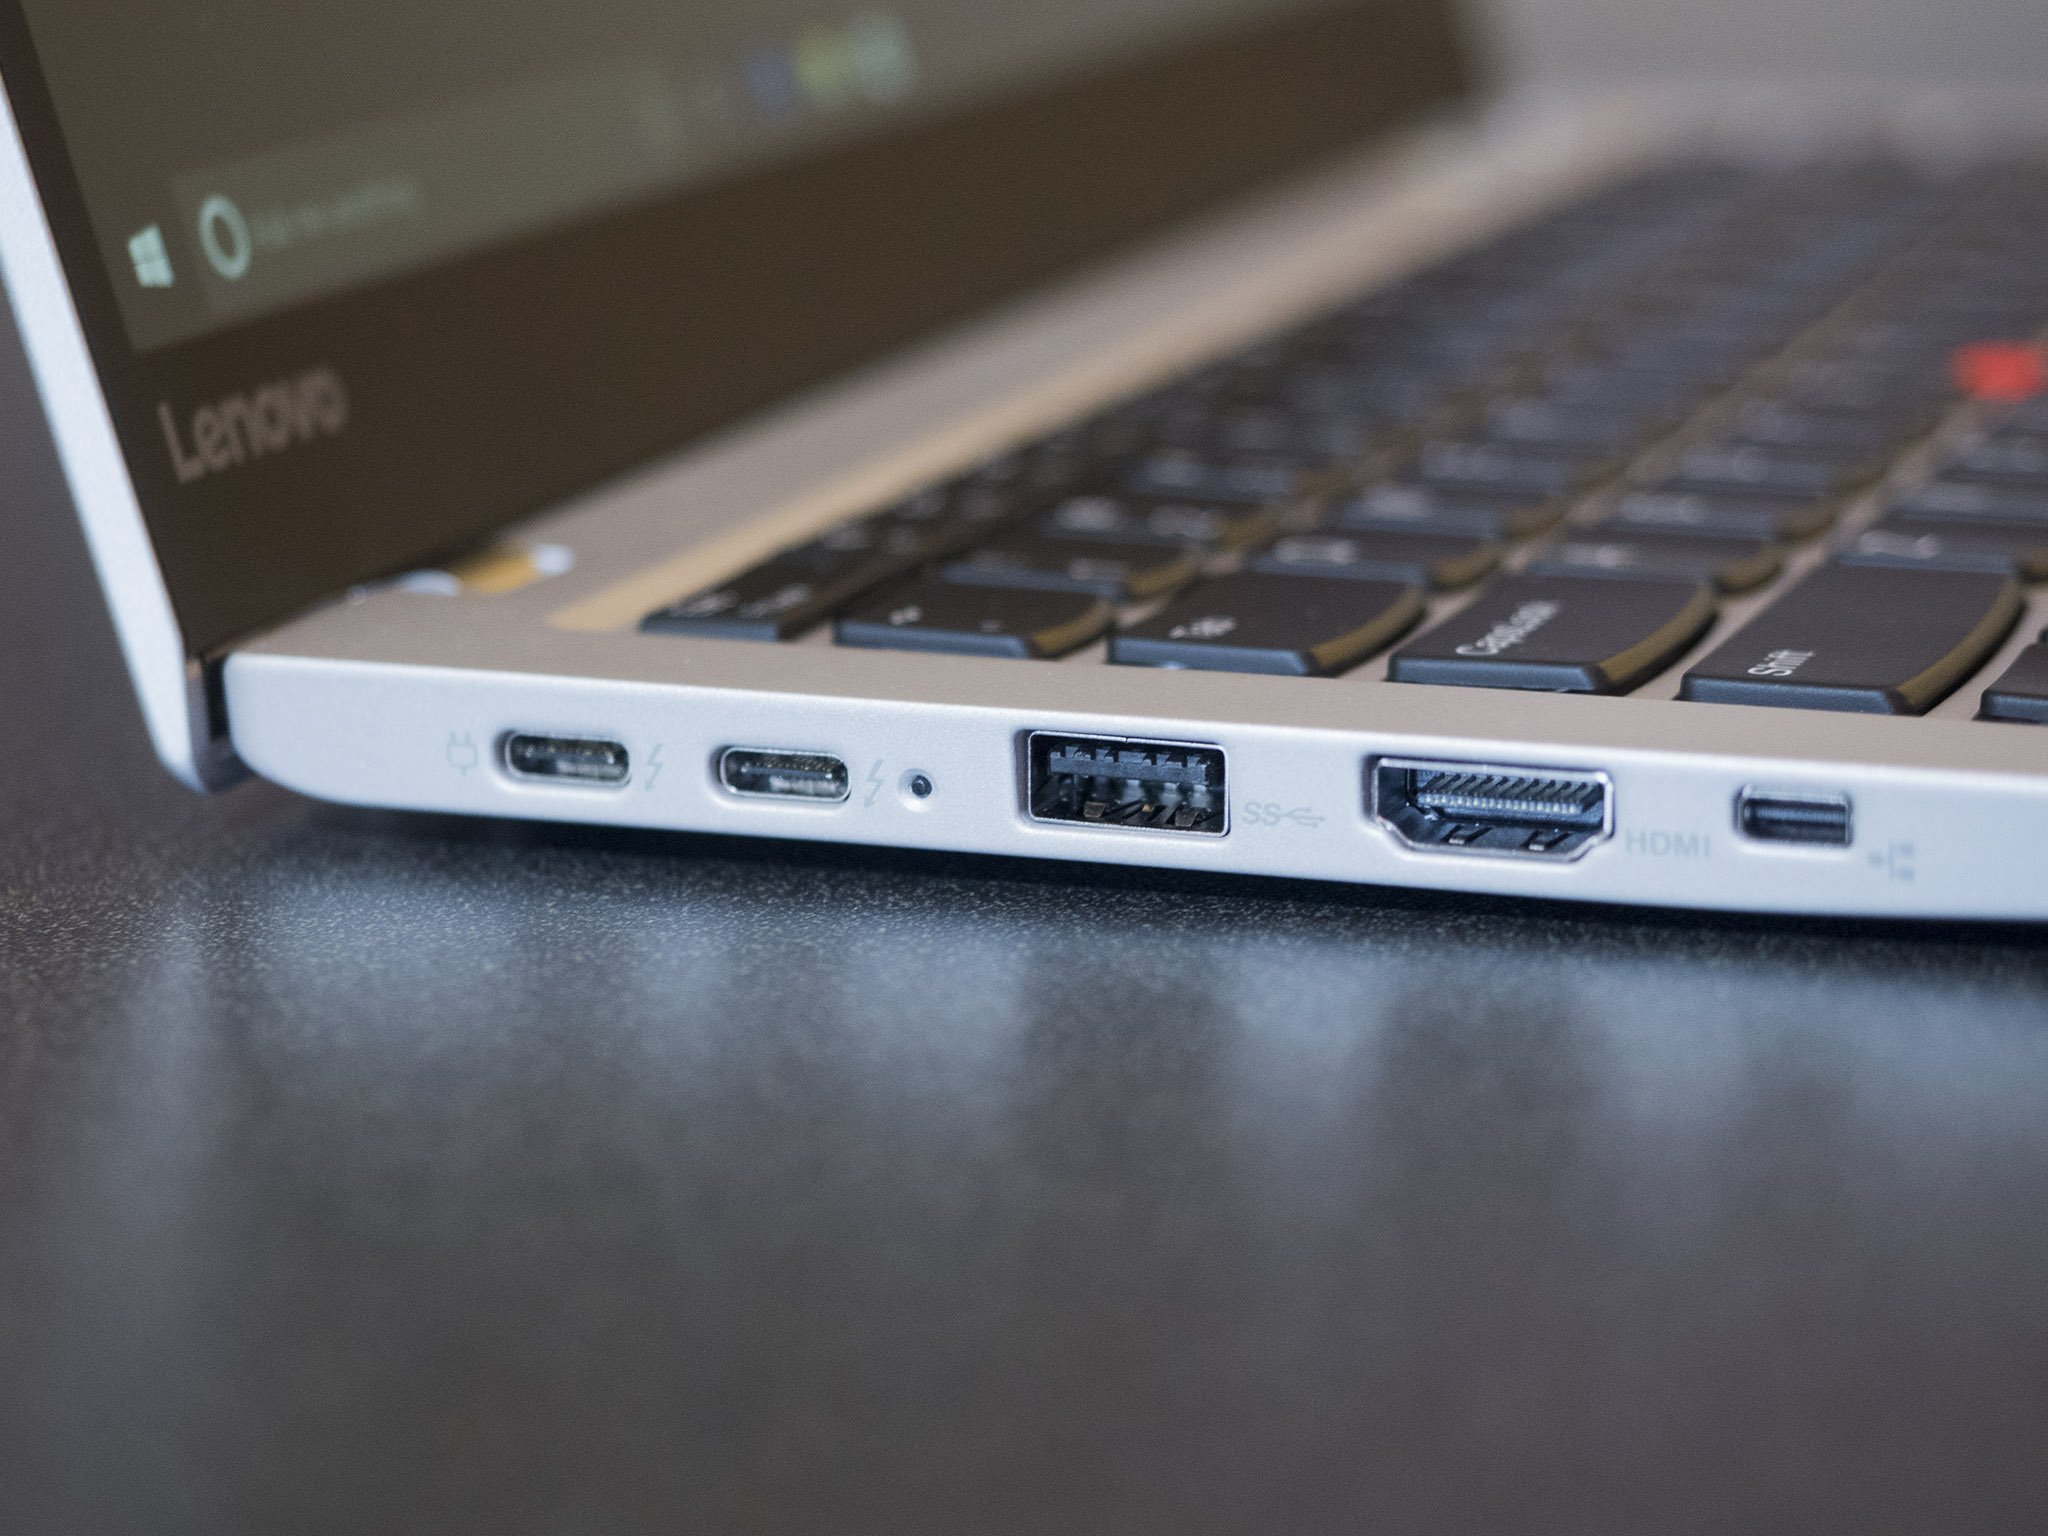
(Image credit: Future)
If the device has both a discrete and integrated graphics card, you can try switching to the integrated video card to determine whether the discrete card is the problem. In the case that you recently updated the UEFI (Unified Extensible Firmware Interface) or BIOS (Basic Input/Output System), this can sometimes disable the discrete graphics card, which you can only enable again from the motherboard firmware.
When you connect to an external monitor, open the control panel on the display to increase the brightness to resolve the black screen problem. It’s also a good idea to check the monitor is using the correct input. (You may need to check the manufacturer support website for specific details.)
If the problem occurs on a laptop, use the function key on the keyboard to increase the display brightness. Typically, you will need to press the Function (Fn) key and one of the functions keys like F8 or F10.
You can also try connecting the monitor to a different computer or using a different video cable to determine whether you are dealing with a broken display, graphics card, or damaged cable.
Detect display
A black screen could also happen because Windows 10 will lose its connection with the display. The «Windows key + Ctrl + Shift + B» keyboard shortcut can restart the video driver and refresh the connection with the monitor.
On specific devices, you can wake up the screen by pressing the volume up and volume down buttons at the same time three times (quickly).
When you perform the wake action, you will hear a beep and activity on the screen indicating that Windows 10 can respond to the command and is trying to establish a new connection.
Alternatively, you can use the «Windows key + P» keyboard shortcut to open the «Project» flyout menu. Then hit the P key again and the Enter key to cycle through the different display modes to see whether the black screen disappears. (You will need to repeat the steps four times to allow passing through all the possible modes.)
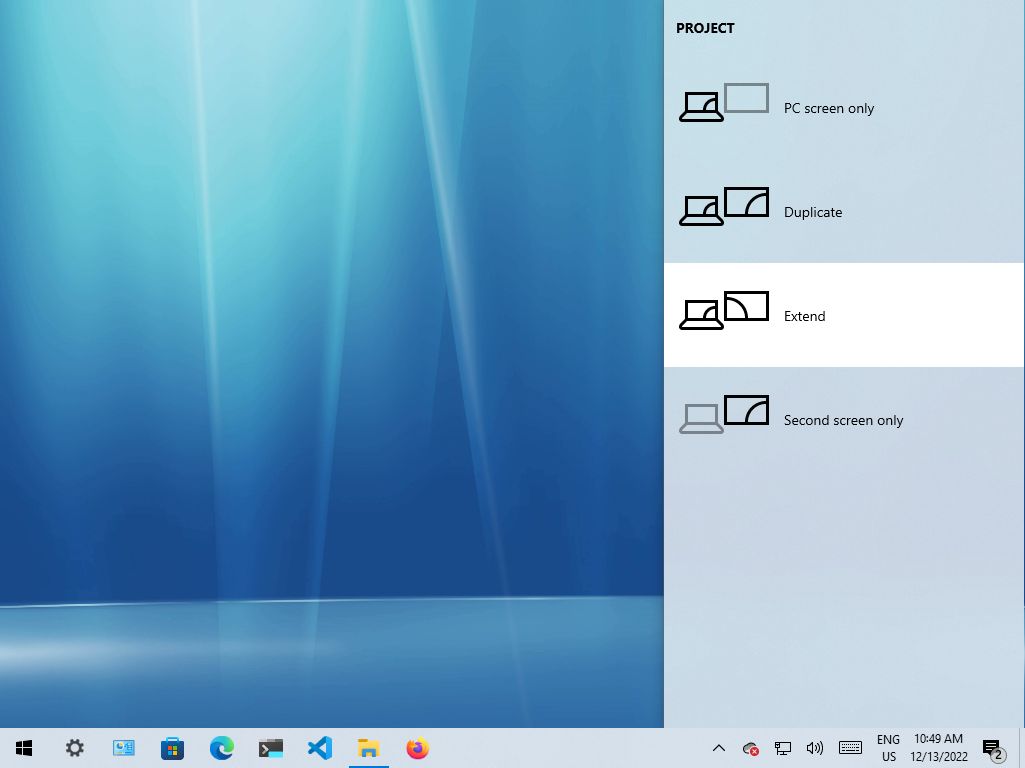
(Image credit: Future)
If the black screen still appears, press and hold the power button for about 10 seconds to shut down the device. Then press the power button again to restart. (If documents are open, you might lose unsaved content using this action.)
Disconnect non-essential devices
Connected peripherals may be why the black screen or black screen with the spinning dots during startup. Typically, spinning dots during startup indicates that an update is in the installation process, and you must wait a few moments. However, if it takes a long time, it could be a compatibility problem with the hardware.
You can fix this problem by disconnecting all peripherals, including printers, cameras, removable drives, Bluetooth, the docking station, and other USB devices from the computer.
Once you disconnect the peripherals, restart the computer, and if it returns to normal, the problem will likely be one of the devices. You can determine which component is causing the issue by reconnecting them one at a time until you find the conflict.
After finding the problematic peripheral, disconnect it, restart the computer, search online to find a solution, or contact the manufacturer for additional assistance.
Fix black screen with desktop access
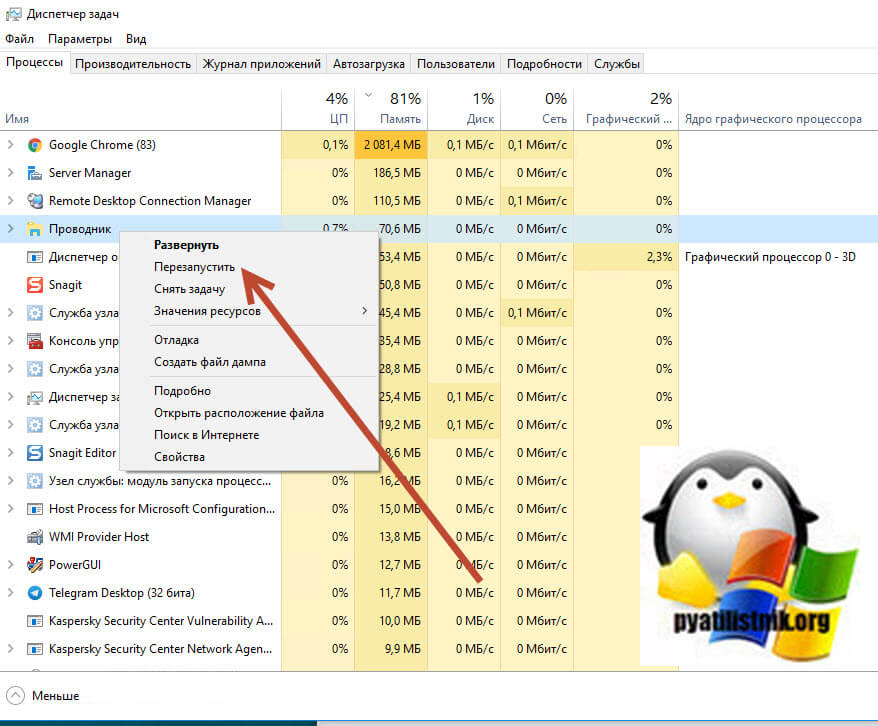
If you see a black screen after signing into Windows 10 and can still use the mouse, the problem could be something with the Windows Explorer process.
To resolve Windows Explorer process issues, use these steps:
- Use the «Ctrl + Shift + Esc» keyboard shortcut to open Task Manager.
- Quick tip: You can also use the «Ctrl + Alt + Del» keyboard shortcut and click the Task Manager button. We are using these methods since we assume the Taskbar is also missing when experiencing a black screen.
- Click the More details button (if in compact mode).
- Click the Processes tab.
- Select the Windows Explorer service.
- Click the Restart button from the bottom-right corner.
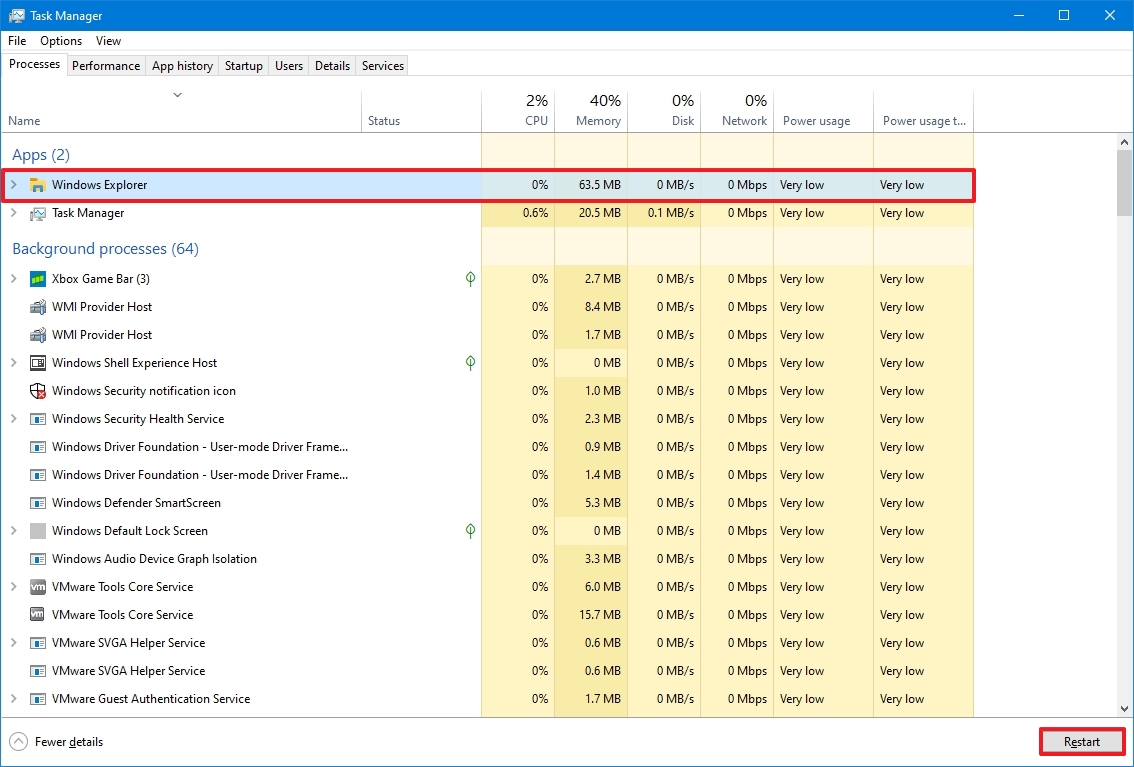
(Image credit: Future)
After you complete the steps, the desktop should appear, fixing the black screen problem.
Restart explorer.exe process
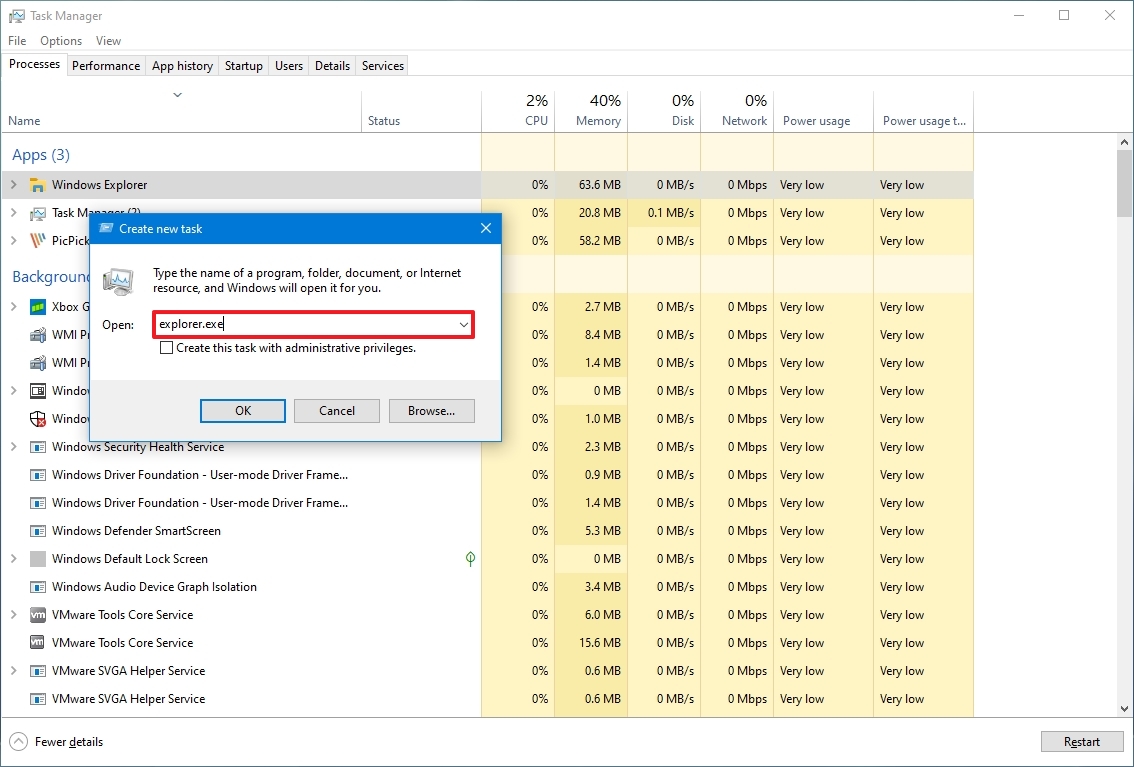
If the above instructions do not work, you can restart the process with these steps:
- Use the «Ctrl + Alt + Delete» keyboard shortcut to open Task Manager.
- Click the More details button (if in compact mode).
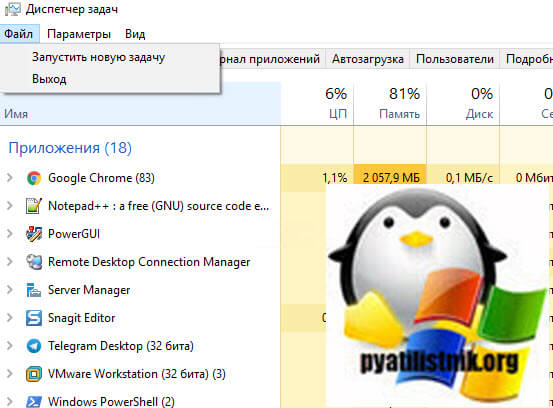
- Right-click the Windows Explorer service and select the End task option (if available).
- Click the File menu.
- Select the Run new task option.
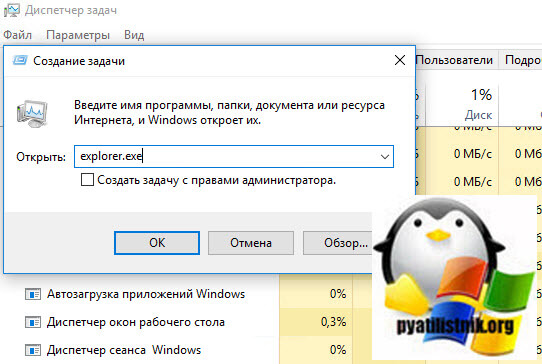
- Type the following command and click the OK button: explorer.exe
(Image credit: Future)
Once you complete the steps, the black screen should go away, and the desktop alongside the Taskbar and icons should appear.
Fix black screen with safe mode
If you do not have access to the desktop, you can use the «Advanced startup» settings boot in safe mode to troubleshoot and fix the black screen issue.
Open Advanced startup using the three-fail boot method
To access the Windows 10 advanced options, use these steps:
- Start the computer.
- As soon as the Windows logo appears on the screen, press the power button to interrupt the boot sequence.
- Repeat steps 1 and 2 two more times.
After the second interruption, Windows 10 will start the Automatic Repair environment, where you will find the option to access Advanced startup, and then you can continue with the steps to boot in safe mode.
Open Advanced startup using bootable media method
Alternatively, you can use a Windows 10 bootable USB flash drive to access the advanced settings using these steps:
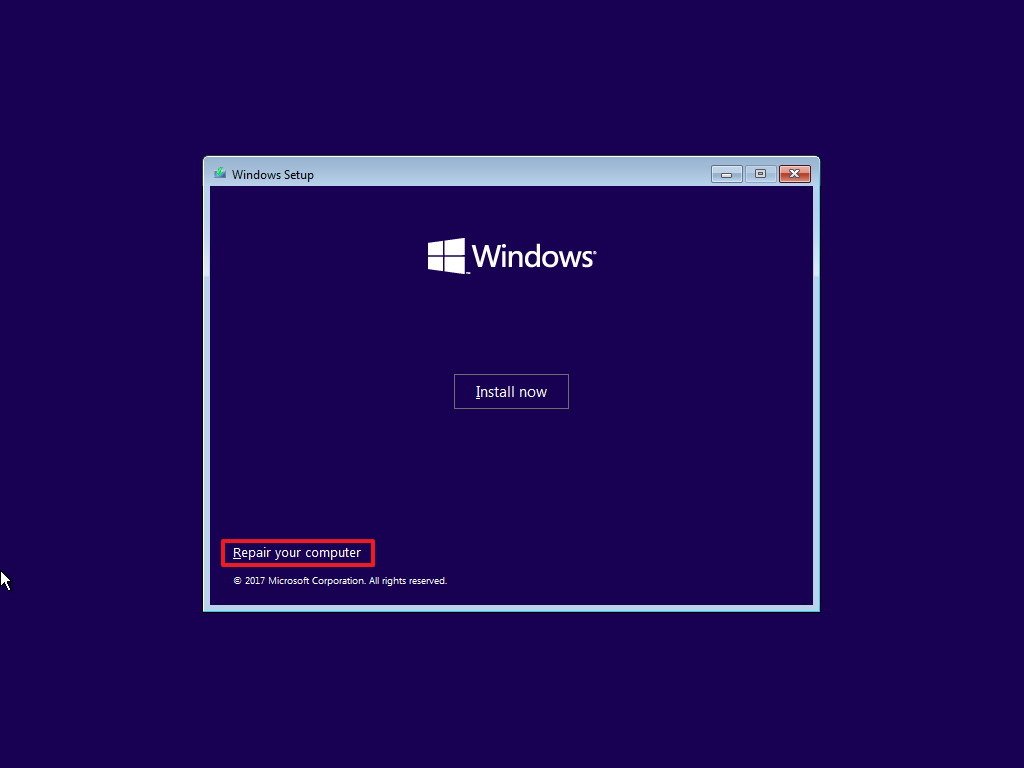
- Start computer using a USB flash drive.
- Quick tip: If the device is not starting from USB, you will have to change the motherboard’s BIOS settings to ensure it can boot from USB. You can usually access the BIOS by powering up the device and pressing one of the functions, the Delete or Esc keys. However, you may need to check your manufacturer’s support website for more specific details.
- Click the Next button.
- Click the «Repair your computer» option in the bottom-left corner.
(Image credit: Future)
Once you complete the steps, continue with the instructions to access safe mode on Windows 10.
Boot Windows 10 in safe mode
To start in safe mode through Advanced startup, use these steps:
- Click the Troubleshoot option.
- Click the Advanced options button.
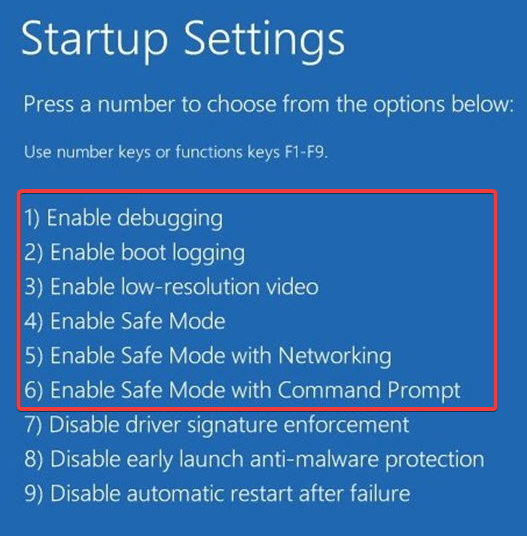
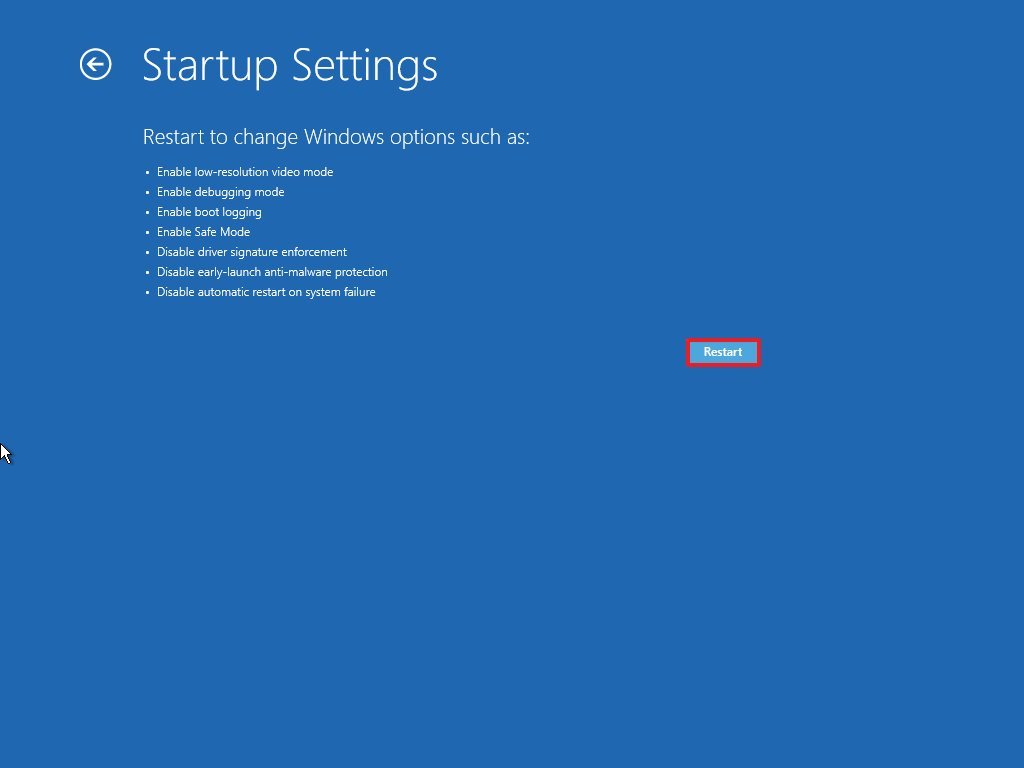
- Click the Startup Settings option.
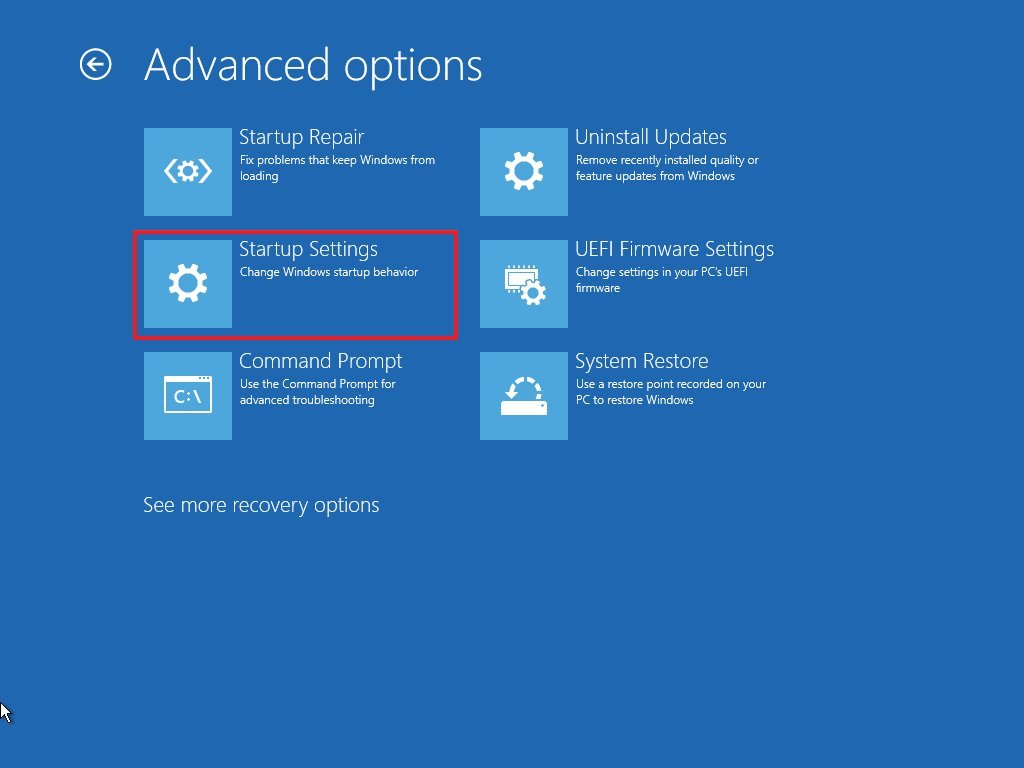
- Click the Restart button.
- On the «Startup Settings» page, press the 5 or F5 key to select the «Enable Safe Mode with Networking» option.
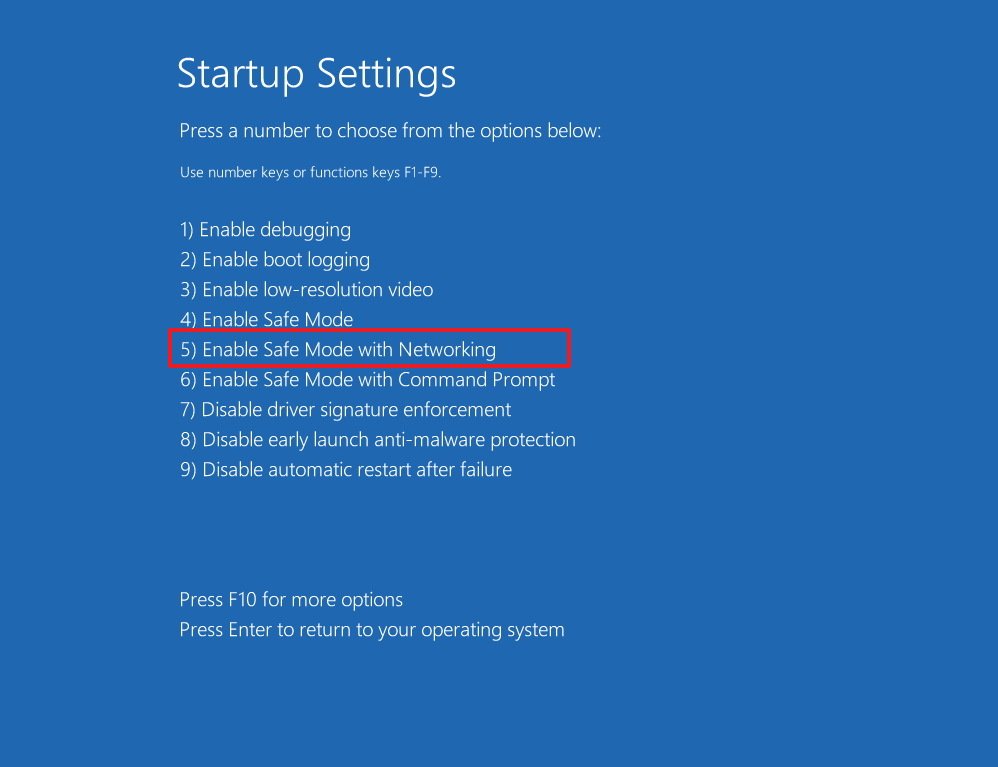
(Image credit: Future)
After the computer boots in safe mode, you can use many troubleshooting steps to fix the black screen problem. For instance, you can reinstall the graphics driver, remove buggy updates, change system settings, and more (see instructions below).
Perform Windows 10 clean boot
Typically, Windows 10 loads services, drivers, and apps during startup, which will remain running in the background. If one or more components are not working correctly, you will see a black screen.
A clean boot allows you to start the system with a minimal set of services, drivers, and apps, which can help you figure out if something running in the background is causing the screen to turn dark.
On Windows 10, a clean boot is similar to safe mode but allows you to re-enable services individually to determine the component causing the issue.
To perform a clean boot of Windows 10, use these steps:
- Open Start.
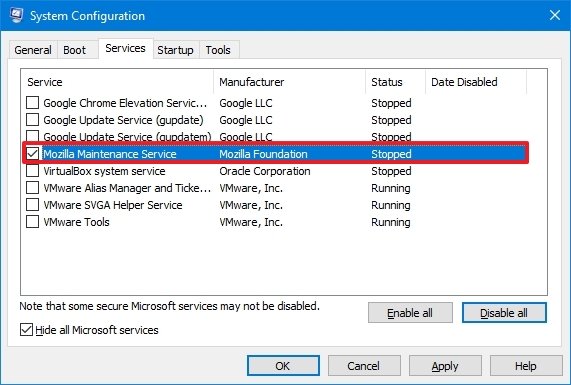
- Search for msconfig and click the top result to open the System Configuration app.
- Click the Services tab.
- Check the «Hide all Microsoft services» option.
- Click the Disable all button.
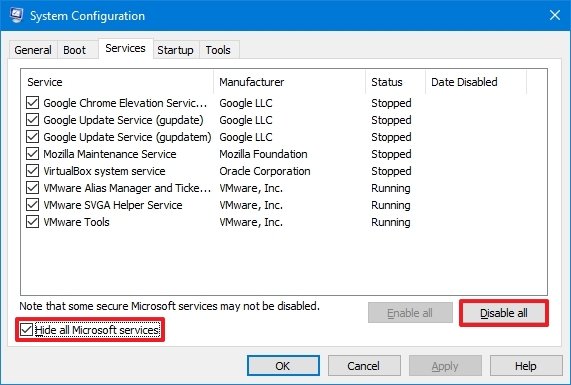
- Click the Apply button.
- Click the Startup tab.
- Click the Open Task Manager option.
- Click the Startup tab.
- Select each application, and click the Disable button in the bottom-right corner.
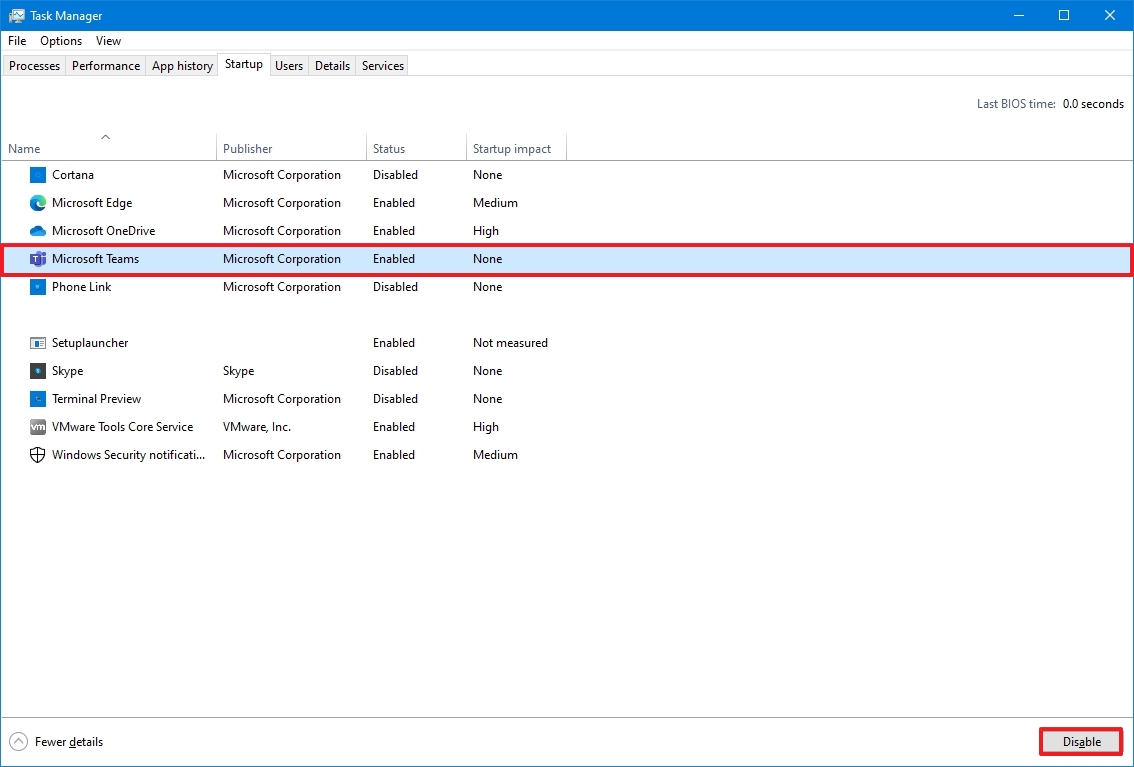
- Close Task Manager.
- Click the OK button.
- Restart the computer.
These steps won’t fix the problem, but they will give you an idea of where to start looking to resolve the black screen problem on Windows 10.
Troubleshoot black screen using clean boot
If, after restarting the computer, the black screen disappears, then you will know the problem is one of the processes.
To fix the issue, re-enable the items one at a time and restart the computer to see which one is causing the black screen with these steps:
- Open Start.
- Search for msconfig and click the top result to open the System Configuration app.
- Click the Services tab.
- Check the «Hide all Microsoft services» option.
- Check one of the services.
- Click the Apply button.
- Click the OK button.
- Restart the computer.
Once you complete the steps, repeat the steps for every item until you find causing the problem.
Re-enable startup items
If none of the services seem to be the issue, use these steps to re-enable the startup items:
- Open Start.
- Search for Task Manager.
- Click the Startup tab.
- Select an app and click the Enable button in the bottom-right corner.
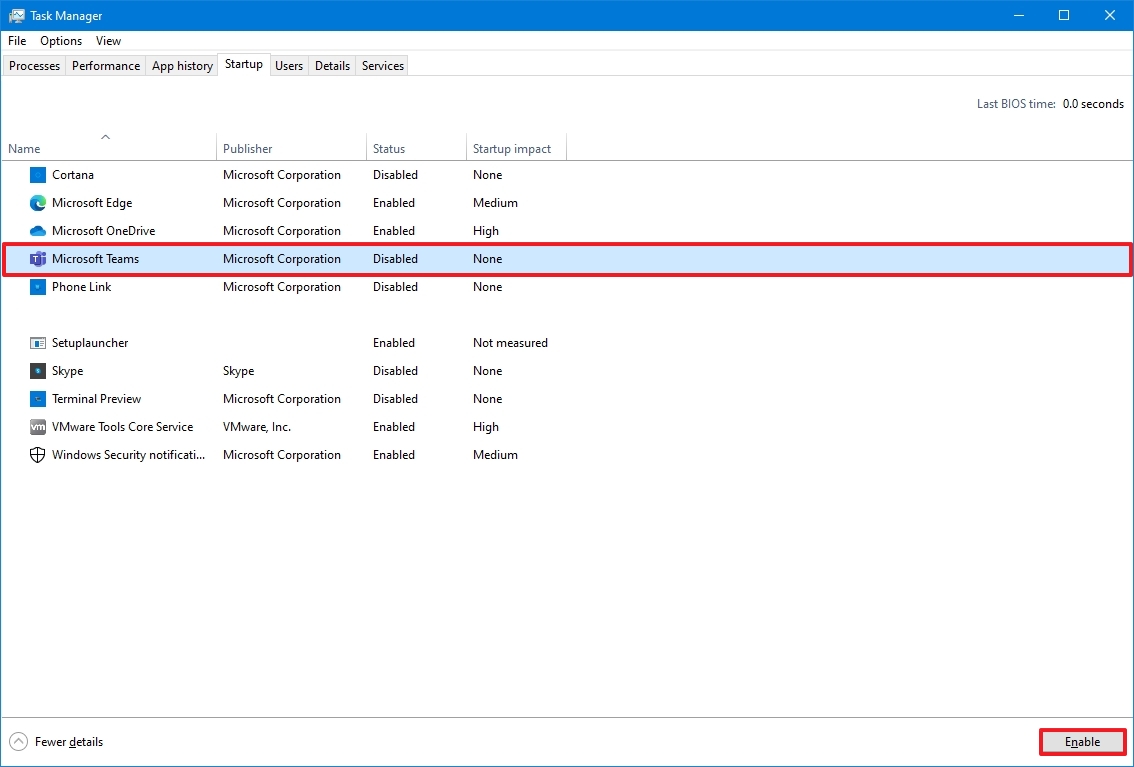
- Close Task Manager.
- Restart the computer.
After you complete the steps, repeat the instructions for every item until figuring out which app is causing the black screen.
If you need to revert the changes, use the same instructions outlined above, but on step 5, click the Enable all button, and on step 10, click the Enable button for each previously enabled application.
Reinstall or rollback graphics driver
Typically, a black screen could result from a compatibility issue with a graphics driver update installed through Windows Update or manually. Other times, it could be the case that the driver got corrupted for unknown reasons.
Reinstall graphics driver
To reinstall the graphics driver while in safe mode, use these steps:
- Open Start.
- Search for Device Manager and click the top result to open the app.
- Expand the Display Adapters branch.
- Right-click the video adapter and select the Uninstall device option.
- Quick tip: Alternatively, you can also select the Delete the driver software for this device option to remove the driver from the computer. Sometimes, this is recommended, but if Windows 10 can’t find the driver online, you will need to download it from your manufacturer’s support website.
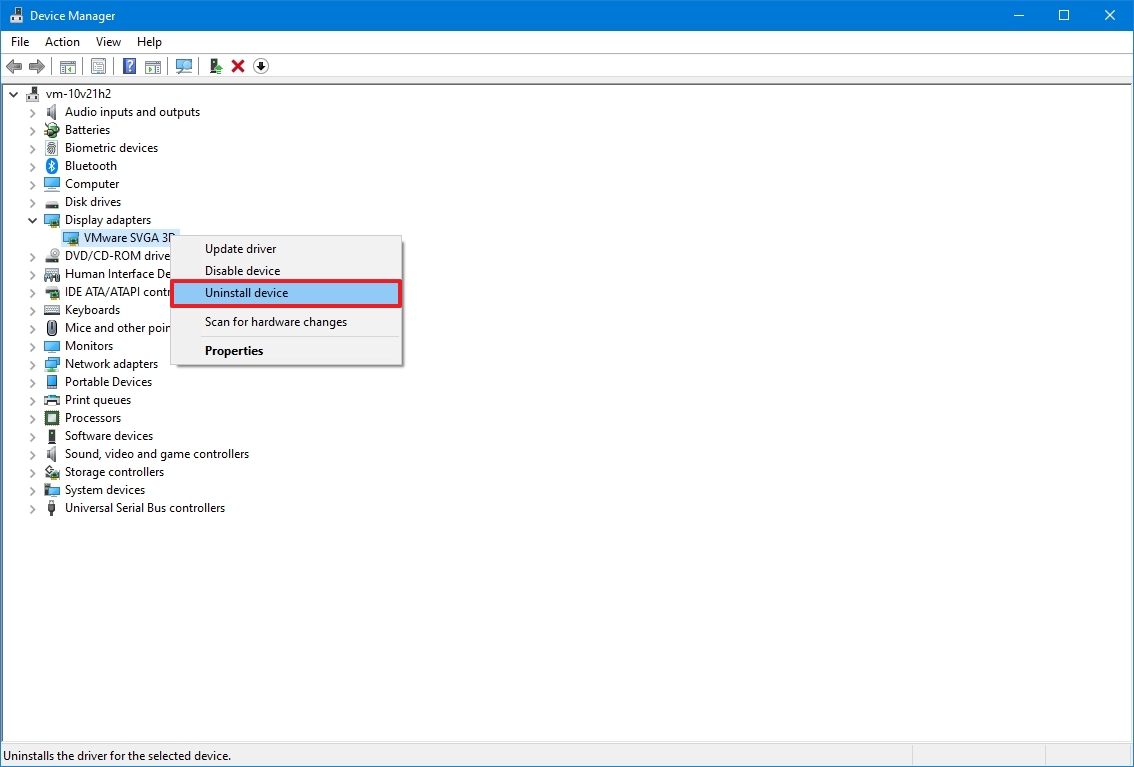
- Click the OK button.
- Restart the computer.
Once the device restarts, Windows 10 will automatically try to reinstall the graphics driver, resolving the black screen problem.
Alternatively, you can uninstall the video drivers from the «Apps & features» settings page by selecting the device driver package and clicking the Uninstall button.
If the problem occurs immediately after upgrading to a new version of Windows 10, then it is likely that the device is experiencing a compatibility problem. In this case, you may need to download and install a newer version of the driver from the computer or graphics card manufacturer’s support website to resolve the issue.
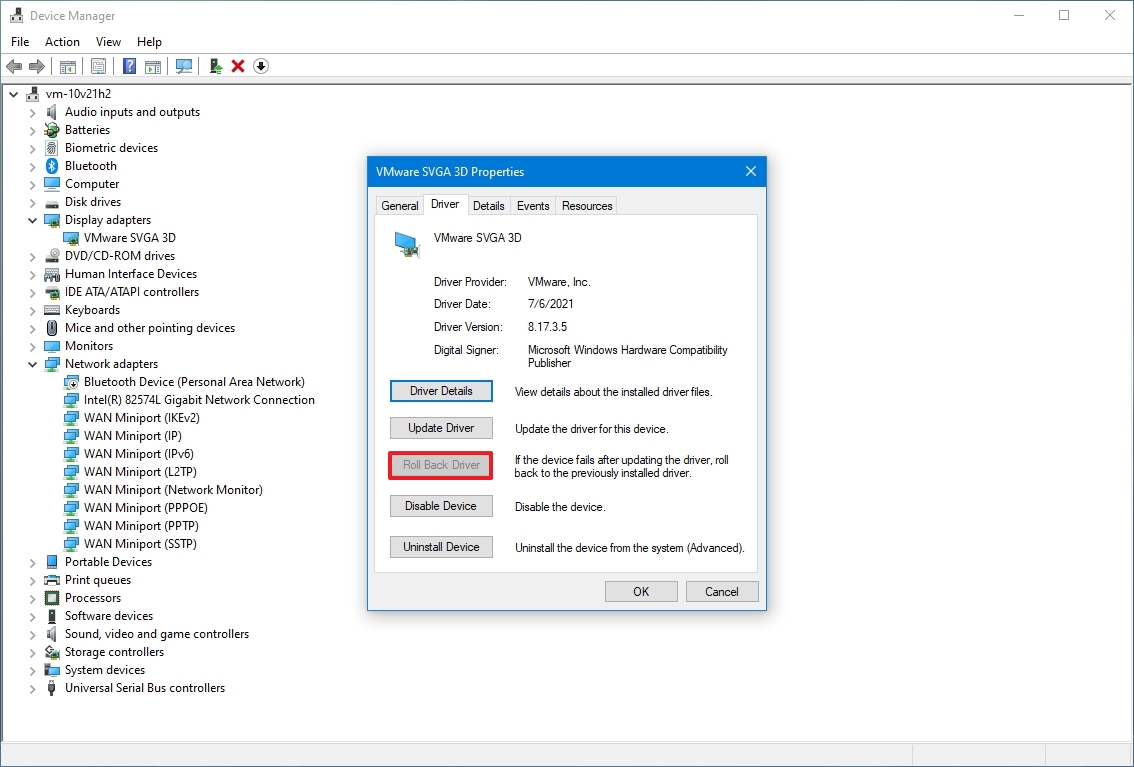
Rollback graphics driver
When the black screen shows up after applying an update, rolling back to the previous version of the driver may fix the problem on Windows 10.
To roll back a previous version of a driver on Windows 10, use these steps:
- Open Start.
- Search for Device Manager and click the top result to open the app.
- Expand the Display Adapters branch.
- Right-click the video card and select the Properties option.
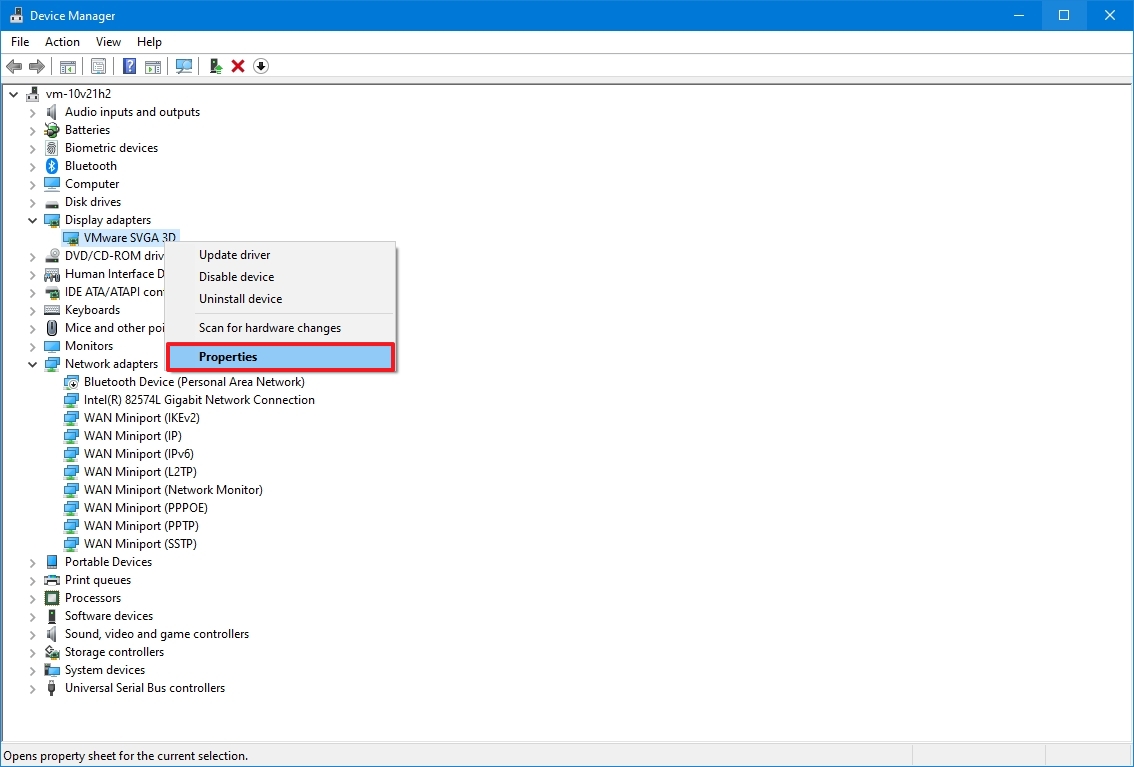
- Click the Driver tab.
- Click the «Roll Back Driver» button.
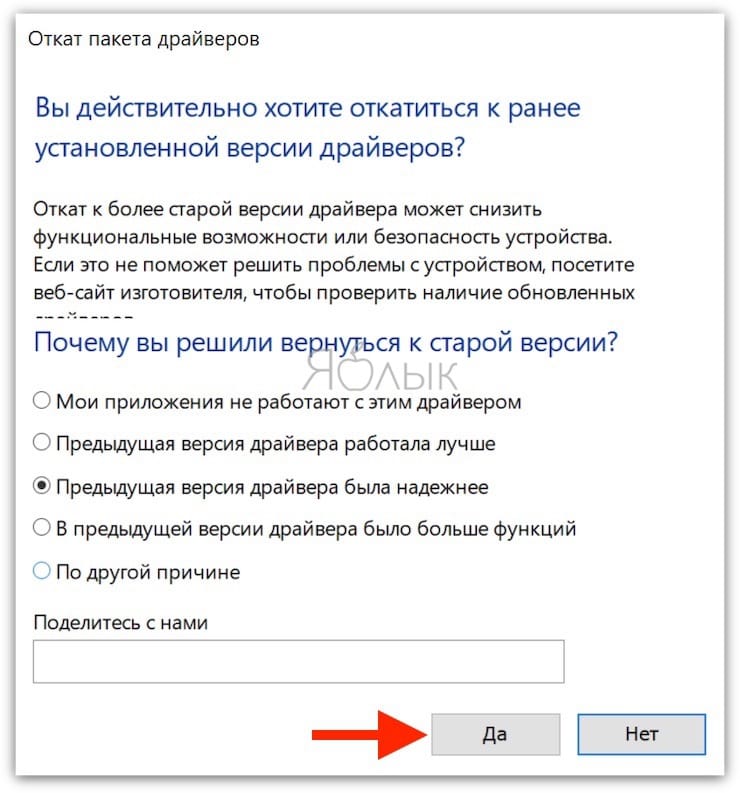
- Select a reason to enable the option to roll back.
- Click the Yes button.
- Restart the computer.
After you complete the steps, Windows 10 will uninstall the driver, and the previous version will be restored, fixing the black screen problem.
The system does not have a previous driver version if the Roll Back Driver option is unavailable. If an earlier version of the driver was working correctly, you might be able to download it from your manufacturer’s support website.
Disable Fast Startup
Sometimes, the fast startup feature may be why the device ends up with a black screen. On Windows 10, fast startup is a feature available in specific hardware configurations to speed up the boot process. If it’s causing a black screen, you can disable it to mitigate the issue.
To disable fast startup on Windows 10, use these steps:
- Open Settings.
- Click on System.
- Click on Power & sleep.
- Under the «Related settings» section, click the «Additional power settings» option.
- Select the «Choose what the power button does» option on the left pane.
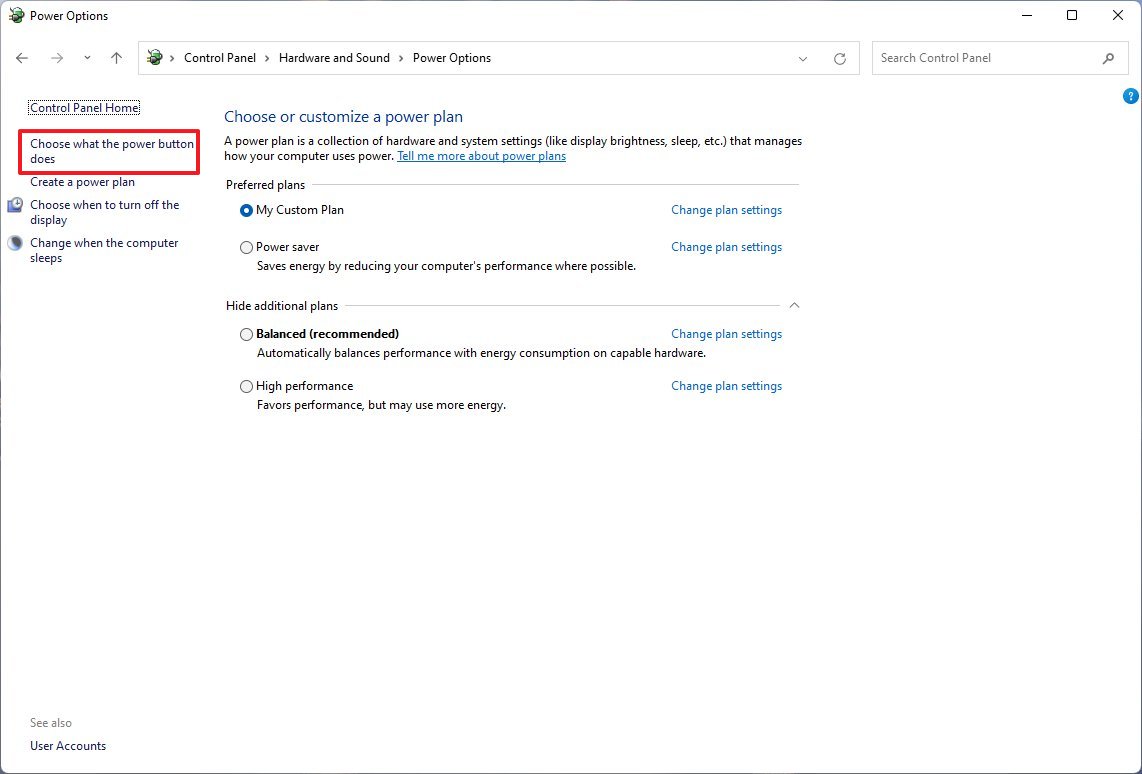
- Click the «Change settings that are currently unavailable» option.
- Clear the «Turn on fast startup (recommended)» option.
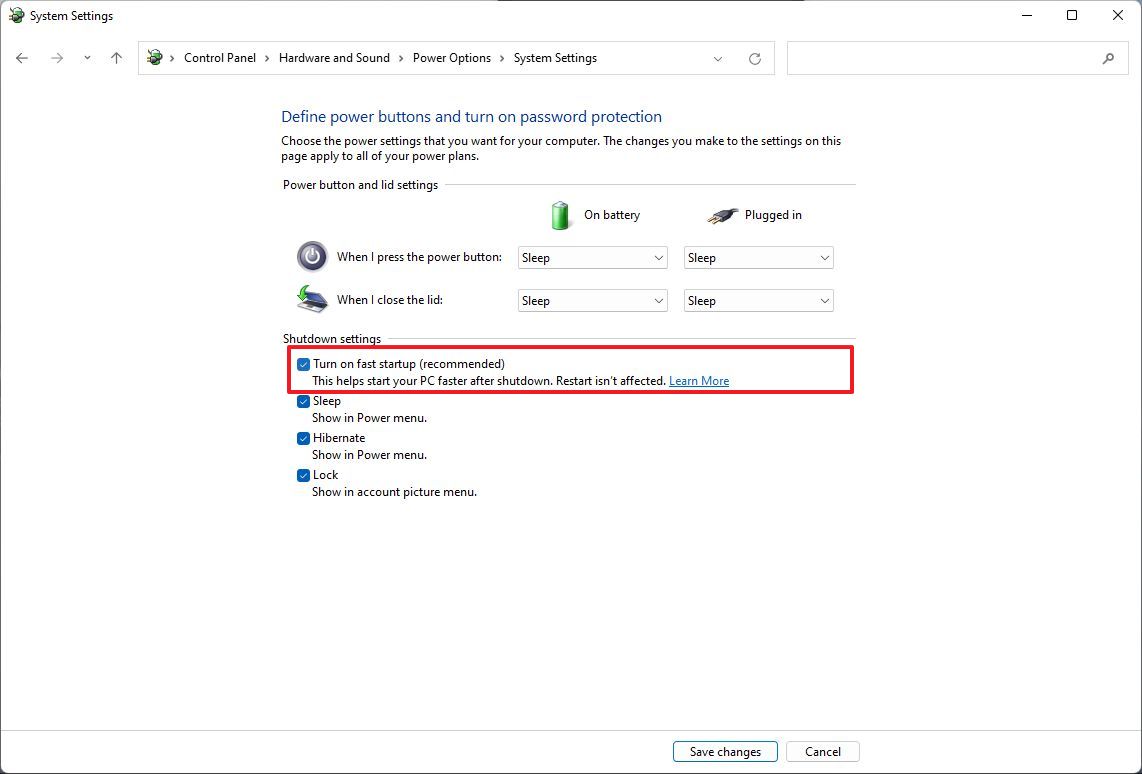
- Click the Save changes button.
- Restart the computer.
After restarting the computer, you should no longer experience the black screen problem.
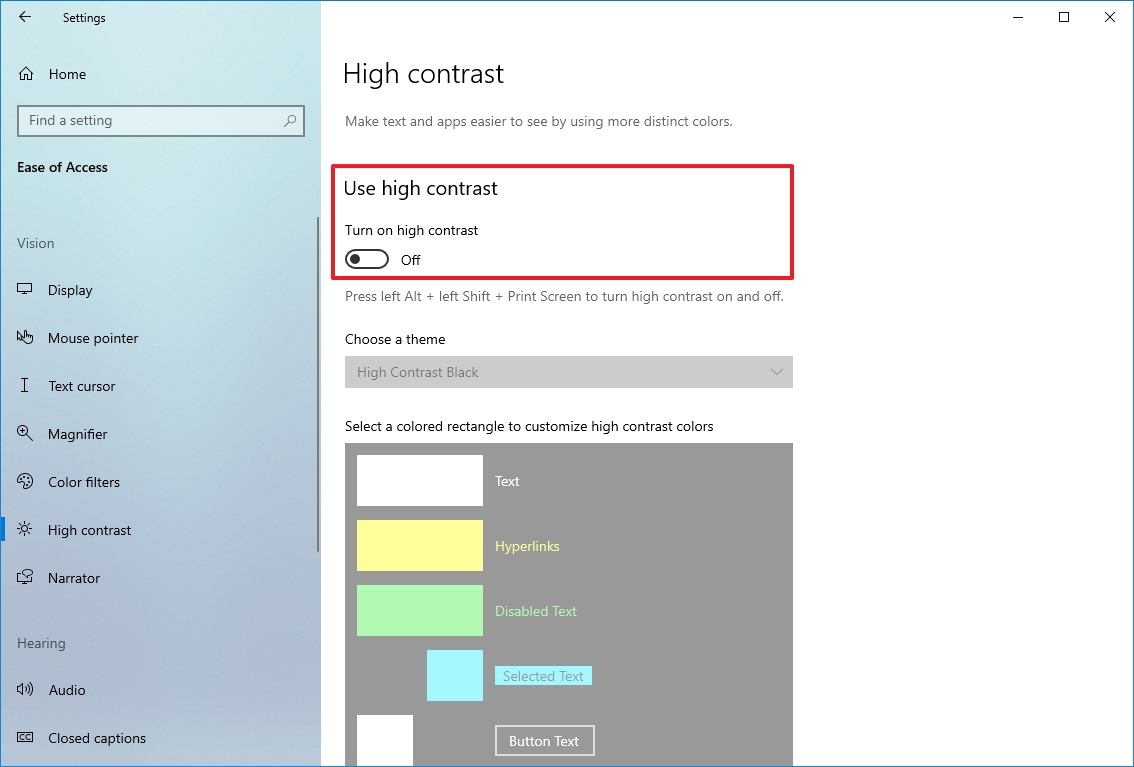
Disable high contrast
On Windows 10, the high contrast feature can also cause a black screen.
To disable high contrast on Windows 10 while in safe mode, use these steps:
- Open Settings.
- Click on Ease of Access.
- Click on High contrast.
- Turn off the «Use high contrast» toggle switch.
(Image credit: Future)
Once you complete the steps, restart the device to confirm the black screen problem has been fixed.
Stop RunOnce process
Windows 10 also includes the «RunOnce» feature to specify a series of commands that should run once during the next reboot, but it can sometimes cause the screen to go black on a computer.
To stop the RunOnce process on Windows 10, use these steps:
- Open Start.
- Search for Task Manager and click the top result to open the app.
- Click the Processes tab.
- Select the RunOnce process and click the End task button.
- (Optional) Click the Services tab (if the process was not in the «Processes» tab).
- Right-click the RunOnce item and select the Stop button.
- Restart the computer.
If the RunOnce process was causing the problem, you should be able to start using the computer normally again.
Uninstall quality updates
It’s not uncommon for updates with bugs and compatibility issues. If your computer recently received an update and you see a black screen, uninstalling the patch may resolve the problem.
You won’t be able to access the «Update & Security» settings to remove a quality update while in Safe mode, but you can still use Control Panel.
To uninstall Windows 10 updates in Safe mode, use these steps:
- Open Start.
- Search for Control Panel and click the top result to open the app.
- Click on Programs.
- Click the «Programs and Features» option.
- Click the «View installed updates» option from the left pane.
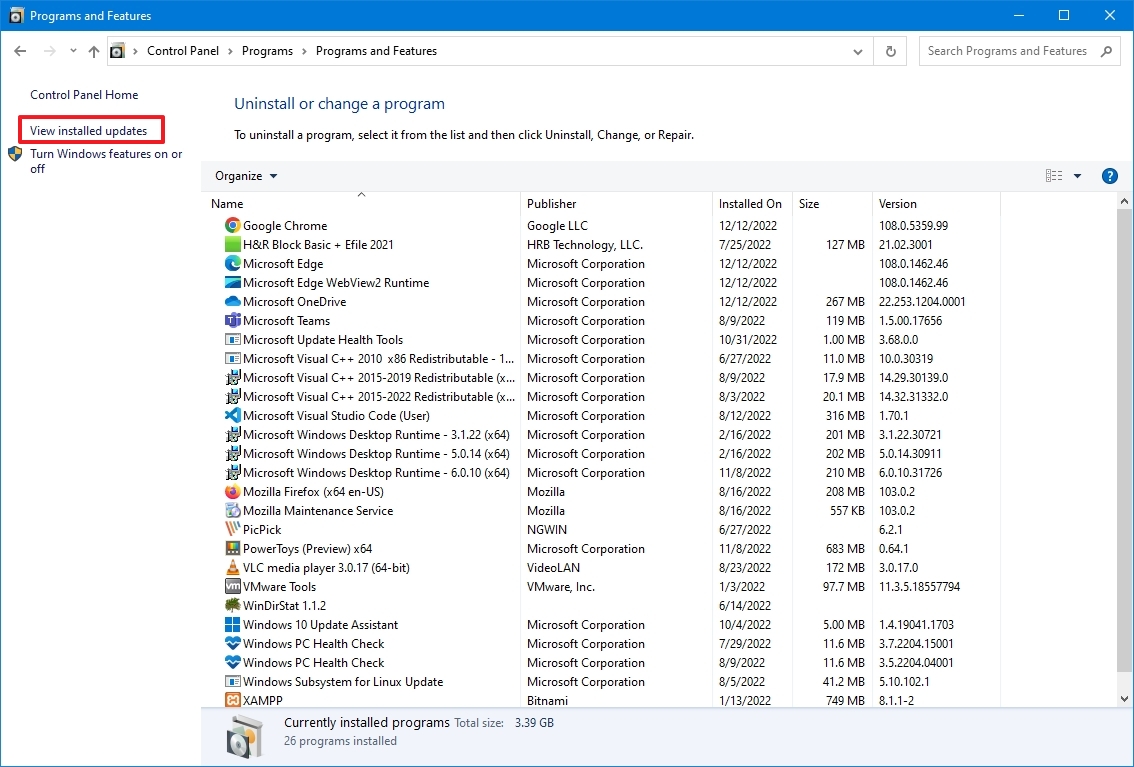
- Select the most recent update.
- Click the Uninstall button.
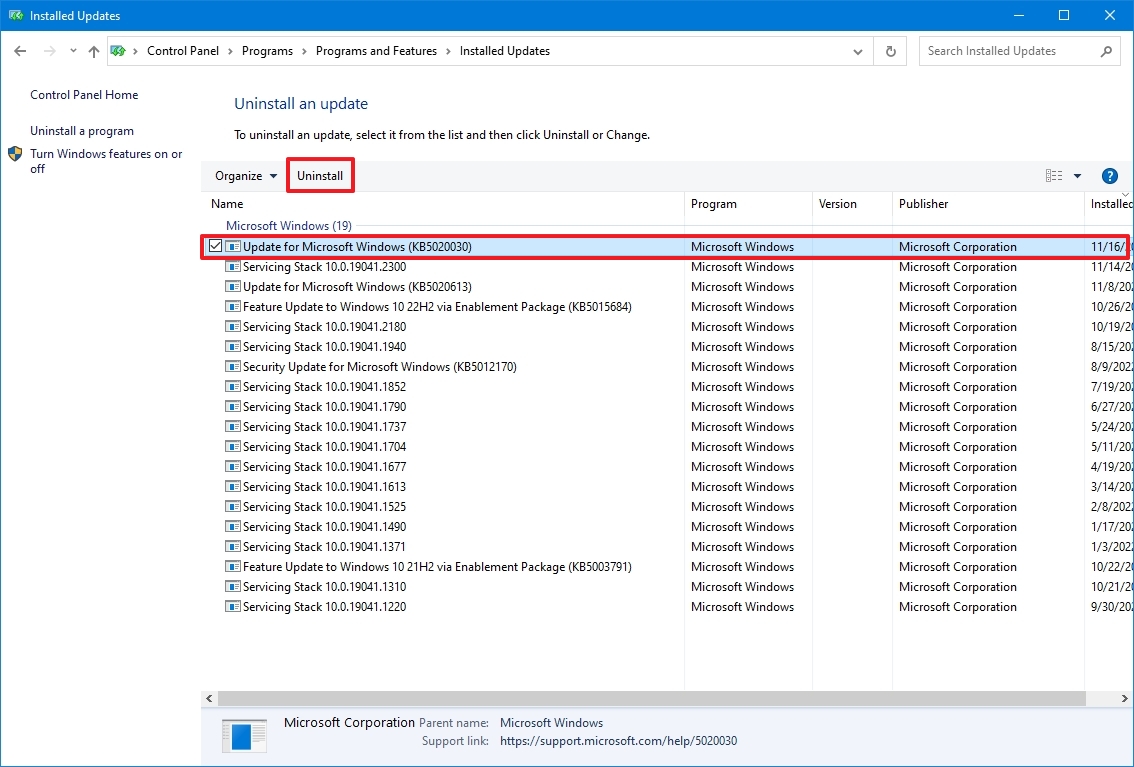
- Restart the computer.
Once you complete the steps, the update will uninstall from the computer, and the system won’t try to install it again until a subsequent update becomes available.
Uninstall security software
Security solutions like third-party antivirus and security software can sometimes cause black screens on Windows 10.
If the computer has a security program, you can temporarily remove it to determine whether the app is causing the problem.
To uninstall a security app while in safe mode on Windows 10, use these steps:
- Open Settings.
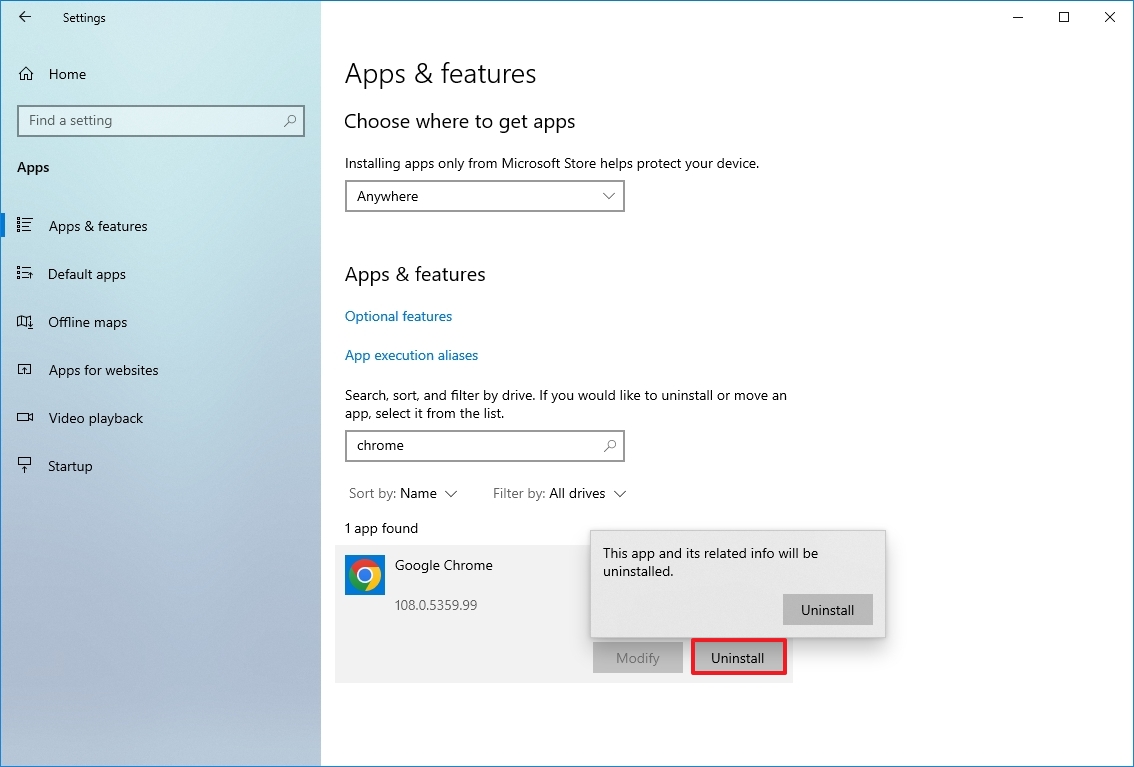
- Click on Apps.
- Click on Apps & features.
- Under the «Apps & features» section, select the security app.
- Click the Uninstall button.
- Continue with the on-screen directions (if applicable).
- Restart the computer.
After you complete the steps, the problem will resolve, and you should be able to install the program again. If the black screen returns, you may need to remove it completely to mitigate the issue.
You may want to check the software support website to download an updated version or contact support for guidance if the program conflicts.
Create new Windows 10 account
A damaged Windows 10 account can also cause a black screen. While in safe mode, you can create a new account to test and see if this is causing the problem. If you can use the device without a black screen, you should consider transferring your files and settings to the new account.
To create a new account in safe mode on Windows 10, use these steps:
- Open Start.
- Search for Command Prompt, right-click the top result, and select the Run as administrator option.
- Type the following command to create a new account and press Enter: net user ACCOUNT-NAME /add
In the command, change «ACCOUNT-NAME» to the name of the account you want to create. For example, this command creates an account named tempuser: net user tempuser /add
- Type the following command to change the account type to «Administrator» and press Enter: net localgroup administrators tempuser /add
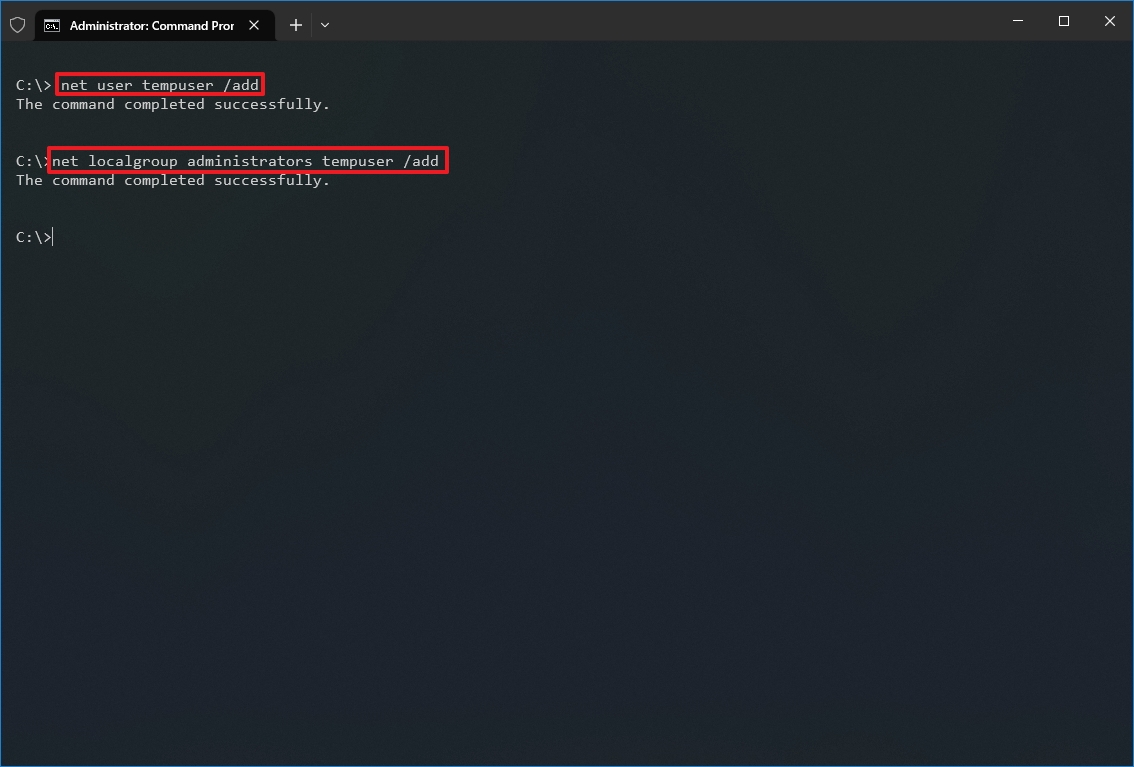
- Restart the computer.
- Sign in with the new user account.
The problem could be related to your old user account if the computer no longer shows a black screen. Instead of troubleshooting the problem, which could take a lot of time, you should refer to this guide to transfer your files, link your user profile with a Microsoft account, and delete the old account.
Fix black screen with System Restore
System Restore is a feature that can help to undo system changes that could be causing the black screen. Using this feature, you won’t lose your files, but you may lose some settings, apps, and updates depending on the current configuration. (System Restore will only work if you have previously enabled and configured the feature.)
Open Advanced startup using the three-fail boot method
Since you won’t be able to access the System Restore feature when dealing with a black screen, you will need to trigger the recovery environment manually. Here’s how:
- Start the computer.
- As soon as the Windows logo appears on the screen, press the power button to interrupt the boot sequence.
- Repeat steps No. 1 and 2 two more times.
After the second interruption, Windows 10 will open into the recovery environment, and then you can continue with the steps to use System Restore.
Open Advanced startup using bootable media method
Alternatively, you can use a USB flash drive to access the recovery environment settings with these steps:
- Start computer using a USB flash drive.
- Quick tip: If the computer is not starting from the USB media, you have to adjust the motherboard’s BIOS settings to ensure it can boot from the USB. Type, you can access the BIOS by powering up the device and pressing one of the functions, Delete or Esc keys. However, you may need to check your manufacturer’s support website for more specific details.
- Click the Next button.
- Click the «Repair your computer» option in the bottom-left corner.
(Image credit: Future)
Once you complete the steps, continue with the System Restore instructions. (See steps below.)
Use restore point to undo system changes
To restore a device to an earlier point in time, use these steps:
- Click the Advanced Startup option.
- Click the Troubleshoot option.
- Click the Advanced options button.
- Click the System Restore option.
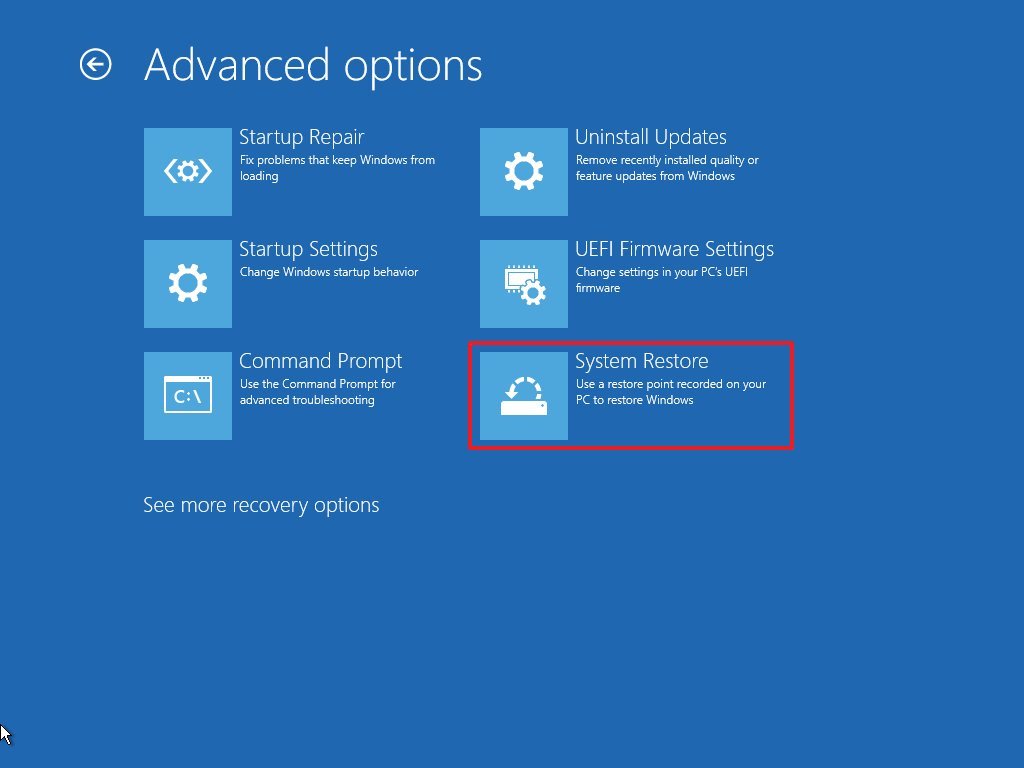
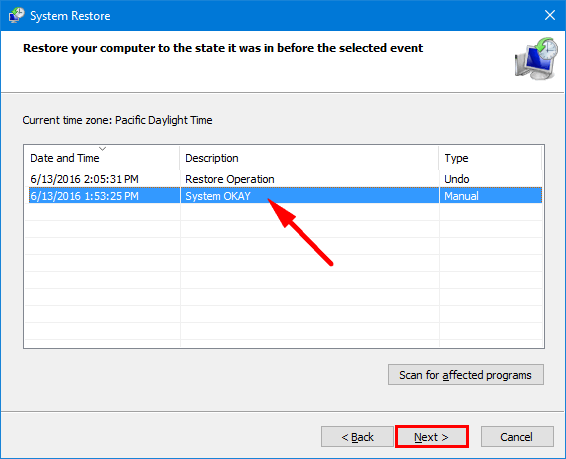
- Click the Next button.
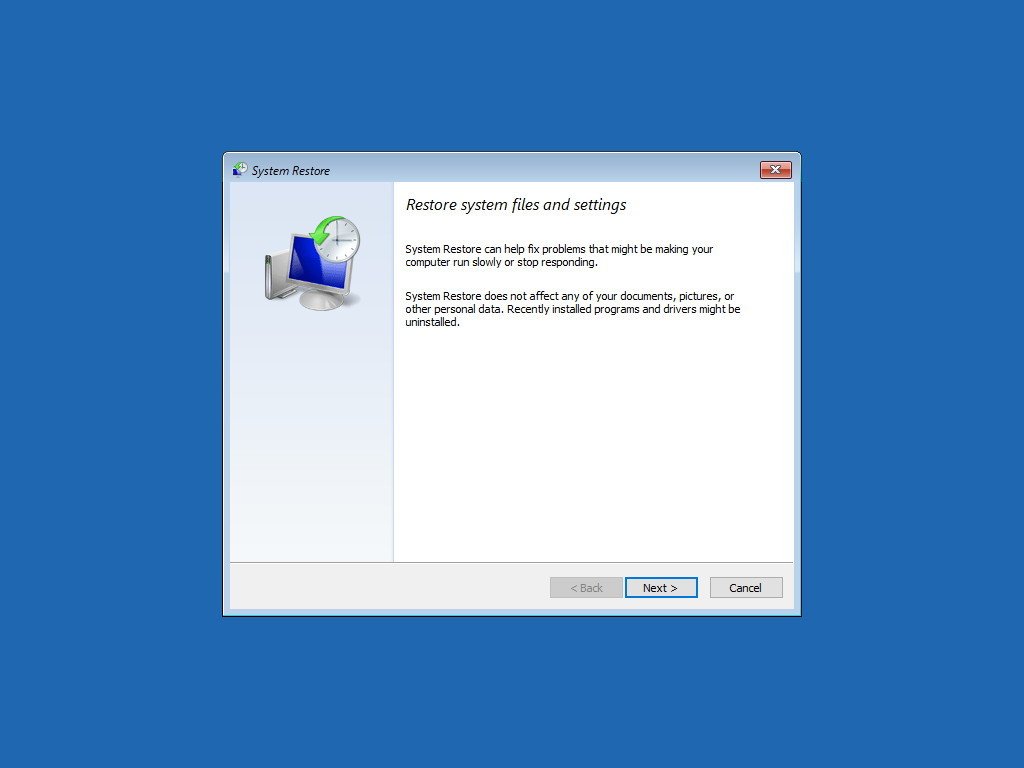
- Select the most recent restore point likely to resolve the issue.
- Click the «Scan for affected programs» button to determine the apps that will be affected after the restore point is created.
- Click the Close button.
- Click the Next button.
- Click the Finish button.
After you complete the steps, the feature will restore the device to an earlier time when everything was working correctly without a black screen.
Reverting to a previous version of Windows 10
If the problem appeared after an upgrade, rolling back to the previous version may mitigate the issue until a system or driver update becomes available to permanently resolve the black screen problem.
Open Advanced startup using the three-fail boot method
Whenever you see a black screen, you won’t be able to use the recovery options through the Settings app or access safe mode from the desktop experience. This means that you will have to trigger the recovery environment manually.
To access the Windows recovery environment, use these steps:
- Start the computer.
- As soon as the Windows logo appears on the screen, press the power button to interrupt the boot sequence.
- Repeat steps 1 and 2 two more times.
After the second interruption, Windows 10 will open into the recovery environment and continue with the steps below to roll back to a previous version.
Open Advanced startup using bootable media method
You can also use a bootable USB flash drive to access the Advanced startup settings on Windows 10 using these steps:
- Start computer using a USB bootable media.
- Quick tip: If the computer is not starting from the USB drive, you must change the motherboard’s BIOS settings to ensure it can boot from the USB. Typically, you can access the BIOS by powering up the device and pressing one of the functions, Delete or Esc keys. However, you may need to check your manufacturer’s support website for more specific details.
- Click the Next button.
- Click the «Repair your computer» option in the bottom-left corner.
(Image credit: Future)
Once you complete the steps, continue with the instructions to revert to an earlier version of Windows 10.
Uninstall latest version of Windows 10
To roll back to the previous version of Windows 10, use these steps:
- Click the Troubleshoot option.
- Click the Advanced options button.
- Click the Uninstall Update option.
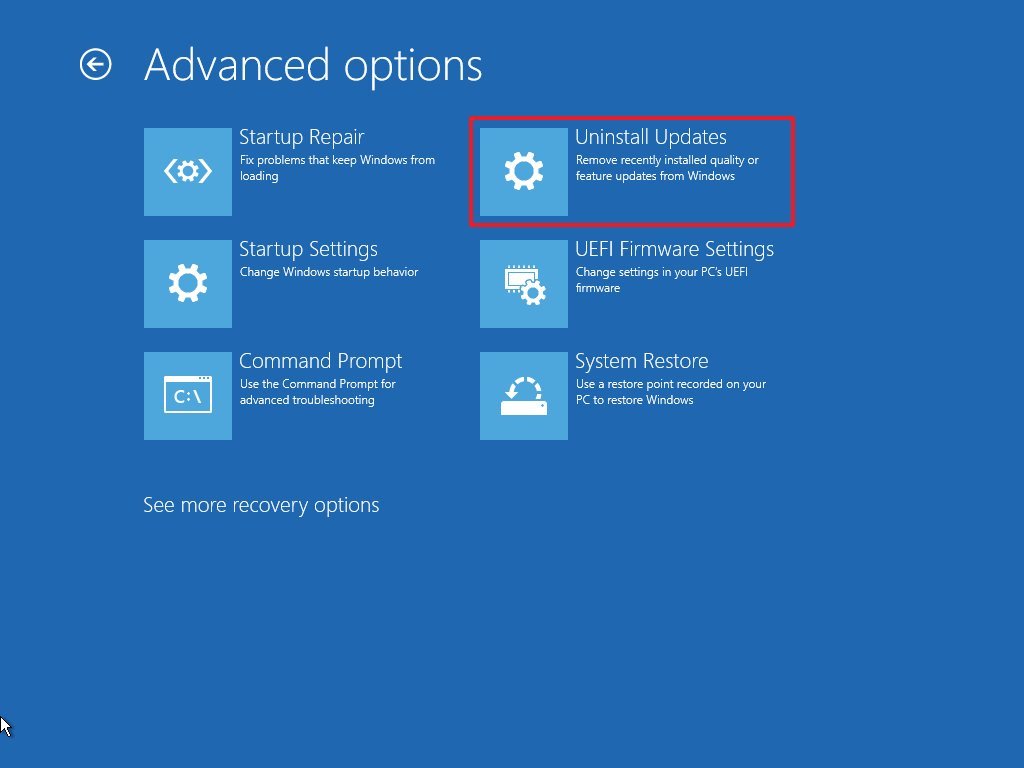
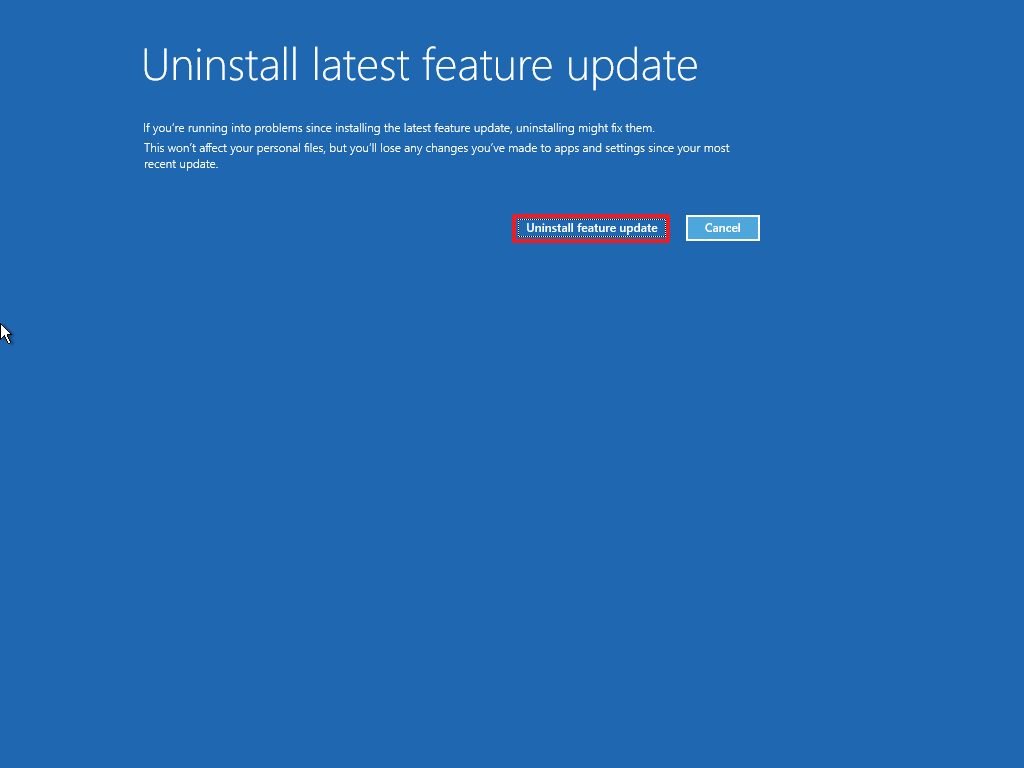
- Select the «Uninstall latest feature update» option.
- Sign in with your account credentials.
- Click the «Uninstall feature update» button.
(Image credit: Future)
If rolling back to a previous version resolves the problem, you should avoid updating again until Microsoft makes an update available that permanently fixes the problem.
Fix black screen during installation of Windows 10
If the black screen happens when installing a new version of Windows 10, the setup may still be working in the background. If this is the case, it can take several hours for the installation to complete, but it will eventually finish successfully.
However, if the installation seems stuck after a long time (after six hours), you should try powering off the computer manually. You can force a device to shut down by pressing and holding the power button for five to 10 seconds or until it shuts down completely. Then unplug the power cable. On a laptop, you should also remove the battery (if possible).
After the computer is powered down, disconnect all non-essential peripherals, including removable storage, printer, network cable, docking station, and secondary displays. Only leave the essentials, such as the mouse, keyboard, and primary monitor.
Wait at least one full minute, and reconnect the battery and power cable, but do not reconnect any peripherals and power on the computer.
If this was not a critical error, the installation should resume and complete successfully. Once on the desktop, remember to reconnect the remaining peripherals.
If this was a critical error, and the system rolls back to the previous setup, then do not reconnect the peripherals and try to install the update manually one more time. If this was a Windows 10 upgrade, you could try the installation one more time, but use a bootable USB flash drive to install Windows 10.
More Windows 10 resources
For more helpful articles, coverage, and answers to common questions about Windows 10, visit the following resources:
- Windows 11 on Windows Central — All you need to know
- Windows 10 on Windows Central — All you need to know

(opens in new tab)
Cutting-edge operating system
A refreshed design in Windows 11 enables you to do what you want effortlessly and safely, with biometric logins for encrypted authentication and advanced antivirus defenses.
Get the best of Windows Central in in your inbox, every day!
Mauro Huculak is technical writer for WindowsCentral.com. His primary focus is to write comprehensive how-tos to help users get the most out of Windows 10 and its many related technologies. He has an IT background with professional certifications from Microsoft, Cisco, and CompTIA, and he’s a recognized member of the Microsoft MVP community.

После обновления или установки Windows 10, а также после обычной перезагрузки уже успешно установленной системы у вас появляется черный экран с указателем мыши, и вы не знаете что делать, не спешите расстраиваться и удалять систему, выход есть. Вообще данный глюк тянется еще с Windows 8.1, ранее я рассказывал как устраняется в windows 8.1 черный экран, советую ее тоже почитать если представленные ниже методы вам не помогут.
Проблема очень часто связана с глюками видеокарт NVidia или AMD Radeon, однако это не единственная причина. В данной инструкции мы рассмотрим ситуацию, когда Windows 10 загружается, слышны звуки, но на экране ничего не отображается, кроме раздражающей мышки или можете столкнуться с еще возможной ситуацией, когда черный экран появляется после сна или гибернации (или после выключения и повторного включения компьютера).

Если у вас есть несколько видеовыходов, попробуйте переключить соединение на другой порт. Часто обновление драйвера может включать изменения, которые по неизвестным причинам могут отправлять видеосигнал на неправильный порт (DisplayPort, HDMI, DVI, Thunderbolt, VGA).
Примечание: в некоторых случаях в windows 10 черный экран может быть вызван подключенным вторым монитором. В этом случае попробуйте его отключить, а если это не сработало, то зайти в систему вслепую (описано ниже, в разделе про перезагрузку), после чего нажать Windows+P, один раз клавишу вниз и Enter.
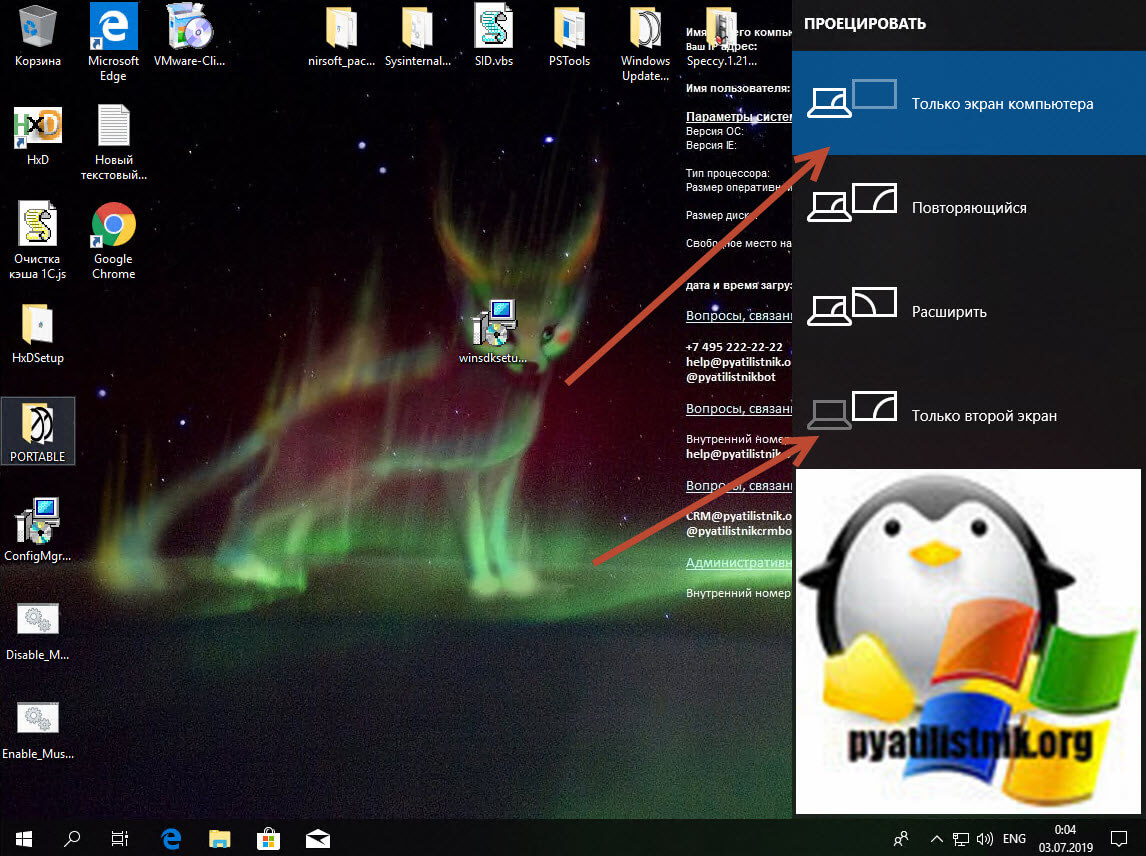
Во многих случаях вы увидите черный экран на вашем устройстве, потому что Windows 10 потеряла связь с дисплеем. Когда это происходит, вы можете использовать сочетание клавиш Windows + Ctrl + Shift + B , которое перезапускает видеодрайвер и обновляет соединение с монитором. Ваш экран должен моргнуть и обновиться, это сродни нажатию клавиши F5 в браузере.
На планшетах (таких как Surface Pro или Surface Go ) вы можете включить экран, нажав кнопки увеличения и уменьшения громкости одновременно три раза.
Как бы смешно не звучало, но я видел человека, который просто забыл включить свой экран монитора, поэтому он и видел черный экран, а как же иначе
Отключение ненужных устройств
Периферийные устройства, подключенные к вашему компьютеру, могут быть причиной появления черного экрана или черного экрана с вращающимися точками во время запуска. Если вы столкнулись с чем-то похожим, отсоедините все периферийные устройства (например, принтеры, камеры, съемные диски, Bluetooth и другие USB-устройства) от компьютера.
Запустите компьютер еще раз, и если все работает нормально, значит, у вас проблема с одним из ваших периферийных устройств. Вы можете выяснить, какое из них вызывает проблему, подключая по одному периферийному устройству за раз, пока не наткнетесь на тот, который вызывает конфликт. Как только вы узнаете устройство, вызывающее проблему, отключите его, перезагрузите компьютер, а затем выполните поиск в Интернете, чтобы выяснить, есть ли исправление, или обратитесь за помощью к производителю устройства.
Перезапуск проводника Windows
Очень часто пользователи не выключают компьютер, а просто отправляют его в сон. Windows система не без греха, и в ней легко могут зависать службы, краеугольной для системы является служба explorer.exe (Проводник). Первым делом, дабы исправить ваш черный экран на вашей Windows 10, пробуем перезапустить проводник. Для этого нажмите на фоне черного экрана сочетание клавиш CTRL+SHIFT+ESC (Одновременно). В результате чего у вас откроется «Диспетчер задач». Находим там службу «Проводник», щелкаем по нему правым кликом и выбираем пункт «Перезапустить».
Если у вас нет активного процесса, то вы можете выбрать меню «Файл — Запустить новую задачу»
Пишем в окне новой задачи, explorer.exe и нажимаем Enter. В результате чего у вас будет запущена служба проводника, и может исчезнуть черный экран на входе.
Если комбинация клавиш CTRL+SHIFT+DEL вам не помогла и диспетчер задач не появился, то вы можете нажать на фоне черного экрана, одновременно CTRL+ALT+DEL и выбрать пункт «Диспетчер задач», а далее последовательность действий, как выше.
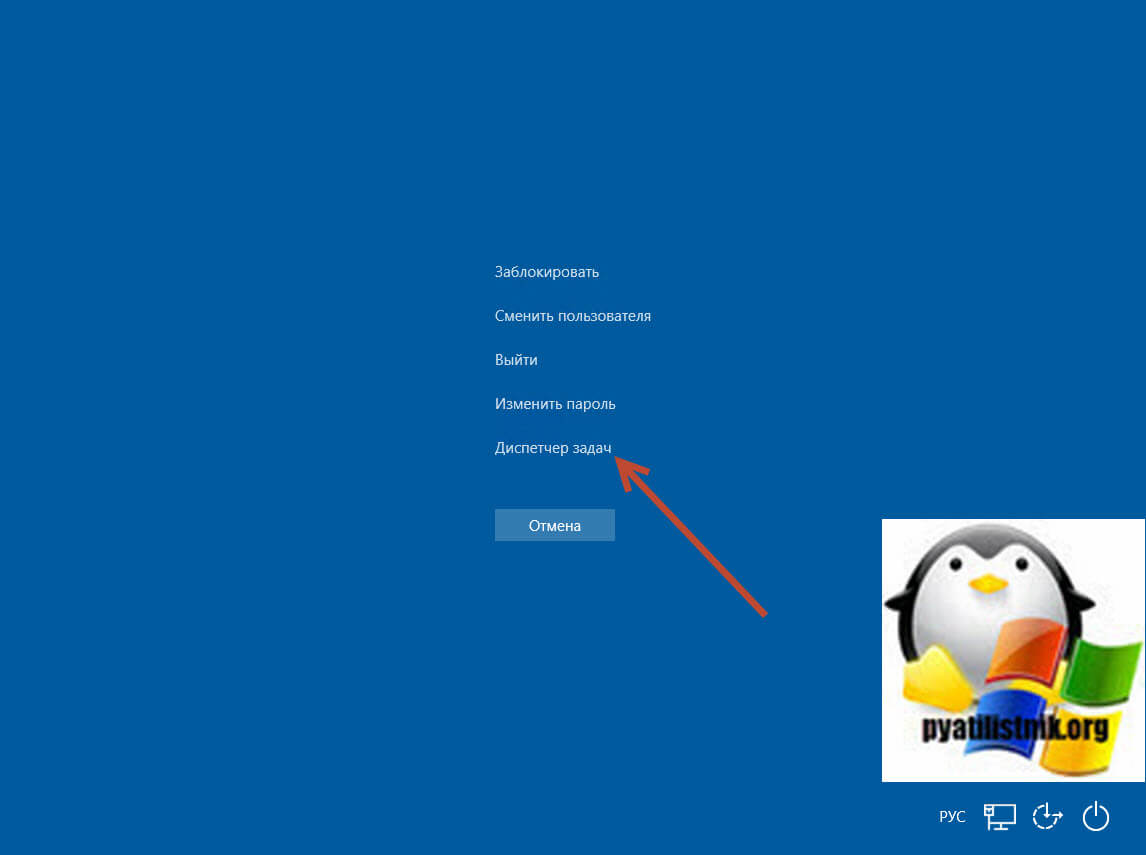
Примечание 2: если вы видите экран входа, а после входа появляется черный экран, то попробуйте следующий вариант. На экране входа нажмите по кнопке вкл-выкл справа внизу, а затем, удерживая Shift, нажмите «Перезагрузка». В открывшемся меню выберите Диагностика — Дополнительные параметры — Восстановление системы.
Перезагрузка Windows 10
Один из работающих способов исправить проблему с черным экраном после повторного включения Windows 10, судя по всему, вполне работоспособный для владельцев видеокарт AMD (ATI) Radeon — полностью перезагрузить компьютер, после чего отключить быстрый запуск Windows 10.
Для того, чтобы сделать это вслепую, после загрузки компьютера с черным экраном несколько раз нажмите на клавишу Backspace (стрелка влево для удаления символа) — это уберет заставку экрана блокировки и удалит любые символы из поля ввода пароля, если вы их туда случайно ввели.
После этого, переключите раскладку клавиатуры (если требуется, по умолчанию в Windows 10 обычно русский, переключить почти гарантированно можно клавишами Windows + Пробел) и введите свой пароль учетной записи. Нажмите Enter и подождите, пока система загрузится.
Следующий шаг — перезагрузка компьютера. Для этого, нажмите на клавиатуре клавиши Windows+R, подождите 5-10 секунд, введите (опять же, может потребоваться переключить раскладку клавиатуры, если по умолчанию в системе у вас русский):
и нажмите Enter. Через несколько секунд еще раз нажмите Enter и подождите около минуты, компьютер должен будет перезагрузиться — вполне возможно, в этот раз вы увидите изображение на экране.
Второй способ перезагрузки Windows 10 при черном экране — после включения компьютера несколько раз нажать клавишу Backspace (а можно пробел или любой символ), затем — пять раз нажать клавишу Tab (это переведет нас к иконке включения-выключения на экране блокировки), нажать Enter, затем — клавишу «Вверх» и еще раз Enter. После этого компьютер перезагрузится.
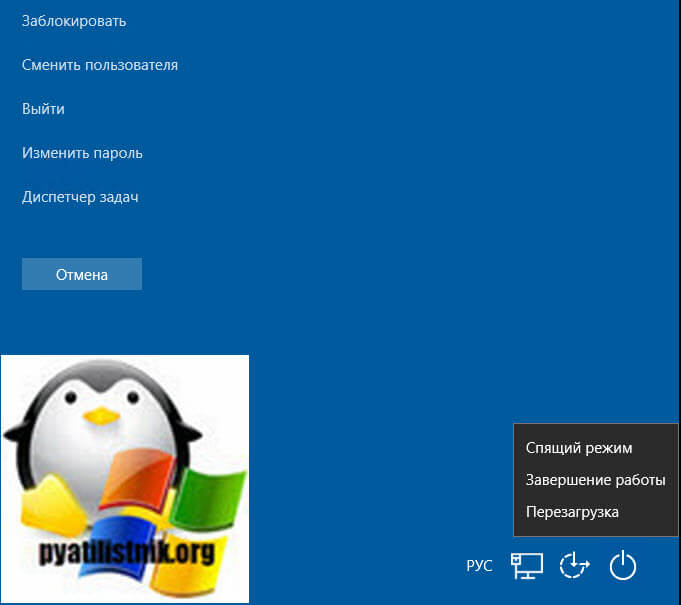
Если ни один из этих вариантов не позволяет перезагрузить компьютер, вы можете попробовать (потенциально опасно) принудительное выключение компьютера долгим удерживанием кнопки питания. А затем снова включить его.
Если в результате всего предложенного изображение на экране появилось, значит дело именно в работе драйверов видеокарты после быстрого запуска (который по умолчанию используется в Windows 10) и для исключения повторения ошибки.
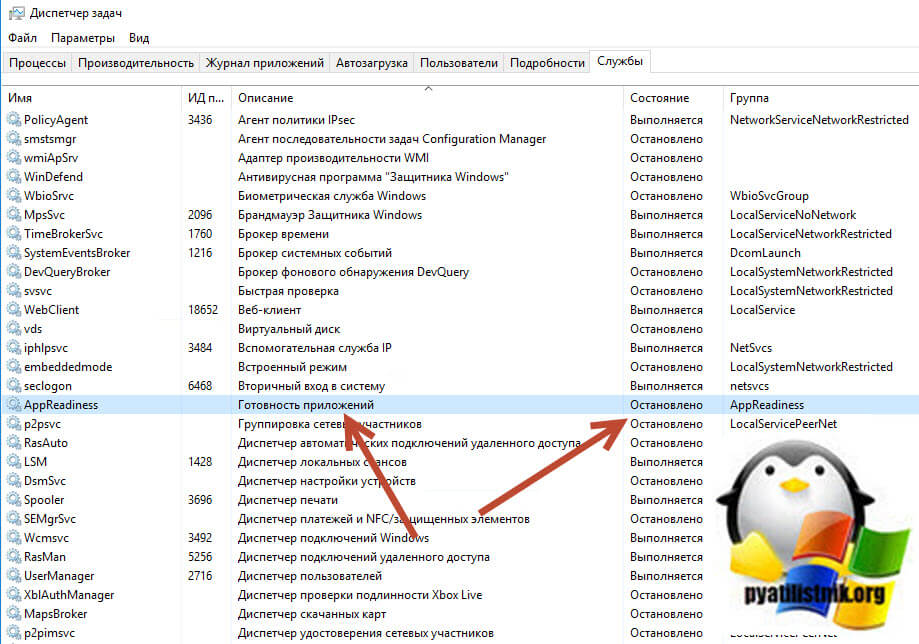
Отключение службы AppReadiness
В диспетчере задач, найдите вкладку «Службы» и найдите службу AppReadiness (Готовность приложений), если она включена, то через правый клик попробуйте ее выключить, и в свойствах выставить тип запуска «Вручную». После чего перезагружаем компьютер.
Использование интегрированного видео
Если у вас имеется выход для подключения монитора не от дискретной видеокарты, а на материнской плате, попробуйте выключить компьютер, подключить монитор к данному выходу и снова включить компьютер.
Есть большая вероятность (если интегрированный адаптер не отключен в UEFI), что после включения, вы увидите изображение на экране и сможете выполнить откат драйверов дискретной видеокарты (через диспетчер устройств), установить новые или же использовать восстановление системы.
Удаление и переустановка драйверов видеокарты
Если предыдущий способ не сработал, следует попробовать удалить драйвера видеокарты из Windows 10. Сделать это можно в безопасном режиме или в режиме с низким разрешением экрана, а о том, как в него попасть, видя только черный экран, я сейчас расскажу (два способа для разных ситуаций).
Если вам удается на фоне черного экрана нажать сочетание клавиш CTRL + ALT + DELETE и у вас появляется синее окно с возможностью манипулированием компьютером, то зажмите клавишу SHIFT и в правом углу выберите пункт перезагрузить.
В итоге вы попадете в меню «Выбор действия». Выбираем пункт «Поиск и устранение неисправностей»
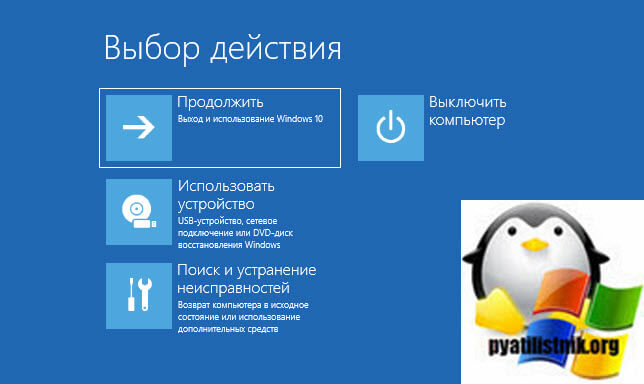
Далее выбираем «Дополнительные параметры»
Если не работает CTL + ALT + DELETE. На экране входа (черном) несколько раз нажмите Backspace, затем — 5 раз Tab, нажмите Enter, потом — один раз вверх и, удерживая Shift, снова Enter. Подождите около минуты (загрузится меню диагностики, восстановления, отката системы, которое вы, вероятно, тоже не увидите).
- Три раза вниз – Enter — два раза вниз — Enter – два раза влево.
- Для компьютеров с BIOS и MBR — один раз вниз, Enter. Для компьютеров с UEFI — два раза вниз – Enter. Если вы не знаете, какой у вас вариант — нажмите «вниз» один раз, а если попадете в настройки UEFI (BIOS), то используйте вариант с двумя нажатиями.
- Еще раз нажмите Enter.

Черный экран в Windows 10
Компьютер перезагрузится и покажет вам особые варианты загрузки. Используя числовые клавиши 3 (F3) или 5 (F5) для того, чтобы запустить режим с низким разрешением экрана или безопасный режим с поддержкой сети. Загрузившись, вы можете либо попробовать запустить восстановление системы в панели управления, либо удалить имеющиеся драйвера видеокарты, после чего, перезапустив Windows 10 в обычном режиме (изображение должно появиться), установить их заново.
Если такой способ загрузить компьютер по какой-то причине не срабатывает, можно попробовать следующий вариант:
- Зайти в Windows 10 с паролем (так как это описывалось в начале инструкции).
- Нажать клавиши Win+X.
- 8 раз нажать вверх, а затем — Enter, откроется командная строка.
В командной строке введите (должна быть английская раскладка):
bcdedit /set safeboot network
и нажмите Enter. После этого введите shutdown /r нажмите Enter, через 10-20 секунд (или после звукового оповещения)— еще раз Enter и подождите, пока компьютер не перезагрузится: он должен загрузиться в безопасном режиме, где можно будет удалить текущие драйвера видеокарты или запустить восстановление системы. (Для того, чтобы в дальнейшем вернуть обычную загрузку, в командной строке от имени администратора используйте команду
bcdedit /deletevalue safeboot )
Дополнительно: если у вас имеется загрузочная флешка с Windows 10 или диск восстановления, то вы можете воспользоваться ими: Восстановление Windows 10 (можно попробовать использовать точки восстановления, в крайнем случае — сброс системы).
Отключение быстрого запуска Windows 10
Кликните правой кнопкой мыши по кнопке Пуск, выберите Панель управления

Электропитание Windows 10
Слева выберите «Действия кнопок питания».
Вверху нажмите «Изменение параметров, которые сейчас недоступны».
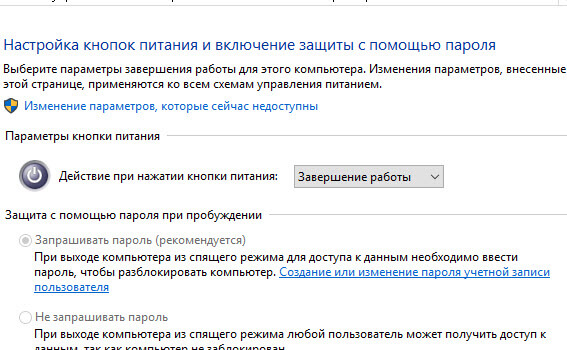
Пролистайте окно вниз и снимите отметку с пункта «Включить быстрый запуск».

Черный экран в Windows 10
Сохраните сделанные изменения. Проблема в дальнейшем повториться не должна.
Последствия вируса
Наличие черного экрана может косвенно говорить, что у вас в системе завелся зловред, который легко мог повредить реестр Windows и например, поменять значение в ветке реестра HKEY_KEY LOCAL_MACHINE — SOFTWARE — Microsoft — Windows NT — CurrentVersion — WinLogon. Найдите тут ключ Shell и проверьте, что у него стоит значение explorer.exe, если оно не стоит, то нужно лечить систему в безопасном режиме, для этого можете скачать бесплатный dr web cureit и пройтись им. так же можете использовать AdwCleaner.
Как исправить случайные черные экраны
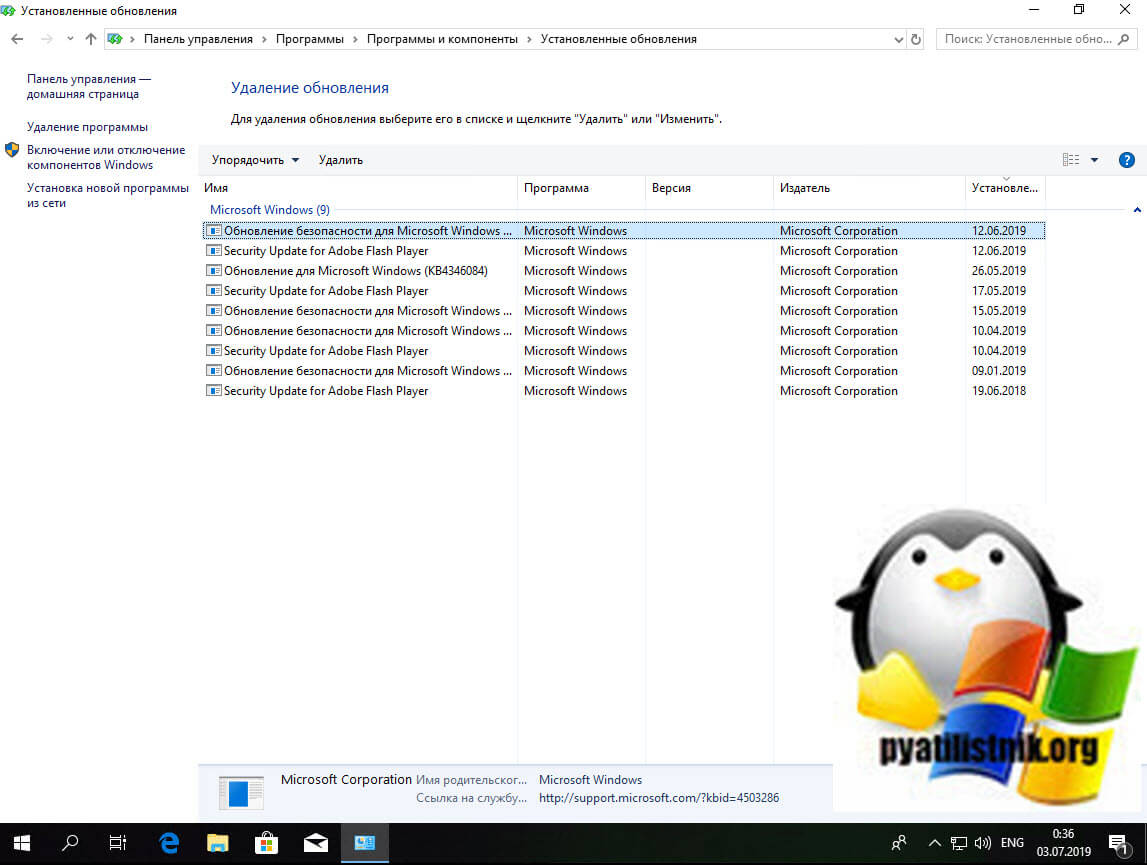
И затем есть черные экраны, которые происходят на ровном месте. Новая модель обслуживания Windows 10 (то есть бесконечные исправления и обновления) означает, что обновления, исправления, исправления безопасности и обновления драйверов для Windows часто загружаются в фоновом режиме и устанавливаются ночью совершенно незаметно для вас. Если вы хотите определить, какие обновления Windows установлены и когда, вы можете, но если они уже прошли мимо вас и дали вам черный экран, попробуйте загрузиться в безопасном режиме. После чего их следует удалить. Для откройте панель управления и перейдите в пункт «Программы и компоненты», далее находим пункт «Просмотр установленных обновлений»
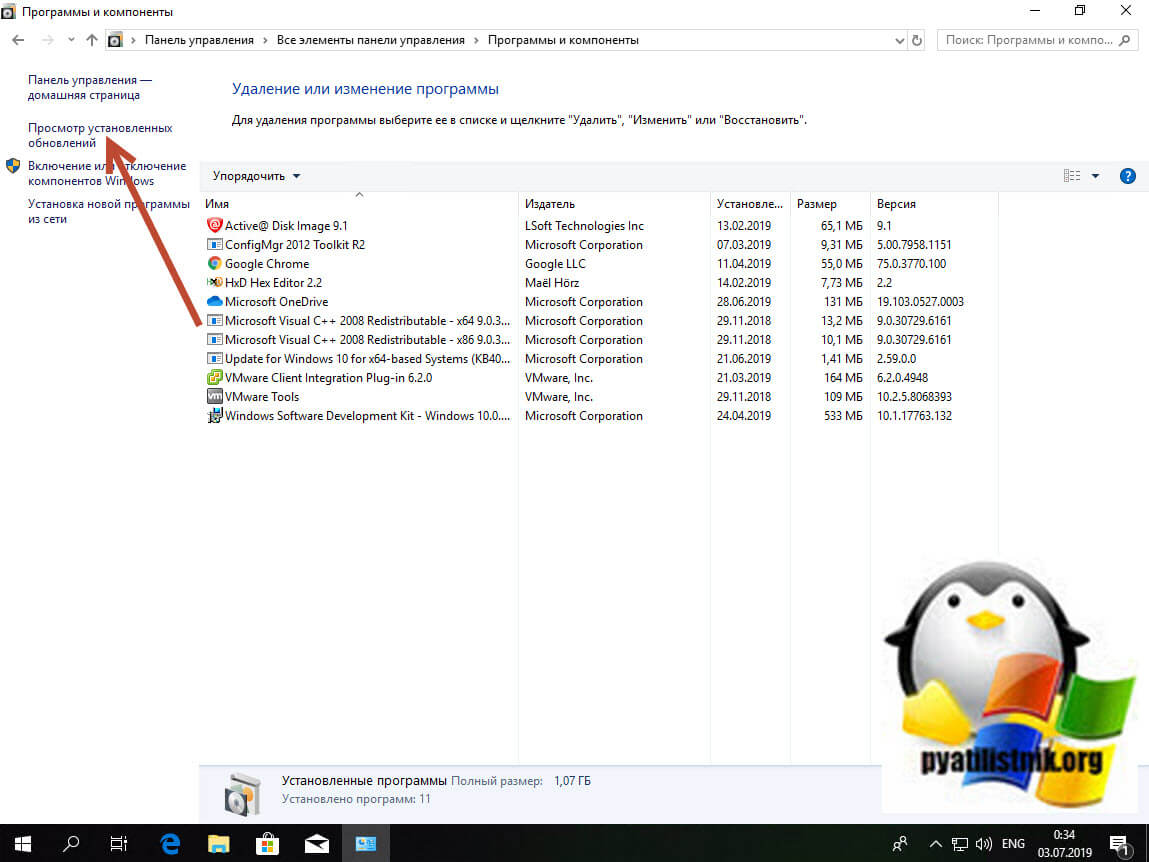
После чего смотрим последние обновления и удаляем их, не забываем потом перезагрузить ваш компьютер и проверить результат.
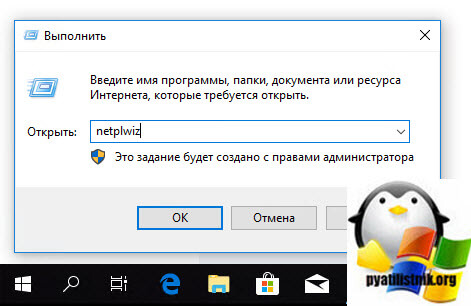
Поврежденный профиль пользователя иногда может вызвать черный экран. Попытка загрузки в безопасном режиме, создание новой учетной записи пользователя, а затем попытка войти в нее может помочь. В диспетчере задач, вызовите новую задачу или если безопасный режим позволяет открыть пуск или вывести окно «Выполнить», после нажатия клавиш WIN + R, то введите netplwiz.
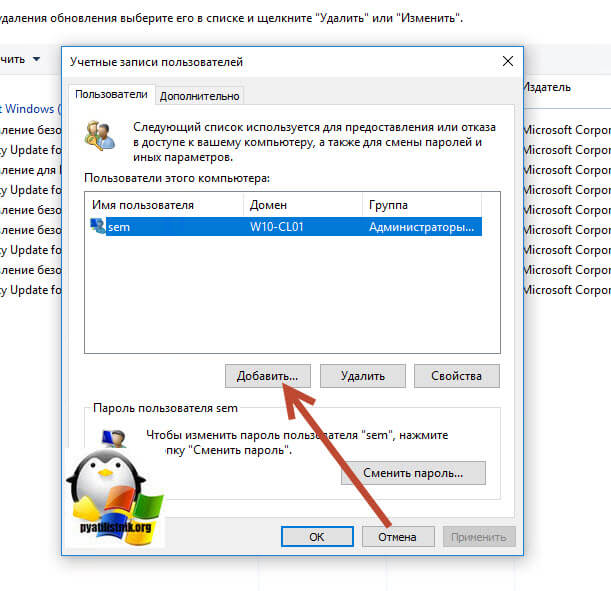
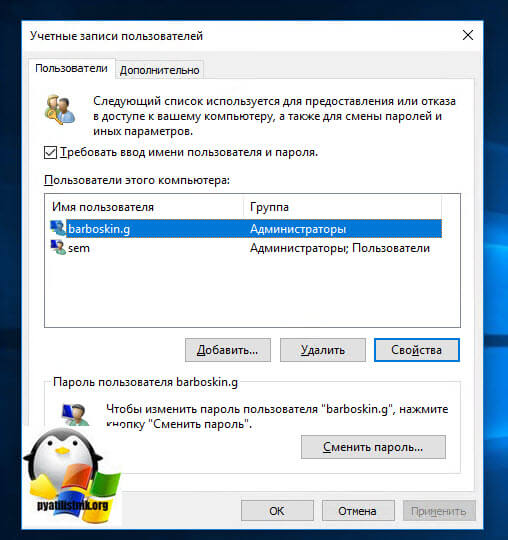
У вас откроется окно «Учетные записи пользователей», нажмите кнопку «Добавить»
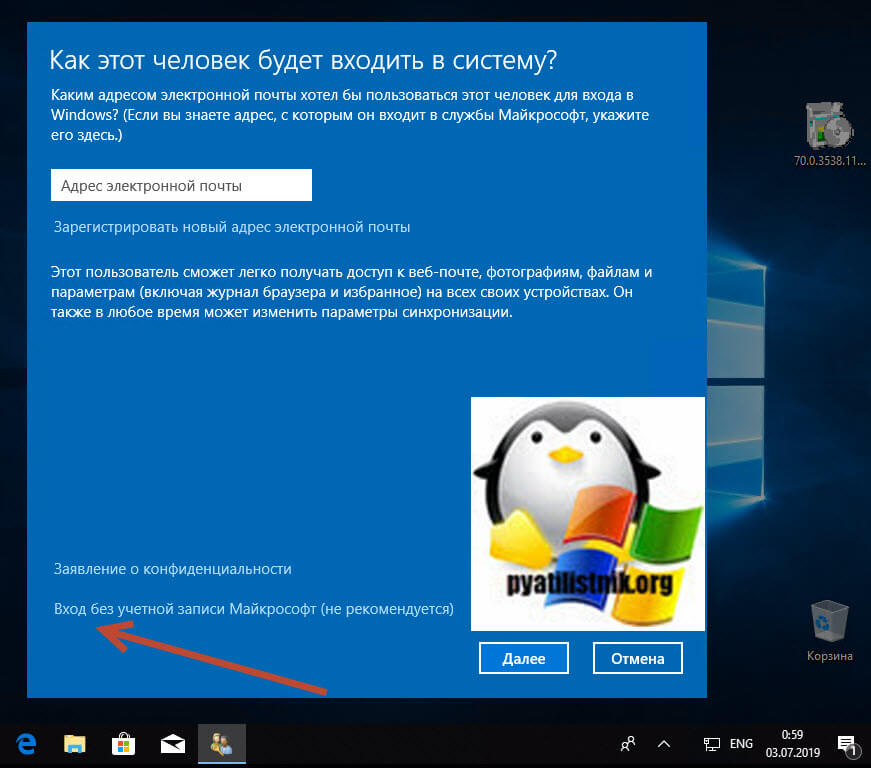
Выбираем «Вход без учетной записи Майкрософт» и далее.
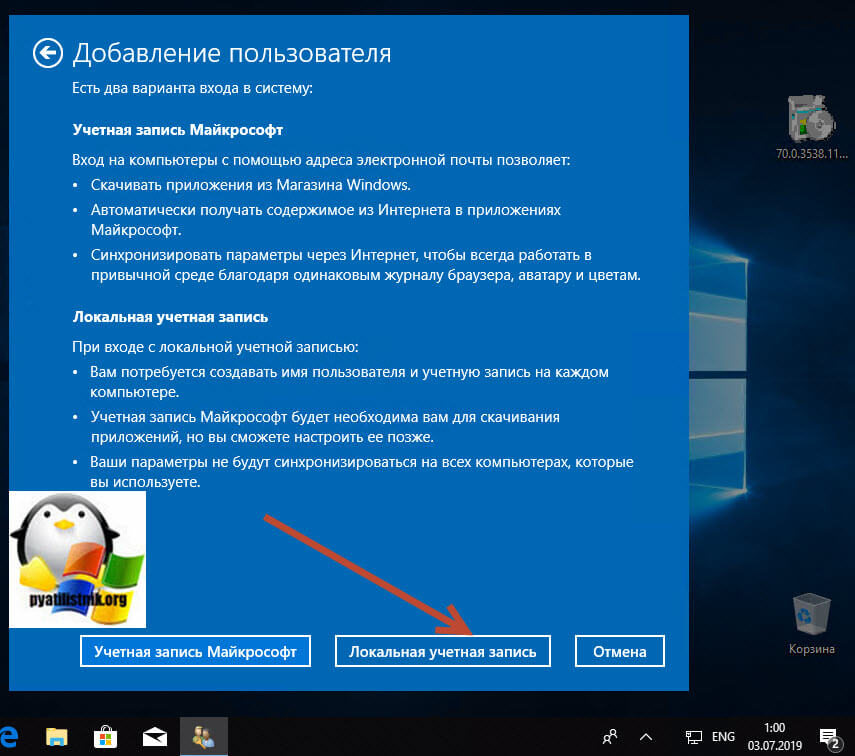
Создаем локальную учетную запись.
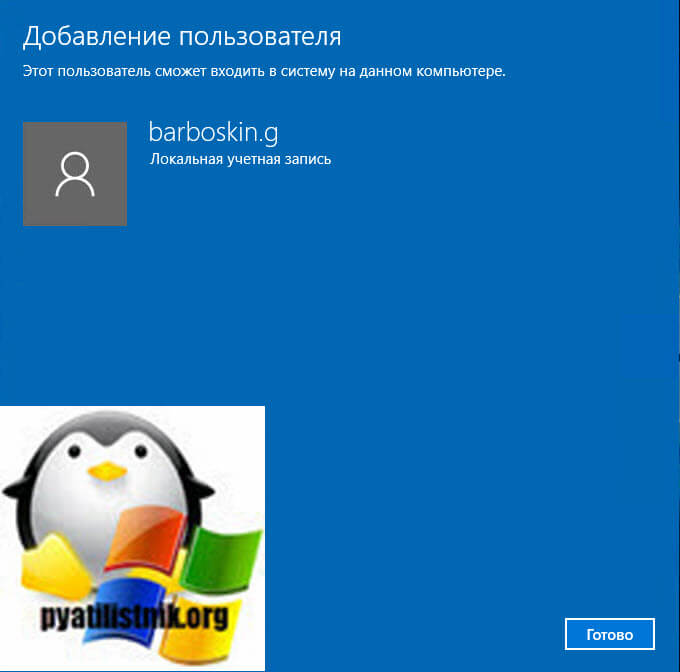
Заполняем реквизиты новой учетной записи.

Готово. Новая учетная запись создана. Осталось дать ей административные права.
Выбираем нового пользователя, переходим в его свойства и назначаем ему группу «Администратор»

В итоге получилось вот так, теперь можно попробовать войти под новым пользователем. Данные потом легко восстановить, скопировав их из старого профиля.
Процессы RunOnce также могут быть виновником. Если вы все видите черный экран после входа в систему, нажмите Control + Shift + Esc на клавиатуре, это запустит диспетчер задач. Перейдите на вкладку «Процессы и службы», а затем найдите все экземпляры RunOnce32.exe или RunOnce.exe. Если вы обнаружите, что они запущены, остановите процесс, отмените приложение или завершите службу. Лучше у службы вообще выставить при старте запуск вручную.
Обновление от 06.07.2017
Вышло обновление KB4034450, призванное устранить все проблемы с черными экранами десятки, по возможности установите его как можно скорее в безопасном режиме, подсунув через флешку или диск.
Черный экран Windows 10 из-за драйверов принтера
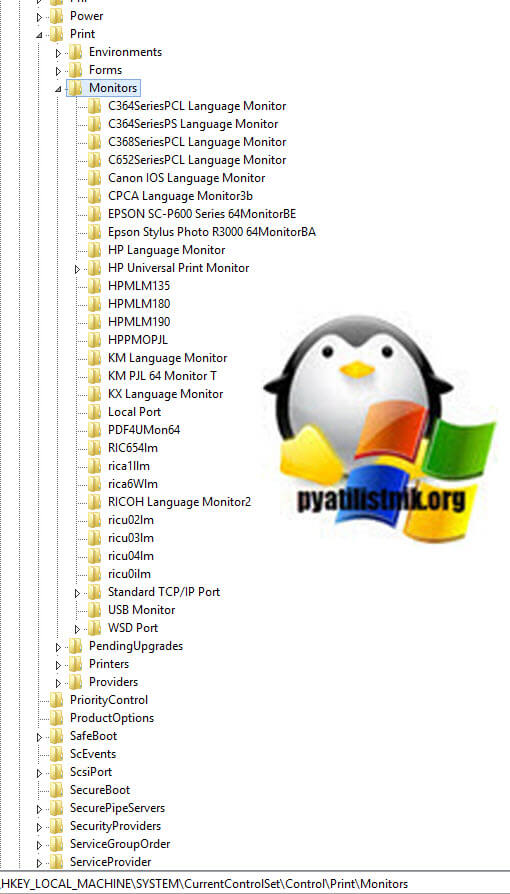
За свою практику, я очень много раз видел черные экраны на RDS фермах, и там одной из причин было, наличие старых, конфликтных драйверов от принтеров. В итоге приходилось заходить в безопасный режим Windows и производить чистку вот таких веток реестра. Первая ветка, в которой нужно удалить все, кроме вот таких значений:
- USB-монитор
- Стандартный порт TCP/IP
- PJL Language Monitor
- Локальный порт
- BJ Language Monitor
- AppleTalk Printing Devices
HKEY_LOCAL_MACHINESYSTEMCurrentControlSet ControlPrintMonitors
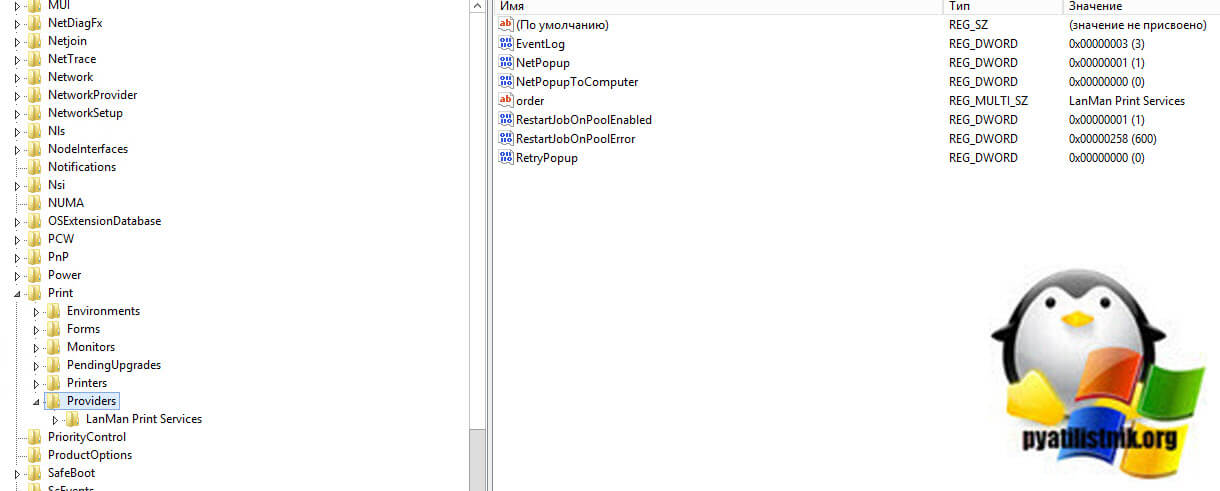
В ветке провайдеров печати, удалить все, кроме поставщиков печати по умолчанию
HKEY_LOCAL_MACHINESYSTEMCurrentControlSet ControlPrintProviders
Так же нужно почистить процессы печати
HKEY_LOCAL_MACHINESYSTEMCurrentControlSetControl PrintEnvironmentsWindows x64
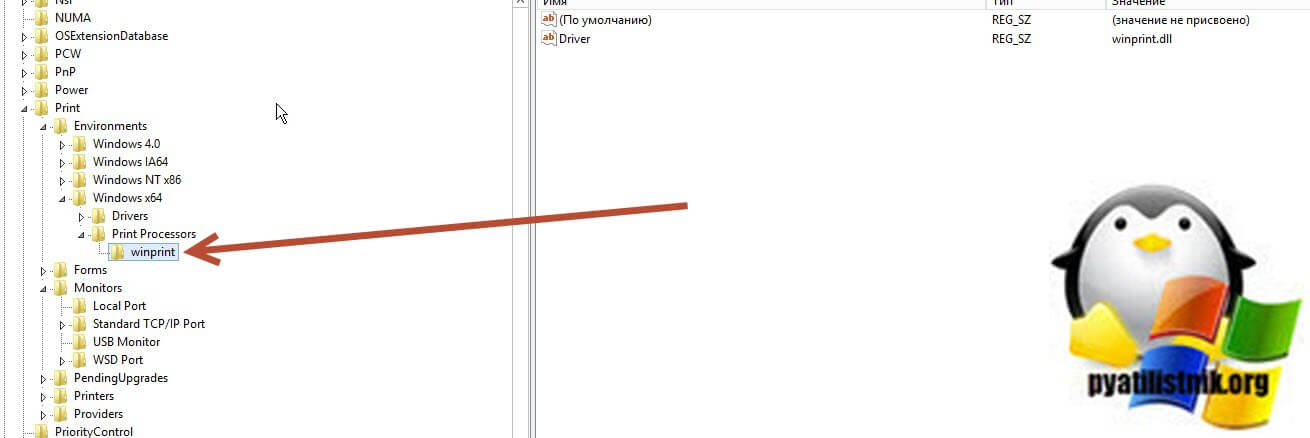
После очистки реестра, я бы вам посоветовал произвести еще очистку компьютера от мусора с помощью Ccleaner, далее необходимо перезагрузить ваш компьютер в нормальном режиме и проверить наличие черного экрана.
Обновление BIOS у компьютера
Недавно видел случай, что пользователь обновил свою Windows 10 1809 до версии 1903 и получил черный экран на входе, в итоге оказалось, что его оборудование не воспринимало новую версию системы. Выходом из нее стало обновление биоса оборудования через безопасный режим Windows.Либо же обратная ситуация, когда продвинутый пользователь наоборот установил свежую версию BIOS и она оказалась еще недоработанной, пример я видел у своего знакомого, когда он накатил на свой Asus, через утилиту ez update, свежую версию, после перезагрузки любовался черным экраном, все манипуляции приведенные выше не давали эффекта, откат версии BIOS к предыдущей вернул все в рабочее русло.
Откат до предыдущей версии
Если вы произвели установку крупного обновления релиза, например вы перешли с Windows 10 1809 на Windows 10 1903, где получили черный экран, то вы можете с помощью загрузочной флешки, произвести процедуру отката до предыдущей версии, я об этом уже подробно рассказывал. Когда восстановите нормальную работу компьютера, можете месяцочек подождать, может быть Microsoft исправит данное поведение свежего апдейта.
Черный экран после обновления до Windows 10 1903
Не так давно было одно крупное обновление под релизом Windows 10 1903, которое у многих пользователей принесло черный экран как при запуске, так и при подключении к другим компьютерам или серверам. Если у вас это локально, то как я и писал вышел откатываемся, если же у вас этот черный квадрат Малевича выскакивает при удаленном доступе к другим компьютерам, то делаем следующее. Тут я нашел для себя два действенных метода, это использование НЕ ВСТРОЕННОГО КЛИЕНТА RDP, а именно:
- Утилита Remote Desktop Connection Manager, про нее я подробно рассказывал
- Второе это использование за место встроенного клиента подключения к удаленному рабочему столу, это утилита из магазина Windows «Удаленный рабочий стол (Майкрософт)«, ее мы и установим.
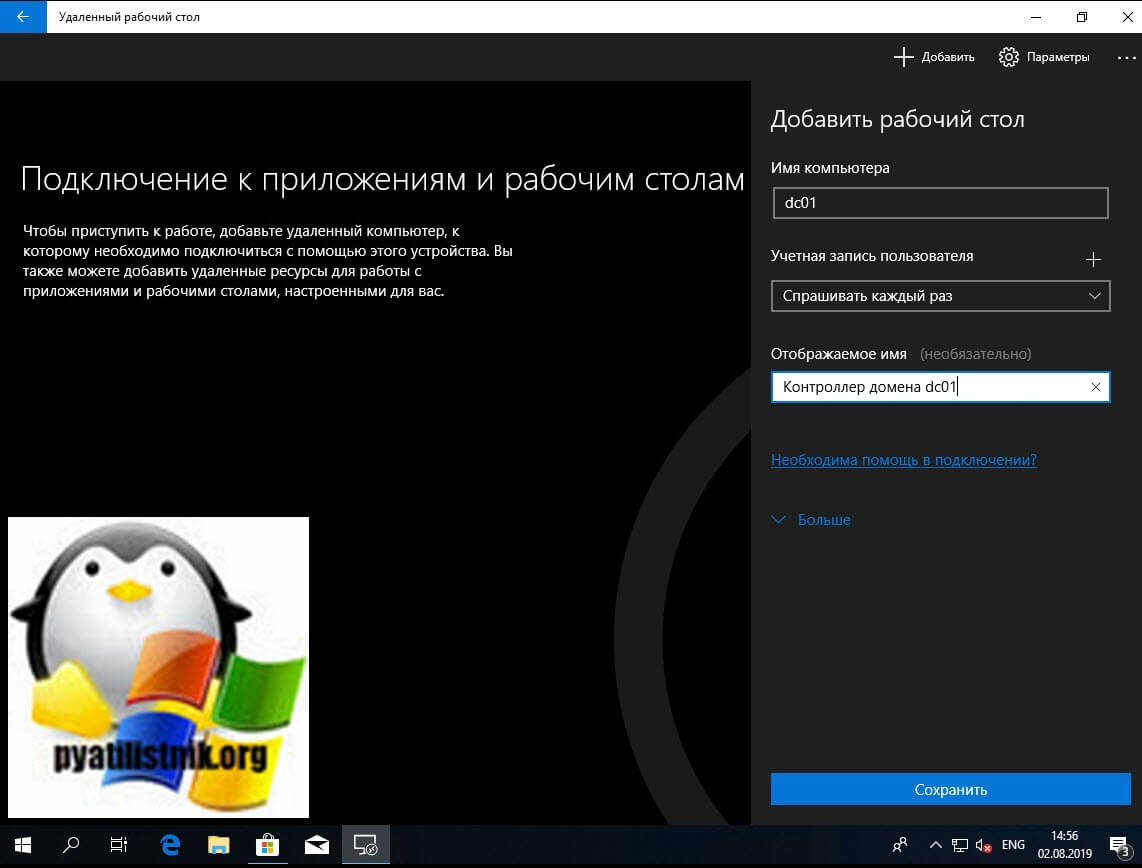
Установка приложения Удаленный рабочий стол (Майкрософт)
Откройте магазин в Windows 10, и в поисковой строке введите «Удаленный рабочий стол (Майкрософт)».
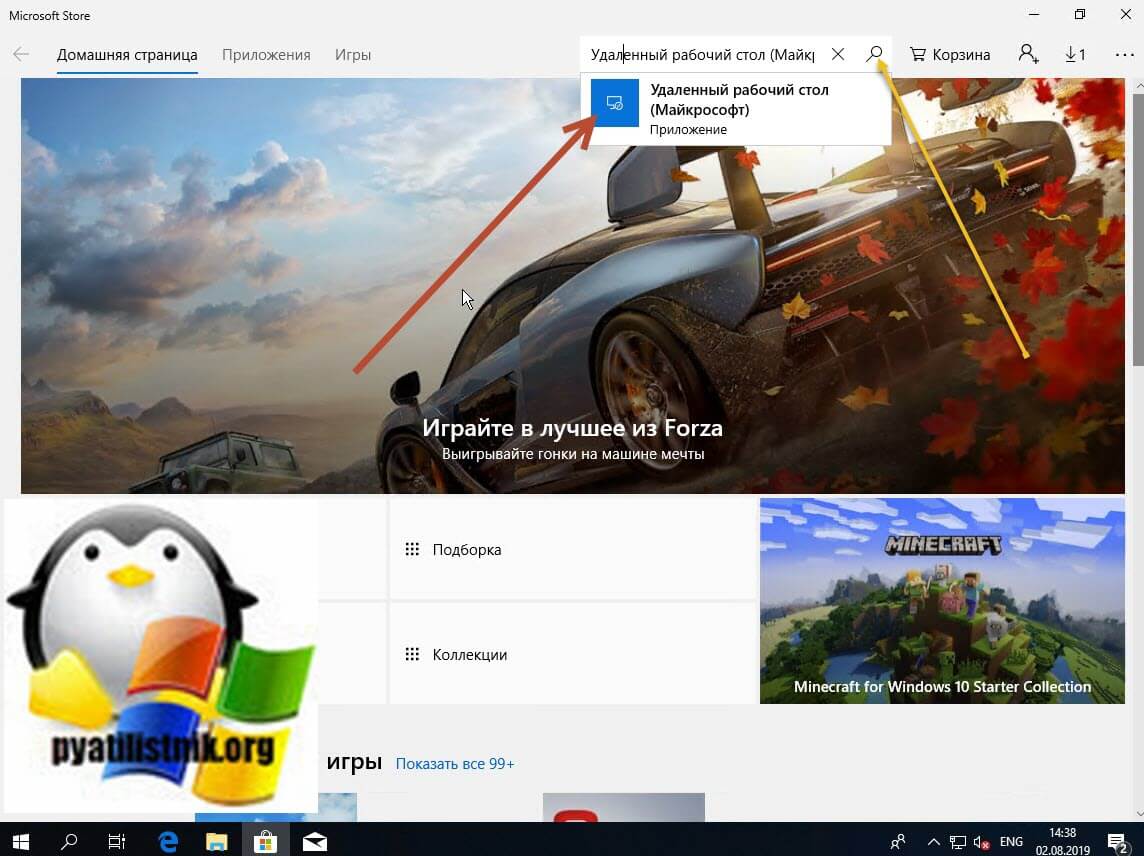
У вас будет найдено два приложения в магазине. Нам необходимо первое, это стабильная версия.
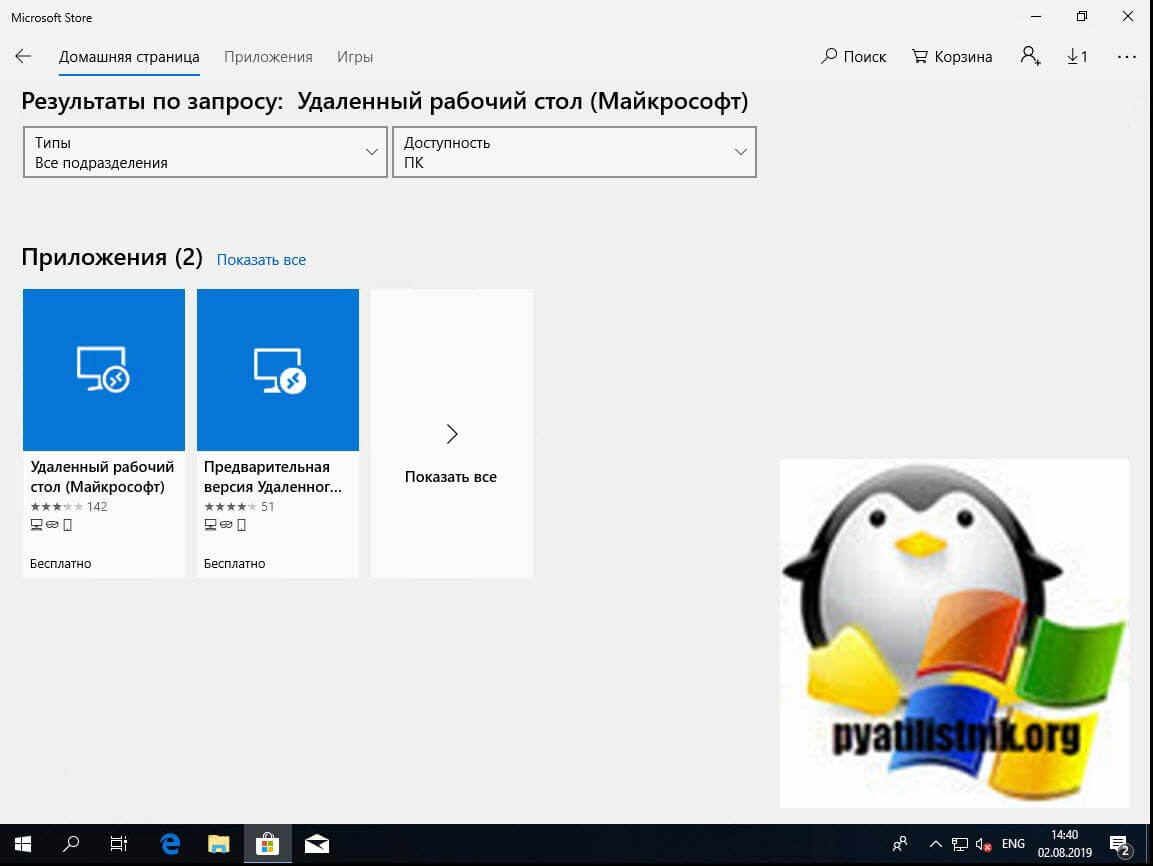
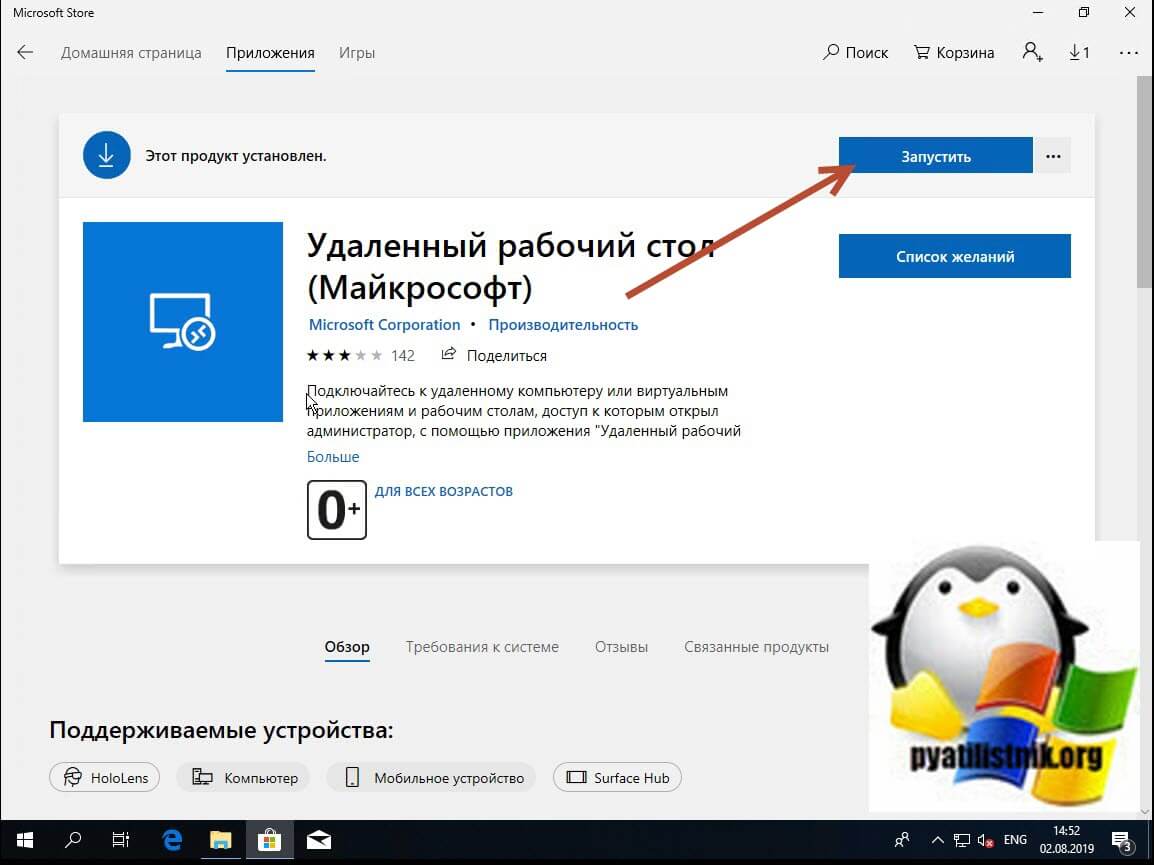
Нажимаем в самом верху кнопку установить.

Начинается скачивание и установка приложения.

Кстати сами файлы приложения «Удаленный рабочий стол (Майкрософт)» , будут хранится в скрытой папке C:Program FilesWindowsApps

Далее пробуем подключиться к удаленному серверу, где у вас возникал черный экран. Для этого нажимаем кнопку «Добавить — Рабочий стол».

Задаем имя сервера и его описание и сохраняем подключение, более тонкая настройка данного клиента описана в статье, как подключиться к удаленному рабочему столу.
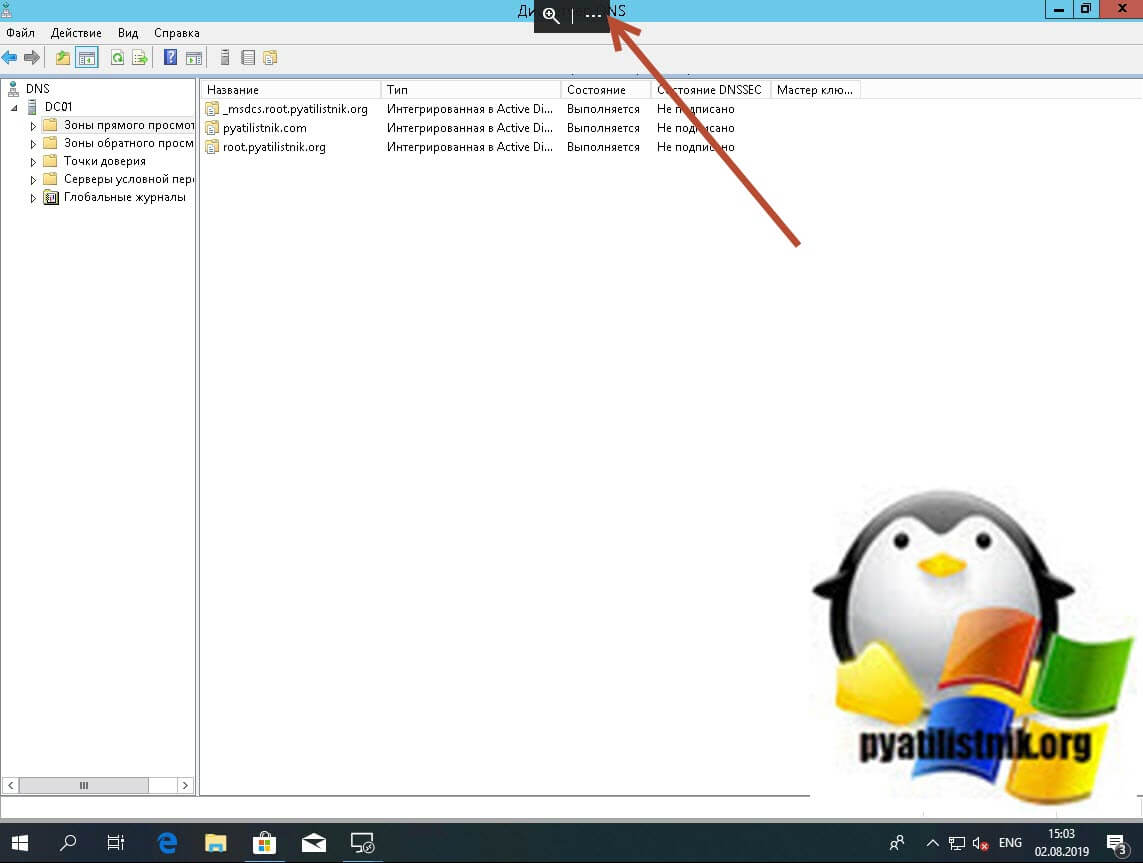
Щелкаем по новому подключению.

Указываем данные учетной записи и проверяем результат.
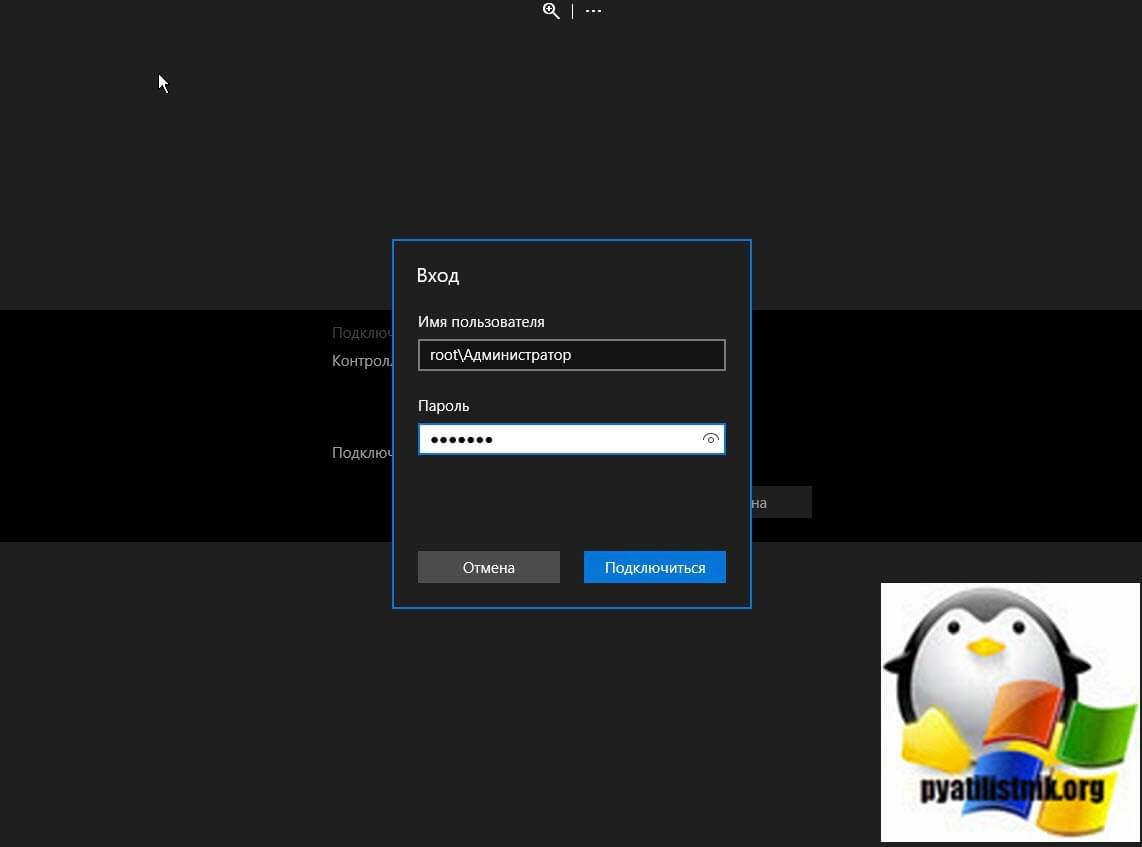
В итоге я успешно подключился и черный экран у меня не появился, я не могу сказать с чем связанно такое поведение и, что этим хочет добиться Microsoft, но факт есть факт.
Отключение функции сжатия памяти
В Windows 10 есть такая функция сжатия памяти (MemoryCompression), как выяснилось на некоторых моделях материнских плат и ноутбуков, вы можете получать черный экран из-за нее. В таких случаях я вам советую попробовать ее отключить, для этого откройте окно PowerShell в режиме администратора и введите:
Команда покажет статус функции, если стоит значение True, то выполняем команду
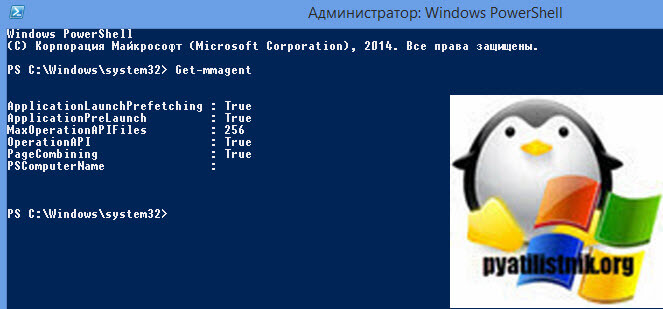
Чтобы изменения вступили в силу, нужно перезагрузиться.
Надеюсь, что данная заметка помогла вам решить вашу проблему с новой ОС от нашего любимого мелкософта. Материал сайта pyatilistnik.org
Пользователи Windows разных версий, начиная с XP и заканчивая 11, сталкиваются порой со странной проблемой. Сразу после загрузки операционной системы, исчезновения ее логотипа или после входа в учетную запись вместо рабочего стола появляется пустой черный экран. На нем может быть курсор мыши, но дальше ничего не происходит. Почему это может случаться и как устранить такую проблему.
♥ ПО ТЕМЕ: Как исправить ошибки Windows и повысить быстродействие: лучшие программы (бесплатно).
Причин появления черного экрана вместо рабочего стола Windows может быть сразу несколько. Такое случается, если выбран неправильный монитор по умолчанию, неправильно установлены драйвера или обновления Windows, загрузке может препятствовать плохо настроенный антивирус, может быть поврежден файл explorer.exe или некорректно происходить его автозапуск. Проблему может породить и конфликт программ.
В зависимости от симптомов можно подобрать те или иные варианты решений.
Если черный экран появляется сразу при включении компьютера и на экране нет надписей BIOS или заставки Windows, то проблема не в операционной системе. Стоит проверить запуск самого компьютера и работоспособность его основных компонентов.
Если черный экран появляется после окна BIOS, но до загрузки Windows (при этом может мигать курсор-подчеркивание), то проблема кроется в загрузчике системы или в дисковом накопителе.
Если на черном фоне появляется меню с вариантами, то надо попробовать выбрать обычную загрузку Windows или последней удачной конфигурации.
Если же на черном (синем) фоне появляется сообщение с кодом ошибки, то надо поискать в Интернете, что именно вызывает эту конкретную проблему.
В этом материале подробно рассмотрим ситуацию, когда система загрузилась, но вместо рабочего стола появился пустой черный экран без каких-либо надписей или значков. При этом указатель курсора может и присутствовать. Обратите внимание, что в большинстве таких случаев имеется возможность получить доступ к меню системы путем ее загрузки в Безопасном режиме или с помощью вызова «Диспетчера задач» и ввода с его помощью тех или иных команд.
Ниже мы приводим различные варианты решения проблемы с черным экраном в Windows.
♥ ПО ТЕМЕ: Горячие клавиши для работы с окнами в Windows.
Как загрузить компьютер с Windows в безопасном режиме
Для решения возникающих проблем в работе Windows, в том числе и исправления ошибки с черным экраном при запуске, иногда необходимо использовать загрузку системы в безопасном режиме.
Загрузка Windows в безопасном режиме подразумевает запуск системы с ограниченным набором системных файлов и драйверов.
Если при загрузке Windows в безопасном режиме текущая проблема больше не проявляет себя, то из списка возможных причин можно исключить настройки, используемые по умолчанию, и базовый набор драйверов. Это позволяет уменьшить количество возможных источников проблемы и помогает при устранении неполадок на компьютере.
Существует две версии безопасного режима: безопасный режим и безопасный режим с загрузкой сетевых драйверов. Безопасный режим с загрузкой сетевых драйверов также загружает сетевые драйверы и службы, необходимые для доступа к Интернету и другим компьютерам в локальной сети.
Для того чтобы загрузить Windows в безопасном режиме:
1. Нажмите сочетание клавиш Win + R (Win – клавиша с логотипом Windows) для вызова окна Выполнить.
2. Введите msconfig в поле и нажмите кнопку ОК.
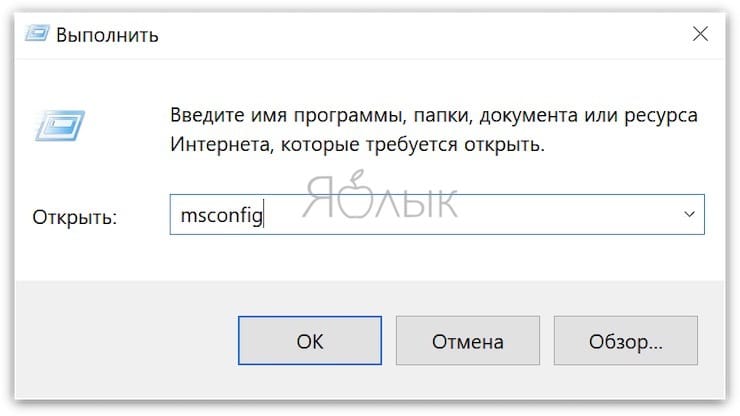
3. Откройте вкладку Загрузка и в разделе Параметры загрузки установите галочку напротив пункта Безопасный режим.
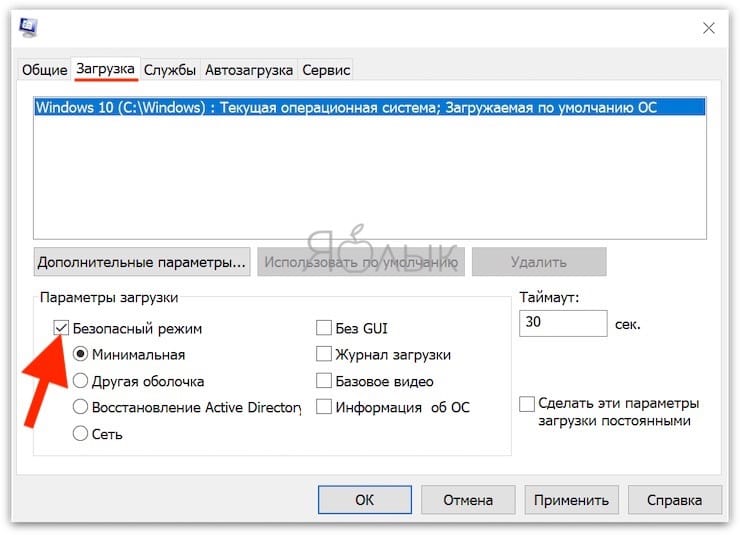
Примечание: Существует несколько типов безопасного режима загрузки Windows: минимальная — запуск безопасного режима, с минимальным набором драйверов; другая оболочка — безопасный режим с поддержкой командной строки; сеть — запуск с поддержкой сети Интернет.
4. Перезагрузите компьютер для запуска Windows в безопасном режиме.
Для выхода из безопасного режима, просто перезагрузите компьютер.
♥ ПО ТЕМЕ: Куда залить видео и получить ссылку: лучшие бесплатные видеохостинги.
Черный экран Windows 10 при запуске: варианты решения проблемы
Простая перезагрузка
Для начала попробуйте прибегнуть к самому простому варианту – перезагрузке компьютера. Эта логичная мера часто помогает решить многие проблемы с Windows.
♥ ПО ТЕМЕ: Как изменить / заменить небо на фото с помощью приложения Luminar на Windows или Mac.
Переустановка драйверов видеокарты
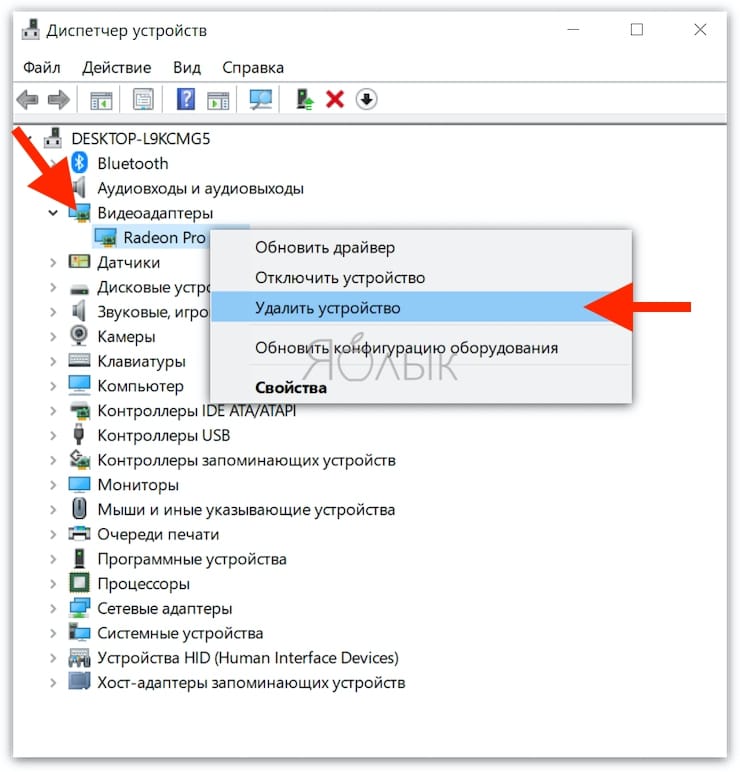
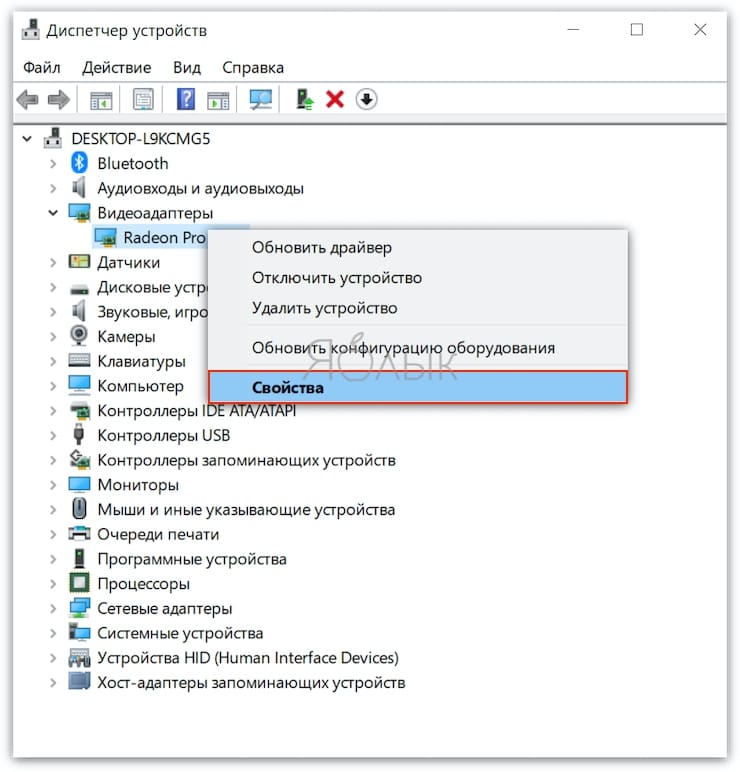
В случае возникновения проблемы сразу же после обновления драйверов под видеокарту или их новой установки понадобится загрузить компьютер в безопасном режиме (инструкция выше) и удалить проблемный драйвер. Запустите «Диспетчер устройств», набрав в поиске системы соответствующий запрос или используя команду devmgmt.msc.

Раскройте элемент «Видеоадаптеры» и удалите используемое устройство. Теперь перезагрузите компьютер и установите другой драйвер.
♥ ПО ТЕМЕ: Как создать невидимую папку в Windows 10.
Откат драйверов видеокарты
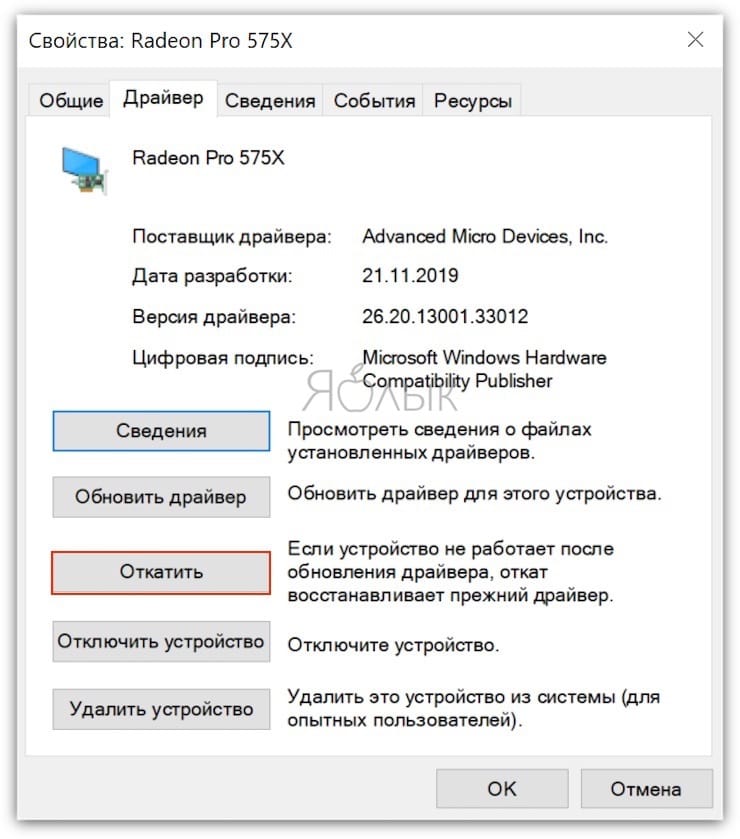
Загрузите компьютер в «Безопасном режиме» и перейдите в «Диспетчер устройств». Раскройте элемент «Видеоадаптеры» и нажмите правой кнопкой мыши на используемое вами устройство, выберите «Свойства».
Перейдите на вкладку «Драйвер» и выберите «Откатить», подтвердив свое действие.
Отключите устройство и снова активируйте его.
♥ ПО ТЕМЕ: Как автоматически переключать язык (раскладку) на клавиатуре в macOS или Windows.
Исправление системных файлов
Если окажутся поврежденными системные файлы операционной системы, то это может повлиять на ее работоспособность. Ошибка загрузки Проводника как раз и приведет к появлению черного экрана. Чтобы проверить систему на целостность системных файлов и их наличие, запустите командную строку от имени Администратора и выполните команду:
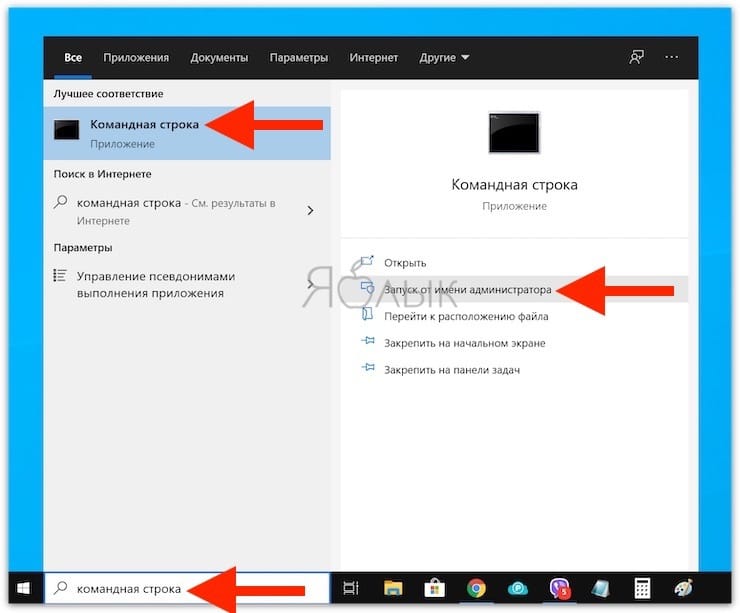
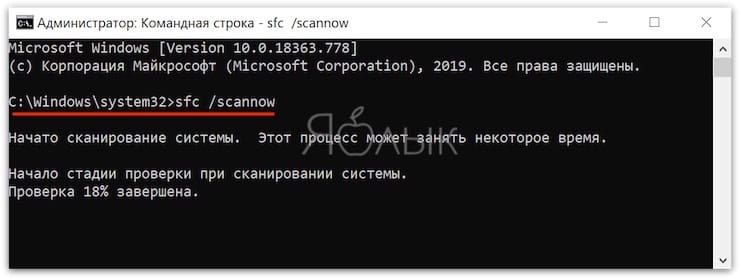
В случае выявления ошибок в результате сканирования выполните следующую команду:
DISM.exe /Online /Cleanup-image /Restorehealth
♥ ПО ТЕМЕ: Как вывести экран iPhone или Android на компьютер с Windows.
Проблема с несколькими дисплеями и выбором монитора по умолчанию
а) При работе с несколькими дисплеями можно нажмите комбинацию клавиш Win+P. Появится окно с выбором режима работы нескольких мониторов. В случае проблемы с черным экраном попробуйте выбрать вариант «Только второй экран» или «Только экран компьютера».
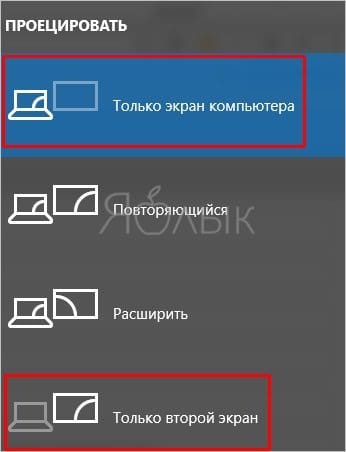
б) В случае использования нескольких мониторов попробуйте оставить подключенным только основной дисплей и перегрузить компьютер. В случае появления изображения стоит проверить, какой же дисплей назначен в системе в качестве основного.
♥ ПО ТЕМЕ: Как в Windows 10 установить пароль любой длины (даже один символ).
Откат Windows
Система периодически создает контрольные точки, что позволяет вернуться к прежнему, стабильному ее состоянию. В случае каких-либо проблем можно воспользоваться этим инструментом. Запуск отката системы возможен из безопасного режима или в режиме восстановления, который можно запустить по пути Параметры Windows → Обновление и безопасность → Восстановление.
![]()
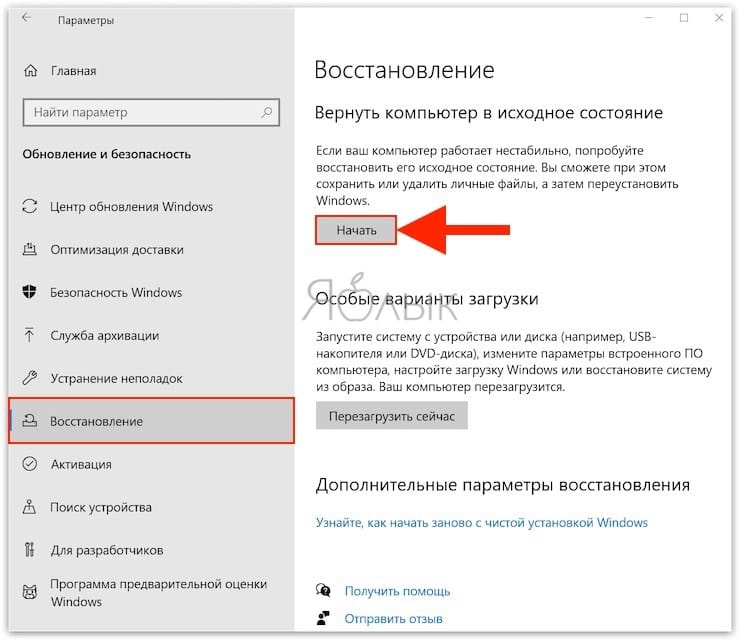
♥ ПО ТЕМЕ: Как в Windows создать иконку для выключения / перезагрузки компьютера.
Удаление антивируса
К сожалению, неправильно настроенный антивирус может стать источником проблем, блокируя нужный системный файл. Попробуйте удалить это средство. Для этого понадобится загрузиться в безопасный режим. Зачастую поставщик антивирусного ПО предлагает и специальную утилиту для удаления антивируса. Если ее нет, то программу можно попробовать удалить из меню «Приложения и возможности» по пути Параметры Windows → Приложения.
♥ ПО ТЕМЕ: Скрытые папки и файлы в Windows 10: как скрыть (показать) фото, видео, документы, диски.
Удаление установленных обновлений Windows
Источником проблемы могут стать и последние обновления системы. Для их удаления откройте «Панель управления» и перейдите по пути Программы и компоненты → Просмотр установленных обновлений.
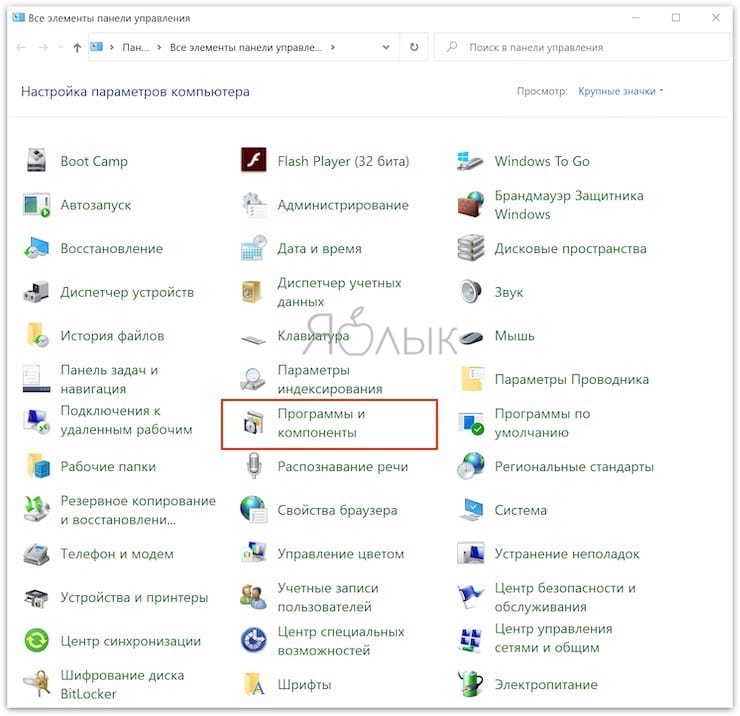
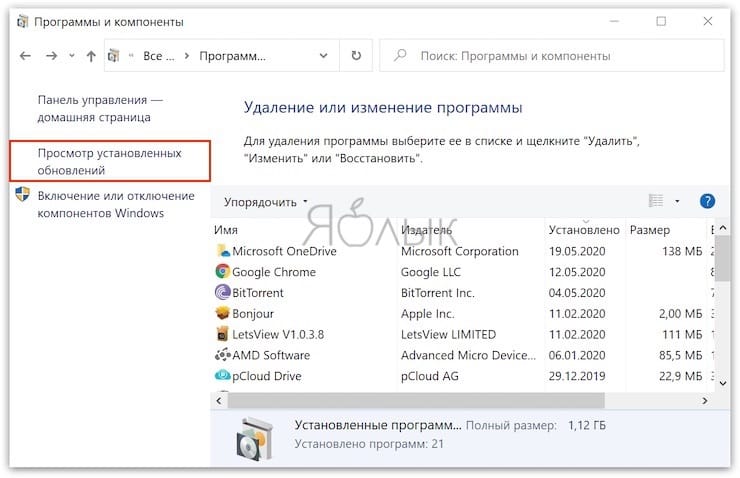
Отсортируйте обновления по дате установки и удалите последние установленные элементы (нажмите на него правой кнопкой мыши и выберите Удалить). Обратите внимания, что сортировка действует внутри одной категории, так что скроллингом придется просмотреть весь список.

♥ ПО ТЕМЕ: Как ускорить работу компьютера с Windows 10, 8, 7: 20 советов.
Сбой в работе проводника Windows
Проводник – это не просто стандартный инструмент Windows для работы с файлами. Эта программа отвечает за отображение окон системы. Если Проводник будет по каким-то причинам сбоить, то рабочий стол может не отображаться. Перезапустить Проводник можно через «Диспетчер задач», вызвать который можно нажав сочетание клавиш Ctrl + Alt + Delete и выбрав «Диспетчер задач».
На вкладке «Процессы» отыщите «Проводник». Щелкните по нему правой кнопкой мыши и выберите «Перезапустить».
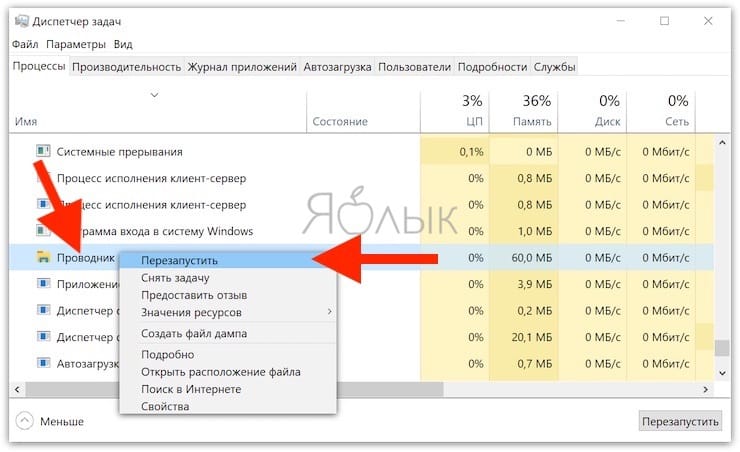
Если это не помогло, то нажмите на меню Файл → Запустить новую задачу и введите explorer.exe. Нажмите OK.
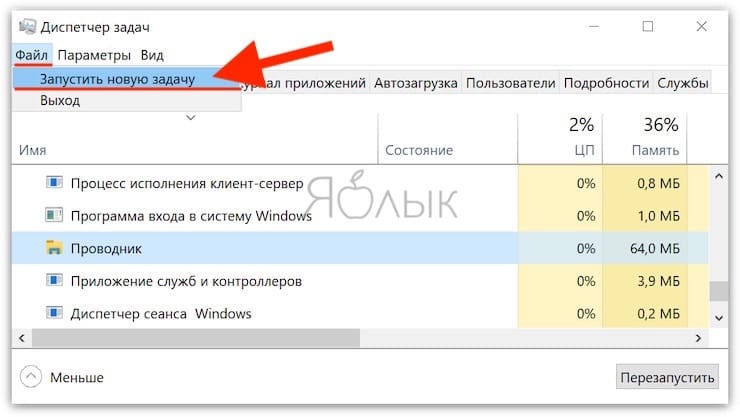

♥ ПО ТЕМЕ: Папка «con» в Windows: почему нельзя создать директорию с таким названием?
Проверка системы на вирусы
Для проверки системы на вирусы можно воспользоваться одноразовыми утилитами, помещенными или установленными на флеш-накопитель. Это может быть Dr.Web, CureIt или другие приложения. Загрузитесь или с флеш-накопителя с установленным ПО, или в безопасном режиме для последующего запуска утилиты с носителя.
♥ ПО ТЕМЕ: Зависает компьютер на Windows? Горячие клавиши, которые помогут решить проблему.
Отключение быстрого запуска или режима гибернации
Функция быстрого запуска помогает при выключении сохранить состояние системы. В свою очередь, это позволяет быстрее осуществить загрузку. Иногда присутствие такого режима вызывает те или иные проблемы. Попробуйте отключить быстрый запуск (режим гибернации). Эти настройки делаются в командной строке.
Для отключения режима гибернации выполните команду :
и перегрузить компьютер. Если загрузка пройдет нормально, то гибернацию можно снова включить командой:
Если отключение режима не помогло, то стоит попробовать отключить быстрый запуск. Windows 8 и первые версии Windows 10 позволяют осуществить это в настройках электропитания. Но в последних сборках отключение возможно только через реестр. Вот как это надо делать:
Запустите командную строку и введите команду:
reg add «HKLMSYSTEMCurrentControlSetControlSession ManagerPower» /v HiberbootEnabled /t REG_DWORD /d 0 /f
Эта команда задаст нулевое значение параметру HiberbootEnabled в ветке, отвечающей за быстрый запуск системы. Перезагрузите компьютер.
♥ ПО ТЕМЕ: Как отключить пароль на вход в Windows 10: рабочие способы.
Удаление приложений из Автозапуска (автозагрузки) Windows
Проблема с появлением черного экрана может возникнуть при автоматическом запуске программы, которая несовместима с текущей версией ОС или работает некорректно с этой системой. Надо отключить все элементы в автозагрузке (Параметры Windows → Приложения → Автозагрузка).
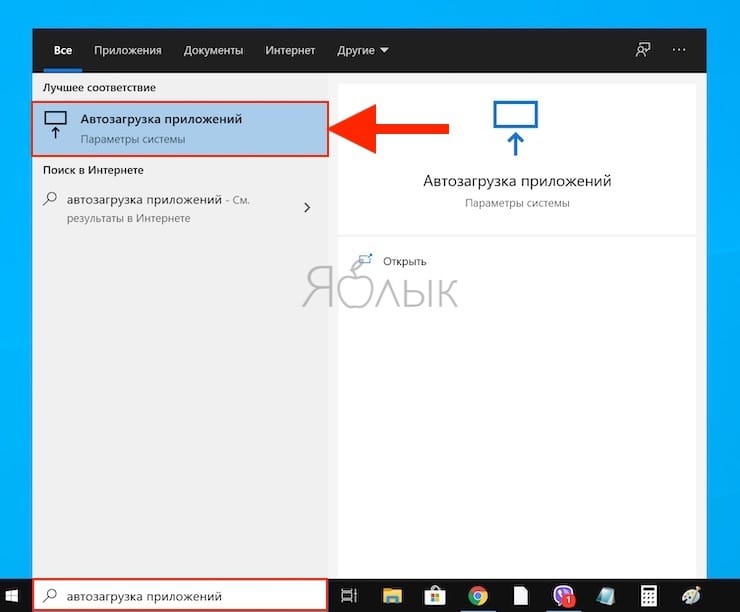

Если это помогло, то дальше уже надо включать программы по одной, выявив ту из них, которая и порождает проблему.
♥ ПО ТЕМЕ: Как настроить Windows, чтобы извлекать USB-флешки и накопители без использования «Безопасного извлечения».
Изменение разрешения экрана Windows
Возможно, черный экран возникает из-за невозможности монитора отобразить предложенное ему разрешение экрана. Стоит перегрузиться в безопасный режим и выбрать по пути Параметры Windows → Система → Дисплей → Масштаб и разметка в качестве стандартного разрешения, например, 1024 × 768.

Если загрузка произойдет успешно, то можно попробовать вернуть прежнее разрешение. В случае очередного появления черного экрана, стоит проверить возможности блока питания – его мощности может не хватать для обеспечения оптимального режима работы видеокарты. Проверьте, является ли вообще заданное вами разрешение экрана допустимым для данной модели монитора.
♥ ПО ТЕМЕ: 32- или 64-битная Windows: какая разница и какую систему нужно устанавливать?
Проверка диска
Причиной появления черного экрана могут стать и ошибки на диске. Для их устранения надо выполнить команду при помощи Командной строки:
вместо «С» подставьте имя диска, на котором установлена система.
Если в результате проверки будут найдены ошибки, надо их исправить с помощью команды:
Система укажет, что данный том используется и предложит осуществить проверку при следующей перезагрузке. Стоит ответить утвердительно (Y) и перегрузить компьютер.
♥ ПО ТЕМЕ: Как ускорить Windows 10, 8 или 7, отключив ненужные службы операционной системы.
Выполнение чистой загрузки Windows
В ходе стандартной загрузки Windows все службы системы и приложения стартуют и работают в фоновом режиме. Иногда какая-то программа может вызвать неполадки с выводом изображения. Чистая загрузка Windows позволяет запустить систему с минимальным числом драйверов и программ, что позволит избежать проблем с совместимостью.
Запустите панель «Конфигурация системы» с помощью команды msconfig в меню Выполнить.
В разделе «Службы» активируйте опцию «Не отображать службы Microsoft», а потом нажмите кнопку «Отключить все».
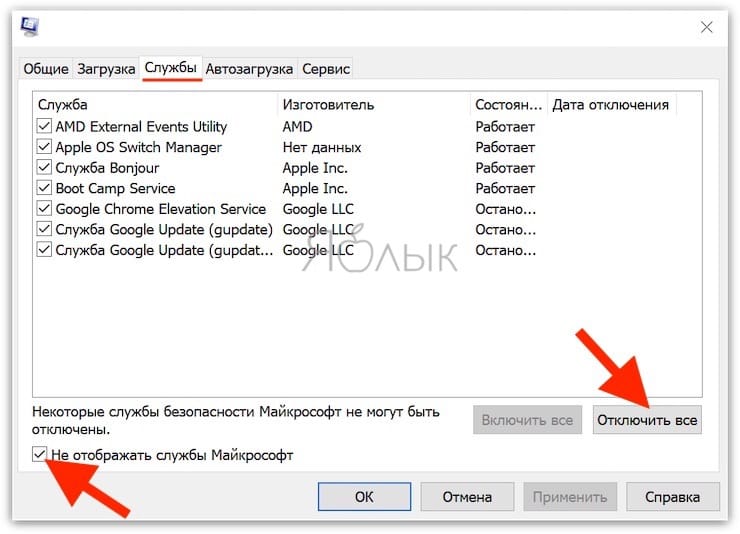
Перейдите на вкладку «Автозагрузка» и нажмите «Открыть диспетчер задач».
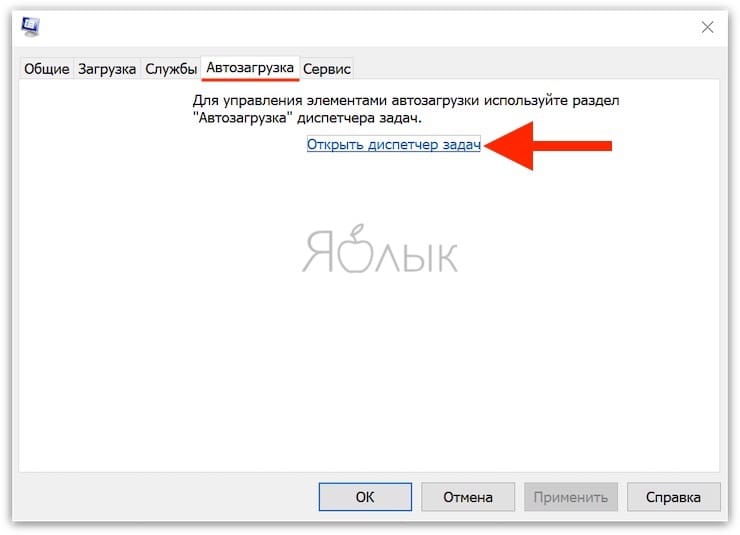
Там на вкладке «Автозагрузка» отключите все элементы.
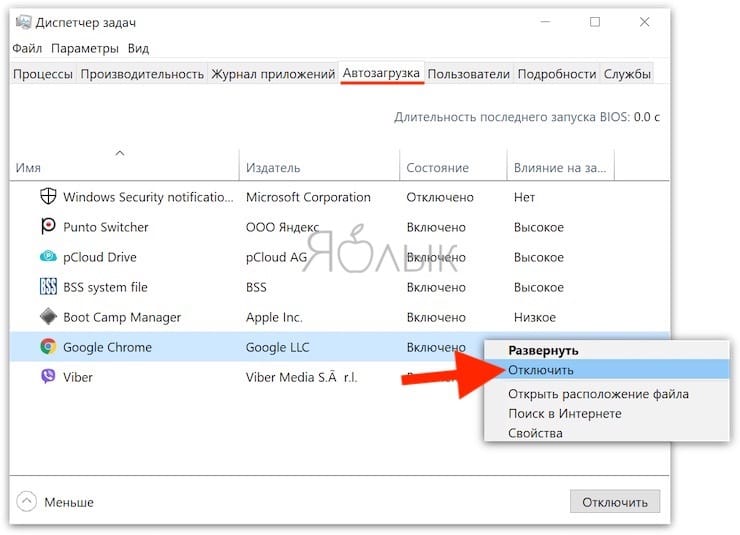
Теперь перейдите в раздел «Загрузка» окна «Конфигурация системы» и нажмите там ОК.
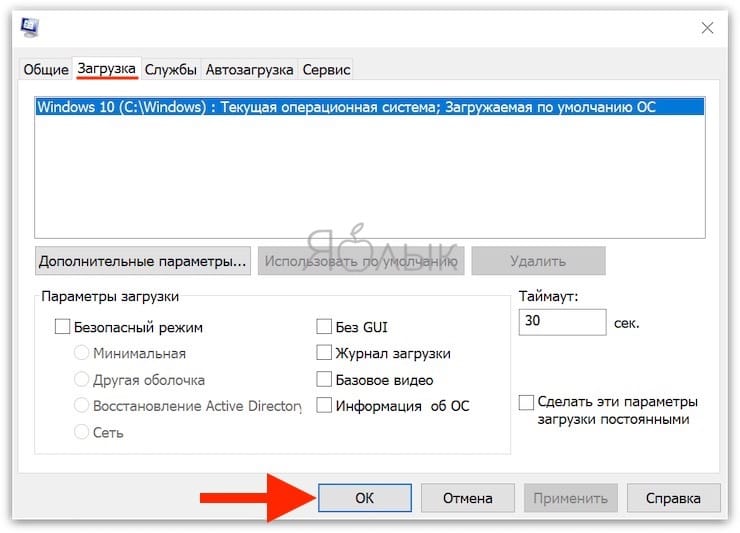
После запуска вы получите желанную чистую среду загрузки.
♥ ПО ТЕМЕ: Самые сложные пароли: как правильно придумывать и не забывать их – 2 совета от хакера.
Замена видеокарты
Если все предыдущие варианты не помогли, как и смена разрешения экрана, то можно попробовать сменить видеокарту. Если в компьютере присутствует дискретный адаптер, то попытайтесь переключиться на него. В противном случае надо установить другую видеокарту и попробовать загрузиться с ней.
♥ ПО ТЕМЕ: Как включить встроенный антивирус в Google Chrome и проверить компьютер на вирусы.
Переустановка Windows
Этот вариант является самым последним, к которому стоит прибегать, если ничто иное не помогает. Если на диске есть ценная информация, то стоит загрузиться с LiveCD/LiveUSB и скопировать все необходимое на внешний носитель. Теперь можно начинать переустанавливать систему.
- Как скачивать видео с Вконтакте, Ютуб, Facebook, Инстаграм, Одноклассников на компьютер: лучшие бесплатные сервисы.
- Как написать любую ссылку при помощи смайликов эмодзи.
- Как сделать черно-белое фото цветным: 4 сервиса для автоматической раскраски черно-белых фотографий.
What is the black screen of death?
The Windows black screen, often called the black screen of death, is a critical Windows system error that your computer displays when a major problem forces the operating system to shut down. The blank screen can happen when you’re logging in, updating software, or even in the middle of working.
What causes the black screen of death?
The black screen of death is caused by a critical error in your computer’s operating system that can happen because of a faulty device driver, a hardware defect, or a Windows software glitch. While usually fixable, finding the root cause of the black screen isn’t always easy.
Here are some common causes of a Windows 10 black screen:
- A Windows update gone wrong
- A faulty startup application
- Outdated or faulty drivers
- Connection issues between your PC and monitor
- Software defects
- Hardware defects
- Problems with your graphics card
- Loose cables connected to your PC or laptop
Below, we’ll guide you through the necessary steps to diagnose and fix the issues causing the black screen of death, both before login and after.
If you see the full black screen before login, it’s probably caused by a malfunctioning device driver or hardware issue. If the blank screen happens after login, there’s probably something wrong with Windows, like a buggy Windows 10 update, or a problem with an installed application. Don’t assume your computer is permanently failing — if you think it’s a hard drive issue, check out our hard drive failure guide.
First, we’ll outline solutions for a black scree n before logging in. Then we’ll discuss solutions for a black screen of death that happens after logging in .
Solutions for a black screen of death — before logging in
If you get a black screen before the Windows login screen appears, the issue often has an easy fix. Check out the possible solutions below to troubleshoot the issue.
1. Optimize your startup applications
If you get a black screen only occasionally, try disabling some startup items to optimize your boot. With AVG TuneUp, you can turn off all non-essential applications and put them to sleep automatically. AVG TuneUp features a built-in Sleep Mode so you can get the most out of your RAM and CPU power and have more resources available at startup.
2. Check your cables and connections
If everything is working normally until suddenly your PC displays a blank screen, something might be wrong with your computer cables or monitor. Here’s how to check your cables and other important connections.
Unplug and reconnect your video cables
Disconnect and reconnect all of your video cables — HDMI, DVI, DisplayPort, and VGA. While you’re at it, blow into the ports to dislodge any dust or other particles that may have got stuck there.
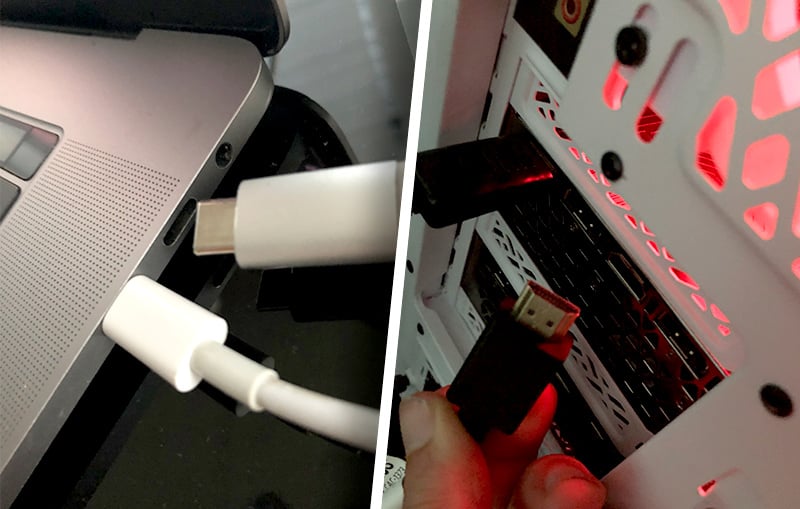
Try a different cable
Constantly unplugging and plugging in cables causes them to wear out over time — eventually, they break. It’s especially common if you use a laptop and an external monitor.
To check whether your cable is causing the black screen, try plugging in a different video cable, like the one from your TV, that you know works. If that cable connection produces an image instead of a full blank screen, it’s time to get a new computer cable.
Try a different monitor
Your monitor display might be defective or set to the wrong source, which can also lead to a black screen. Try connecting to a different display if you have one. Or, move from your monitor to your TV (or vice versa).
The blank screen might be caused by a mismatch between your monitor and your resolution. For example, an optimized gaming PC might not work with a projector that can’t display the high resolution. If your Windows 10 PC shows a “boot error” when connected to a projector, try hooking it up to a regular monitor. If the regular monitor displays images normally, the root of your problem is likely a very low resolution, which the projector can’t display.
3. Unplug all unnecessary accessories
Sometimes, external hard drives, USB connections, Wi-Fi antennas, or VR headsets cause issues during boot. If your laptop screen is black upon startup, unplug everything not necessary for your PC to work — leave only your monitor, mouse, and keyboard plugged in and restart your computer.
On a bigger desktop computer, try removing all unnecessary components, such as sound cards and extra RAM sticks. If that doesn’t work, you can also switch out the graphics card and upgrade your RAM completely.
4. Try a BIOS/UEFI reset and check the boot order
BIOS is the core program that runs older PCs, while UEFI runs newer models. BIOS/UEFI regulates basic hardware configuration and makes sure the operating system launches.
If you’re getting a black screen of death, try reverting to the default settings. Here’s how to reset BIOS/UEFI: Turn off your PC, then hit the power button to turn it back on. Immediately during startup, you’ll get a prompt to hit a certain key to enter setup (usually F2 or the DEL key). Hit that key repeatedly.
Now, you can try two things:
Reset to default settings
Find an entry that says Load defaults (or Optimized defaults or something similar). BIOS/UEFI looks different depending on your device, but the general wording of the entry should be similar. Selecting this option resets everything back to default settings.
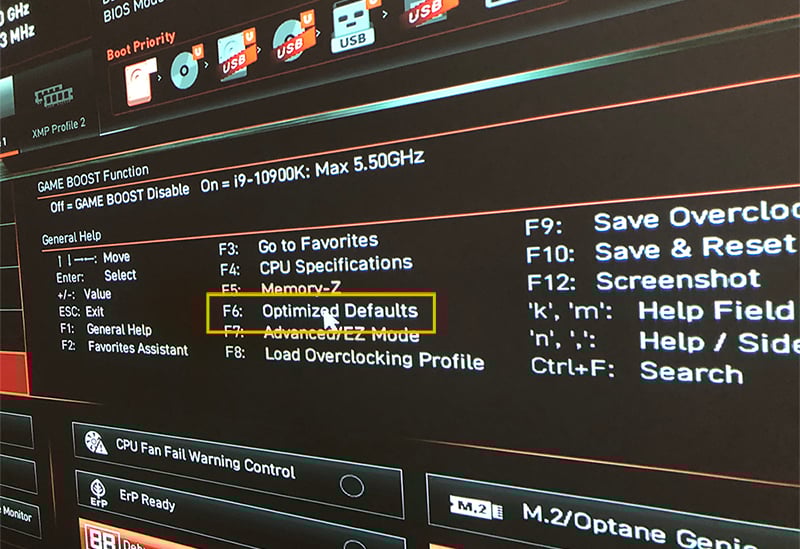
Make sure your PC boots from its hard disk
The BIOS/UEFI also controls how your PC starts up. Your PC could boot from a hard disk, a CD/DVD (e.g., rescue disks), a USB thumb drive (to install Windows), or even a floppy drive. In Boot Priority (or First Boot Device) settings, ensure the hard disk option is selected.
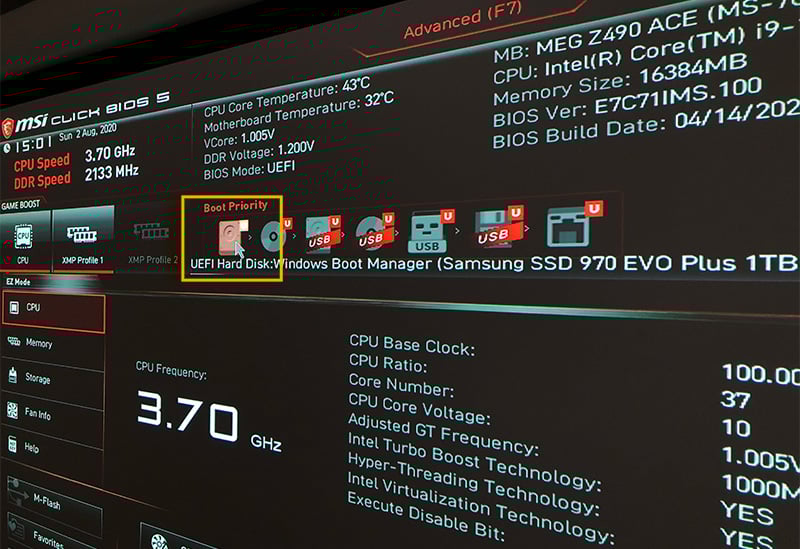
You can also check your BIOS/UEFI performance by running a CPU stress test. If your computer fails the test and causes the black screen of death, your BIOS/UEFI drivers might be outdated. You can easily update your drivers with one of the best free driver updaters on the market.
5. Launch a Windows repair
If your PC boots to a black screen, you should restart your PC several times. After doing this repeatedly, the Windows Startup Automatic Repair screen should launch automatically.
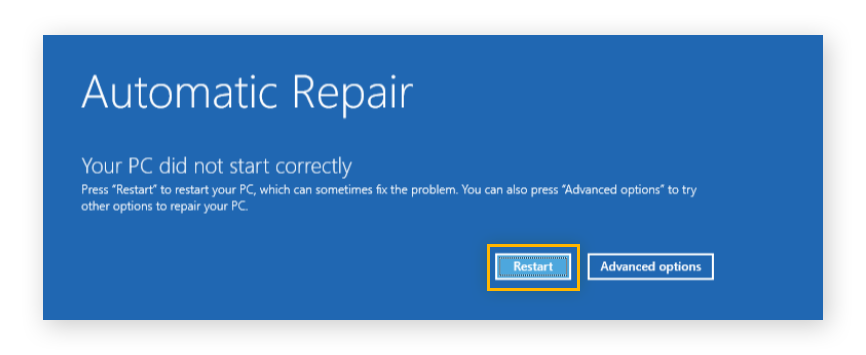
Click Restart. If it doesn’t fix the black screen issue, go to Advanced options, then select System Restore.
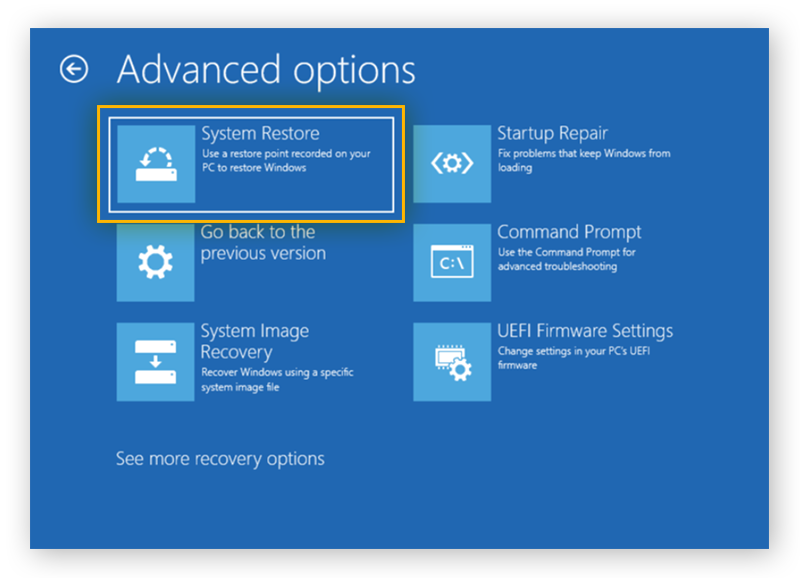
If the Windows repair doesn’t work, you need to create a bootable Windows 10 drive, plug it in, and use the disk-boot tip above to make sure your PC boots from the USB drive.
Once the system restore launches, select a system restore point that’s a few days old.
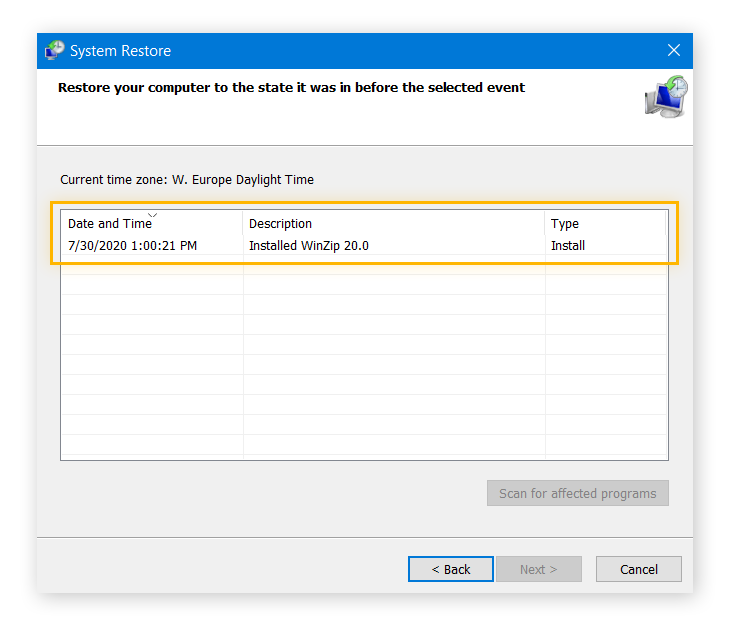
Hit Next, then wait for Windows to restore all necessary files and return things to working order. In some cases, you might need to reinstall an application or an update that you installed after the restore point and before you got the black screen of death.
6. Boot into Safe Mode
Windows Safe Mode launches your PC with the minimum amount of drivers or programs running, which will help you avoid a black screen. Safe Mode means only Windows launches — eliminating any interference from unnecessary programs or drivers.
To boot into Safe Mode, follow the steps above to launch the Windows Repair tool. This time, click Startup Settings. If you don’t see that option, click See more recovery options, then click Startup Settings.
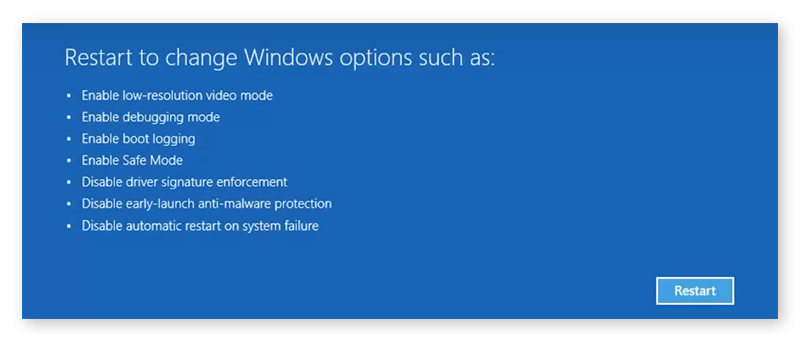
Next, click Restart. After a few seconds, you’ll see the Startup Settings screen.
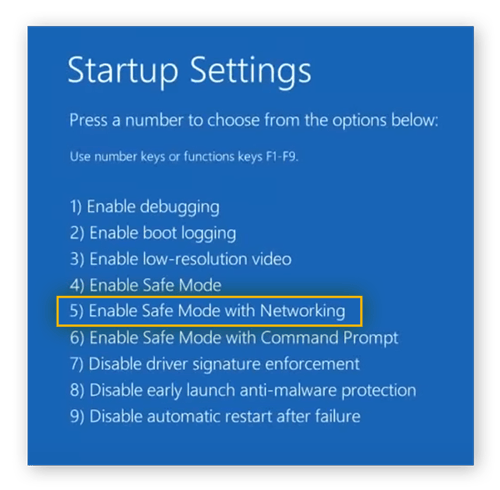
Press 5 on your keyboard to launch your computer in Safe Mode with Networking. Once it’s booted up, it’ll look like something like this:
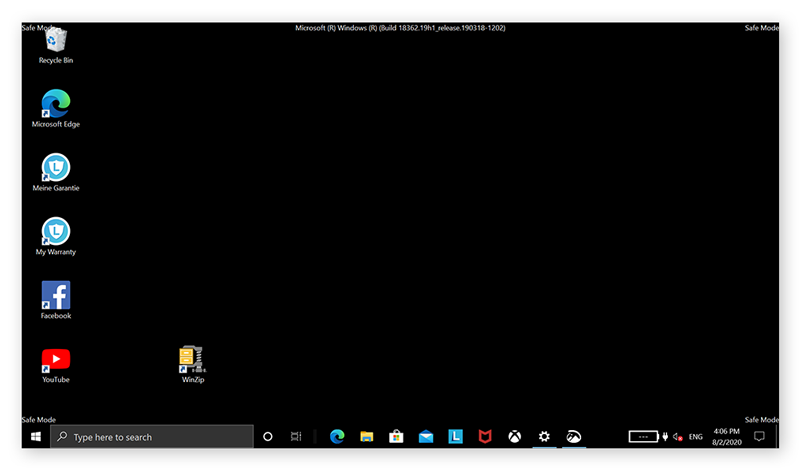
Now you can start eliminating potential causes of the black screen of death. Try these two methods:
First, uninstall applications that could interfere with your boot, like graphics drivers, audio drivers, network drivers, etc.

Then, turn off all startup items using the Task Manager. Right-click your taskbar, select Task Manager, then go to Startup. Turn off everything in this tab by right-clicking each item and selecting Disable.

Now, reboot the system normally. If the black screen is gone and everything is working, reverse the options above one by one. Enable one item in Task Manager, reboot, and ensure everything works. Then, repeat the process with the next item on the list. This will help you identify the program preventing your system from rebooting.
7. Roll back or update all drivers in Safe Mode
As mentioned above, a faulty device driver can cause an unbootable system. To fix this, uninstall any device drivers that could be a problem. Right-click Start and select Device Manager.
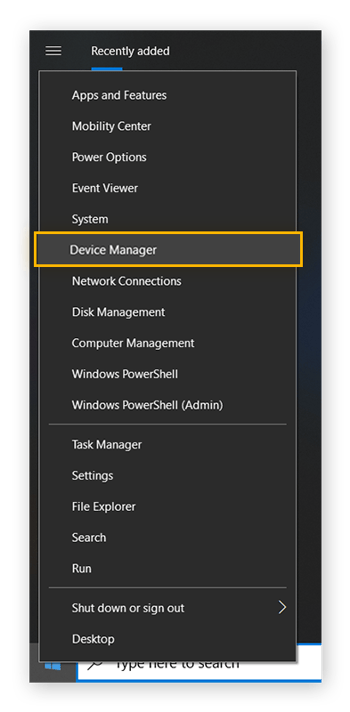
Go to the problematic device driver (usually drivers like display adapters, network adapters, or sound, video, and game controllers). Double-click the entry, such as NVIDIA GeForce GTX 1650, go to the Driver tab, and select Roll Back Driver. Click Yes to confirm.

If that doesn’t help, updating your drivers might fix your Windows black screen problem. Check out our ultimate guide on finding and updating device drivers.
If you want to update your drivers immediately and keep them updated automatically, get AVG Driver Updater and run a free scan. AVG Driver Updater’s easy-to-use dashboard will help you identify and update your outdated or faulty drivers, fix lingering driver issues, and get your computer working optimally again.
Solutions for a black screen of death — after logging in
If the black screen of death happens after you log in (you enter your password and then everything goes blank), you can still find the cause of the black screen using one of the solutions below.
Here’s how to solve a Windows black screen after login:
1. Disable all automatic applications
If you see a black screen after login, something is affecting your Windows operating system while it’s trying to load your desktop and icons. Usually, it’s an application that’s loading automatically. To disable it, press the Ctrl + Alt + Delete buttons simultaneously, and select Task Manager.
If the black screen prevents you from getting to Task Manager, follow the advice above on how to boot into Safe Mode. In Task Manager, go to Startup and disable every item. Reboot your computer, and check that everything works normally.

Check Task Manager as part of regular PC maintenance. Disabling resource-draining apps at startup is an easy way to speed up your PC’s boot time and avoid the black screen of death.
2. Start explorer.exe
The program explorer.exe (Windows Explorer) is responsible for loading your desktop and icons. If that program isn’t loading, then Windows Explorer isn’t running automatically like it should after login, and all you’ll see is a black screen with a floating cursor.
Here’s how to fix that:
First, hit the Ctrl + Alt + Delete keys on your keyboard and select Task Manager (or hit Ctrl + Shift + Esc to launch it directly).
In Task Manager, click File, and select Run new task. Type explorer.exe and click OK.
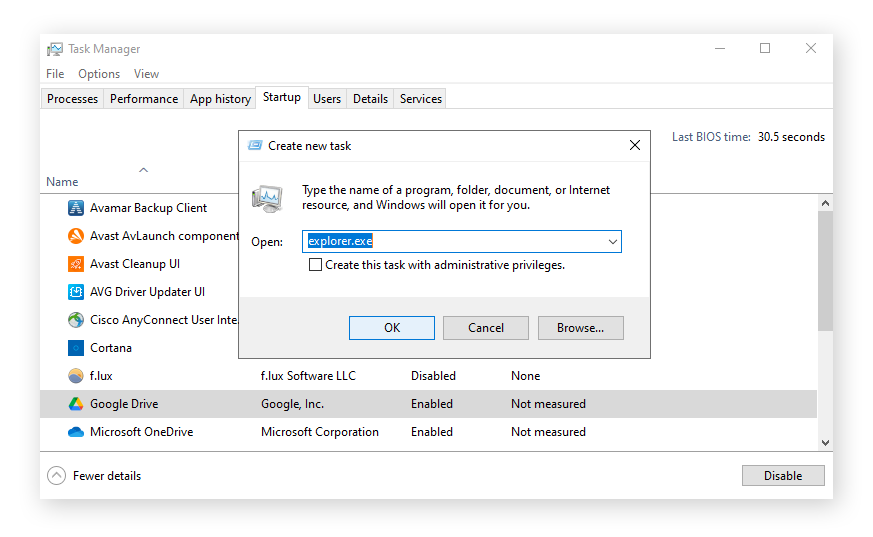
Your desktop should now reappear.

Why isn’t Windows Explorer loading as it should? To fix this, you need to edit the Windows Registry — the heart of the Windows operating system. Before you make any changes, create a backup of your PC or system restore point. (You can also use a specialized registry cleaning tool to clean up and repair any broken registry items on your Windows PC.)
Here’s how to fix Windows Explorer launch via Windows Registry:
First, hold down the Windows key and press R. In the Run box, type in regedit. Hit Enter.
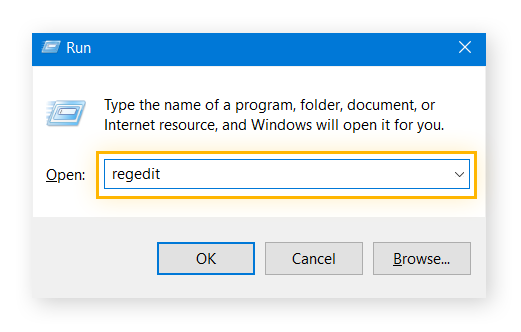
Then, go to the following folder (also called keys): HKEY_LOCAL_MACHINE > SOFTWARE > Microsoft > Windows NT > CurrentVersion > Winlogon.
On the right side of the screen, double-click Shell. Check that the Value data section reads explorer.exe. If this field is empty or something else is there, enter explorer.exe.
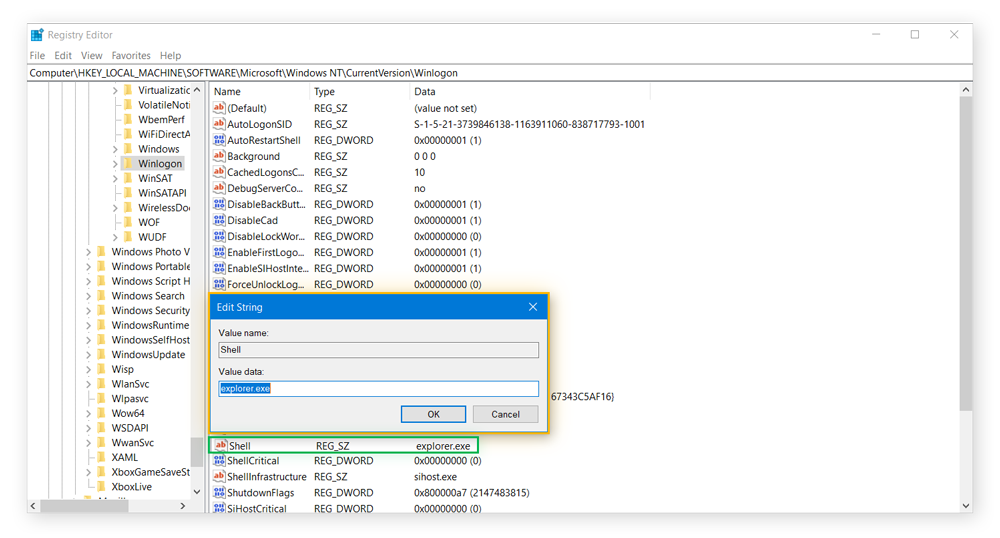
If something else is written in the Value data section, it could be a virus, malware, or some other potentially unwanted program. To find out, Google the name of the program and do some research. Even if your search doesn’t turn up any information, you should run a virus scan immediately.
A strong antivirus program like AVG AntiVirus FREE will scan your machine from top to bottom to find any malicious code. Then, it will delete the malware and set up defenses to detect and block any future signs of trouble.
3. Install a new graphics driver
If your computer screen keeps going blank seemingly at random, the cause of the black screen of death might be your graphics driver. Make sure to update all AMD, Intel, and NVIDIA drivers regularly so that your graphics card works properly. Check out our detailed instructions on how to update your graphics drivers and our guide to monitoring GPU performance.
4. Switch between screens
If your PC is connected to multiple monitors or even a VR headset (which Windows identifies as a monitor), you can accidentally hit the wrong button and switch your output to a screen that’s off. When you see a blank screen, hold down the Windows key on your keyboard and press P. This shows you the possible display modes, and allows you to switch.
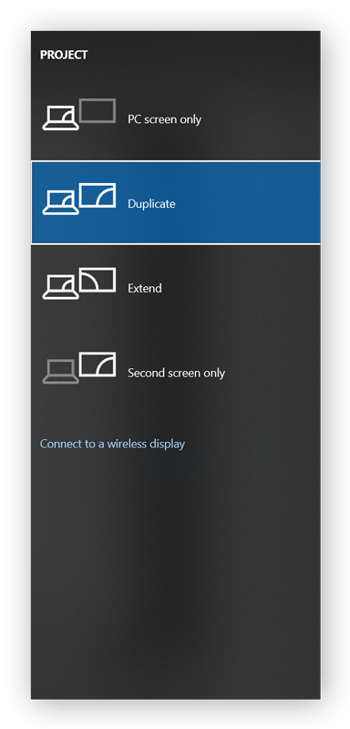
Avoid the black screen of death with PC TuneUp
Hopefully, this guide has helped you solve your black screen problems. If all else fails, you may need to reinstall Windows from scratch, because the issue is likely more serious or beyond fixing. Otherwise, keep your system fresh by maintaining it on a weekly basis to help prevent issues like the black screen of death.
To keep your machine clean, optimized, and running as smoothly as possible, use AVG TuneUp for PC. AVG TuneUp’s Automatic Maintenance feature tunes your machine weekly, while its Sleep Mode feature disables unnecessary applications. And the built-in Software Uninstaller gets rid of apps that could render your system unbootable. Try AVG TuneUp today and say goodbye to Windows black screen issues.

Иногда случается, что в результате якобы успешной установки ОС Виндовс 10 или ее обновления, после перезагрузки, вместо корректной работы системы пользователь видит перед собой черный экран. Это довольно неприятная ситуация, которая требует определенных действий.
Причины возникновения черного экрана и методы их устранения
Давайте попробуем разобраться, почему появляется черный экран, а также как можно устранить эту проблему.
Данная проблема тяжело поддается диагностике и пользователю просто необходимо поочередно пробовать разные способы ее устранения.
Способ 1: Ожидание
Как бы смешно это не звучало, но довольно распространенная ситуация, когда черный экран возникает после установки обновлений и перезагрузки персонального компьютера. Если до выключения ПК было сообщение о том, что устанавливается обновление, а после перезагрузки появилось черное окно с курсором или вращающимися точками, то необходимо подождать (не более 30 минут) пока система обновится. Если на протяжении этого времени ничего не изменилось — используйте другие варианты решения проблемы.

Способ 2: Проверка монитора
Если на экране абсолютно ничего не отображается, то стоит проверить исправность дисплея. При возможности, подключите монитор к другому устройству и посмотрите, будет ли на нем что-то отображаться. В то же время проблемой может быть подключенный к ПК другой монитор или телевизор. В таком случае видеосигнал может подаваться на второе устройство, соответственно на основном мониторе ничего не будет.

Способ 3: Проверка системы на вирусы
Вредоносное программное обеспечение также является довольно частой причиной появления черного экрана в Виндовс 10, поэтому еще один возможный вариант решения проблемы — проверка системы на вирусы. Сделать это возможно либо с использованием Live-дисков (например, от Dr.Web, который можно скачать с их официального сайта), либо в безопасном режиме с использованием обычных портативных утилит (AdwCleaner, Dr.Web CureIt).
Читайте также: Проверка системы на вирусы
Что такое безопасный режим и как в него можно попасть можно прочитать из публикации, представленной ниже.
Подробнее: Безопасный режим в Windows 10
Результатом работы вирусов может стать повреждение важных системных файлов и одного удаления вредоносного ПО будет недостаточно. В таком случае необходимы переустановка системы или ее откат к последней стабильной версии.
Способ 4: Переустановка драйверов
Довольно частой причиной неисправности, которая проявляется в виде черного экрана, является сбой в работе драйвера видеокарты. Конечно же, просто смотря на монитор нельзя сказать, что причина именно в этом, но если все описанные ранее способы не помогли решить проблему, то можно попробовать переустановить драйверы видеокарты. Задача эта для неопытного пользователя довольно непростая, поскольку наиболее легкий способ это сделать — зайти в безопасный режим, который по умолчанию в Windows 10 выключен, без графической картинки перед глазами. Иными словами, все придется делать вслепую. Наиболее оптимальный вариант такой работы выглядит следующим образом.
- Включите ПК.
- Подождите некоторое время (необходимое для загрузки системы).
- Если установлен пароль, введите вслепую нужные символы.
- Подождите еще некоторое время.
- Нажмите комбинацию клавиш «Win+X».
- Нажмите кнопку «стрелка вверх» 8 раз подряд, а затем «Enter». Такого рода действия запустят «Командную строку».
- Введите команду bcdedit /set safeboot network и клавишу «Enter».
- После этого необходимо также набрать shutdown /r и также нажать «Enter».
- Дождитесь, пока ваш ПК подаст звуковой сигнал и начинайте считать до 15. По истечении этого времени нажмите «Enter».
В итоге Виндовс 10 запустится в безопасном режиме. Далее можно приступать к удалению драйверов. Как правильно это сделать, можно прочесть в публикации по ссылке ниже.

Подробнее: Удаляем драйвера видеокарты
Способ 5: Откат системы
Если ни один из вышеперечисленных способов не помог избавиться от проблемы, то единственный выход — это осуществить откат системы из резервной копии до предыдущей рабочей версии, где не возникало черного экрана. Более детально о резервных копиях можно узнать из статьи на нашем сайте.
Подробнее: Инструкция по созданию резервной копии Windows 10
Причины возникновения черного экрана достаточно разнообразны, поэтому установить конкретную иногда довольно сложно. Но несмотря на причину неисправности, в большинстве случаев, решить проблему можно вышеупомянутыми способами.
A black screen at boot is bad news. It’s tough to diagnose a problem without any information on the screen. If you’ve got a black screen on boot, various things can cause the problem on Windows 10 and Windows 11.
We’re going to detail ways to try to resolve a black screen on a Windows 10 or Windows 11 computer, from simple hardware checks to reinstalling your display driver.
1. Check If Windows Is Responsive
It’s important to check that your computer and Windows are actually booting. To do this, press Windows key + Ctrl + Shift + B. This command actually restarts your graphics driver—which might itself fix the black screen—but also emits a beep.
If you hear a beep, then Windows is responsive. However, if you don’t hear anything, it could suggest that your computer isn’t booting. If that’s the case, see our guides on repairing a PC that won’t boot and how to fix a black screen of death.
2. Check Your Monitor and Cables
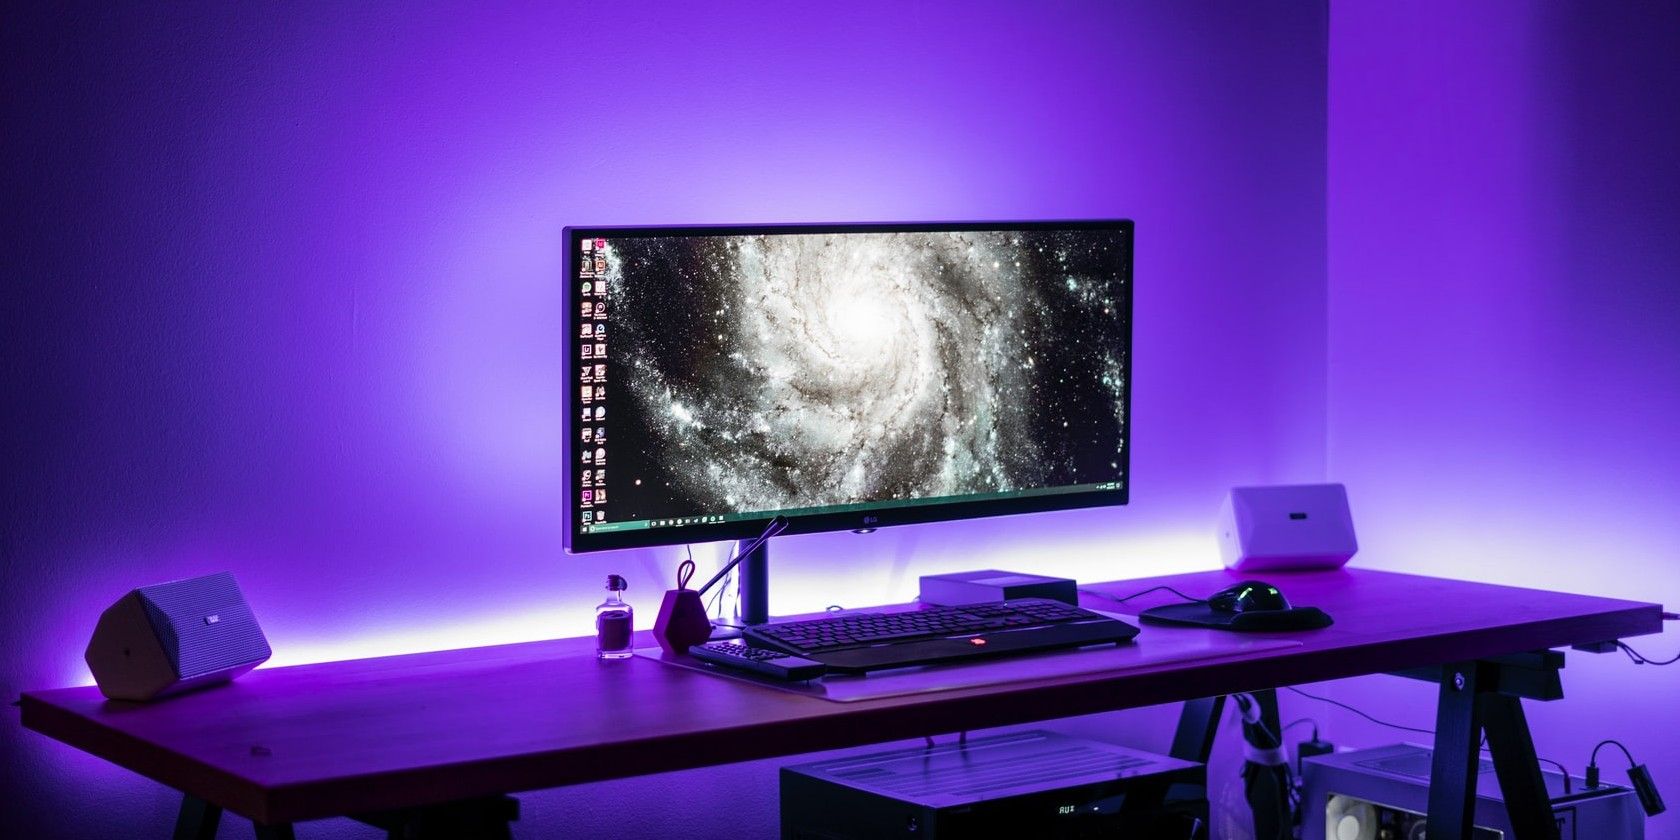
If you have a black screen from boot, a key step is to check the display connection. It might sound simple, but it’s where many black screen problems arise.
Remove all your monitor cables and plug them back in to ensure they are all firmly connected. Then make sure your monitor is actually turned on.
If you can, use another monitor connection. For example, move from HDMI to DisplayPort. Alternatively, use a new cable. This will help you determine whether the issue lies with the monitor port or the cable.
If possible, connect your monitor to a different computer. If it has a black screen there too, it’s a sign the monitor is faulty, so you should contact the manufacturer. You can also try using another monitor on your computer.
3. Unplug Your External Devices
Turn your computer off and disconnect all of your external devices. This includes your mouse, keyboard, external hard drive, and so on. Restart your computer and see if you still get the black screen. If you don’t, plug each device in one at a time until you find what’s causing the problem.
With the problematic device identified, try updating its drivers. See our guide on how to find and replace drivers if you need a hand with that. No luck? Browse through the device manufacturer’s support site and contact them for further help.
4. Adjust Projection Settings
It may be that your system’s projection settings are set incorrectly. For example, your display might be set to project on a second screen that doesn’t exist, thus causing your monitor to show a black screen.
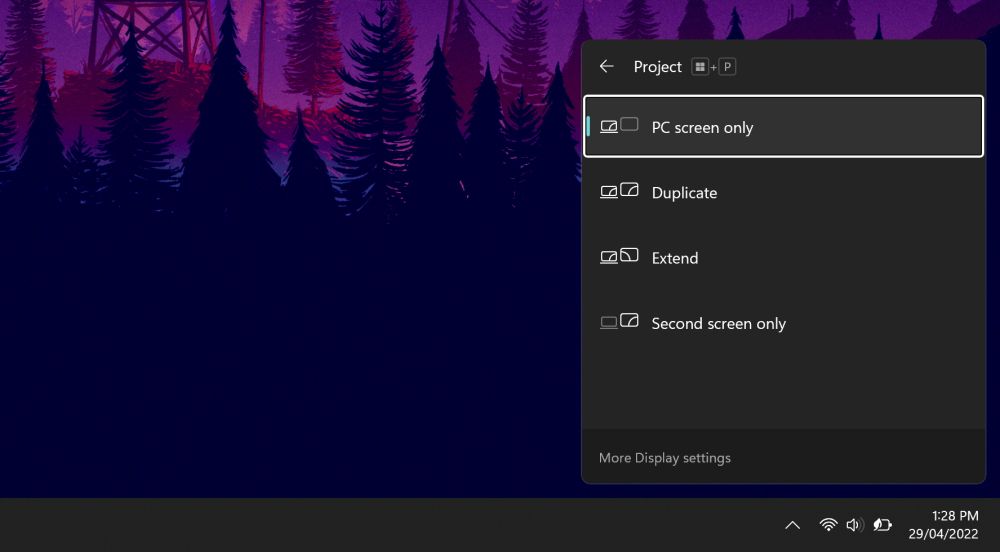
Press Windows key + P to bring up the Projection menu. From top to bottom, the options are: PC screen only, Duplicate, Extend, and Second screen only. While the first is the default, yours might not be set to it.
Press P to highlight the next option and Enter to select. Repeat this four times to get back to the original setting, though hopefully one of the settings along the way will bring your display back.
5. Reinstall Display Drivers
To reinstall display drivers, you’ll need to boot into safe mode. The method you need depends on various factors, so follow the appropriate steps below and then continue reading to discover how to reinstall your display drivers.
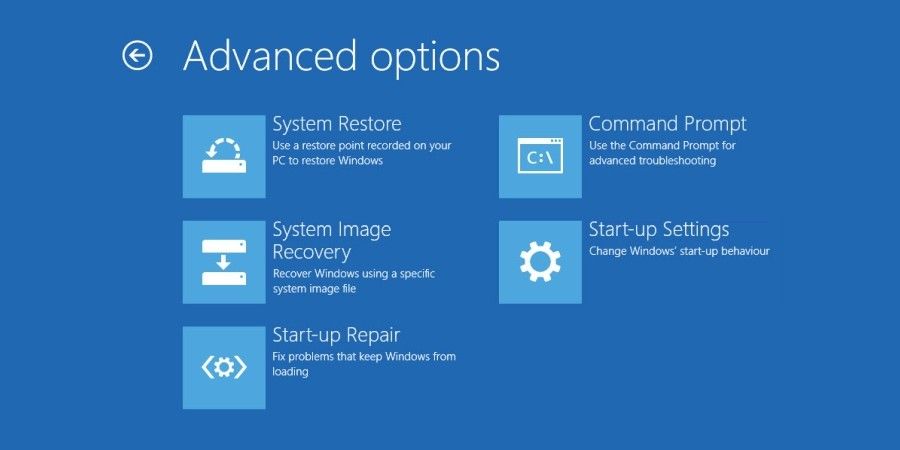
A. You Can See the Login Screen
- Restart your computer.
- At the login screen, hold Shift, select the Power icon, and click Restart.
- Once restarted, select Troubleshoot >Advanced options >Start-up settings >Restart. Again, your system will restart and present you with different options.
- Once restarted, press F5 to select Safe Mode with Networking. If that doesn’t work, follow the prior steps but select F3.
B. You Can’t See Anything and Have a Recovery Drive
If you already created a recovery drive before this problem occurred, good job!
- Shut down your system and then connect the recovery drive.
- On the Choose an option screen, select Troubleshoot >Advanced Options >Start-up Settings >Restart.
- Once restarted, press F5 to select Safe Mode with Networking. If that doesn’t work, follow the prior steps but select F3.
C. You Can’t See Anything and Don’t Have a Recovery Drive
You need access to a working computer so that you can create Windows 10/11 installation media. Download Windows 10 or Windows 11 from Microsoft and then use this to create installation media. If you need help on that, see our guide on making a bootable ISO.
You then need to set the boot order in the BIOS to read your installation media first. Again, if you need a hand, see our guide on how to change the boot order.
Then, on the installation screen:
- Select Repair your computer.
- Select Troubleshoot >Advanced Options >Start-up Settings >Restart.
- Once restarted, press F5 to select Safe Mode with Networking. If that doesn’t work, follow the prior steps but select F3.
How to Reinstall Your Display Drivers
Now you’re in Safe Mode and signed in to your computer:
- Press Windows key + X and click Device Manager.
- Double-click the Display adapters category.
- Right-click your graphics card and select Properties. Go to the Driver tab.
If available, click Roll Back Driver, select a reason, and click Yes. This will take you back to the previously installed driver.
If this doesn’t work or isn’t an option, select Uninstall to remove the driver completely. Then, go to the manufacturer’s website (likely AMD, NVIDIA, or Intel) and install an older driver or contact them for support.
6. Clean Inside Your Computer Case
Your computer may be overheating, which can result in a black screen. It’s very important that you keep your PC cool because it extends the lifespan of your components.
Turn your computer off, unplug everything, and open it up. As a first step, grab a microfiber cloth and air blower and use this to clean out all dust and dirt inside your computer, especially from the fans. It’s best to do this outside if you can, since it will kick up a lot of dust. Try not to let it settle back inside the computer.
For more tips, see our guide on how to keep your PC cool.
7. Assess Your Internal Hardware
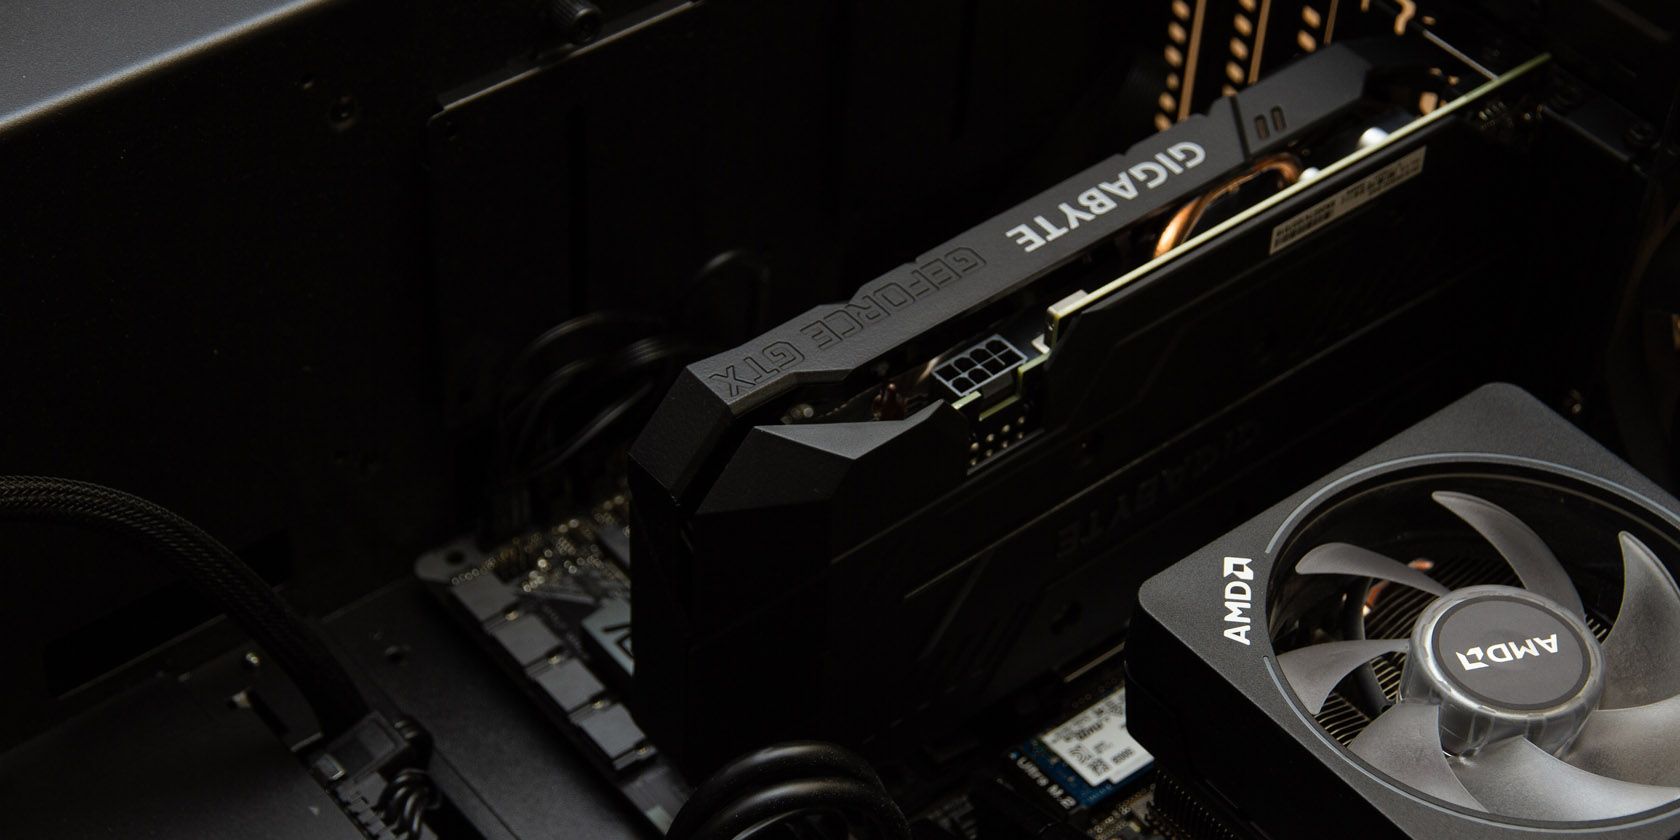
Turn your computer off, unplug everything, and open it up. Look over all your components for signs of damage. Remove each component and reseat it, ensuring it’s firmly secured.
Have you recently upgraded something inside your computer, like the graphics card or RAM? If so, this is a prime culprit for causing a black screen. If you’ve verified the component is installed correctly, contact the manufacturer as the part may be faulty.
Alternatively, your power supply unit (PSU) may not supply enough power to support the new parts, which causes the computer to black screen and shut down. Use an online power supply calculator to ensure that your PSU is suitable.
Return From the Dark Side
Hopefully, working through these steps has solved your black screen problems. While it can be scary, it doesn’t mean that your data has vanished, so keep calm.
If you don’t have a black screen, but instead one that’s constantly flashing, you should still try some of these steps as it’s often caused by the same issue.