Все версии операционной системы Windows поставляются с множеством различных инструментов и утилит, которые доступны пользователям Windows, если Windows когда-либо потребуется какой-либо ремонт. Одним из таких инструментов является инструмент развертывания образов и управления обслуживанием (DISM). Инструмент DISM можно использовать через любую командную строку (с соответствующими привилегиями) и можно использовать для проверки состояния сетевого или автономного образа
На чтение 4 мин. Просмотров 1.6k. Опубликовано 17.04.2021
Все версии операционной системы Windows поставляются с множеством различных инструментов и утилит, которые доступны пользователям Windows, если Windows когда-либо потребуется какой-либо ремонт. Одним из таких инструментов является инструмент развертывания образов и управления обслуживанием (DISM). Инструмент DISM можно использовать через любую командную строку (с соответствующими привилегиями) и можно использовать для проверки состояния сетевого или автономного образа Windows и исправления образа Windows, который был поврежден или нуждается в каком-либо другом ремонте. Ниже приводится одна из наиболее часто используемых командных строк DISM:
DISM/Online/Cleanup-Image/RestoreHealth
Эта конкретная командная строка используется для восстановления онлайн-образа Windows. Часть этой команды RestoreHealth в первую очередь инструктирует DISM восстановить онлайн-образ Windows, но также открывает пользователю возможность указать дополнительные источники восстановления, в которых DISM может искать файлы, необходимые для восстановления онлайн-образ Windows. Однако при запуске этой командной строки в Windows 10 некоторые пользователи Windows могут столкнуться с ошибкой и появлением следующего сообщения об ошибке.
« Ошибка: 0x800f081f Не удалось найти исходные файлы. »

В этом сообщении об ошибке в основном говорится, что DISM не удалось найти файлы, необходимые для исправления образа Windows в Интернете в их местоположение по умолчанию. Чтобы решить эту проблему, необходимо либо запустить очистку компонентов, а затем сканирование SFC, либо предоставить DISM расположение, содержащее файлы, необходимые для восстановления образа. Вы также можете исправить это, обновив Windows с помощью средства создания мультимедиа на веб-сайте Microsoft.
Метод 1. Выполнение очистки компонентов
Используя переключатель очистки компонентов DISM, вы можете очистить образ и снова заставить все работать правильно. Вот как это сделать.

- Откройте меню “Пуск”, введите cmd , щелкните правой кнопкой мыши и Запуск от имени администратора .
- В командной строке с повышенными привилегиями введите следующие команды в том же порядке:
dism.exe/online/Cleanup-Image/StartComponentCleanup
sfc/scannow
- Дождитесь выполнения этих команд, а когда они будут выполнены, запустите: Dism/Online/Cleanup-Image/RestoreHealth
На этом этапе Dism/Online/Cleanup-Image/RestoreHealth должен снова работать.
Метод 2: получение исходного кода из образа Windows
Используя свежий образ Windows 10, вы можете запустить команду DISM, указав расположение, которое содержит файлы, необходимые для восстановления образа..

- С тех пор, как MS удалила iso-файлы tech bench, доступно не так много источников. Однако отсюда вы можете получить дампы образов.
- После загрузки ISO-образа Windows 10 вам необходимо смонтировать его на свой компьютер, чтобы компьютер извлек его и затем имел к нему доступ. . Чтобы смонтировать ISO-файл в Windows, перейдите сюда и выполните действия, относящиеся к используемой вами версии Windows.
- Откройте меню «Пуск», введите cmd , щелкните правой кнопкой мыши и выполните Запуск от имени администратора .
- В командной строке с повышенными привилегиями введите следующую команду, заменив X на каталог, в котором находится ISO-файл Windows 10. загруженное ранее монтируется:
DISM/Online/Cleanup-Image/RestoreHealth/source:WIM:X:SourcesInstall.wim:1/LimitAccess - Дождитесь выполнения команды, и на этот раз DISM должен успешно восстановить образ Windows. .
Убедитесь, что вы загрузили ISO-файл Windows 10 по ссылке для дампа Tech Bench, указанной выше, поскольку в результате вы получите ISO-образ, содержащий Install.wim. файл, который вам нужен. При загрузке ISO-образа Windows 10 из Microsoft Media Creation Tool вы получите ISO-образ, содержащий файл Install.esd, который практически бесполезен для исправления ошибки 0x800f081f.
Метод 3: Обновление Windows
Хотя это долгий процесс, он решает проблему путем переустановки всего ядра Windows с последним образом от Microsoft, что устраняет проблему. . Этот инструмент будет работать в Windows 7, Windows 8.1 или Windows 10.
- Получите средство создания Windows 10 Media отсюда.
- Запустите исполняемый файл с вашего ПК. Вам необходимо запустить это от имени администратора.
- Примите условия лицензии и выберите Обновить этот компьютер сейчас в Что вы хотите сделать ? , а затем нажмите кнопку “Далее”.
- Инструмент начнет загрузку, а затем установку Windows 10. Внимательно следуйте инструкциям, чтобы завершить обновление.
- По завершении , у вас должна быть свежая копия Windows с целым файлом. Нет необходимости запускать Dism/Online/Cleanup-Image/RestoreHealth, но вы можете запустить его, чтобы узнать, решена ли ваша проблема.
Running the update troubleshooter is an easy fix
by Vladimir Popescu
Being an artist his entire life while also playing handball at a professional level, Vladimir has also developed a passion for all things computer-related. With an innate fascination… read more
Updated on December 19, 2022
Reviewed by
Vlad Turiceanu
Passionate about technology, Windows, and everything that has a power button, he spent most of his time developing new skills and learning more about the tech world. Coming… read more
- Microsoft .NET Framework is an important software to run software and applications on Windows OS.
- If there are some issues with the .NET Framework, then you may experience Windows 11 update error 0x800f081f.
- To fix this, you can try to tweak the Group Policy files, install Windows updates manually, or remove WUServer and WIStatusServer from registry.
X INSTALL BY CLICKING THE DOWNLOAD FILE
Fix Windows 11 OS errors with Restoro PC Repair Tool: This software repairs common computer errors by replacing the problematic system files with the initial working versions. It also keeps you away from critical file loss, hardware failure, and repairs damages made by malware and viruses. Fix PC issues and remove viruses now in 3 easy steps:
- Download Restoro PC Repair Tool that comes with Patented Technologies (patent available here) .
- Click Start Scan to find Windows 11 issues that could be causing PC problems.
- Click Repair All to fix issues affecting your computer’s security and performance
- Restoro has been downloaded by 0 readers this month.
Installing the latest Windows 11 updates is essential for multiple reasons. But in short, the latest updates let you experience the latest features as and when they arrive.
Besides, they also improve the user experience by fixing the bugs present in the previous version of the operating system.
Microsoft delivers the latest update that also bumps the security protection to keep your Windows 11 PC out of danger from various new viruses or malware attacks. With new cumulative updates and feature releases, it has become common to experience some errors or issues.
With Windows 11, that is no different. People have been complaining about the Windows 11 update error 0x800f081f. This error code is mainly related to the Microsoft .NET Framework 3.5 incompatibilities.
However, just like every Windows 11 update error code, this error 0x800f081f could also trouble users because of corrupt registry or system files. Notably, similar issues were reported by users with the Windows 10 OS as well.
Whatever the case may be, in this guide, we have created a list of solutions that will help you fix this problem. Since the issue is mainly related to the Microsoft .Net Framework incompatibility, we will look to tackle that issue first and possibly resolve the Windows 11 update error 0x800f081f.
What does error code 0x800f081f mean?
Error 0x800f081f is a system error code related to updates in Windows 11. The interesting fact about this error code is that it’s among the most common ones that pop up for the same reason.
The other three error codes are 0x800F0906, 0x800F0907, and 0x800F0922. All these error codes, including error code 0x800F081f, will show you an error message:
There were some problems installing updates, but we’ll try again later. If you keep seeing this and want to search the web or contact support for information, this may help.
This happens because Windows cannot download the critical files from the available update. But, as already mentioned, Microsoft .Net Framework incompatibilities also cause this problem.
It may also come up because of the DISM (Deployment Image Servicing and Management) tool, or some Windows PowerShell commands.
Here are some specific reasons for the different error codes:
- 0x800F081F: Your system failed to find the .NET Framework source files for the installation to proceed. This could also mean that the DISM Windows 11 tool failed.
- 0x800F0906: Windows couldn’t connect to the internet or install a role, role service, or feature.
- 0x800F0907: The DISM tool failed, or your network policy settings are blocking internet access.
- 0x800F0922: The processing of important .NET advanced installers or generic commands failed.
How do I fix error code 0x800f081f in Windows 11?
In this article
- What does error code 0x800f081f mean?
- How do I fix error code 0x800f081f in Windows 11?
- 1. Run Windows Update troubleshooter
- 2. Tweak your group policy
- 3. Repair Windows system files
- 4. Download Windows 11 update manually
- 5. Clear Windows Update Cache and components
- 6. Remove WUServer and WIStatusServer from registry
- Why do my Windows updates keep failing?
- What else can I do to avoid Windows 11 update error 0x800f081f?
1. Run Windows Update troubleshooter
Multiple users reported that Windows Update troubleshooter can help you restore the 0x800f081f error on Windows 11 OS.
1. Open the Start Menu.
2. Type in Troubleshoot other problems and open the app.
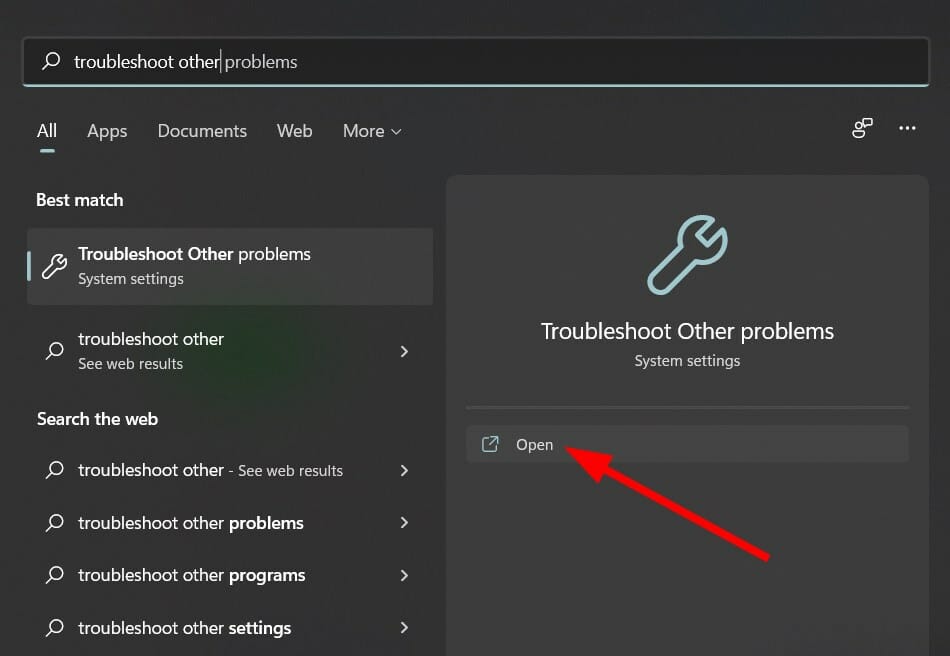
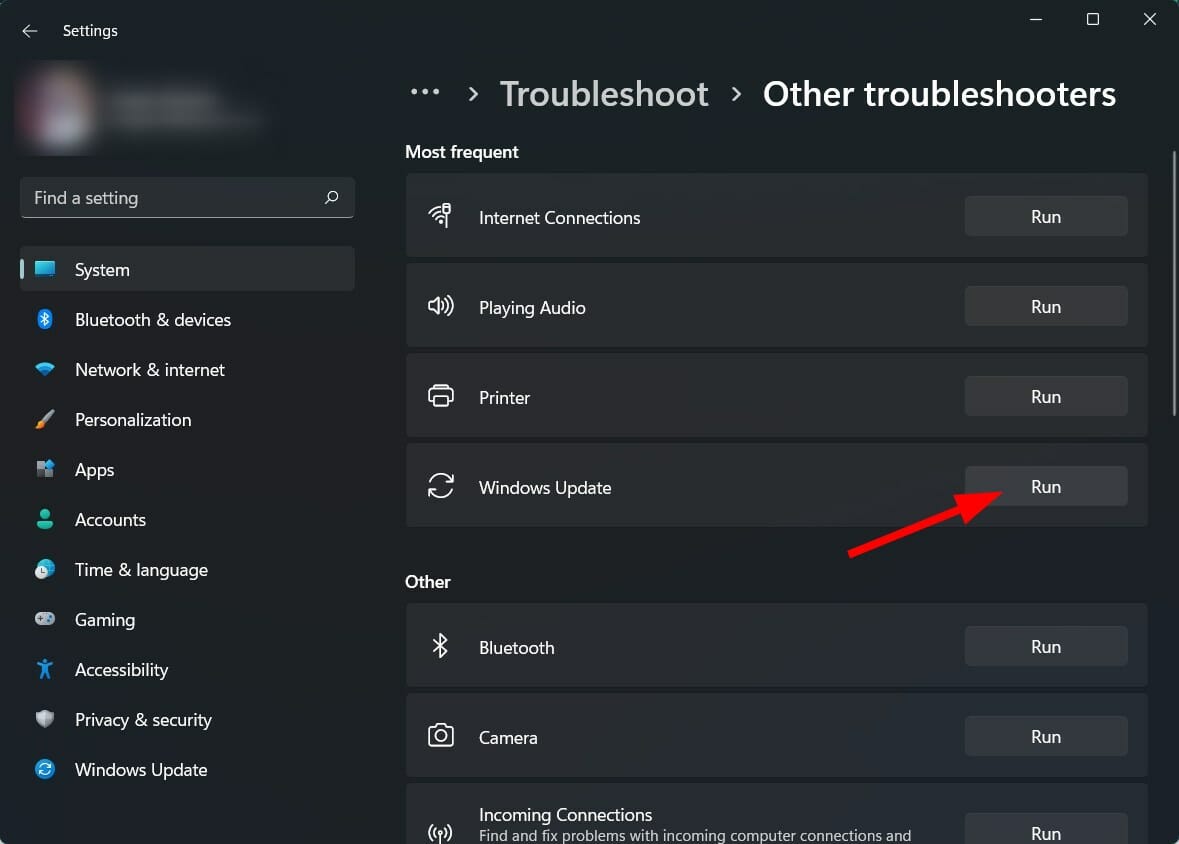
3. Click Run next to Windows Update .
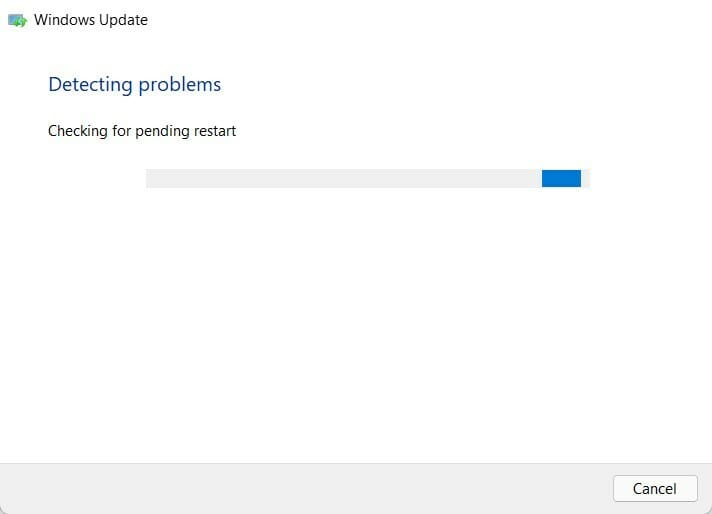
4. The troubleshooter will begin the diagnosis and will check for errors.
5. Apply the recommended fixes.
6. Restart your PC.
Some PC issues are hard to tackle, especially when it comes to corrupted repositories or missing Windows files. If you are having troubles fixing an error, your system may be partially broken.
We recommend installing Restoro, a tool that will scan your machine and identify what the fault is.
Click here to download and start repairing.
One of the most common solutions to fix most of the common Windows 11 issues is to run the in-built Windows troubleshooter.
To fix this Windows 11 update error 0x800f081f, we advise you to try the Windows update troubleshooter. It will not only detect the issue but possibly fix it during the process.
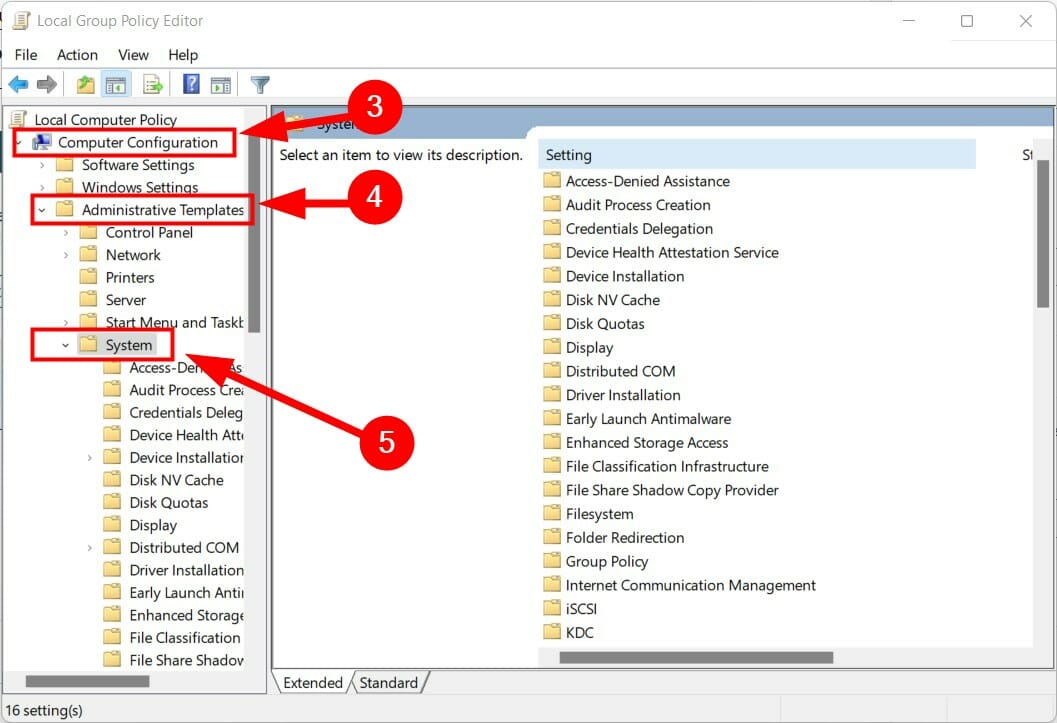
2. Tweak your group policy
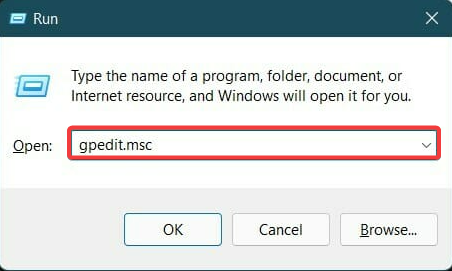
- Press Windows + R keys to open the Run dialogue.
- Type gpedit.msc and hit Enter .

- Expand Computer Configuration.
- Then expand Administrative Templates.
- Click on System.

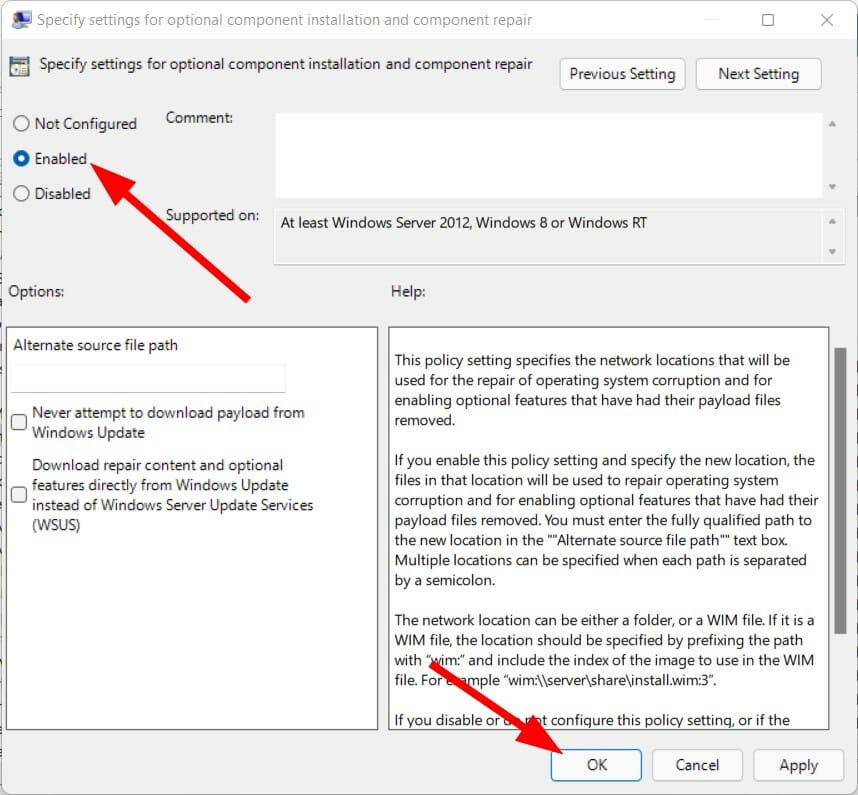
- On the right pane, click on the entry labeled Specify settings for optional component installation and component repair.
- Double-click on this entry to open it.
- Check Enabled and hit OK.


3. Repair Windows system files
- Open the Start menu.
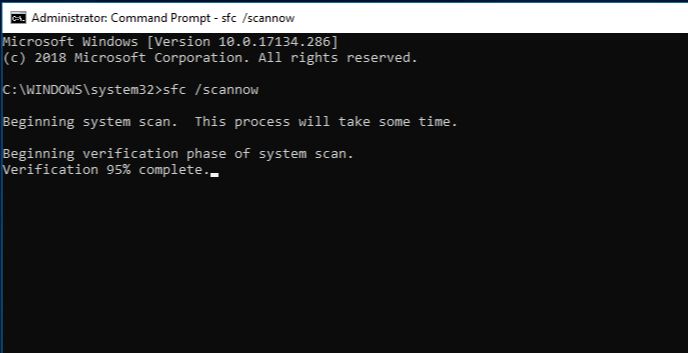
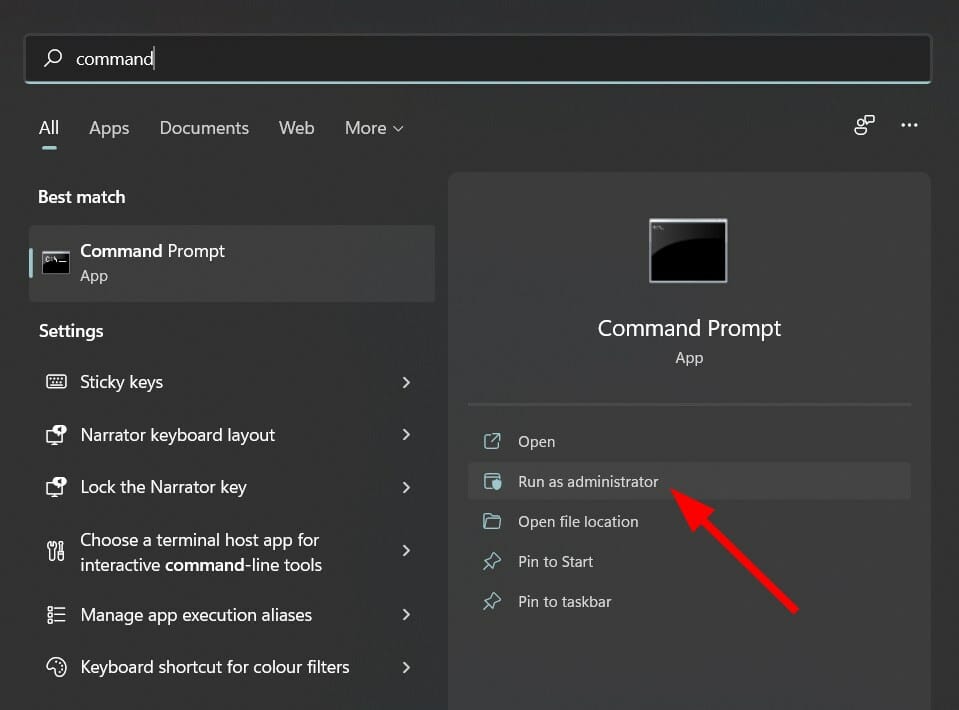
- Search for Command Prompt and run it as an administrator.

- Type the below command and hit Enter .
sfc /scanow
- Your PC will start scanning and, in the process, will try to fix the issue.
- Reboot your PC.
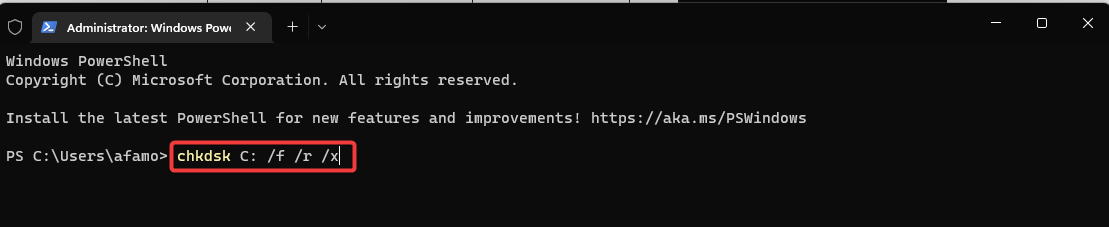
- Again open command prompt.
- Type in the below command and hit Enter
chkdsk C: /f /r /x - After the process completes, enter the below command and press Enter .
DISM.exe /Online /Cleanup-image /Restorehealth - You will see the message – The operation completed successfully. Close the window and reboot your PC.
Besides this manual process, you can always choose a professional tool that will perform all these steps automatically. It is a safer and much easier option for your computer’s health and performance.
Restoring your system to a previous state can fix a number of system issues. A simpler way to safely restore your system is using a specialized tool that can do all the work for you.
Restoro will automatically scan your PC for problematic files and will replace all critical Windows system files that are malfunctioning with previous versions that are working perfectly.
Here’s how you can perform this action:
- Download and install Restoro.
- Launch the application.
- Wait for it to find any system stability issues.
- Press Start Repair.
- Restart your PC for all the changes to take effect.
The built-in system restoration tool will revert your Windows to a previous version, therefore you can lose some precious data that was saved after the restoration point was made. You can always return your system to its pre-repair condition.
⇒ Get Restoro
Disclaimer: This program needs to be upgraded from the free version in order to perform some specific actions.
Read more about this topic
- A Fatal Error Occurred Creating a TLS Client Credential [Fix]
- How to Add Text in The Snipping Tool [Quickest Ways]
- How to Remove Windows 11 File Explorer Please Sign In
4. Download Windows 11 update manually
- Open the official Microsoft Catalogue website.
- In the search bar, enter the KB (Knowledge Base) number of the Windows update you wish to download and hit the Search button.

- A list of available update packages associated with the entered KB number will show up.
- Click on the update’s title to get more information, such as Installation Resources, Package details, and Languages supported about the update.

- Identify the correct update and hit the Download button.
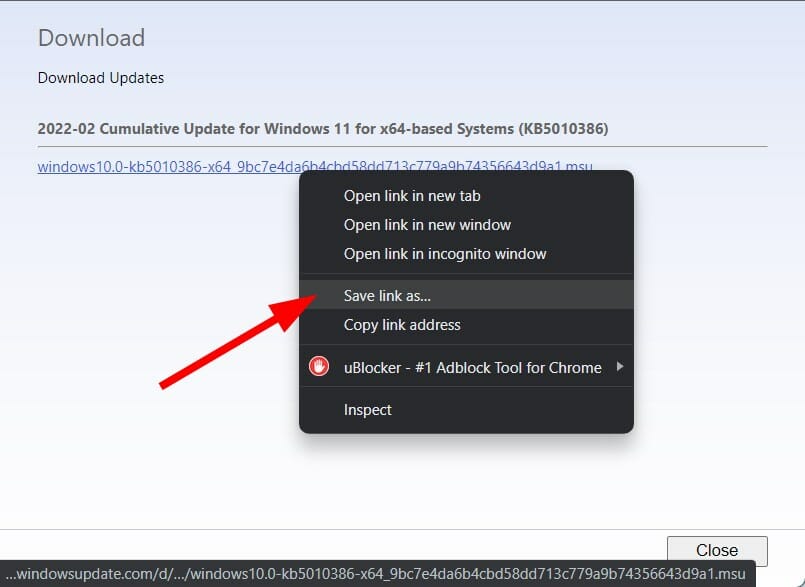
- Right-click on the download link and press Save link as.

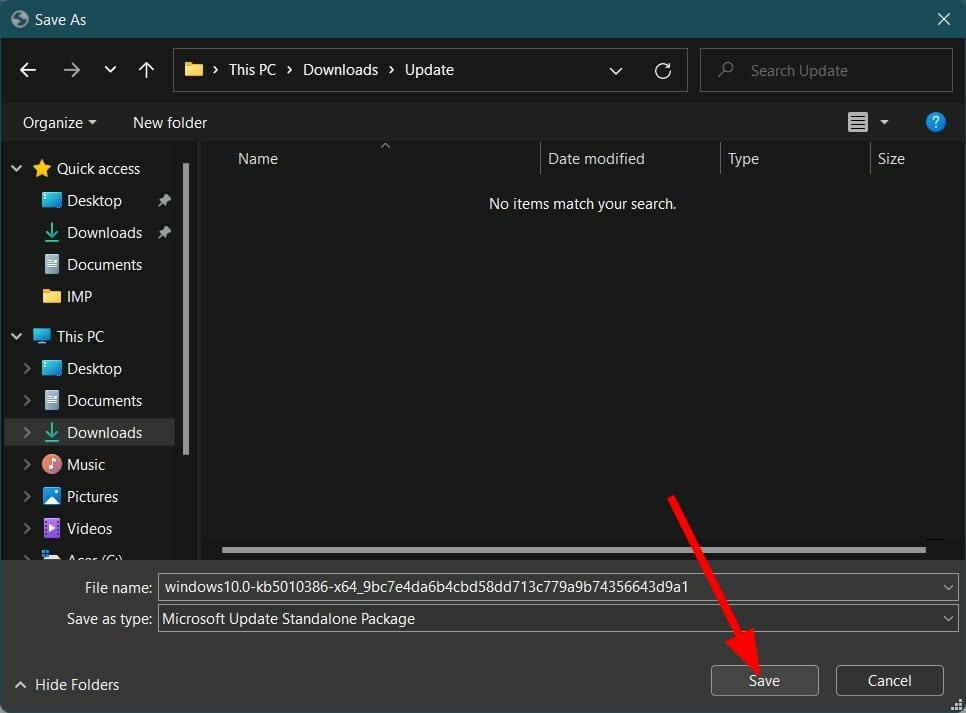
- Choose the download directory and press Save.

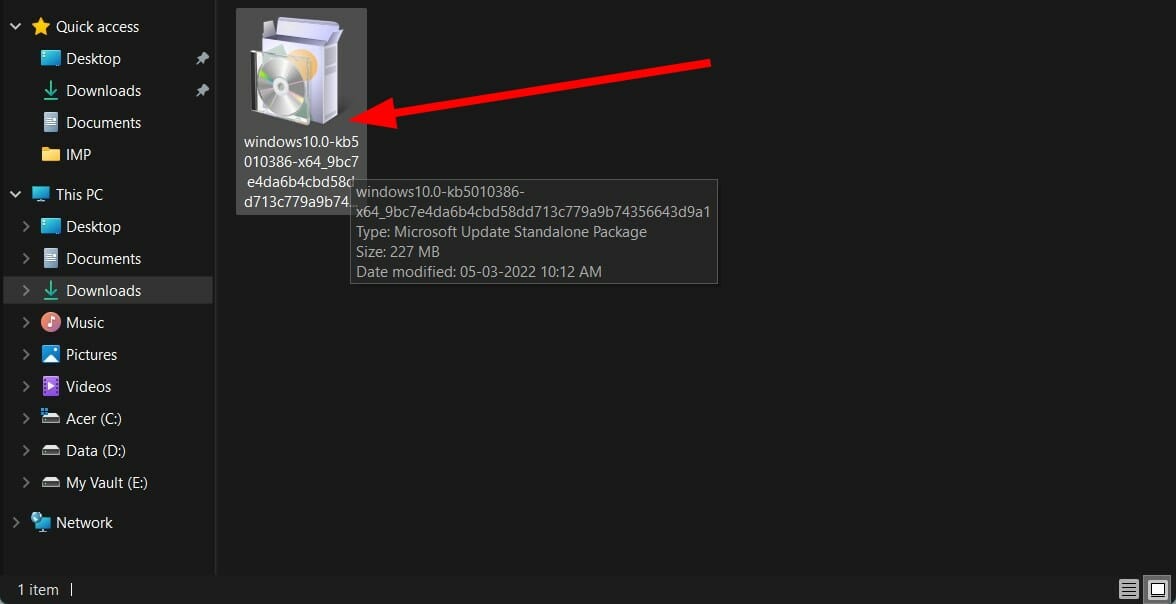
- Open the folder where you have downloaded the Windows 11 update package.
- Double-click on it to run.

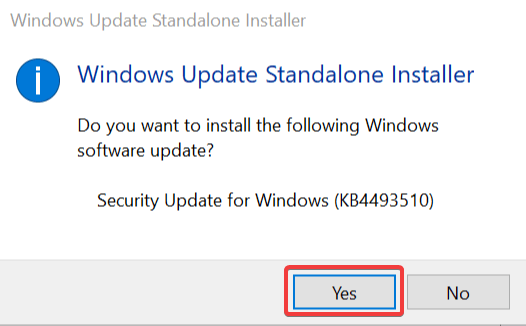
- After a few seconds, press the Yes button on the Windows Update Standalone Installer pop-up to begin the update installation.

- Reboot your PC and check if this fixes the Windows 11 update error 0x800f081f.
5. Clear Windows Update Cache and components
- Open the Start menu.
- Search for Command Prompt and run it as an administrator.
- Type the below commands and hit Enter after you have typed each command, one by one.
Net Stop bits
Net Stop wuauserv
Net Stop appidsvc
Net Stop cryptsvc
Ren %systemroot%SoftwareDistribution SoftwareDistribution.bak
Ren %systemroot%system32catroot2 catroot2.bak
Net Start bits
Net Start wuauserv
Net Start appidsvc
Net Start cryptsvc
4. Exit cmd and restart your PC.
6. Remove WUServer and WIStatusServer from registry
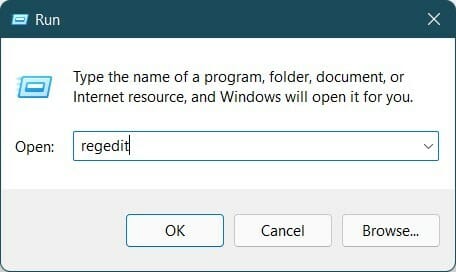
- Open Run dialog using Windows + R keys on your keyboard.
- Type the below command and press Enter . regedit

- Click on Yes if a prompt asks you for permission.
- You need to navigate to the below address
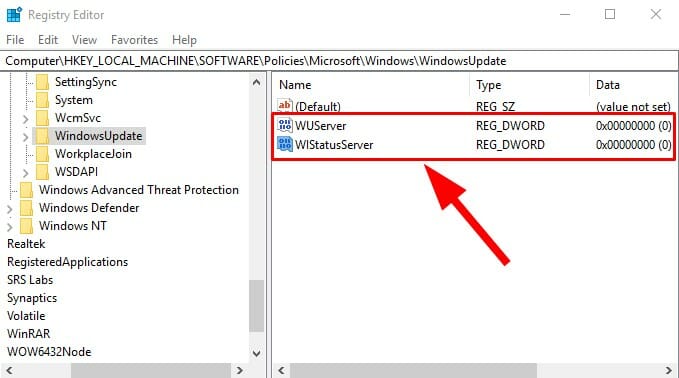
HKEY_LOCAL_MACHINESOFTWAREPoliciesMicrosoftWindowsWindowsUpdate - On the right pane, locate WUServer and WIStatusServer.
- Delete both entries.

- If these entries are not available, then hop onto another solution.
Why do my Windows updates keep failing?
There are several potential causes for problems like Windows Update failing repeatedly. Based on user feedback, we have generated a list of the most frequent reasons.
- Out-of-date drivers – Drivers must operate components like graphic cards and network cards that aren’t natively compatible with Windows. Windows Update problems might result from outdated drivers connected to this problem.
- System file errors or absences – System files are essential to the smooth operation of your device. Your system files may have recently been destroyed or damaged, which is why Windows Update failed.
- A problem with the Windows Update service – Your update service may be having problems. If so, alternate methods for downloading the most recent Windows update are provided above.
Remember that not all potential reasons are included in the list mentioned above. However, the error can occur specifically for you because of a problem with your machine.
What else can I do to avoid Windows 11 update error 0x800f081f?
When you come across an error, and that too while installing a Windows 11 update, then it can be frustrating and annoying.
The solutions mentioned above can be of great help when facing Windows 11 update error 0x800f081f, but that’s not all.
If, for some reason, none of the above steps helped you fix it, then we have some important points that you can follow and check if this fixes the issue or not.
➡ Make sure the .NET Framework is turned on
It is essential since this issue is related to the Microsoft .Net Framework. Open Windows Feature by searching for it on the Start menu and checking the box next to .NET Framework 3.5 (includes .NET 2.0 and 3.0).
Hit OK and reboot your PC. Ensuring the .NET Framework is enabled will let you get automatic updates with no issues.
➡ Turn off Developer Mode
All you need to do is open the Start menu and search for Developer mode. Open it and make sure to turn off Developer mode.
There are instances when developer mode may interfere with Windows update installation and, thus, the error. Make sure it is disabled and check if this fixes the issue or not.
➡ Reset your copy of Windows 11
If absolutely nothing works, then as a last resort, all you can do is reset or reinstall the Windows 11 OS on your PC. Possibly, some critical files were not installed during the previous installation.
If you encounter the 0x800f081f error on Windows 10, we have another article on the topic that you can check out.
Let us know in the comments below which one of the above solutions helped you fix the Windows 11 update error 0x800f081f. Moreover, you can also share with us any other solution.
![]()
Newsletter
Running the update troubleshooter is an easy fix
by Vladimir Popescu
Being an artist his entire life while also playing handball at a professional level, Vladimir has also developed a passion for all things computer-related. With an innate fascination… read more
Updated on December 19, 2022
Reviewed by
Vlad Turiceanu
Passionate about technology, Windows, and everything that has a power button, he spent most of his time developing new skills and learning more about the tech world. Coming… read more
- Microsoft .NET Framework is an important software to run software and applications on Windows OS.
- If there are some issues with the .NET Framework, then you may experience Windows 11 update error 0x800f081f.
- To fix this, you can try to tweak the Group Policy files, install Windows updates manually, or remove WUServer and WIStatusServer from registry.
X INSTALL BY CLICKING THE DOWNLOAD FILE
Fix Windows 11 OS errors with Restoro PC Repair Tool: This software repairs common computer errors by replacing the problematic system files with the initial working versions. It also keeps you away from critical file loss, hardware failure, and repairs damages made by malware and viruses. Fix PC issues and remove viruses now in 3 easy steps:
- Download Restoro PC Repair Tool that comes with Patented Technologies (patent available here) .
- Click Start Scan to find Windows 11 issues that could be causing PC problems.
- Click Repair All to fix issues affecting your computer’s security and performance
- Restoro has been downloaded by 0 readers this month.
Installing the latest Windows 11 updates is essential for multiple reasons. But in short, the latest updates let you experience the latest features as and when they arrive.
Besides, they also improve the user experience by fixing the bugs present in the previous version of the operating system.
Microsoft delivers the latest update that also bumps the security protection to keep your Windows 11 PC out of danger from various new viruses or malware attacks. With new cumulative updates and feature releases, it has become common to experience some errors or issues.
With Windows 11, that is no different. People have been complaining about the Windows 11 update error 0x800f081f. This error code is mainly related to the Microsoft .NET Framework 3.5 incompatibilities.
However, just like every Windows 11 update error code, this error 0x800f081f could also trouble users because of corrupt registry or system files. Notably, similar issues were reported by users with the Windows 10 OS as well.
Whatever the case may be, in this guide, we have created a list of solutions that will help you fix this problem. Since the issue is mainly related to the Microsoft .Net Framework incompatibility, we will look to tackle that issue first and possibly resolve the Windows 11 update error 0x800f081f.
What does error code 0x800f081f mean?
Error 0x800f081f is a system error code related to updates in Windows 11. The interesting fact about this error code is that it’s among the most common ones that pop up for the same reason.
The other three error codes are 0x800F0906, 0x800F0907, and 0x800F0922. All these error codes, including error code 0x800F081f, will show you an error message:
There were some problems installing updates, but we’ll try again later. If you keep seeing this and want to search the web or contact support for information, this may help.
This happens because Windows cannot download the critical files from the available update. But, as already mentioned, Microsoft .Net Framework incompatibilities also cause this problem.
It may also come up because of the DISM (Deployment Image Servicing and Management) tool, or some Windows PowerShell commands.
Here are some specific reasons for the different error codes:
- 0x800F081F: Your system failed to find the .NET Framework source files for the installation to proceed. This could also mean that the DISM Windows 11 tool failed.
- 0x800F0906: Windows couldn’t connect to the internet or install a role, role service, or feature.
- 0x800F0907: The DISM tool failed, or your network policy settings are blocking internet access.
- 0x800F0922: The processing of important .NET advanced installers or generic commands failed.
How do I fix error code 0x800f081f in Windows 11?
In this article
- What does error code 0x800f081f mean?
- How do I fix error code 0x800f081f in Windows 11?
- 1. Run Windows Update troubleshooter
- 2. Tweak your group policy
- 3. Repair Windows system files
- 4. Download Windows 11 update manually
- 5. Clear Windows Update Cache and components
- 6. Remove WUServer and WIStatusServer from registry
- Why do my Windows updates keep failing?
- What else can I do to avoid Windows 11 update error 0x800f081f?
1. Run Windows Update troubleshooter
Multiple users reported that Windows Update troubleshooter can help you restore the 0x800f081f error on Windows 11 OS.
1. Open the Start Menu.
2. Type in Troubleshoot other problems and open the app.
3. Click Run next to Windows Update .
4. The troubleshooter will begin the diagnosis and will check for errors.
5. Apply the recommended fixes.
6. Restart your PC.
Some PC issues are hard to tackle, especially when it comes to corrupted repositories or missing Windows files. If you are having troubles fixing an error, your system may be partially broken.
We recommend installing Restoro, a tool that will scan your machine and identify what the fault is.
Click here to download and start repairing.
One of the most common solutions to fix most of the common Windows 11 issues is to run the in-built Windows troubleshooter.
To fix this Windows 11 update error 0x800f081f, we advise you to try the Windows update troubleshooter. It will not only detect the issue but possibly fix it during the process.
2. Tweak your group policy
- Press Windows + R keys to open the Run dialogue.
- Type gpedit.msc and hit Enter .
- Expand Computer Configuration.
- Then expand Administrative Templates.
- Click on System.
- On the right pane, click on the entry labeled Specify settings for optional component installation and component repair.
- Double-click on this entry to open it.
- Check Enabled and hit OK.
3. Repair Windows system files
- Open the Start menu.
- Search for Command Prompt and run it as an administrator.
- Type the below command and hit Enter .
sfc /scanow - Your PC will start scanning and, in the process, will try to fix the issue.
- Reboot your PC.
- Again open command prompt.
- Type in the below command and hit Enter
chkdsk C: /f /r /x - After the process completes, enter the below command and press Enter .
DISM.exe /Online /Cleanup-image /Restorehealth - You will see the message – The operation completed successfully. Close the window and reboot your PC.
Besides this manual process, you can always choose a professional tool that will perform all these steps automatically. It is a safer and much easier option for your computer’s health and performance.
Restoring your system to a previous state can fix a number of system issues. A simpler way to safely restore your system is using a specialized tool that can do all the work for you.
Restoro will automatically scan your PC for problematic files and will replace all critical Windows system files that are malfunctioning with previous versions that are working perfectly.
Here’s how you can perform this action:
- Download and install Restoro.
- Launch the application.
- Wait for it to find any system stability issues.
- Press Start Repair.
- Restart your PC for all the changes to take effect.
The built-in system restoration tool will revert your Windows to a previous version, therefore you can lose some precious data that was saved after the restoration point was made. You can always return your system to its pre-repair condition.
⇒ Get Restoro
Disclaimer: This program needs to be upgraded from the free version in order to perform some specific actions.
Read more about this topic
- A Fatal Error Occurred Creating a TLS Client Credential [Fix]
- How to Add Text in The Snipping Tool [Quickest Ways]
- How to Remove Windows 11 File Explorer Please Sign In
- How to Change Real Time Update Speed in Task Manager
- How to Check Your Windows Experience Index on Windows 11
4. Download Windows 11 update manually
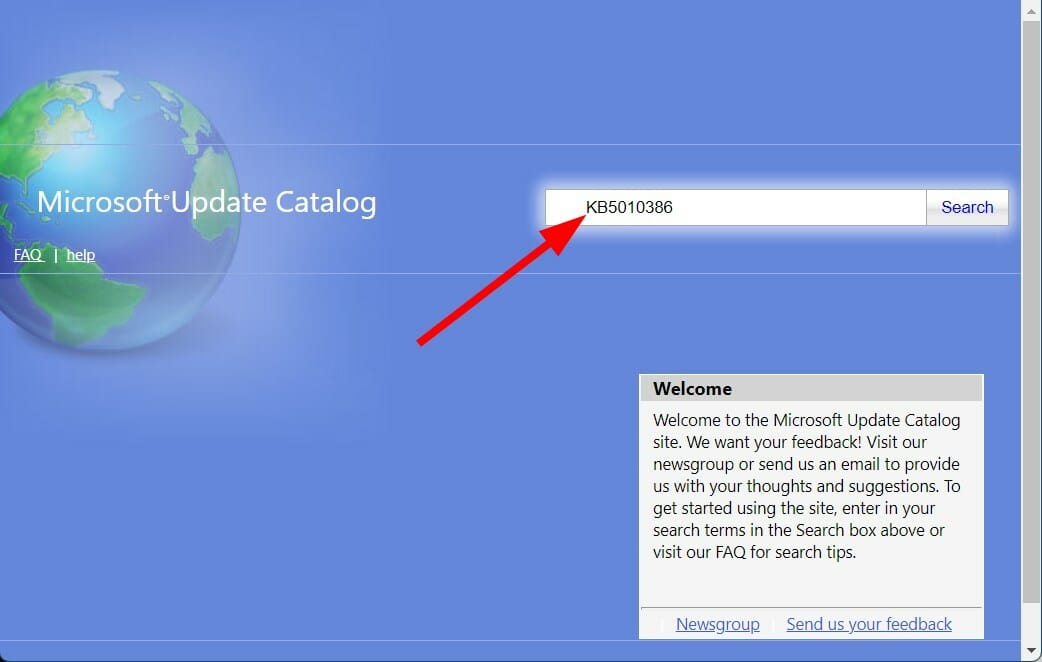
- Open the official Microsoft Catalogue website.
- In the search bar, enter the KB (Knowledge Base) number of the Windows update you wish to download and hit the Search button.
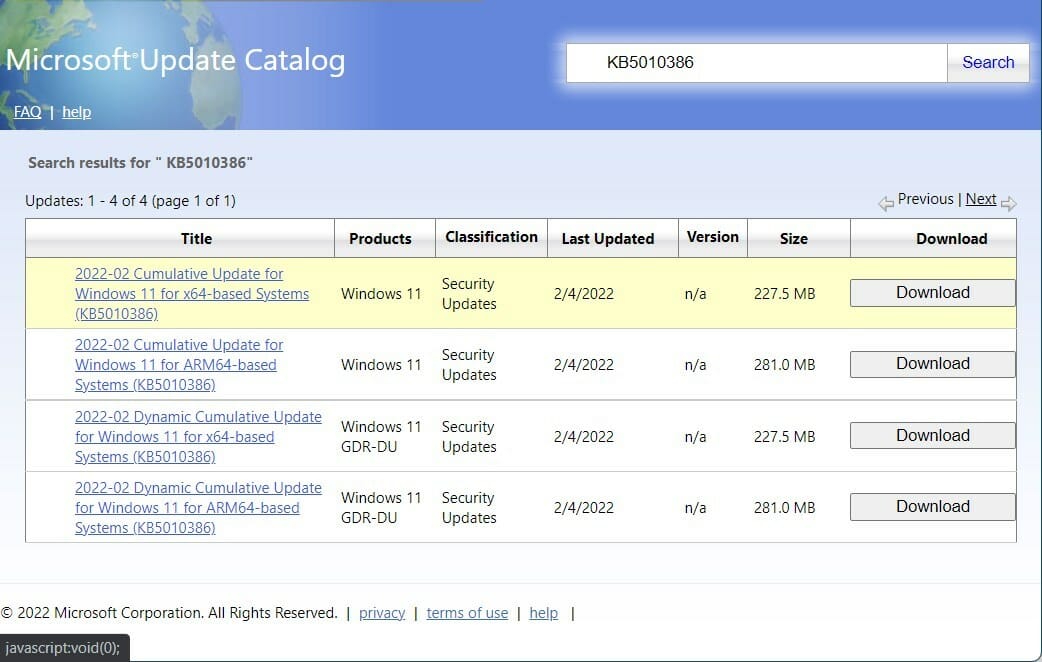
- A list of available update packages associated with the entered KB number will show up.
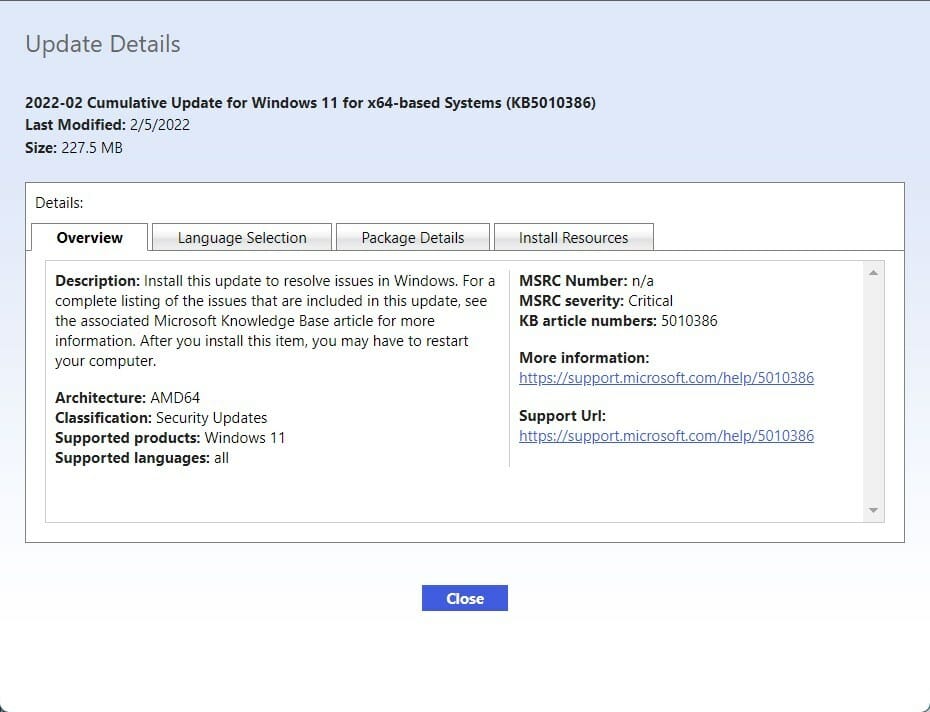
- Click on the update’s title to get more information, such as Installation Resources, Package details, and Languages supported about the update.
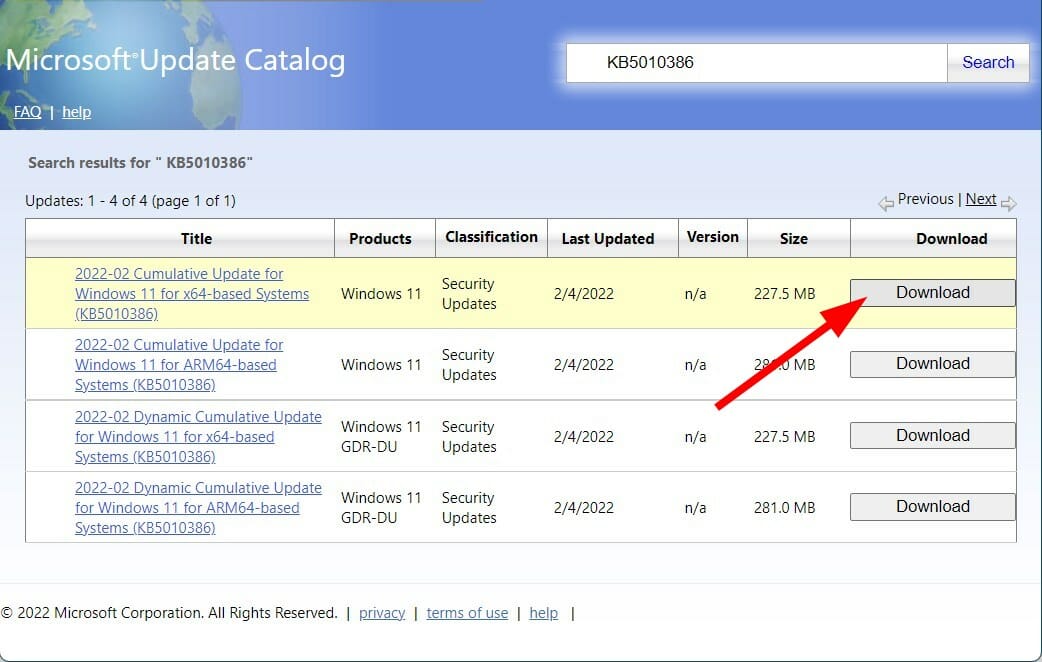
- Identify the correct update and hit the Download button.
- Right-click on the download link and press Save link as.
- Choose the download directory and press Save.
- Open the folder where you have downloaded the Windows 11 update package.
- Double-click on it to run.
- After a few seconds, press the Yes button on the Windows Update Standalone Installer pop-up to begin the update installation.
- Reboot your PC and check if this fixes the Windows 11 update error 0x800f081f.
5. Clear Windows Update Cache and components
- Open the Start menu.
- Search for Command Prompt and run it as an administrator.
- Type the below commands and hit Enter after you have typed each command, one by one.
Net Stop bits
Net Stop wuauserv
Net Stop appidsvc
Net Stop cryptsvc
Ren %systemroot%SoftwareDistribution SoftwareDistribution.bak
Ren %systemroot%system32catroot2 catroot2.bak
Net Start bits
Net Start wuauserv
Net Start appidsvc
Net Start cryptsvc
4. Exit cmd and restart your PC.
6. Remove WUServer and WIStatusServer from registry
- Open Run dialog using Windows + R keys on your keyboard.
- Type the below command and press Enter . regedit
- Click on Yes if a prompt asks you for permission.
- You need to navigate to the below address
HKEY_LOCAL_MACHINESOFTWAREPoliciesMicrosoftWindowsWindowsUpdate - On the right pane, locate WUServer and WIStatusServer.
- Delete both entries.
- If these entries are not available, then hop onto another solution.
Why do my Windows updates keep failing?
There are several potential causes for problems like Windows Update failing repeatedly. Based on user feedback, we have generated a list of the most frequent reasons.
- Out-of-date drivers – Drivers must operate components like graphic cards and network cards that aren’t natively compatible with Windows. Windows Update problems might result from outdated drivers connected to this problem.
- System file errors or absences – System files are essential to the smooth operation of your device. Your system files may have recently been destroyed or damaged, which is why Windows Update failed.
- A problem with the Windows Update service – Your update service may be having problems. If so, alternate methods for downloading the most recent Windows update are provided above.
Remember that not all potential reasons are included in the list mentioned above. However, the error can occur specifically for you because of a problem with your machine.
What else can I do to avoid Windows 11 update error 0x800f081f?
When you come across an error, and that too while installing a Windows 11 update, then it can be frustrating and annoying.
The solutions mentioned above can be of great help when facing Windows 11 update error 0x800f081f, but that’s not all.
If, for some reason, none of the above steps helped you fix it, then we have some important points that you can follow and check if this fixes the issue or not.
➡ Make sure the .NET Framework is turned on
It is essential since this issue is related to the Microsoft .Net Framework. Open Windows Feature by searching for it on the Start menu and checking the box next to .NET Framework 3.5 (includes .NET 2.0 and 3.0).
Hit OK and reboot your PC. Ensuring the .NET Framework is enabled will let you get automatic updates with no issues.
➡ Turn off Developer Mode
All you need to do is open the Start menu and search for Developer mode. Open it and make sure to turn off Developer mode.
There are instances when developer mode may interfere with Windows update installation and, thus, the error. Make sure it is disabled and check if this fixes the issue or not.
➡ Reset your copy of Windows 11
If absolutely nothing works, then as a last resort, all you can do is reset or reinstall the Windows 11 OS on your PC. Possibly, some critical files were not installed during the previous installation.
If you encounter the 0x800f081f error on Windows 10, we have another article on the topic that you can check out.
Let us know in the comments below which one of the above solutions helped you fix the Windows 11 update error 0x800f081f. Moreover, you can also share with us any other solution.
![]()
Newsletter
Не секрет, что в Windows 8 / Windows Server 2012 / R2 .Net Framework 3.5 не идет в комплекте поставки ОС (в рамках концепции Features on Demand), и для его установки требует дистрибутив ОС или прямой доступ к сайту обновлений Microsoft. В одной из предыдущих статей мы уже показывали, как установить .NET Framework 3.5 в Windows Server 2012 R2 / Windows 8. На днях сразу на нескольких системах столкнулись с ошибкой установки .Net Framework 3.5. Проблема наблюдалась при установке компонента как на серверной Windows Server 2012, так и на клиентской Windows 8.1.
Что самое интересное, победить проблему получилось разными методами : ).
Невозможно установить .NET Framework 3.5 в Windows 8 / Windows Server 2012
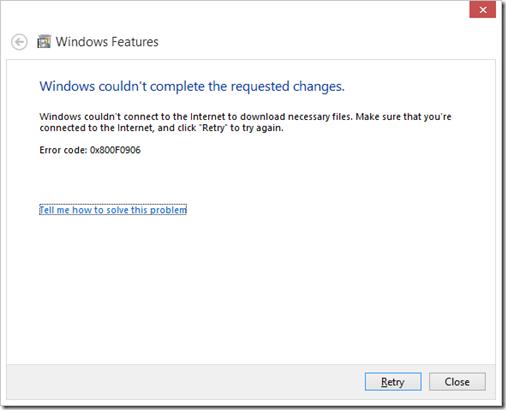
При онлайн установке .NET Framework 3.5 в Windows 8 через Панель управления (Control Panel -> Programs and Features -> Turn Windows features on or off) появляется ошибка 0x800F0906:
Error: 0x800F0906
Windows couldn’t connect to the Internet to download necessary files. Make sure that you’re connected to the Internet and click «Retry» to try again.
Примечание. Каких либо проблем с доступом в Интернет на проблемных машинах не было.
При попытке офлайн установки .NET 3.5 со смонтированного диска с дистрибутивом ОС (использовался именно тот установочный диск, с которого разворачивалась система) командой:
dism /online /enable-feature /featurename:NetFX3 /All /Source:e:sourcessxs /LimitAccess
Выполнение команды DISM завершается с ошибкой 0x800F081F:
Deployment Image Servicing and Management tool Version: 6.2.9200.16384
Image Version: 6.2.9200.16384
Error: 0x800f081f
The source files could not be found.
Use the «Source» option to specify the location of the files that are required to restore the feature. For more informat
ion on specifying a source location, see http://go.microsoft.com/fwlink/?LinkId=243077.
The DISM log file can be found at C:WindowsLogsDISMdism.log

В локализованной версии Windows 8 ошибка, соответственно:
Включение функций
[===========================66.5%====== ]
Ошибка: 0x800f081f
Не удалось найти исходные файлы.
Лог C:WindowsLogsDISMdism.log содержит такие ошибки:
2014-10-24 10:11:22, Info DISM DISM Package Manager: PID=776 TID=4024 Error in operation: source for package or file not found, ResolveSource() unsuccessful. (CBS HRESULT=0x800f081f) — CCbsConUIHandler::Error
2014-10-24 10:11:22, Error DISM DISM Package Manager: PID=776 TID=2856 Failed finalizing changes. — CDISMPackageManager::Internal_Finalize(hr:0x800f081f)
2014-10-24 10:11:22, Error DISM DISM Package Manager: PID=776 TID=2856 The source files could not be found; their location must be specified using the /source option to restore the feature. — GetCbsErrorMsg
2014-10-24 10:11:22, Error DISM DISM Package Manager: PID=776 TID=2856 Failed processing package changes with session options — CDISMPackageManager::ProcessChangesWithOptions(hr:0x800f081f)
2014-10-24 10:11:22, Error DISM DISM Package Manager: PID=776 TID=2856 Failed ProcessChanges. — CPackageManagerCLIHandler::Private_ProcessFeatureChange(hr:0x800f081f)
2014-10-24 10:11:23, Error DISM DISM Package Manager: PID=776 TID=2856 Failed while processing command enable-feature. — CPackageManagerCLIHandler::ExecuteCmdLine(hr:0x800f081f)
Некорректные обновления, препятствующие установке .NET 3.5
В одной из свежей статей базы знаний Microsoft http://support2.microsoft.com/kb/3005628 описывается проблема с августовскими обновлениями безопасности Windows, установка которых приводит к ситуации, когда невозможно установить компонент .NET Framework 3.5. Речь идет о двух обновлениях:
- KB2966828 — MS14-046: Security update for the .NET Framework 3.5 on Windows 8.1 and Windows Server 2012 R2: August 12, 2014
- KB2966827 — MS14-046: Security update for the .NET Framework 3.5 on Windows 8 and Windows Server 2012: August 12, 2014
Как мы видим из описаний, указанные обновления безопасности предназначены для .NET Framework 3.5 в Windows 8.1 и Windows Server 2012 R2, причем устанавливаются эти обновления не зависимо от того, установлен ли компонент .NET Framework 3.5 в системе или нет.
Понять установлены ли данные обновления в системе можно так или с помощью такой команды Powershell:
Get-HotFix |?
Если любое из этих обновление установлено в системе, его нужно удалить (процедура подробно описана в статье Как правильно удалить обновление в Windows ). После этого можно установить .Net Framework 3.5 как обычно (он установится без ошибки), а затем еще раз установить удаленные обновления (дабы не оставлять дыру в системе).
Совет. Альтернативно на портале Microsoft вместо удаления/установки обновлений рекомендуют установить хотфикс 3005628. Данный фикс удалит обновления 2966827 2966828 в системах, где не установлен.NET Framework 3.5. Какой способ удобнее – решать вам.
Конфликт Language Pack и .NET Framework 3.5
На машине с Windows 8.1, на которой также присутствовала рассматриваемая проблема, указанные выше обновлений отсутствовали. В попытках решить проблему перебрали множество вариантов, начиная от последовательного удаления всех обновлений и заканчивая восстановлением хранилища компонентов. Но эффекта так и не достигли…
Как не странно, помогло удаление дополнительного (русского) языкового пакета (команда lpksetup).
После удаления языкового пакета, .NET Framework устанавливается корректно. Затем можно заново установить нужный Language Pack.
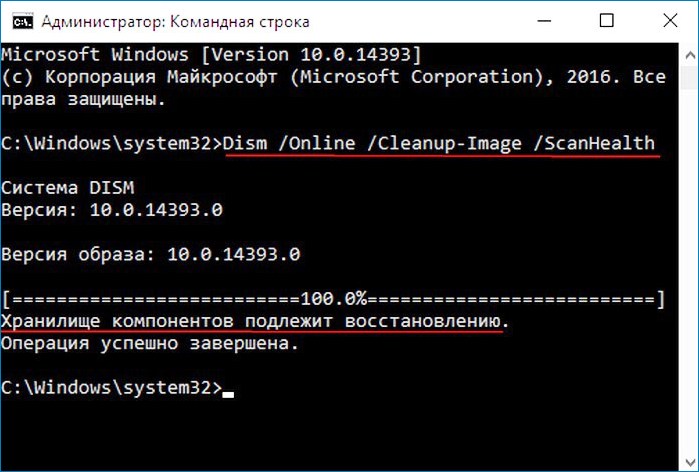
Здравствуйте, Владимир! У меня целая эпопея с восстановлением хранилища оригинальных компонентов Windows 10. Нужен Ваш совет, думаю я Вас пойму, так как считаю себя опытным пользователем. Установленная на моём ноутбуке Windows 10 работает со значительными ошибками. Решил проверить целостность системных файлов с помощью средства sfc /scannow , но вышла ошибка «Программа защиты ресурсов Windows обнаружила повреждённые файлы, но не может восстановить некоторые из них». Как я понял, ошибка эта обозначает, что нарушена целостность самого хранилища системных компонентов Win 10 (папка WinSxS). Тогда решил проверить целостность этого самого хранилища командой Dism /Online /Cleanup-Image /ScanHealth , вышло сообщение « Хранилище компонентов подлежит восстановлению » . Соответственно восстанавливаю хранилище командой Dism /Online /Cleanup-Image /RestoreHealth , данная команда восстанавливает хранилище компонентов с помощью Центра обновлений Windows, и у меня опять выходит ошибка « Не удалось скачать исходные файлы. Укажите расположение файлов, необходимых для восстановления компонента, с помощью параметра «Источник» ».
Непонятно, почему вылезла ошибка в этот раз, ведь интернет у меня есть. Ладно думаю, буду использовать для восстановления хранилища компонентов средство PowerShell и ISO-образ Windows 10, скачал дистрибутив Windows 10 и подсоединил его к виртуальному дисководу, запустил PowerShell и ввёл команду: Repair-WindowsImage -Online -RestoreHealth -Source F:sourcesinstall.wim:1 (где буква «F» соответствует букве подключенного образа с Win 10, а цифра «1» — индексу издания в образе Win 10 PRO (именно она у меня установлена), но и в очередной раз я потерпел неудачу — « Ошибка: 0x800f081. Сбой восстановления. Не найден источник восстановления, или хранилище компонентов восстановить невозможно ».
На одном известном форуме подсказали, что не нужно подсоединять ISO-образ Windows 10 к виртуальному дисководу, а нужно смонтировать ISO-образ с файлами Win 10 в папку с помощью команды: Dism /Mount-Wim /WimFile: F :sourcesinstall.wim /index:1 /MountDir:C:WIM /ReadOnly (где WIM, это пустая папка на диске C:, в которую монтируется ISO-образ, а F:sourcesinstall.wim — местонахождение файла-образа install.wim ), но у меня и здесь уже при монтировании вышел промах « Ошибка: 11. Была сделана попытка загрузить программу, имеющую неверный формат » .
Короче я сдался и не знаю, почему у меня ничего не получается.
Автор — Владимир
Привет, друзья. Цель данной статьи рассказать начинающим пользователям в подробностях, как производить восстановление повреждённого хранилища компонентов Windows 10 в различных критических ситуациях. Если вы хотите проверить целостность системных файлов в своей операционной системе, то поможет вам в этом встроенная утилита «sfc /scannow » , но если она выдаст ошибку: «Программа защиты ресурсов Windows обнаружила повреждённые файлы, но не может восстановить некоторые из них»,

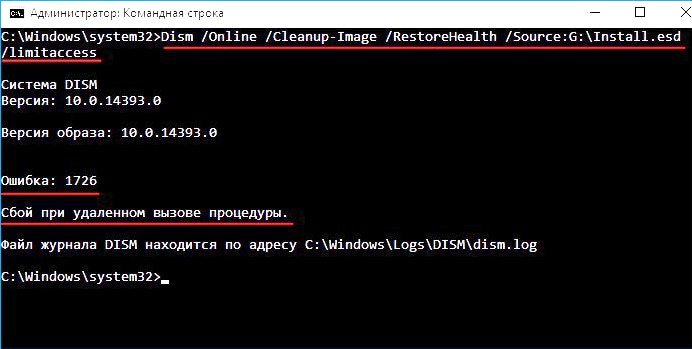
то значит в вашей OS нарушена целостность самого хранилища системных компонентов (содержимое папки WinSxS). В этом случае нужно проверить целостность хранилища компонентов командой « Dism /Online /Cleanup-Image /ScanHealth », если при данной проверке тоже будут выходить различные ошибки, например, «Хранилище компонентов подлежит восстановлению», « Ошибка: 1910 Не найден указанный источник экспорта объекта », «Ошибка: 1726 Сбой при удалённом вызове процедуры»,
то в этом случае нужно сначала восстановить хранилище компонентов, а уже затем восстанавливать целостность системных файлов с помощью «sfc /scannow», вот здесь начинается самое интересное, так как имеется очень много нюансов, давайте разберём их все.
Запускаем командную строку администратора и вводим команду:
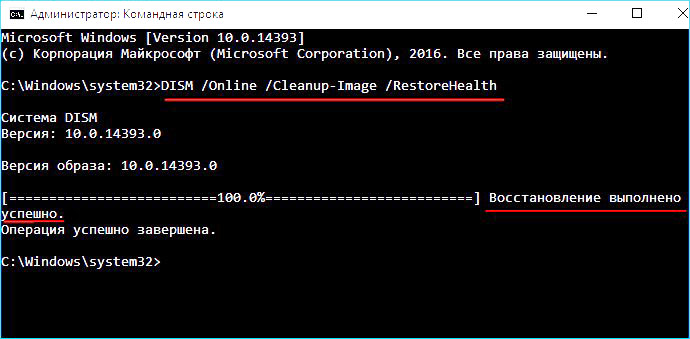
Dism /Online /Cleanup-Image /RestoreHealth
Данная команда восстанавливает хранилище компонентов с помощью Центра обновлений Windows (у вас должен работать Интернет), отсутствующие компоненты будут скачаны на серверах Майкрософт и восстановлены в вашей системе. В итоге должны получить сообщение « Восстановление выполнено успешно».
Но если данная команда выдаст ошибку 0x800f0906 «Не удалось скачать исходные файлы. Укажите расположение файлов, необходимых для восстановления компонента, с помощью параметра «Источник»» или

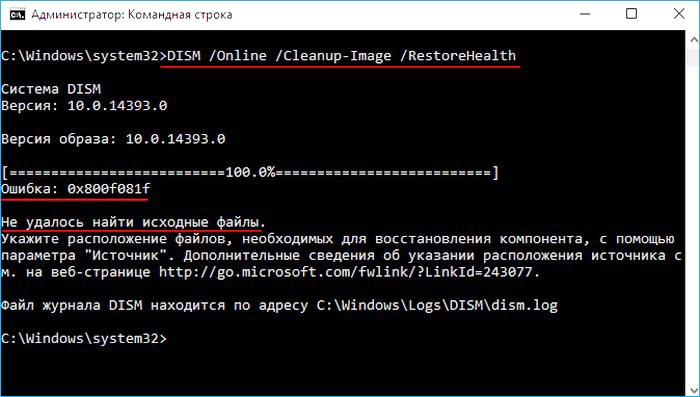
выйдет другая ошибка 0x800f081f «Не удалось найти исходные файлы. Укажите расположение файлов, необходимых для восстановления компонента, с помощью параметра «Источник»»,
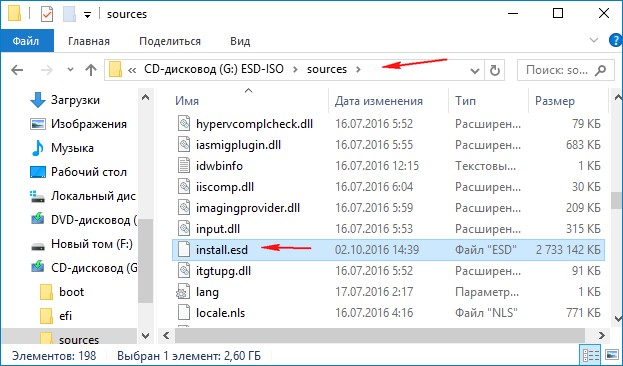
то нужно использовать для восстановления хранилища ISO-образ Windows 10. Скачиваем дистрибутив Windows 10 на сайте Майкрософт и подсоединяем его к виртуальному дисководу (в моём случае (G:)), затем заходим в папку sources и смотрим какое сжатие у файла-образа Windows 10,
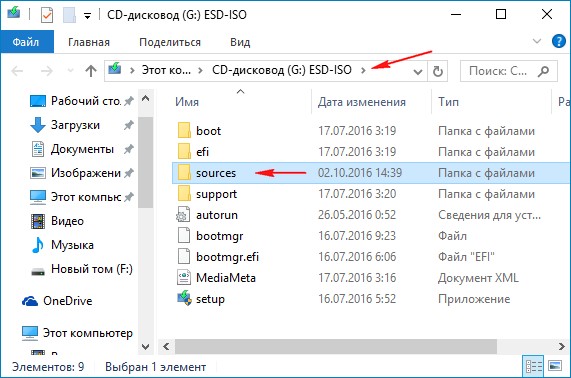
обычно бывает install.esd , запоминаем это, пригодится при вводе последующих команд (если в вашем случае попадётся файл install.wim, то читайте информацию в конце статьи).
соответственно вводим следующую команду:
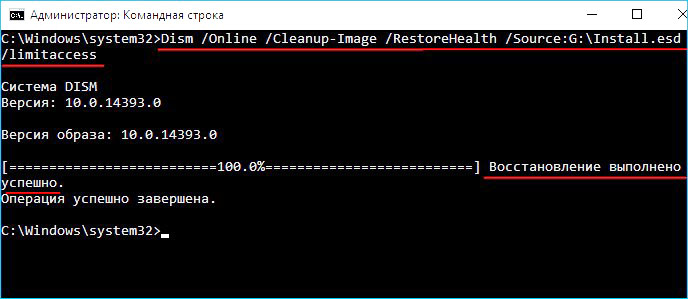
Dism /Online /Cleanup-Image /RestoreHealth /Source:G:Install.esd /limitaccess
где G: — буква виртуального дисковода с Windows 10,
Install.esd — файл-образ Win 10,
/limitaccess — параметр, закрывающий доступ к центру обновлений (ведь мы используем для восстановления дистрибутив Win 10)
В итоге получаем сообщение «Восстановление выполнено успешно. Операция успешно завершена».
Вот таким способом мы с вами восстановили повреждённое хранилище компонентов Windows 10.
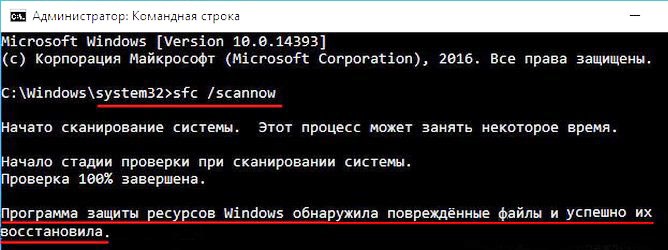
Хранилище компонентов восстановлено, теперь восстанавливаем целостность системных файлов Windows 10 командой «sfc /scannow». Получаем сообщение «Программа защиты ресурсов Windows обнаружила повреждённые файлы и успешно их восстановила». Целостность системных файлов Windows 10 восстановлена.
Ещё один способ восстановления хранилища компонентов с помощью файла виртуального жёсткого диска VHD
Друзья, но хочу сказать вам, что в особо сложных случаях, при вводе команды:
Dism /Online /Cleanup-Image /RestoreHealth /Source:G:Install.esd /limitaccess
вы опять получите ошибку, к примеру, «Ошибка: 1726 Сбой при удалённом вызове процедуры».
В этом случае нужно поступить так. Создать виртуальный жёсткий диск и распаковать на него содержимое файла-образа install.esd, после этого запустить команду:
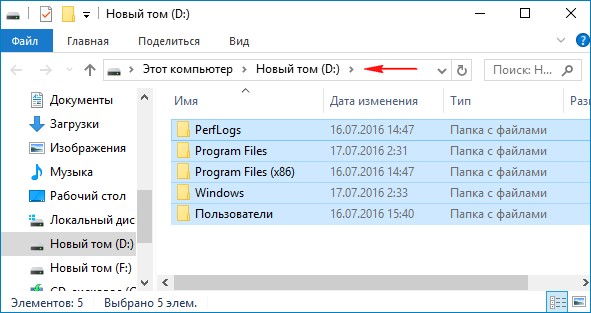
Dism /Online /Cleanup-Image /RestoreHealth /Source:D:Windows /limitaccess
Где D: — буква подсоединённого виртуального диска VHD с развёрнутыми файлами Windows 10.
в результате будет произведено восстановление хранилища компонентов за счёт распакованных на виртуальный диск VHD файлов операционной системы.
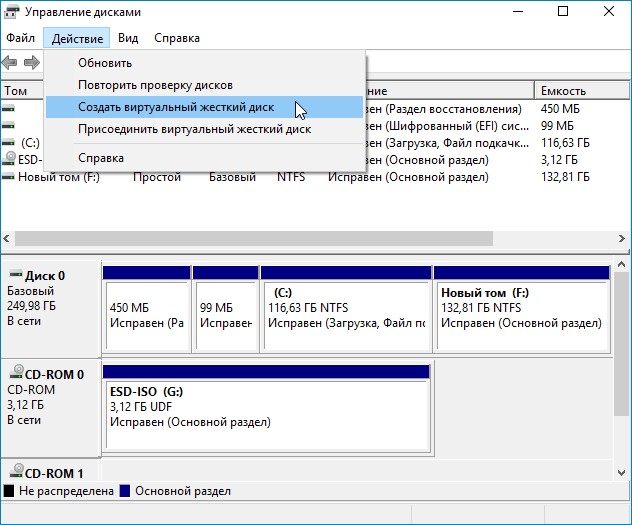
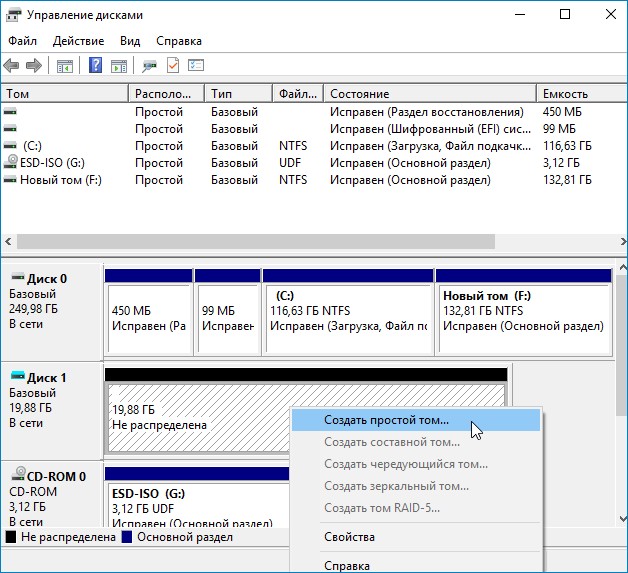
Идём в Управлении дисками и создаём виртуальный диск VHD. «Действие»—>«Создать виртуальный жёсткий диск»
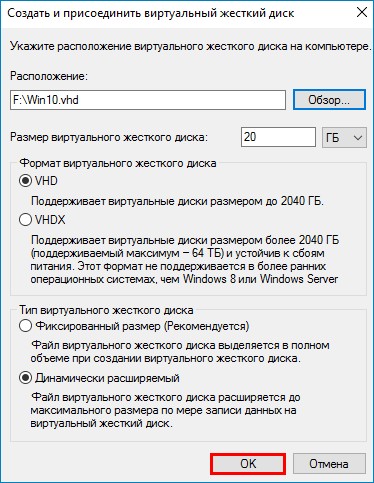
Отмечаем пункт «Динамический расширяемый». Размер виртуального жёсткого диска — 20 Гб. Жмём на кнопку «Обзор».
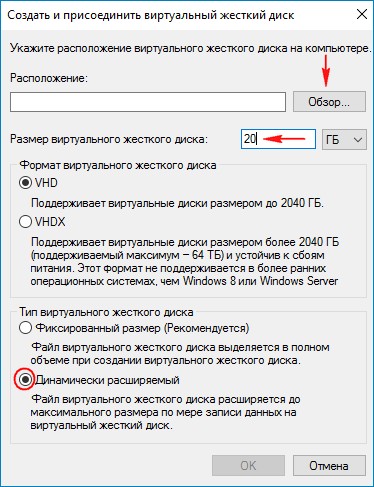
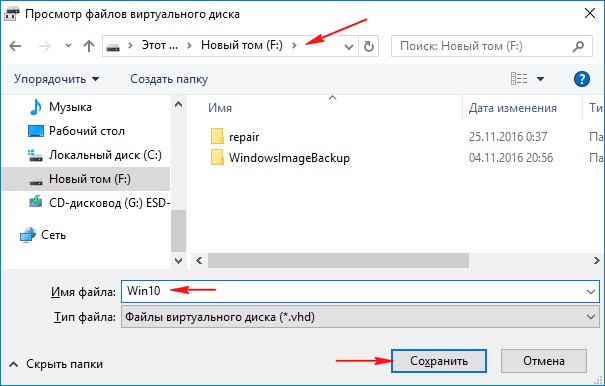
Выбираем в проводнике место сохранения виртуального жёсткого диска. Я выберу диск (F:). Присваиваю имя виртуальному диску — «Win10» и жму кнопку «Сохранить».
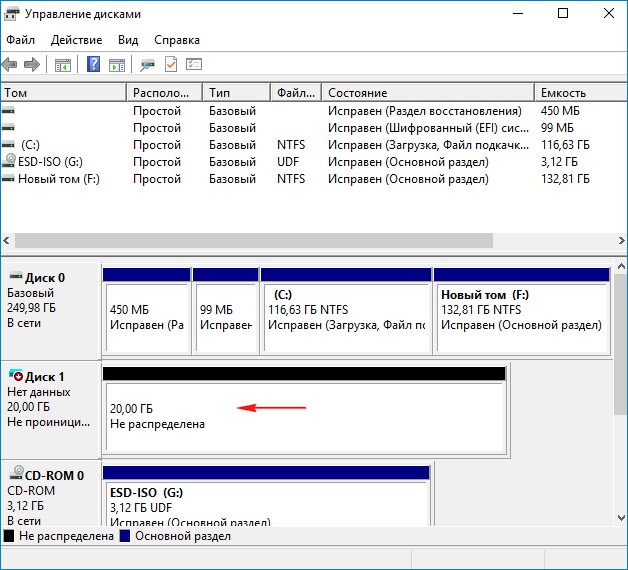
Созданный виртуальный диск представляет из себя в Управлении дисками нераспределённое пространство (Диск 1) размером 20 Гб.
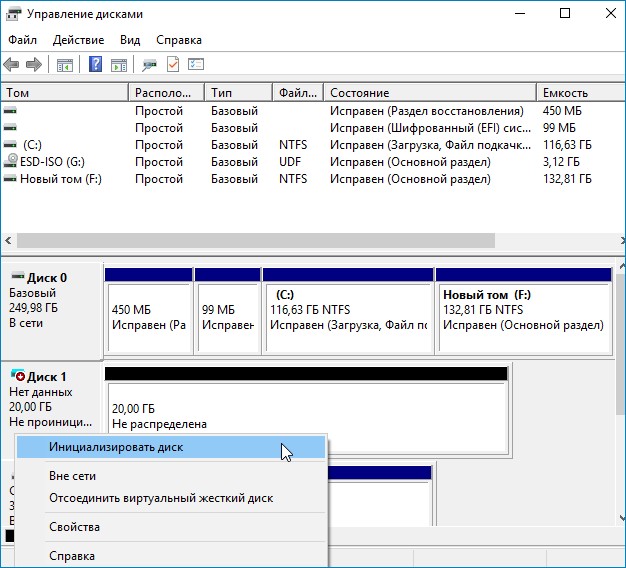
Щёлкаем на Диске 1 правой мышью и выбираем «Инициализировать диск»
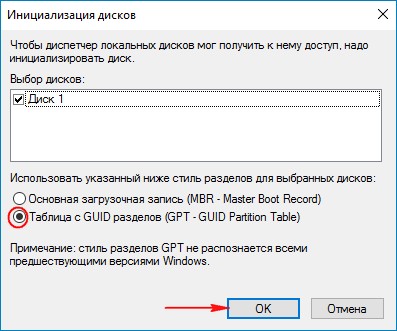
По большему счёту всё равно какой пункт отмечать — MBR или GPT. Я отмечу пункт «Таблица с GUID разделов (GPT)» и жму «ОК»
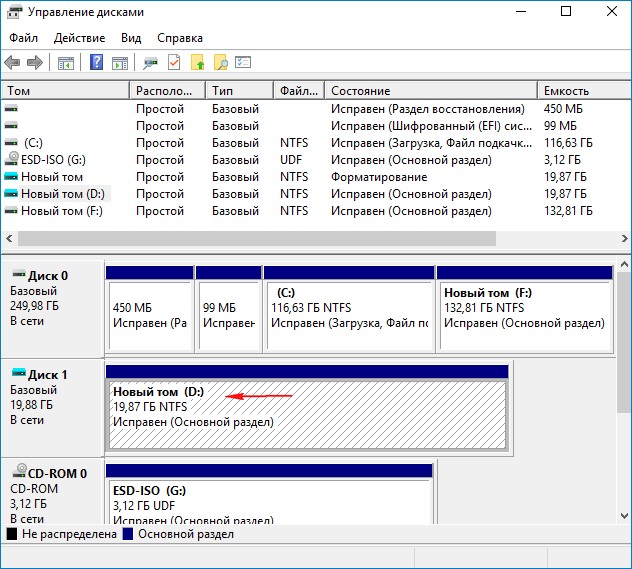
После инициализации диска создаём на нераспределённом пространстве простой том.
Новый том (G:) создан.
Архивы операционной системы — install.esd или install.wim могут содержать в себе несколько других архивов (релизов) операционных систем (Про, Домашняя и т.д.) и этим образам присваиваются индексы 1, 2, 3, 4. Чтобы узнать, какие образы находятся внутри нашего файла install.esd, вводим команду:
Dism /Get-WimInfo /WimFile:G:\sourcesinstall.esd
Где G: буква виртуального дисковода с Windows 10,
sourcesinstall.esd — адрес файла-образа install.esd в дистрибутиве Win 10.
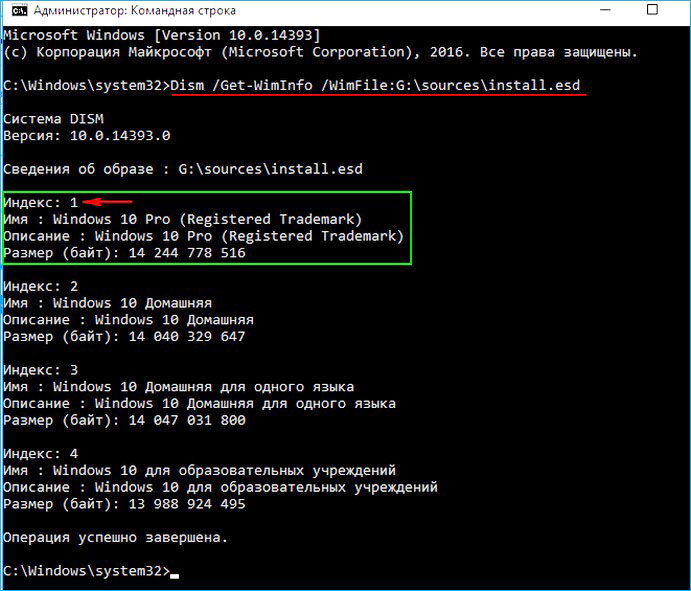
На моём компьютере установлена Windows 10 PRO и именно её я хочу восстановить. Нужный мне образ Win 10 PRO имеет индекс 1.
Dism /apply-image /imagefile:G:\sourcesinstall.esd /index:1 /ApplyDir:D:\
Где G:sources — адрес расположения файла install.esd,
index:1 — индекс Windows 10 PRO,
D : — подключенный виртуальный диск VHD (раздел D:).
Операция успешно завершена.
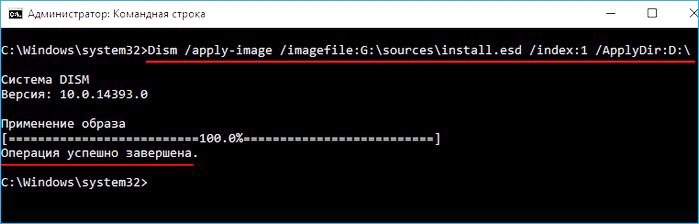
Файл install.esd (Win 10 PRO) развёрнут на виртуальный диск VHD (раздел D:).
Ну и теперь восстанавливаем хранилище компонентов з а счёт распакованных на виртуальный диск VHD (раздел D:) файлов операционной
системы Win 10, командой:
Dism /Online /Cleanup-Image /RestoreHealth /Source:D:Windows /limitaccess
Восстановление выполнено успешно. Операция успешно завершена.
Вот таким ещё способом мы с вами восстановили повреждённое хранилище компонентов Windows 10! Т еперь восстанавливаем целостность системных файлов Windows 10 командой «sfc /scannow».
В конце статьи вам пригодится такая информация. Если в ISO-образе Windows 10, в папке sourses, вам попадётся вместо файла install.esd файл install.wim, то команда восстановления немного изменится:
Dism /Online /Cleanup-Image /RestoreHealth /Source:G:install.wim /limitaccess
Это команда восстановления хранилища компонентов.
Вот столкнулся с проблемой после ноябрьских обновлений до Windows 10 Pro TH2 Build 586, далее расскажу о проблеме и ее решение.
Получается при проверки целостности системных файлов получал следующее:
C:WINDOWSsystem32>sfc /scannowЗащита ресурсов Windows обнаружила повреждённые файлы, но не может восстановить некоторые из них.
получается проблема следующая:
2015-11-18 09:41:56, Info CSI 00003ff4 [SR] Cannot repair member file [l:10]"opencl.dll" of microsoft-windows-RemoteFX-clientVM-RemoteFXWDDMDriver-WOW64-C, version 10.0.10586.0, arch Host= amd64 Guest= x86, nonSxS, pkt in the store, hash mismatch 2015-11-18 09:41:58, Info CSI 00004001 [SR] Cannot repair member file [l:10]"opencl.dll" of microsoft-windows-RemoteFX-clientVM-RemoteFXWDDMDriver-WOW64-C, version 10.0.10586.0, arch Host= amd64 Guest= x86, nonSxS, pkt in the store, hash mismatch 2015-11-18 09:41:58, Info CSI 00004002 [SR] This component was referenced by [l:125]"Microsoft-Windows-RemoteFX-VM-Setup-Package~31bf3856ad364e35~amd64~~10.0.10586.0.RemoteFX clientVM and UMTS files and regkeys" 2015-11-18 09:41:58, Info CSI 00004005 [SR] Could not reproject corrupted file [l:23 ml:24]"??C:WINDOWSSysWOW64"[l:10]"opencl.dll"; source file in store is also corrupted 2015-11-18 09:46:59, Info CSI 0000534b [SR] Repairing 1 components 2015-11-18 09:46:59, Info CSI 0000534e [SR] Cannot repair member file [l:10]"opencl.dll" of microsoft-windows-RemoteFX-clientVM-RemoteFXWDDMDriver-WOW64-C, version 10.0.10586.0, arch Host= amd64 Guest= x86, nonSxS, pkt in the store, hash mismatch 2015-11-18 09:46:59, Info CSI 00005351 [SR] Cannot repair member file [l:10]"opencl.dll" of microsoft-windows-RemoteFX-clientVM-RemoteFXWDDMDriver-WOW64-C, version 10.0.10586.0, arch Host= amd64 Guest= x86, nonSxS, pkt in the store, hash mismatch 2015-11-18 09:46:59, Info CSI 00005352 [SR] This component was referenced by [l:125]"Microsoft-Windows-RemoteFX-VM-Setup-Package~31bf3856ad364e35~amd64~~10.0.10586.0.RemoteFX clientVM and UMTS files and regkeys" 2015-11-18 09:46:59, Info CSI 00005355 [SR] Could not reproject corrupted file [l:23 ml:24]"??C:WINDOWSSysWOW64"[l:10]"opencl.dll"; source file in store is also corrupted 2015-11-18 09:46:59, Info CSI 00005357 [SR] Repair complete 2015-11-18 09:46:59, Info CSI 00005358 [SR] Committing transaction
Проверка на возможность
восстановления образа Windows показало следующее:
C:WindowsSystem32>dism /online /cleanup-image /scanhealth Cистема DISM Версия: 10.0.10586.0 Версия образа: 10.0.10586.0 [==========================100.0%==========================] Хранилище компонентов подлежит восстановлению. Операция успешно завершена.
Но при попытки восстановления образа Windows получил следующий результат:
C:WINDOWSsystem32>dism /online /cleanup-image /restorehealth Cистема DISM Версия: 10.0.10586.0 Версия образа: 10.0.10586.0 [==========================100.0%==========================] Ошибка: 0x800f081f Не удалось найти исходные файлы. Укажите расположение файлов, необходимых для восстановления компонента, с помощью параметра "Источник". Дополнительные сведения об указании расположения источника см. на веб-странице http://go.microsoft.com/fwlink/?LinkId=243077. Файл журнала DISM находится по адресу C:WINDOWSLogsDISMdism.log
Помогло мне следующее решение:
1) Скачать
Windows 10 TechBench , важно при этом указать верную битность и язык при выборе скачивания ISO.
2) Далее скаченный образ (в моем случае Win10_1511_Russian_x64.ISO) монтируем (в моем случае монтировал как диск
E:)
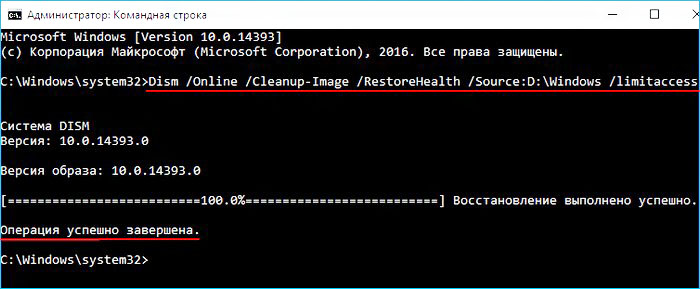
3) Далее в привилегированном режиме (Run as Administrator) открываю командную строку (cmd.exe) и выполняю следующее:
c:windowssystem32>DISM /Online /Cleanup-Image /RestoreHealth /source:WIM:E:sourcesInstall.wim:1 /LimitAccess Cистема DISM Версия: 10.0.10586.0 Версия образа: 10.0.10586.0 [==========================100.0%==========================] Восстановление выполнено успешно. Операция успешно завершена.
На этом проблема ушла. Важно понимать если Вы монтировали диск не как диск E:, то соответственно указываете в описанном выше команде не E: , а тот том который монтировали
Возможно данное решение поможет решить схожие проблемы с восстановление образа Windows.
P.S. буду рад услышать если кому-нибудь поможет/помогла описанная выше статья.
Best Regards, Andrei …
Microsoft Certified Professional
Если при попытке восстановить образ системы Windows и сбой DISM с ошибкой 0x800f081f, исходные файлы не найдены , этот пост может вас заинтересовать.
Сбой DISM Исходные файлы не найдены
В случае сбоя DISM Tool у вас есть 2 варианта – очистить компоненты системы и указать альтернативный источник восстановления образа Windows, который затем будет использован для восстановления поврежденного образа Windows. Вы можете сделать это с помощью групповой политики.
Как правило, во время операции восстановления, автоматическое восстановление повреждений предоставляет файлы. Но это само по себе повреждено, вы можете использовать указанный источник восстановления в своей сети или использовать Центр обновления Windows, чтобы получить исходные файлы, необходимые для включения функции или восстановления образа Windows.
Очистить компоненты образа системы

Откройте окна командной строки с повышенными правами, введите следующее и нажмите Enter:
Dism.exe/online/Cleanup-Image/StartComponentCleanup
После завершения операции введите команду DISM Tool /RestoreHealth и посмотрите, работает ли она.
Если это произойдет, отлично, иначе вам придется перейти к следующему варианту.
Сбой DISM Исходный файл не может быть загружен

Если вы получили сообщение Ошибка 0x800f081f или 0x800f0906 Исходные файлы не могут быть загружены , вам придется установить альтернативный исходный файл. Читайте дальше, чтобы узнать, как это сделать.
Настройте альтернативный источник восстановления Windows
Вы можете настроить свою систему на использование альтернативного источника восстановления, используя параметр групповой политики, запустите gpedit.msc , чтобы открыть редактор групповой политики, и перейдите к следующему параметру:
Конфигурация компьютера> Административные шаблоны> Система
Теперь на правой панели дважды нажмите Укажите настройки для установки дополнительных компонентов и настройки восстановления компонентов .
Выберите Включено и введите Альтернативный путь к исходному файлу . Вы также можете выбрать:
- Никогда не пытайтесь загрузить полезные данные из Центра обновления Windows
- Обратитесь непосредственно в Центр обновления Windows, чтобы загрузить материалы для восстановления вместо службы обновления Windows Server (WSUS).

Этот параметр политики указывает сетевые расположения, которые будут использоваться для исправления повреждения операционной системы и включения дополнительных функций, для которых были удалены файлы полезной нагрузки. Если вы включите этот параметр политики и укажете новое местоположение, файлы в этом расположении будут использоваться для исправления повреждения операционной системы и включения дополнительных функций, у которых были удалены файлы полезной нагрузки. Вы должны ввести полный путь к новому местоположению в текстовом поле «Альтернативный путь к исходному файлу». Можно указать несколько местоположений, когда каждый путь разделяется точкой с запятой. Сетевым местоположением может быть либо папка, либо файл WIM. Если это файл WIM, местоположение должно быть указано путем добавления префикса пути к «wim:» и включения индекса изображения для использования в файле WIM. Например, «wim: \ server share install.wim: 3». Если вы отключите или не настроите этот параметр политики или если требуемые файлы не будут найдены в местах, указанных в этом параметре политики, они будут загружены из Центра обновления Windows, если это разрешено параметрами политики для компьютера.
Нажмите Apply/OK и выйдите.
Помните, что вам нужно будет поддерживать и поддерживать источник восстановления, который соответствует последним обновлениям обслуживания и т. Д. В вашей сети.
Совет по теме : использовать работающую установку Windows в качестве источника восстановления или использовать параллельную папку Windows из общей сетевой папки или со съемного носителя, такого как DVD-диск Windows, в качестве источника из файлов, вы можете использовать следующую команду:
DISM.exe/Online/Cleanup-Image/RestoreHealth/Источник: C: RepairSource Windows/LimitAccess
Здесь вам придется заменить C: RepairSource Windows на местоположение вашего источника восстановления.
Читайте дальше: Исправьте ошибки DISM 87, 112, 11, 50, 2, 3, 87, 1726, 1393, 0x800f081f.
Все версии операционной системы Windows поставляются с множеством различных инструментов и утилит, которые предоставляются пользователям Windows, если Windows когда-либо потребует какого-либо ремонта. Одним из таких инструментов является инструмент управления развертыванием образов и обслуживанием (DISM). Средство DISM можно использовать в любой командной строке (с соответствующими правами), а также для проверки состояния подключенного или отключенного образа Windows и исправления образа Windows, который поврежден или нуждается в ремонте любого другого типа. Ниже приведена одна из наиболее часто используемых командных строк DISM:
DISM / Online / Cleanup-Image / RestoreHealth
Эта конкретная командная строка используется для восстановления образа Windows в Интернете. RestoreHealth часть этой команды в первую очередь инструктирует DISM восстанавливать сетевой образ Windows, но также открывает для пользователя возможность указать дополнительные местоположения источника восстановления, которые DISM может выполнять поиск файлов, необходимых для восстановления сетевого образа Windows. Однако при запуске этой командной строки в Windows 10 некоторые пользователи Windows могут столкнуться с ошибкой и появлением следующего сообщения об ошибке.
«Ошибка: 0x800f081f Исходные файлы не найдены.»
Это сообщение об ошибке в основном говорит о том, что DISM не смог найти файлы, необходимые для исправления сетевого образа Windows, в их расположении по умолчанию. Чтобы решить эту проблему, вы должны либо запустить очистку компонента, а затем выполнить сканирование SFC или предоставить DISM местоположение, содержащее файлы, необходимые для восстановления образа. Это также можно исправить, обновив Windows с помощью средства создания мультимедиа на веб-сайте Microsoft.
Метод 1: Выполнение очистки компонента
С помощью переключателя очистки компонентов DISM вы можете очистить образ и снова запустить все правильно. Вот как это сделать.
- Откройте меню Пуск, введите CMD, щелкните правой кнопкой мыши и Запустить от имени администратора.
- В командной строке с повышенными привилегиями введите следующие команды в том же порядке:
dism.exe / online / Cleanup-Image / StartComponentCleanup
SFC / SCANNOW
- Дождитесь запуска этих команд и, когда они будут выполнены, запустите:Dism / Онлайн / Очистка-Image / RestoreHealth
С этой точки зрения, Dism / Онлайн / Очистка-Image / RestoreHealth должен работать снова.
Способ 2: получение источника из образа Windows
Со свежим образом Windows 10 вы можете запустить команду DISM с местоположением, содержащим файлы, необходимые для восстановления образа.
- С тех пор как MS удалила техническую версию iso, источников не так много. Однако вы можете получить дампы изображений здесь.
- После того, как Windows 10 ISO был загружен, вам необходимо смонтировать его на своем компьютере, чтобы ваш компьютер мог извлечь его, а затем получить к нему доступ. Чтобы смонтировать файл ISO в Windows, перейдите по этой ссылке и выполните действия, относящиеся к используемой версии Windows.
- Откройте меню Пуск, введите CMD, щелкните правой кнопкой мыши и Запустить от имени администратора.
- В командной строке с повышенными привилегиями введите следующую команду, заменив X каталогом, в который смонтирован загруженный ранее ISO-файл Windows 10:
DISM / Online / Cleanup-Image / RestoreHealth /source:WIM:X:SourcesInstall.wim:1 / LimitAccess
- Дождитесь выполнения команды, и на этот раз DISM должен успешно восстановить ваш образ Windows.
Убедитесь, что вы загрузили ISO-файл Windows 10 по приведенной выше ссылке дампа Tech Bench, так как в результате вы получите ISO-файл с файлом Install.wim, который вам нужен. Загрузка ISO 10 для Windows 10 из Microsoft Media Creation Tool приведет к тому, что вы получите ISO, содержащий файл Install.esd, который практически бесполезен для исправления ошибки 0x800f081f.
Способ 3: обновление Windows
Хотя это длительный процесс, он решает проблему, переустанавливая все ядро Windows с последним образом от Microsoft, что устраняет проблему. Этот инструмент будет работать в Windows 7, Windows 8.1 или Windows 10.
- Получите инструмент для создания Windows 10 Media отсюда.
- Запустите исполняемый файл с вашего ПК. Вы должны запустить это как администратор.
- Примите условия лицензии и выберите Обновите этот компьютер сейчас на Что ты хочешь делать? и затем нажмите Далее.
- Инструмент начнет загрузку, а затем установит Windows 10. Тщательно следуйте инструкциям для завершения обновления.
- После завершения у вас должна быть свежая копия Windows с вашим файлом, все еще неповрежденным. Там нет необходимости бежать Dism / Онлайн / Очистка-Image / RestoreHealth но вы можете запустить его, чтобы увидеть, была ли ваша проблема решена.