Swift is a general-purpose programming language built using a modern approach to safety, performance, and software design patterns.
Getting Started
Here, you’ll find information about the how to use the Swift programming language.
If you’re new to Swift, check out A Swift Tour in
The Swift Programming Language, for a quick introduction to the
most important concepts and features of the language.
Installing Swift
The first step to using Swift is to download and install
the compiler and other required components.
Go to the Download page
and follow the instructions for your target platform.
In order to follow along with the examples below,
make sure to add Swift to your $PATH .
On macOS
The default location for the downloadable toolchain on macOS is
/Library/Developer/Toolchains .
You can make the latest installed toolchain available for use from the terminal with the following command:
$ export TOOLCHAINS=swift To select any other installed toolchain, use its identifier in the TOOLCHAINS
variable. The identifier can be found in toolchain’s Info.plist file.
$ /usr/libexec/PlistBuddy -c "Print CFBundleIdentifier:" /Library/Developer/Toolchains/swift-4.0-RELEASE.xctoolchain/Info.plist org.swift.4020170919 $ export TOOLCHAINS=org.swift.4020170919 On Linux
$ apt-get install binutils git libc6-dev libcurl4 libedit2 libgcc-5-dev libpython2.7 libsqlite3-0 libstdc++-5-dev libxml2 pkg-config tzdata zlib1g-dev$ apt-get install binutils git gnupg2 libc6-dev libcurl4 libedit2 libgcc-9-dev libpython2.7 libsqlite3-0 libstdc++-9-dev libxml2 libz3-dev pkg-config tzdata uuid-dev zlib1g-dev$ apt-get install binutils git gnupg2 libc6-dev libcurl4-openssl-dev libedit2 libgcc-9-dev libpython3.8 libsqlite3-0 libstdc++-9-dev libxml2-dev libz3-dev pkg-config tzdata unzip zlib1g-dev$ yum install binutils gcc git glibc-static libbsd-devel libedit libedit-devel libicu-devel libstdc++-static pkg-config python2 sqlite # __block conflicts with clang's __block qualifier sed -i -e 's/*__block/*__libc_block/g' /usr/include/unistd.h$ yum install binutils gcc git glibc-static gzip libbsd libcurl libedit libicu libsqlite libstdc++-static libuuid libxml2 tar tzdataIf you installed the Swift toolchain on Linux
to a directory other than the system root,
you will need to run the following command,
using the actual path of your Swift installation:
$ export PATH=/path/to/Swift/usr/bin:"$PATH>" On Windows
Dependencies
Swift has the following general dependencies:
- Git (used by Swift Package Manager)
- Python 1 (used by the debugger — lldb)
Windows has the following additional platform specific dependencies:
- Windows SDK (provides the Windows headers and import libraries)
- Visual Studio (provides the Visual C++ SDK/Build Tools for additional headers)
Enabling Developer Mode
In order to develop applications, particularly with the Swift Package Manager, you will need to enable developer mode. Please see Microsoft’s documentation for instructions for enabling developer mode.
Installation Instructions
Install using the Windows Package Manager
The Windows Package Manager can be found in the App Store or be installed directly.
-
Install required dependencies: The platform dependencies cannot be installed through the Windows Package Manager as the install rules do not install the components necessary. They will be installed through Visual Studio installer.
winget install Git.Git winget install Python.Python.3 --version 3.10.2150.0 curl -sOL https://aka.ms/vs/16/release/vs_community.exe start /w vs_community.exe --passive --wait --norestart --nocache ^ --installPath "%ProgramFiles(x86)%Microsoft Visual Studio2019Community" ^ --add Microsoft.VisualStudio.Component.Windows10SDK.19041 ^ --add Microsoft.VisualStudio.Component.VC.Tools.x86.x64 del /q vs_community.exe Start up a new Command Prompt and install the Python library six.
pip install six - Using the official installer:
- Download the latest package release.
- Run the package installer.
- Using the Windows Package Manager:
winget install Swift.Toolchain A Swift toolchain will be installed at %SystemDrive%LibraryDeveloperToolchainsunknown-Asserts-development.xctoolchain . A compatible Swift SDK will be installed at %SystemDrive%LibraryDeveloperPlatformsWindows.platformDeveloperSDKsWindows.sdk .
Traditional Installation
NOTE: The traditional installation process is required for Swift older than 5.4.2.
Swift has been tested with Visual Studio 2019. You will need to install Visual Studio with the following components. The installer for Swift is available in the Download section. The toolchain on Windows is installed to %SystemDrive%LibraryDeveloperToolchains .
The following Visual Studio components are required:
| Component | Visual Studio ID |
|---|---|
| MSVC v142 — VS 2019 C++ x64/x86 build tools (Latest) | Microsoft.VisualStudio.Component.VC.Tools.x86.x64 |
| Windows 10 SDK (10.0.17763.0) 2 | Microsoft.VisualStudio.Component.Windows10SDK.17763 |
The following additional Visual Studio components are recommended:
| Component | Visual Studio ID |
|---|---|
| Git for Windows | Microsoft.VisualStudio.Component.Git |
| Python 3 64-bit (3.7.8) | Component.CPython.x64 |
The following additional Visual Studio component is suggested:
| Component | Visual Studio ID |
|---|---|
| C++ CMake tools for Windows | Microsoft.VisualStudio.Component.VC.CMake.Project |
Support Files
NOTE: This is only required for versions older than 5.4.2
You must use the x64 Native Tools for VS2019 Command Prompt to run the following steps. The x64 Native Tools for VS2019 Command Prompt runs the DevEnv script from Visual Studio that sets up the necessary environment variables to find the system headers.
In order to make the Windows SDK accessible to Swift, it is necessary to deploy a few files into the Windows SDK. The following will modify your Visual Studio Installation, and as such will require to be run from an (elevated) “Administrator” x86 Native Tools for VS2019 Command Prompt .
copy /Y %SDKROOT%usrshareucrt.modulemap "%UniversalCRTSdkDir%Include%UCRTVersion%ucrtmodule.modulemap" copy /Y %SDKROOT%usrsharevisualc.modulemap "%VCToolsInstallDir%includemodule.modulemap" copy /Y %SDKROOT%usrsharevisualc.apinotes "%VCToolsInstallDir%includevisualc.apinotes" copy /Y %SDKROOT%usrsharewinsdk.modulemap "%UniversalCRTSdkDir%Include%UCRTVersion%ummodule.modulemap" Because it is installing the files into the Visual Studio image, the files will need to be copied each time Visual Studio is updated.
Repairing after Visual Studio Updates
If Visual Studio is updated, you may have to repair the installation. See Microsoft’s instructions for repairing installed programs.
Swift Version
You can verify that you are running the expected version of Swift
by entering the swift command and passing the —version flag:
$ swift --version Apple Swift version 2.2-dev (LLVM . Clang . Swift . ) The -dev suffix on the version number
is used to indicate that it’s a development build,
not a released version.
Using the REPL
If you run swift repl without any other arguments,
you’ll launch the REPL, an interactive shell
that will read, evaluate, and print the results
of any Swift code you enter.
$ swift repl Welcome to Apple Swift version 5.7 (swiftlang-5.7.0.127.4 clang-1400.0.29.50). Type :help for assistance. 1> Interacting with the REPL is a great way to experiment with Swift.
For example, if you enter the expression 1 + 2 ,
the result of the expression, 3 , is printed on the next line:
You can assign values to constants and variables,
and use them in subsequent lines.
For instance, the String value Hello, world!
can be assigned to the constant greeting ,
and then passed as an argument to the print(_:) function:
2> let greeting = "Hello!" greeting: String = "Hello!" 3> print(greeting) Hello!
If you enter an invalid expression,
the REPL will print an error showing where the problem occurred:
let answer = "forty"-"two" error: binary operator '-' cannot be applied to two 'String' operands let answer = "forty"-"two" ~~~~~~~^~~~~~ You can use the up-arrow and down-arrow keys ( ↑ and ↓ )
to cycle through previous lines entered into the REPL.
This allows you to make a slight change to a previous expression
without retyping the entire line,
and is especially convenient for fixing errors like the one in the previous example:
let answer = "forty-two" answer: String = "forty-two" Another useful feature of the REPL
is that it can automatically suggest functions and methods
that can be used in a particular context.
For example, if you enter re
after a dot operator on a String value
and then hit the tab key ( ⇥ ),
the REPL will give a list of available completions
like remove(at:) and replaceSubrange(bounds:with:) :
5> "Hi!".re⇥ Available completions: remove(at: Index) -> Character removeAll() -> Void removeAll(keepingCapacity: Bool) -> Void removeSubrange(bounds: ClosedRange) -> Void removeSubrange(bounds: Range) -> Void replaceSubrange(bounds: ClosedRange, with: C) -> Void replaceSubrange(bounds: ClosedRange, with: String) -> Void replaceSubrange(bounds: Range, with: C) -> Void replaceSubrange(bounds: Range, with: String) -> Void reserveCapacity(n: Int) -> Void If you start a block of code,
such as when iterating over an array with a for-in loop,
the REPL will automatically indent the next line,
and change the prompt character from > to .
to indicate that code entered on that line
will only be evaluated when the entire code block is evaluated.
6> let numbers = [1,2,3] numbers: [Int] = 3 values [0] = 1 [1] = 2 [2] = 3 > 7> for n in numbers.reversed() 8. print(n) 9. > 3 2 1
All of the functionality of Swift is available to you from the REPL,
from writing control flow statements
to declaring and instantiating structures and classes.
You can also import any available system modules,
such as Darwin on macOS and Glibc on Linux:
On macOS
1> import Darwin 2> arc4random_uniform(10) $R0: UInt32 = 4 On Linux
1> import Glibc 2> random() % 10 $R0: Int32 = 4 On Windows
The REPL depends on Python bindings. You must ensure that Python 3.7 is available
in the path. The following command adds Python 3.7 from Visual Studio to %PATH%
so that it can be used:
path %ProgramFiles(x86)%Microsoft Visual StudioSharedPython37_64;%PATH% Because the Windows installation separates out the SDK from the toolchain, a few
extra parameters must be passed to the REPL. This allows you to use multiple
different SDKs with the same toolchain.
set SWIFTFLAGS=-sdk %SDKROOT% -I %SDKROOT%/usr/lib/swift -L %SDKROOT%/usr/lib/swift/windows swift repl -target x86_64-unknown-windows-msvc %SWIFTFLAGS% Using the Package Manager
Swift package manager provides a convention-based system for
building libraries and executables, and sharing code across different packages.
These examples assume you have made swift available in your path;
see Installing for more information.
Once available, you can invoke the package manager tools: swift package , swift run , swift build and swift test .
$ swift package --help OVERVIEW: Perform operations on Swift packages . Creating a Package
To create a new Swift package, first create and enter a directory named Hello :
Every package must have a manifest file called Package.swift in its root directory.
You can create a minimal package named Hello using:
By default the init command will create a library package directory structure:
├── Package.swift ├── README.md ├── Sources │ └── Hello │ └── Hello.swift └── Tests ├── HelloTests │ └── HelloTests.swift └── LinuxMain.swift You can use swift build to build a package. This will download, resolve and compile dependencies mentioned
in the manifest file Package.swift .
$ swift build Compile Swift Module 'Hello' (1 sources) To run the tests for a package, use: swift test
$ swift test Compile Swift Module 'HelloTests' (1 sources) Linking ./.build/x86_64-apple-macosx10.10/debug/HelloPackageTests.xctest/Contents/MacOS/HelloPackageTests Test Suite 'All tests' started at 2016-08-29 08:00:31.453 Test Suite 'HelloPackageTests.xctest' started at 2016-08-29 08:00:31.454 Test Suite 'HelloTests' started at 2016-08-29 08:00:31.454 Test Case '-[HelloTests.HelloTests testExample]' started. Test Case '-[HelloTests.HelloTests testExample]' passed (0.001 seconds). Test Suite 'HelloTests' passed at 2016-08-29 08:00:31.455. Executed 1 test, with 0 failures (0 unexpected) in 0.001 (0.001) seconds Test Suite 'HelloPackageTests.xctest' passed at 2016-08-29 08:00:31.455. Executed 1 test, with 0 failures (0 unexpected) in 0.001 (0.001) seconds Test Suite 'All tests' passed at 2016-08-29 08:00:31.455. Executed 1 test, with 0 failures (0 unexpected) in 0.001 (0.002) seconds Building an Executable
A target is considered as an executable if it contains a file named main.swift .
The package manager will compile that file into a binary executable.
In this example,
the package will produce an executable named Hello
that outputs “Hello, world!”.
First create and enter a directory called Hello :
Now run the swift package’s init command with executable type:
$ swift package init --type executable Use the swift run command to build and run the executable:
$ swift run Hello Compile Swift Module 'Hello' (1 sources) Linking ./.build/x86_64-apple-macosx10.10/debug/Hello Hello, world! Note: Since there is only one executable in this package, we can omit the
executable name from the swift run command.
You can also compile the package by running the swift build command and then run
the binary from .build directory:
$ swift build Compile Swift Module 'Hello' (1 sources) Linking ./.build/x86_64-apple-macosx10.10/debug/Hello $ .build/x86_64-apple-macosx10.10/debug/Hello Hello, world! As a next step, let’s define a new sayHello(name:) function
in a new source file, and have the executable call that
instead of calling print(_:) directly.
Working with Multiple Source Files
Create a new file in the Sources/Hello directory called Greeter.swift ,
and enter the following code:
func sayHello(name: String) print("Hello, (name)!") > The sayHello(name:) function takes a single String argument
and prints our “Hello” greeting before, substituting the word “World”
with the function argument.
Now, open main.swift again, and replace the existing contents with the following code:
if CommandLine.arguments.count != 2 print("Usage: hello NAME") > else let name = CommandLine.arguments[1] sayHello(name: name) > Rather than using a hardcoded name as before,
main.swift now reads from the command line arguments.
And instead of invoking print(_:) directly,
main.swift now calls the sayHello(name:) method.
Because the method is part of the Hello module,
no import statement is necessary.
Run swift run and try out the new version of Hello :
$ swift run Hello `whoami` To learn about the Swift Package Manager,
including how to build modules, import dependencies, and map system libraries,
see the Swift Package Manager section of the website.
To learn more about Package Plugins, see Getting Started with Plugins.
Using the LLDB Debugger
You can use the LLDB debugger to
run Swift programs step-by-step,
set breakpoints,
and inspect and modify program state.
As an example,
consider the following Swift code,
which defines a factorial(n:) function,
and prints the result of calling that function:
func factorial(n: Int) -> Int if n 1 return n > return n * factorial(n: n - 1) > let number = 4 print("(number)! is equal to (factorial(n: number))") Create a file named Factorial.swift with the code above,
and run the swiftc command,
passing the filename as a command line argument,
along with the -g option to generate debug information.
This will create an executable named Factorial
in the current directory.
$ swiftc -g Factorial.swift $ ls Factorial.dSYM Factorial.swift Factorial* Instead of running the Factorial program directly,
run it through the LLDB debugger
by passing it as a command line argument to the lldb command.
$ lldb Factorial (lldb) target create "Factorial" Current executable set to 'Factorial' (x86_64). This will start an interactive console
that allows you to run LLDB commands.
For more information about LLDB commands,
see the LLDB Tutorial.
Set a breakpoint on line 2 of the factorial(n:) function
with the breakpoint set ( b ) command,
to have the process break each time the function is executed.
(lldb) b 2 Breakpoint 1: where = Factorial`Factorial.factorial (Swift.Int) -> Swift.Int + 12 at Factorial.swift:2, address = 0x0000000100000e7c Run the process with the run ( r ) command.
The process will stop at the call site of the factorial(n:) function.
(lldb) r Process 40246 resuming Process 40246 stopped * thread #1: tid = 0x14dfdf, 0x0000000100000e7c Factorial`Factorial.factorial (n=4) -> Swift.Int + 12 at Factorial.swift:2, queue = 'com.apple.main-thread', stop reason = breakpoint 1.1 frame #0: 0x0000000100000e7c Factorial`Factorial.factorial (n=4) -> Swift.Int + 12 at Factorial.swift:2 1 func factorial(n: Int) -> Int < ->2 if n 3 return n * factorial(n: n - 1) 4 > 5 6 let number = 4 7 print("(number)! is equal to (factorial(n: number))") Use the print ( p ) command
to inspect the value of the n parameter.
The print command can evaluate Swift expressions as well.
(lldb) p n * n (Int) $R1 = 16 Use the backtrace ( bt ) command
to show the frames leading to factorial(n:) being called.
(lldb) bt * thread #1: tid = 0x14e393, 0x0000000100000e7c Factorial`Factorial.factorial (n=4) -> Swift.Int + 12 at Factorial.swift:2, queue = 'com.apple.main-thread', stop reason = breakpoint 1.1 * frame #0: 0x0000000100000e7c Factorial`Factorial.factorial (n=4) -> Swift.Int + 12 at Factorial.swift:2 frame #1: 0x0000000100000daf Factorial`main + 287 at Factorial.swift:7 frame #2: 0x00007fff890be5ad libdyld.dylib`start + 1 frame #3: 0x00007fff890be5ad libdyld.dylib`start + 1 Use the continue ( c ) command
to resume the process until the breakpoint is hit again.
(lldb) c Process 40246 resuming Process 40246 stopped * thread #1: tid = 0x14e393, 0x0000000100000e7c Factorial`Factorial.factorial (n=3) -> Swift.Int + 12 at Factorial.swift:2, queue = 'com.apple.main-thread', stop reason = breakpoint 1.1 frame #0: 0x0000000100000e7c Factorial`Factorial.factorial (n=3) -> Swift.Int + 12 at Factorial.swift:2 1 func factorial(n: Int) -> Int < ->2 if n 3 return n * factorial(n: n - 1) 4 > 5 6 let number = 4 7 print("(number)! is equal to (factorial(n: number))") Use the print ( p ) command again
to inspect the value of the n parameter
for the second call to factorial(n:) .
Use the breakpoint disable ( br di ) command
to disable all breakpoints
and the continue ( c ) command
to have the process run until it exits.
(lldb) br di All breakpoints disabled. (1 breakpoints) (lldb) c Process 40246 resuming 4! is equal to 24 Process 40246 exited with status = 0 (0x00000000) Now that you’ve been introduced to the Swift REPL, build system, and debugger,
here are a few suggestions for what to do next:
- Check out the Package Manager project page
for a deep dive into the Swift build system and package manager. - Read Contributing to Swift
to learn about the different ways you can participate in the Swift community. - Go to developer.apple.com/swift
for additional Swift resources, including videos, sample code, and playgrounds.
Честно говоря, хотя вы, возможно, не захотите полностью работать с этим языком в этой среде для создания приложений или чего-то еще, вы можете обнаружить полезный факт, что программирование на этом языке в среде Windows предназначено только для обучения и изучения синтаксиса. Следует отметить, что никто не может Купить устройство Apple Чтобы иметь дело с этим языком, поэтому, если вы один из тех, кто работает в Окружающая среда Windows И кто может захотеть представиться на Swift Language Для начала вы нашли нужную статью.
Swift Language — это язык программирования Высокопроизводительная система с очень чистым и современным синтаксисом, обеспечивающая беспрепятственный доступ к существующим программам на C и Objective-C, по умолчанию безопасная в памяти. Несмотря на то что Из этого Свифта Однако, вдохновленный Objective-C и многими другими языками, он сам по себе не является языком, производным от C.Как полный, независимый язык, Swift объединяет основные функции, такие как управление потоком, структуры данных и функции, с высокоуровневыми структурами. такие как объекты, протоколы, замыкания и обобщения. Swift включает модули, устраняя необходимость в заголовках и повторении кода, если это необходимо.
Итак, Swift — один из самых популярных языков на данный момент, и не зря. Приложения для Mac и iOS захватывают большую часть рынка. Возможность создавать приложения для iOS изначально важна для людей, которые не хотят погружаться в глубины Objective C.
Поскольку Swift является домом для Apple, вам нужен Mac, верно? Ошибка. Хотя нет способа связать Swift в Windows «вне приложения», это не означает, что пользователи Windows не могут изучить Swift.
Вот как создать, скомпилировать и запустить простую программу Swift в Windows 10.
Что такое Свифт?
Прежде чем мы начнем, давайте посмотрим, что такое Swift на самом деле. Swift — это язык программирования, разработанный Apple. По словам Криса Латтнера, для этого потребовались идеи «из Objective-C, Rust, Haskell, Ruby, Python, C #, CLU и многих других языков программирования».
Это относительно молодой язык, выпущенный для публики в 2014 году, хотя он уже получил широкое признание. ситуация Индекс TIOBE В рейтинге лучших языков программирования в 2017 году Swift занял 11-е место, что делает его одним из самых быстрорастущих языков всех времен.
Короче говоря, если вы программируете для Mac или iOS, Swift для вас! Для более глубокого изучения использования Swift ознакомьтесь с этими причинами, по которым стоит изучить Swift.
Во-первых, нам понадобится редактор для написания нашего кода. Вы можете использовать любую удобную для вас среду IDE, хотя это не обязательно, и подойдет любой текстовый редактор. Выбор в основном зависит от личных предпочтений, хотя, если вам нужна помощь, использование этого руководства может помочь вам решить, что может помочь.
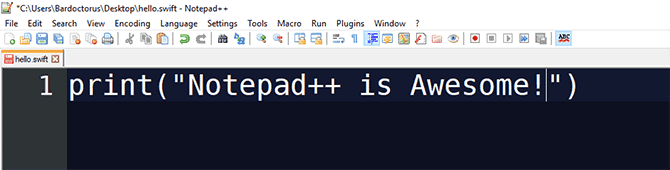
Сегодня мы будем использовать Notepad ++, потому что он бесплатный, простой и расширяемый. Скачать Блокнот ++ И вы должны его открыть. Давайте окунемся в мир программирования прямо сейчас!
Приложение Simple Swift для Windows
Для нашего тестового проекта сегодня мы собираемся создать простую программу, которая запускается в командной строке Windows. Начните с открытия нового файла Notepad ++. Мы начнем с вывода вопроса на экран, дождемся, пока пользователь напишет свой ответ, а затем воспользуемся этим ответом для предоставления ответа.
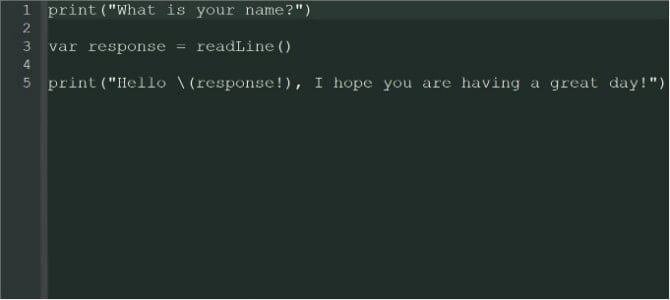
print("What is your name?")
Это будет отображаться, когда программа запущена. Теперь, когда мы задали вопрос, мы должны предоставить возможность пользователю ответить. Для этого мы используем метод readline () и сохраняем ответ как переменную с именем response.
var response = readLine()
Если вы знакомы с другими языками программирования, вы можете заметить здесь небольшие отличия. Во-первых, мы можем сохранить данные, полученные из readLine, как переменную вместо того, чтобы указывать, что это будет строка. Еще одно изменение для программистов, перешедших с JavaScript или C #, — это отсутствие точек с запятой для обозначения конца строк.
может быть Пользователи Python Здесь уже больше дома!
добавить вывод
Теперь, когда эта информация хранится в переменной, мы хотим использовать ее и отобразить для пользователя. Что может быть лучше, чем пожелать отличного дня?
print("Hello (response!), I hope you are having a great day!")
Даже если у вас есть опыт работы на других языках, вы увидите здесь некоторые различия. Вместо использования оператора + вне кавычек для отображения вашей переменной вы можете использовать (имя_переменной) в кавычках. Еще одно преимущество Swift — использование необязательных значений. Эти значения трудно понять на первый взгляд, но они добавляют больше функциональности к использованию переменных в Swift.
В этом случае мы просто хотим отобразить значение как есть, поэтому мы добавляем восклицательный знак после имени переменной. отклик! Чтобы указать, что это не необязательное значение. Необязательное значение — это переменная, которой может быть присвоено или не присвоено значение. не требует. Если ему не присвоено значение, оно не будет установлено ни с чем.
Определите вопросительный знак (?) После типа значения он не является обязательным, а восклицательный знак означает, что это не так.
Ваш код будет выглядеть так:
Чтобы сохранить код, используйте Файл -> Сохранить как и выберите файл Swift. Из списка Сохранить как тип. Если в вашем списке отсутствует тип файла Swift, выберите вместо него «Все файлы» и добавьте расширение файла. swift после выбранного имени файла.
Быстрая компиляция в Windows 10
Теперь, когда у нас есть простое приложение, нам нужно его скомпилировать и запустить. Хотя встроенного способа программирования Swift в Windows 10 нет, есть обходной путь. Хан Санджин создал переводчик для Swift, и он доступен Скачать с Github. Загрузите и установите приложение Swift для Windows, следуя инструкциям по ссылке.
После установки откройте его. Нажмите кнопкуПеревести файли выберите приложение, которое вы создали ранее. Нажмите Компилировать И подождите, пока приложение скомпилируется.
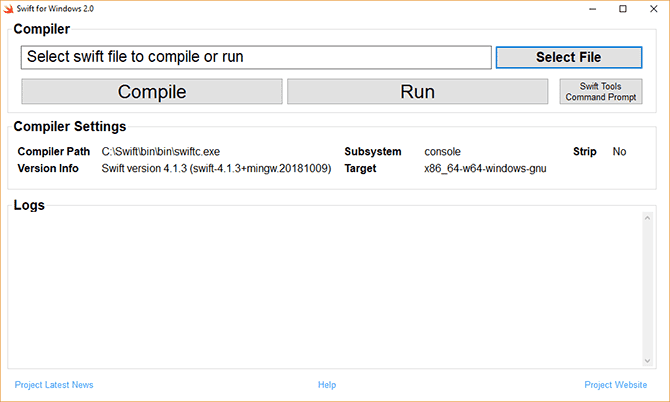
Для этого апплета это должно быть почти мгновенным, хотя это может занять некоторое время, в зависимости от того, насколько сложен ваш код!
В диалоговом окне должно появиться сообщение «Преобразовано успешно». Если нет, просмотрите свой код, чтобы убедиться, что вы не допустили ошибок. После того, как код будет скомпилирован, нажмите «Выполнить», чтобы запустить программу. Программа откроется в командной строке Windows и будет выглядеть так:
Стоит отметить, что вы должны использовать приложение Swift для Windows для запуска вашего кода, EXE-файл, созданный сам по себе, не будет запускаться, даже если приложение открыто.
Проект SwiftForWindows с открытым исходным кодом предоставляет простую в использовании среду разработки для программирования приложений Swift для Windows. Проект работает с компилятором Swift для Cygwin, MSVC и MinGW.
Начните писать код на Swift в Windows уже сегодня
Если вы решите, что Swift для вас, существует множество инструментов, которые могут вам помочь. Если у вас есть базовое представление об окружающей среде, почему бы не попробовать Несколько стартап-проектов для возрождения ваших знаний؟
Getting Started with Swift on Windows
One can build and run Swift natively or through the Windows Subsystem for Linux.
Native Windows
Currently there are two supported ways to build Swift for Windows.
- To cross-compile Swift for Windows from another host operating system (using clang ), see Cross Compiling for Windows
- To build on Windows using Microsoft Visual C++ (MSVC), see Building on Windows
Windows Subsystem for Linux (WSL)
Windows Subsystem for Linux is an Ubuntu environment. Follow the instructions for building on Linux
There two versions of WSL as of November 23, 2019:
- WSL1: is the current stable version. Both Swift compilation and execution work but REPL and debugging (LLDB) hang on startup.
- WSL2: Both REPL and debugging work with WSL2. Although, WSL2 is still in development, it is available by downloading an insider build. Installing WSL2 is pretty simple if WSL1 was already installed (switch to insider, download an insider build and run some scripts). WSL2 can be installed by following this link.
Swift — один из самых популярных языков сейчас, и на то есть веские причины. Приложения для Mac и iOS занимают огромную долю рынка. Возможность создавать приложения для iOS изначально важна для людей, которые не хотят погружаться в темные глубины Objective C.
Поскольку Swift является родным для Apple, вам нужен Mac, верно? Неправильно. Хотя не существует метода «из коробки» для компиляции Swift в Windows, это не означает, что пользователи Windows не могут изучать Swift.
Вот как можно создать простую программу Swift, скомпилировать и запустить ее в Windows 10.
Что такое Свифт?
Прежде чем начать, давайте посмотрим, что же такое Swift. Swift — это язык программирования, разработанный Apple. По словам создателя проекта Криса Латтнера, для этого нужны идеи «из Objective-C, Rust, Haskell, Ruby, Python, C #, CLU и многих других».
Это относительно молодой язык, который был выпущен для публики в 2014 году, хотя он уже широко известен. Индекс лучших языков программирования TIOBE в 2017 году поставил Swift на 11-е место, что делает его одним из самых быстрорастущих языков за все время.
Короче говоря, если вы программируете для Mac или iOS, Swift для вас! Для более глубокого изучения использования Swift, взгляните на эти причины, почему Swift стоит изучать Swift стоит изучать Swift стоит изучать
Начало работы с Swift на Windows 10
Во-первых, нам понадобится редактор для написания нашего кода. Вы можете использовать любую IDE, которая вам удобна, хотя использовать ее не обязательно, и любого текстового редактора также будет достаточно. Это в основном сводится к личным предпочтениям, хотя, если вам нужна помощь, вам может помочь решение о том, как пользоваться этим руководством .
Сегодня мы собираемся использовать Notepad ++, так как он бесплатный, простой и расширяемый. Загрузите Блокнот ++ и откройте его. Давайте приступим к некоторому кодированию!

Простая программа Swift для Windows
Для нашего тестового проекта сегодня мы собираемся создать простую программу, которая будет работать в командной строке Windows. Начните с открытия нового файла Notepad ++. Мы начнем с вывода вопроса на экран, подождем, пока пользователь напечатает его ответ, а затем используем этот ответ для предоставления ответа.
print("What is your name?") Это будет отображаться при запуске программы. Теперь, когда мы задали вопрос, мы должны предоставить пользователю возможность ответить. Для этого мы используем метод readline () и сохраняем ответ как переменную с именем response .
var response = readLine() Если вы уже знакомы с другими языками программирования, вы можете заметить здесь несколько небольших отличий. Во-первых, мы можем хранить данные, полученные из readLine, как переменную, вместо того, чтобы указывать, что это будет строка. Еще одно изменение для тех из вас, кто пришел из JavaScript или C #, — отсутствие точки с запятой для обозначения конца строки.
Пользователи Python уже могут быть здесь как дома!
Добавление вывода
Теперь, когда эта информация хранится в переменной, мы хотим использовать ее и отобразить ее пользователю. Что может быть лучше, чем пожелать им хорошего дня?
print("Hello (response!), I hope you are having a great day!") Даже если у вас есть опыт работы на других языках, вы увидите здесь некоторые различия. Вместо того, чтобы использовать оператор + вне кавычек для отображения вашей переменной, вы используете (variableName) в кавычках. Еще одной особенностью Swift является использование дополнительных значений . Эти значения на первый взгляд сложно понять, но они расширяют функциональность использования переменных в Swift.
В этом случае мы просто хотим отобразить значение как есть, поэтому мы добавляем восклицательный знак после ответа имени переменной ! обозначить, что это не необязательное значение. Необязательное значение — это переменная, которой может или не может быть присвоено значение. Это не требует одного. Если ему не присвоено значение, то ему будет присвоено ноль.
Знак вопроса (?) После типа значения определяет его как необязательный, а восклицательный знак означает, что это не так.
Ваш код будет выглядеть примерно так:

Чтобы сохранить код, используйте « Файл»> «Сохранить как» и выберите файл Swift в меню « Тип файла» . Если в вашем меню отсутствует тип файла Swift, выберите вместо него все файлы и добавьте расширение файла .swift после выбранного имени файла.
Компиляция Swift в Windows 10
Теперь, когда у нас есть программа, мы должны быть в состоянии скомпилировать и запустить ее. Хотя нет встроенного способа программирования Swift в Windows 10, есть обходной путь. Хан Санджин создал компилятор для Swift, который можно загрузить с Github . Загрузите и установите приложение Swift для Windows, используя инструкции, приведенные в ссылке.
Как только это установлено, откройте это. Нажмите на кнопку « Выбрать файл» и выберите ранее созданную программу. Нажмите Compile и подождите, пока программа скомпилируется.

Для такой маленькой программы это должно быть почти мгновенно, хотя это может занять время в зависимости от того, насколько сложным вы сделали свой код!
Вы должны получить сообщение «Успешно скомпилировано» в диалоговом окне. Если нет, вернитесь и проверьте свой код, чтобы убедиться, что вы не допустили ошибок. После того, как код скомпилирован, нажмите Run, чтобы запустить вашу программу. Программа откроется в командной строке Windows и должна выглядеть следующим образом:

Стоит отметить, что для запуска кода необходимо использовать приложение Swift for Windows, созданный EXE- файл не будет работать автономно, даже если приложение открыто.
Начните писать код Swift в Windows сегодня
Если вы решите, что Swift для вас, есть множество инструментов , которые помогут вам. После того, как вы овладеете базовыми знаниями об окружающей среде, почему бы не попробовать несколько проектов для начинающих, чтобы воплотить свои знания в жизнь?
Если вы пользователь Linux и хотите кодировать приложения для iOS, вот как написать код в Swift с Ubuntu
With the release of Swift 3.0 being available for Mac OS and Windows, does this mean you can compile and run Swift code on Windows? If so what compiler do you use for Windows?
15.8k 10 gold badges 74 silver badges 103 bronze badges
asked Apr 17, 2016 at 9:59