Добрый день! Уважаемые читатели и гости одного из крупнейших IT блогов рунета Pyatilistnik.org. В прошлый раз мы с вами устранили ошибку 0x80300024 при попытке установить Windows. Движемся дальше и сегодня пойдет речь, том, как выполнить чистую переустановку IIS роли. Для выполнения этой задачи у вас может быть ряд причин, например вы хотите начать работу с ролью IIS, так как будто вы ее только установили, вы можете захотеть попытаться устранить какие-то ошибки и проблемы. Давайте разбираться.
Постановка задачи
Ранее мы с вами производили установку роли IIS, мы настроили там сайты. Через какое-то время ко мне обратился разработчик, и сообщил, что у него есть ряд проблем с IIS. Начав разбираться я обнаружил, что есть повреждение файла конфигурации может привести к неисправностям или сбоям вашего веб-сайта/приложения. Пример ошибки:
The configuration section ‘system.webServer’ cannot be read because it is missing a section declaration
Иногда бывает проще произвести чистую переустановку IIS, чем проверять файлы конфигурации (такие как ApplicationHost.config или web.config) один за другим, построчно. При удалении IIS без выполнения дополнительных действий. вы обнаружите, что после переустановки у вас все та же конфигурация на сервере: те же веб-сайты, то же приложение и, вероятно, та же проблема. Это связано с тем, что в системе остаются старые конфигурационные файлы, которые так же нужно удалить перед новой установкой.
Как полностью удалить IIS в Windows
Чтобы вам произвести полную деинсталляцию роли IIS с удалением всех старых хвостов, нужно выполнить два этапа:
- Удалить роль IIS
- Удалить файлы из рабочих каталогов inetsrv, inetsrv, windows
ОБЯЗАТЕЛЬНАЯ РЕКОМЕНДАЦИЯ! Эта манипуляция сотрет всю вашу конфигурацию на IIS. Настоятельно рекомендуется сделать полную резервную копию вашего сервера перед выполнением этого действия.
Для начала давайте полностью удалим вашу роль Internet Information Services. Для этого есть два варианта, быстрый через PowerShell и более медленный, но через графический интерфейс.
Удаление IIS через диспетчер серверов
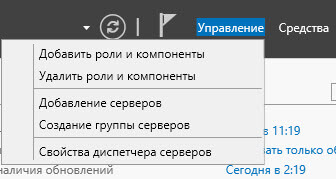
Самый простой метод, подходящий любому системному администратору, особенно начинающему. Откройте оснастку «Диспетчер серверов» и выберите пункт «Управление — Удалить роли и компоненты».
Указываем сервер на котором будет происходить деинсталляция Internet Information Services, просто у вас в диспетчер серверов может быть добавлен не один сервер, например мы так ранее собирали оснастку управления RDS фермой.
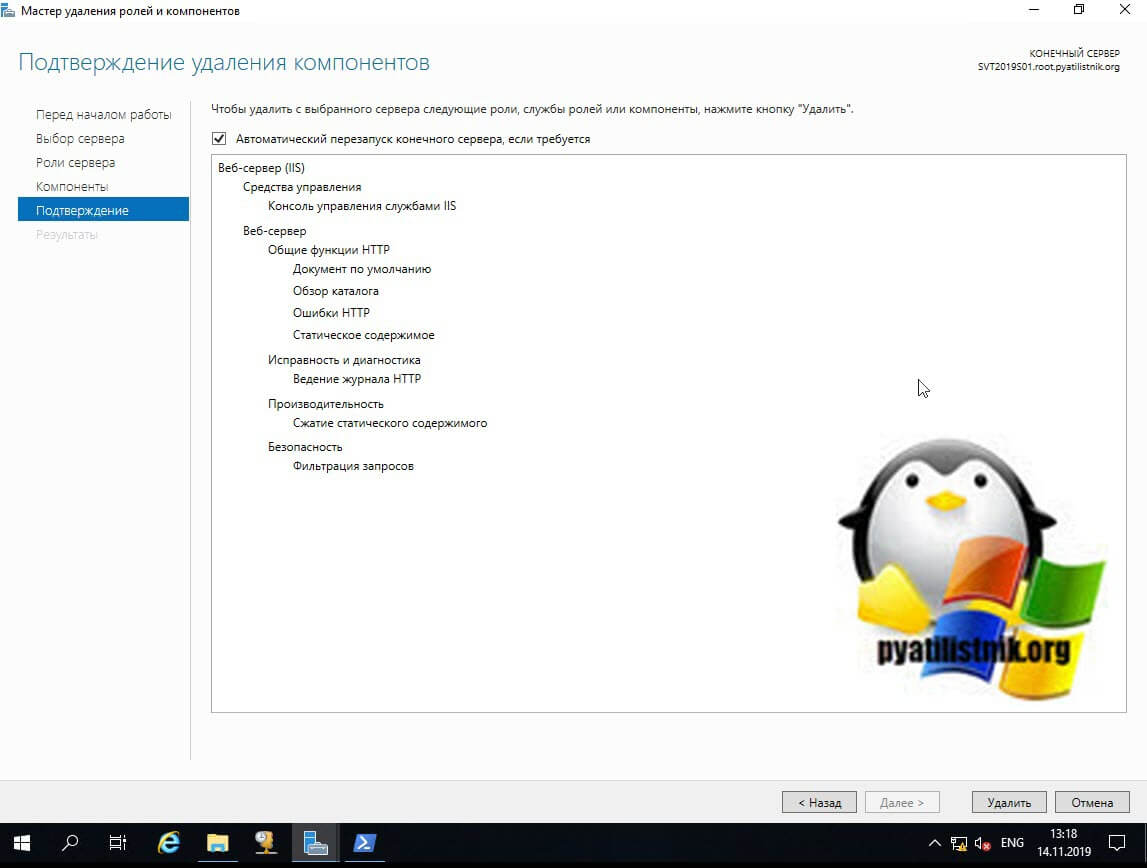
Снимаем галку с роли «Веб-сервер IIS» и нажимаем далее.
Так же убедитесь, что у вас убрана галка с компонента «Служба активации процессов Windows (Windows Process Activation Services)«. Служба активации процессов Windows (WAS) управляет конфигурацией пула приложений, а также созданием и временем жизни рабочих процессов для HTTP и других протоколов. Служба публикации в Интернете (W3SVC) и другие службы зависят от WAS. Список управляемых объектов, которые включены в этот управляемый объект:

- Пул приложений IIS (IIS Application Pool) — Пул приложений служб IIS представляет собой группу URL-адресов, которые направляются одному или нескольким рабочим процессам. Поскольку пулы приложений определяют набор веб-приложений, которые совместно используют один или несколько рабочих процессов, они предоставляют удобный способ администрирования набора веб-сайтов и приложений и их соответствующих рабочих процессов. Границы процесса отделяют каждый рабочий процесс; следовательно, веб-сайт или приложение в одном пуле приложений не будут затронуты проблемами приложений в других пулах приложений. Пулы приложений значительно повышают как надежность, так и управляемость веб-инфраструктуры.
- IIS Protocol Adapter — Адаптер протокола информационных служб Интернета (IIS) — это служба Windows, которая принимает сообщения по определенному сетевому протоколу и взаимодействует со службой активации процессов Windows (WAS) для направления входящих сообщений правильному рабочему процессу.
Подробнее на https://docs.microsoft.com/en-us/previous-versions/windows/it-pro/windows-server-2008-R2-and-2008/cc735229(v=ws.10)
Далее после удаления потребуется перезагрузка сервера. поэтому я рекомендую поставить галку «Автоматический перезапуск конечного сервера, если требуется» и смело нажимайте кнопку «Удалить».
Удаление IIS через PowerShell
Данный метод мне нравится больше, поскольку все делается одной командой. Во первых запустите оболочку PowerShell от имени администратора. Далее чтобы посмотреть список всех компонентов у роли IIS выполните вот такую команду.
get-windowsfeature *web* | Where-Object -FilterScript
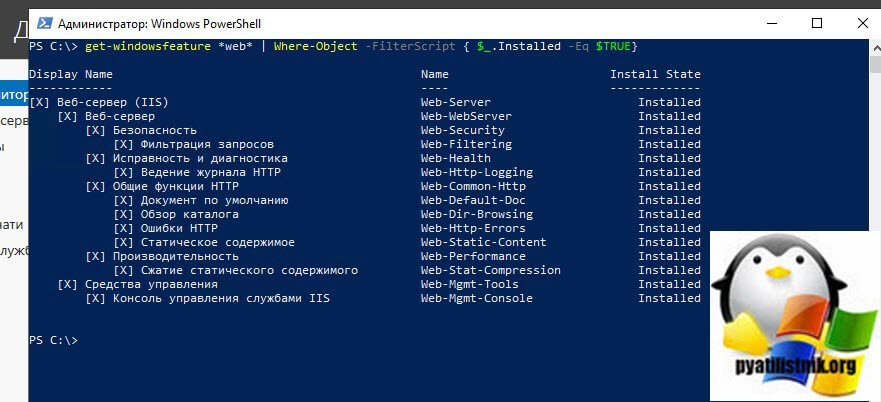
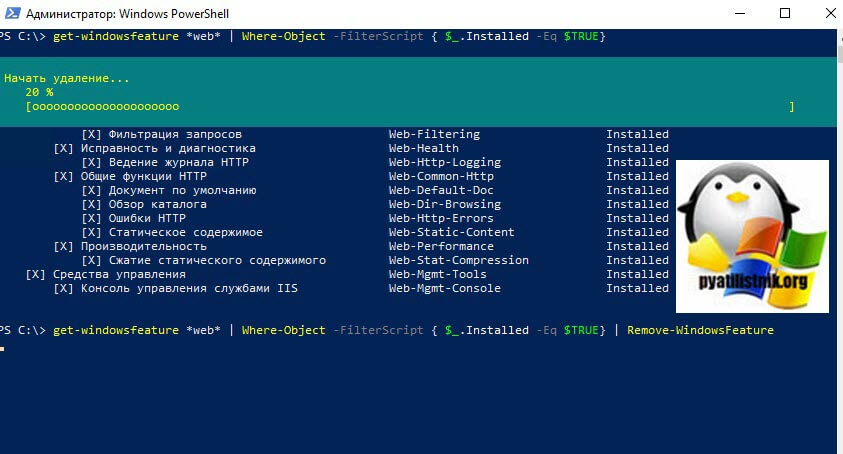
У вас будет выведен список всех установленных компонентов Internet Information Services. Чтобы удалить, вам необходимо добавить конвейер, в итоге получим:
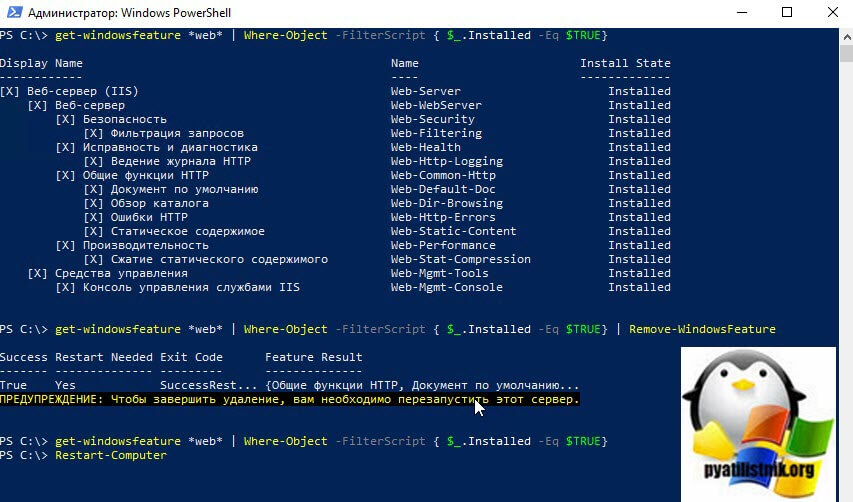
get-windowsfeature *web* | Where-Object -FilterScript < $_.Installed -Eq $TRUE>| Remove-WindowsFeature
Можете еще раз проверить остались ли компоненты, хочу напомнить, что для завершения процедуры, нужно перезагрузить сервер, через командлет Restart-Computer
для удобства можете скачать готовый скрипт по удалению IIS через Powershell
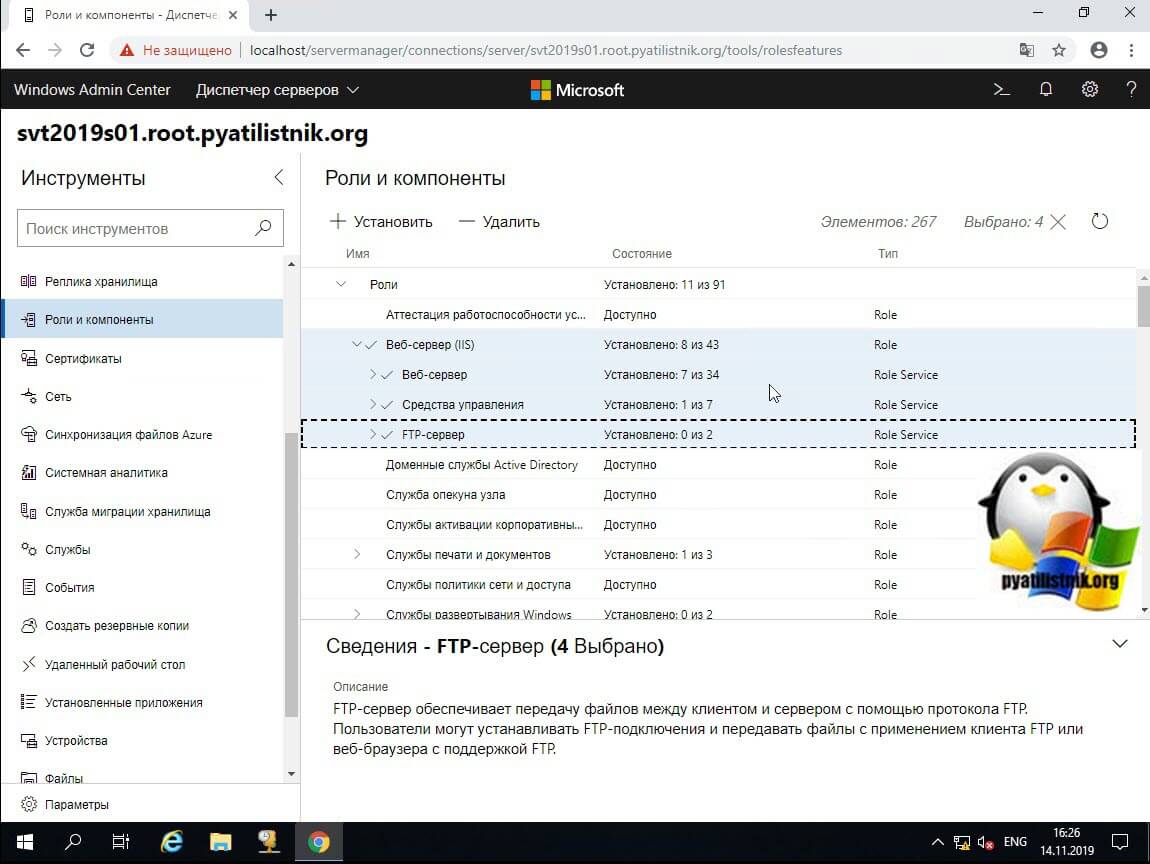
Удаление IIS через Windows Admin Center
Не могу не упомянуть используемый мной новый инструмент администрирования и управления сервером Windows Admin Center. Заходим в нем в раздел «Роли и компоненты«, выбираем роль IIS и ее содержимое. После чего просто нажимаем удалить.
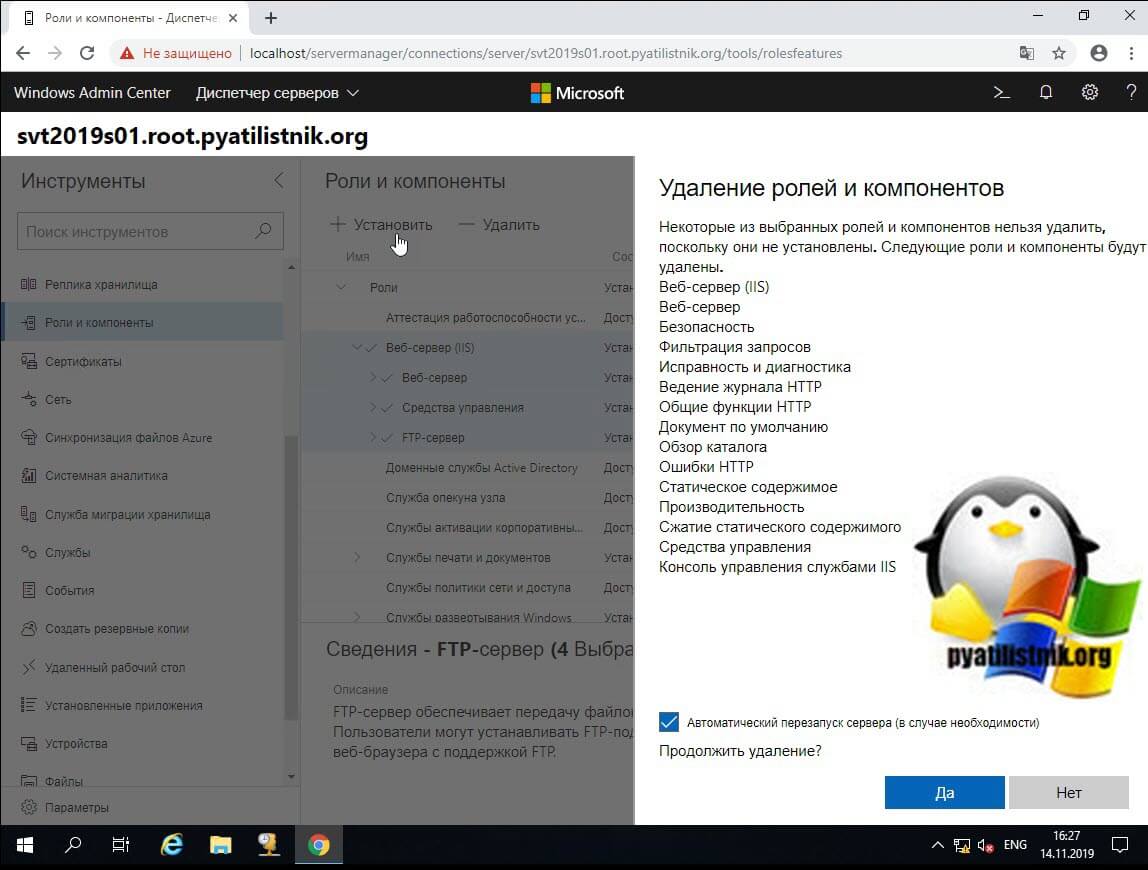
Вам покажут список затрагиваемых компонентов, если все устраивает, то нажимаем удалить.
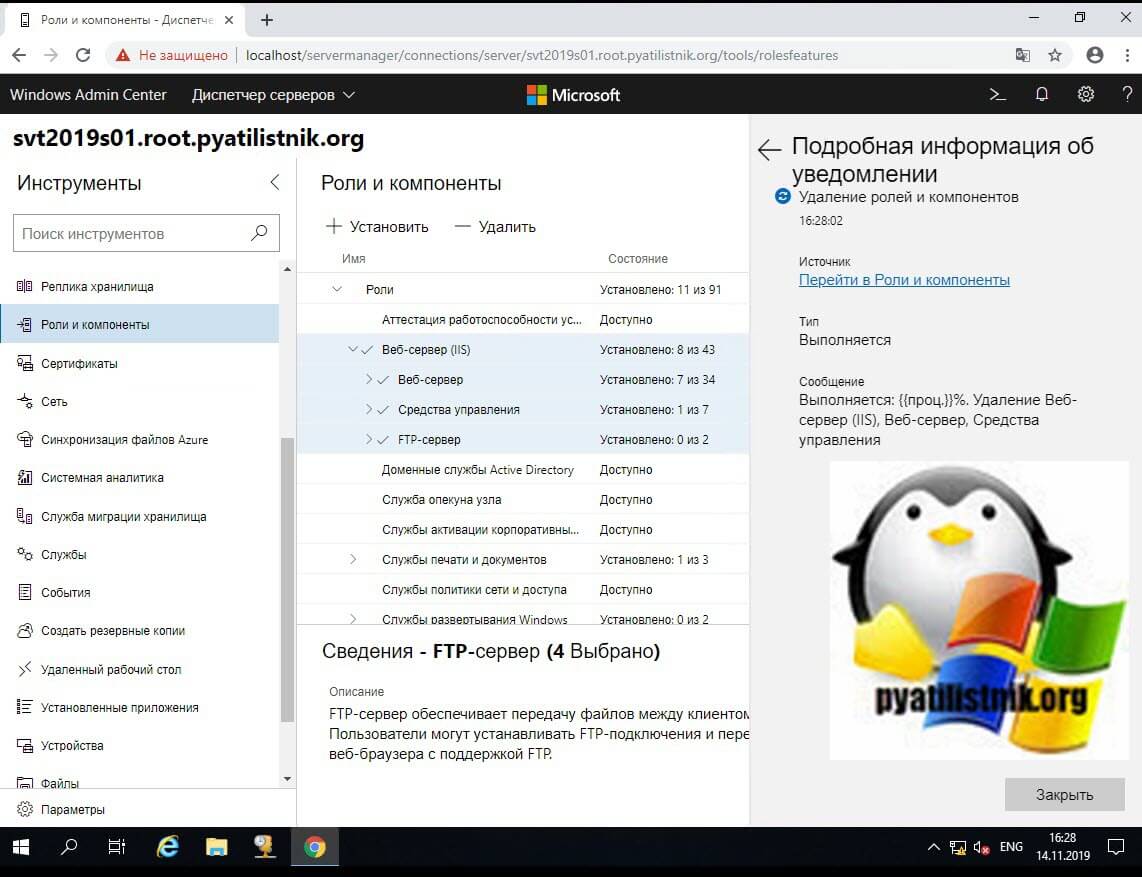
ждем удаление роли, потребуется перезагрузка.
Удаление старых конфигурационных файлов
Вторым этапом очистки хвостов от роли IIS, выступает удаление или очистка некоторых каталогов.
ОБЯЗАТЕЛЬНАЯ РЕКОМЕНДАЦИЯ! Эта манипуляция сотрет всю вашу конфигурацию на IIS. Настоятельно рекомендуется сделать полную резервную копию вашего сервера перед выполнением этого действия.
- C:Windowssystem32inetsrv — тут лежат конфигурационные файлы
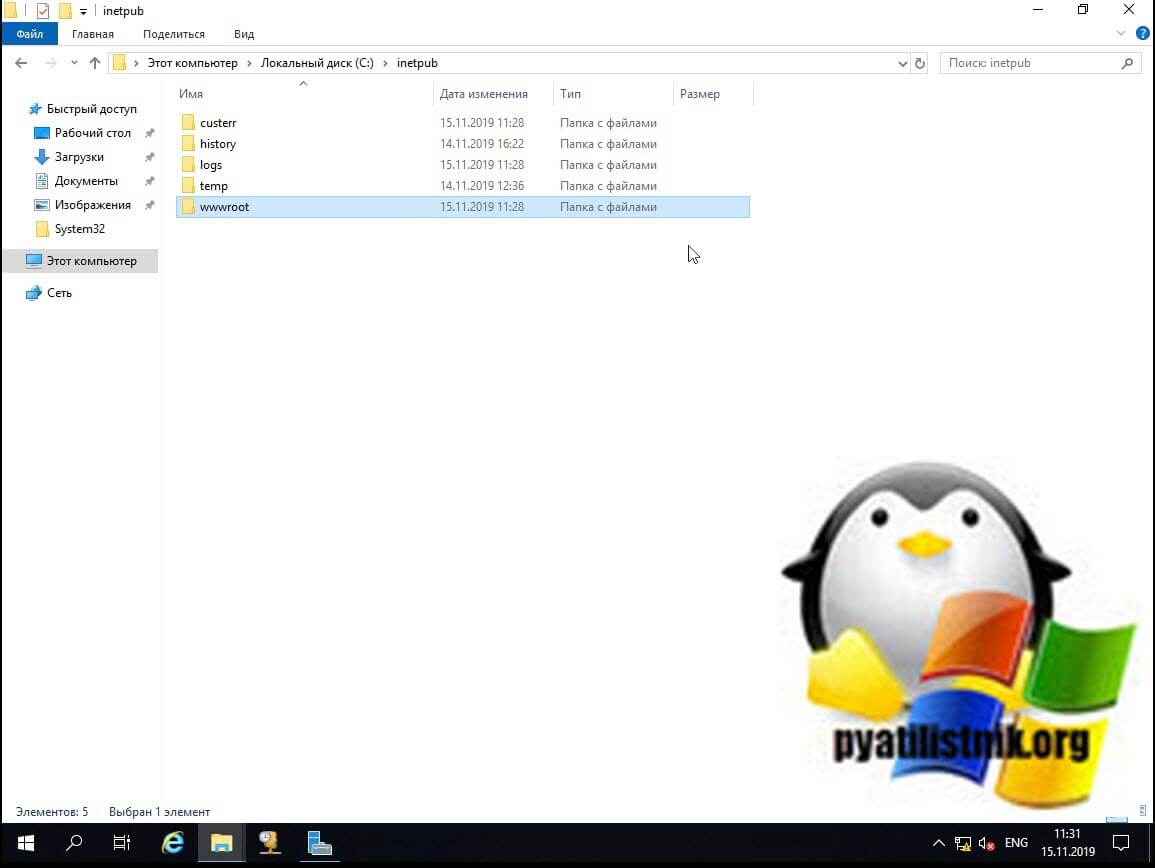
- C:inetpub — тут лежат ваши сайты, не забываем делать их копию
- C:Windowsiis_версия.log — тут лежат логи
На этом чистую переустановку роли Internet Information Services можно считать оконченной. С вами был Иван Семин, автор и создатель IT портала Pyatilistnik.org.
- Перейдите в раздел «Добавить программы удаления» «Включение или отключение функций Windows». Удалите IIS и WAS (служба активации Windows). Перезагрузите компьютер.
- Перейдите в раздел «Добавить программы для удаления» «Включение или отключение функций Windows». Включите IIS и WAS (службу активации Windows).
Как установить IIS на Windows Server 2012?
Чтобы узнать, как включить IIS и необходимые компоненты IIS в Windows Server 2012/2012 R2, см. Инструкции ниже.
- Откройте диспетчер серверов и нажмите «Управление»> «Добавить роли и компоненты». …
- Выберите установку на основе ролей или функций и нажмите кнопку Далее.
- Выберите подходящий сервер. …
- Включите веб-сервер (IIS) и нажмите Далее.
Как открыть диспетчер IIS в Windows Server 2012?
Чтобы открыть диспетчер IIS с начального экрана
- На начальном экране щелкните Панель управления.
- Щелкните Система и безопасность, а затем щелкните Администрирование.
- В окне «Администрирование» дважды щелкните Диспетчер информационных служб Интернета (IIS).
Как удалить IIS из Windows Server 2012?
Чтобы удалить IIS, перейдите к опции «Управление» в верхнем правом углу и нажмите «Удалить ролики и компоненты». Теперь откроется Окно, которое сообщит вам, что вы собираетесь удалить раздел. Просто нажмите «Далее», чтобы продолжить. После этого вы должны выбрать сервер из пула серверов.
Как удалить и переустановить IIS?
Если вы попытаетесь переустановить IIS, сначала удалите IIS и WAS с помощью «Установка и удаление программ», а затем удалите все существующие файлы в каталогах C: inetpub и C: Windowssystem32inetsrv. После этого можно будет снова установить чисто.
Как переустановить IIS на Windows Server 2019?
Установить IIS через графический интерфейс
- Откройте диспетчер серверов, его можно найти в меню «Пуск». …
- Щелкните текст «Добавить роли и функции».
- В окне «Перед началом» просто нажмите кнопку «Далее».
- В окне «Выбор типа установки» оставьте выбранным «Ролевую или функциональную установку» и нажмите «Далее».
19 колода 2018 г.
Как включить сервер IIS?
Включение IIS и необходимых компонентов IIS в Windows 10
- Откройте панель управления и щелкните «Программы и компоненты»> «Включение или отключение компонентов Windows».
- Включите информационные службы Интернета.
- Разверните компонент Internet Information Services и убедитесь, что компоненты веб-сервера, перечисленные в следующем разделе, включены.
- Нажмите кнопку ОК.
Как мне подключиться к серверу IIS?
Подключение к веб-серверу с помощью диспетчера IIS
- Откройте диспетчер IIS. …
- На панели «Подключения» разверните «Создать новое подключение» на панели инструментов.
- Щелкните «Подключиться к серверу», чтобы открыть мастер подключения к серверу.
Какая последняя версия IIS?
IIS поддерживает HTTP, HTTP / 2, HTTPS, FTP, FTPS, SMTP и NNTP.
…
Информационные службы Интернета.
| Снимок экрана консоли диспетчера IIS Internet Information Services 8.5 | |
|---|---|
| Разработчики) | Microsoft |
| Начальная версия | 30 мая 1995 |
| Стабильный выпуск | 10.0.17763.1 / 2 октября 2018 г. |
| Написано в | C + + |
Как установить IIS?
Включение IIS и необходимых компонентов IIS в Windows 8 / 8.1
- Откройте панель управления и щелкните «Программы и компоненты»> «Включение или отключение компонентов Windows».
- Включите информационные службы Интернета.
- Разверните функцию Internet Information Services и убедитесь, что компоненты веб-сервера, перечисленные ниже, включены.
- Нажмите кнопку ОК.
Как запустить IIS из командной строки?
Чтобы открыть диспетчер IIS из командной строки
- В меню «Пуск» выберите «Выполнить».
- В диалоговом окне «Открыть» введите inetmgr и нажмите кнопку «ОК».
Как узнать, запущен ли IIS?
Чтобы проверить, работает ли IIS в 32-битном или 64-битном режиме:
- Нажмите Пуск> Выполнить, введите cmd и нажмите ОК. Появится командная строка.
- Выполните эту команду: c: inetpubadminscriptsadsutil.vbs ПОЛУЧИТЬ W3SVC / AppPools / Enable32BitAppOnWin64. Эта команда возвращает Enable32BitAppOnWin64: Истинно, если IIS работает в 32-битном режиме.
Как сбросить IIS?
Как сбросить Internet Information Services (IIS)
- Щелкните значок Пуск в Windows.
- В поле поиска введите cmd.
- Щелкните правой кнопкой мыши cmd.exe и выберите Запуск от имени администратора. Откроется окно командной строки.
- В командной строке введите IISRESET.
- Нажмите Ввод.
- Когда появится сообщение об успешном перезапуске интернет-служб, введите exit.
- Нажмите Ввод.
Могу ли я удалить IIS?
Просто сняв флажок «Роль веб-сервера IIS», вы можете удалить весь IIS сразу. Кроме того, вы можете удалить одну роль, службу роли или функцию, просто сняв флажок в мастере.
Как переустановить IIS на Windows Server 2016?
Включение IIS и необходимых компонентов IIS в Windows Server 2016 (Standard / DataCenter)
- Откройте диспетчер серверов и нажмите «Управление»> «Добавить роли и компоненты». …
- Выберите установку на основе ролей или функций и нажмите кнопку Далее.
- Выберите подходящий сервер. …
- Включите веб-сервер (IIS) и нажмите Далее.
Веб-сервер представляет собой некоторую программу (службу), принимающую HTTP- запросы от клиентов, обычно от веб-браузеров, обрабатывающую данные запросы и выдающую им ответ, как правило, вместе с HTLM-страницей (сайтом), изображением, файлом, медиа-потоком или другими данными. Ниже подробно рассмотрим процесс установки подобной службы, а именно веб-сервера IIS 8 (Internet Information Server) входящего в поставку Microsoft Windows Server 2012 R2.
0. Оглавление
- Установка веб-сервера IIS
- Перезапуск сервера IIS
1. Установка веб-сервера IIS
Запускаем Диспетчер серверов (Server Manager). Его можно запустить с ярлыка на панели задач, или же выполнив команду servermanager.exe (Для этого необходимо нажать комбинацию клавиш Win + R, в появившемся окне в поле «Открыть» (Open) написать имя команды и нажать «ОК» ).

В диспетчере серверов, в меню, расположенном в правом верхнем углу окна, выберем «Управление» (Manage) — «Добавить роли и компоненты» (Add Roles and Features)

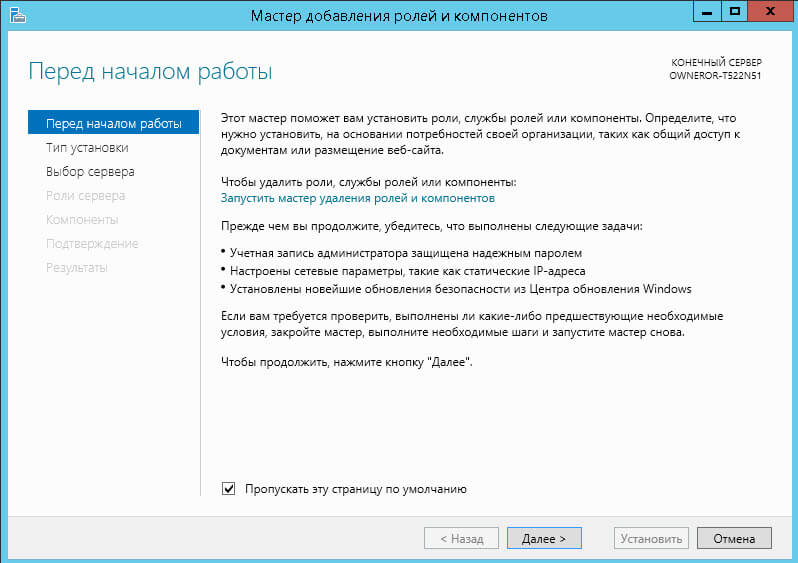
Запустится Мастер добавления ролей и компонентов (Add Roles and Features Wizard). Нажимаем «Далее» (Next) на стартовой странице.

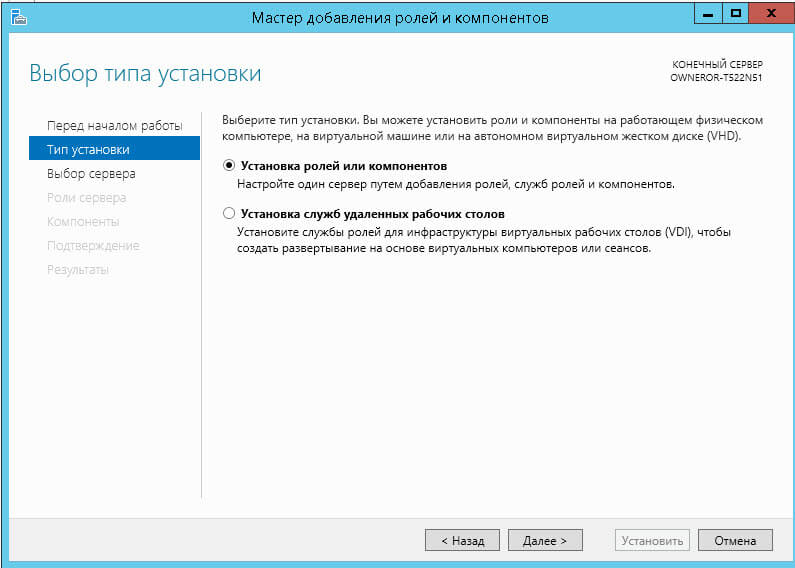
Тип установки (Installation Type) отмечаем «Установка ролей или компонентов» (Role-based or feature-based installation) и нажимаем «Далее» (Next).

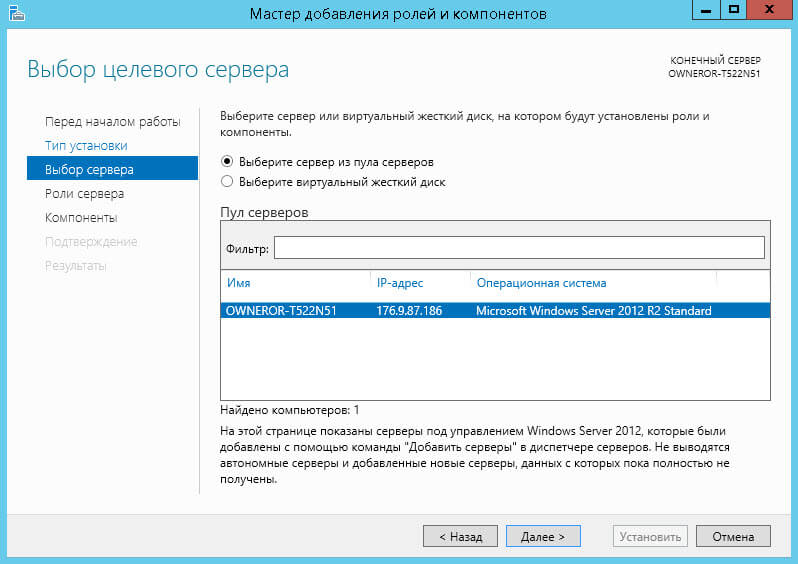
Выбираем текущий сервер из пула серверов (Select a server from the server pool) и снова жмем «Далее» (Next).

На следующем шаге выбираем роль, которую необходимо установить. В нашем случае это роль «Веб-сервер (IIS)» (Web Server). Отмечаем ее в списке.

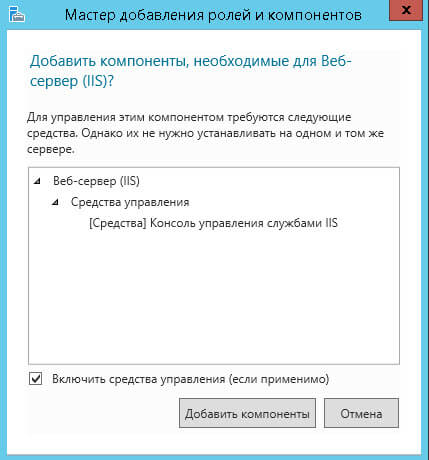
При этом мастер предложит нам добавить компоненты, необходимые для Веб-сервера, а именно «Консоль управления службами IIS» (IIS Management Console). Соглашаемся на установку дополнительных компонент нажав «Добавить компоненты» (Add Features) и жмем «Далее» (Next).

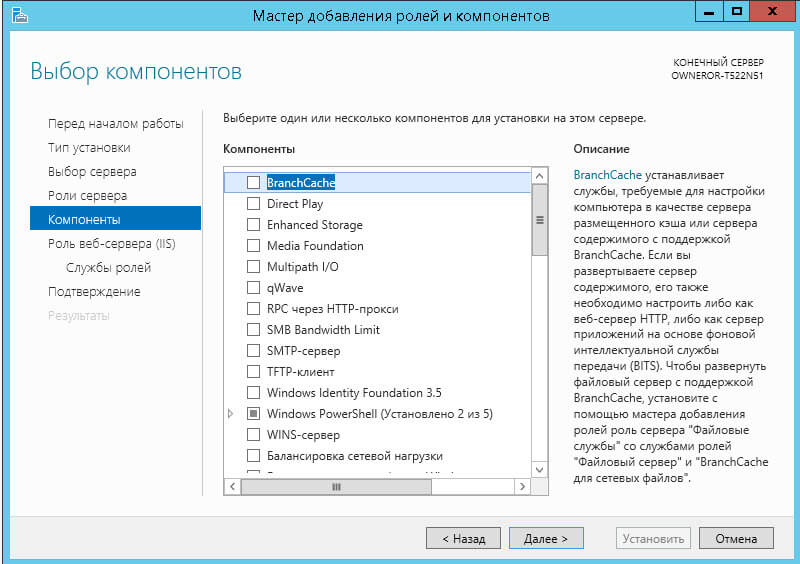
Оставляя список компонент без изменений нажимаем «Далее» (Next).

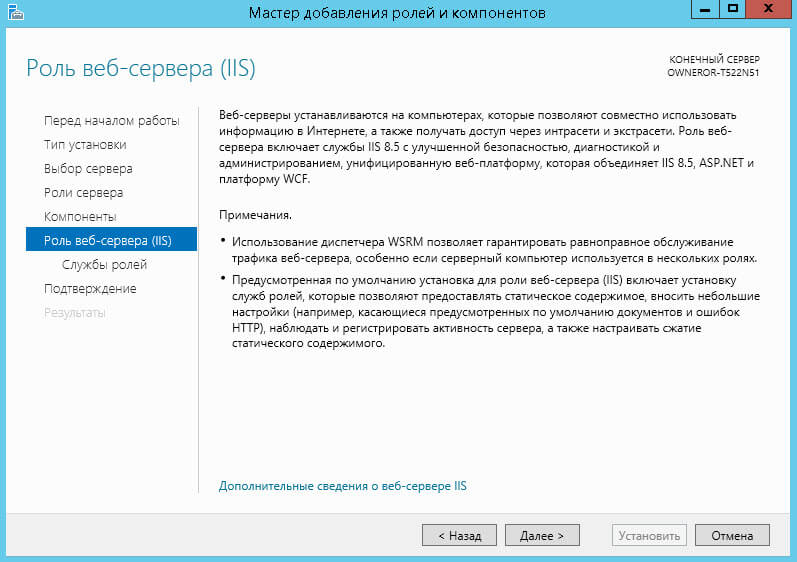
Ознакомившись с информацией о роли веб-сервера снова жмем «Далее» (Next).

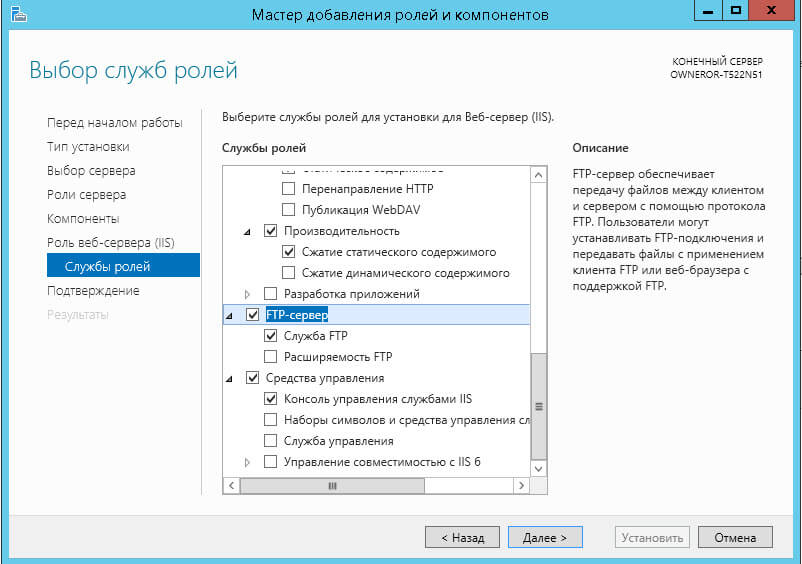
Затем необходимо выбрать службы ролей, которые будут установлены для веб-сервера. Этот набор зависит от конкретных задач, которые будет выполнять сервер IIS.
Например, для публикации баз данных «1С:Предприятие» 8 на веб-сервере или для запуска сайта на WordPress, требуется установка компонент:
- Общие функции HTTP (Common HTTP Features)
- Статическое содержимое (Static Content)
- Документ по умолчанию (Default Document)
- Обзор каталогов (Directory Browsing)
- Ошибки HTTP (HTTP Errors)
- ASP
- ASP.NET 3.5
- Расширяемость .NET 3.5 (.NET Extensibility 3.5)
- Расширения ISAPI (ISAPI Extensions)
- Фильтры ISAPI (ISAPI Filters)
- Ведение журнала HTTP (HTTP Logging)
- Монитор запросов (Request Monitor)
- Консоль управления IIS (IIS Management Console)
Для установки FTP-сервера требуются компоненты:
- FTP-Сервер (FTP Server)
- Служба FTP (FTP Service)
- Расширяемость FTP (FTP Extensibility)
и т. д. Если выделить службу в списке, слева доступно ее краткое описание. Выбрав необходимые службы ролей жмем «Далее» (Next).

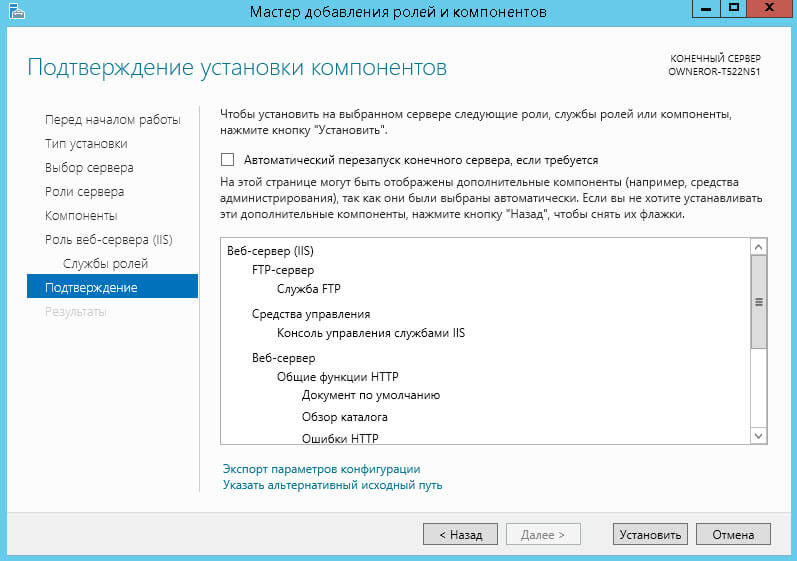
Устанавливаем флаг «Автоматический перезапуск конечного сервера, если требуется» (Restart the destination server automatically if required) если перезагрузка не помешает работе других пользователей и жмем «Установить» (Install) для начала установки указанных в списке служб.
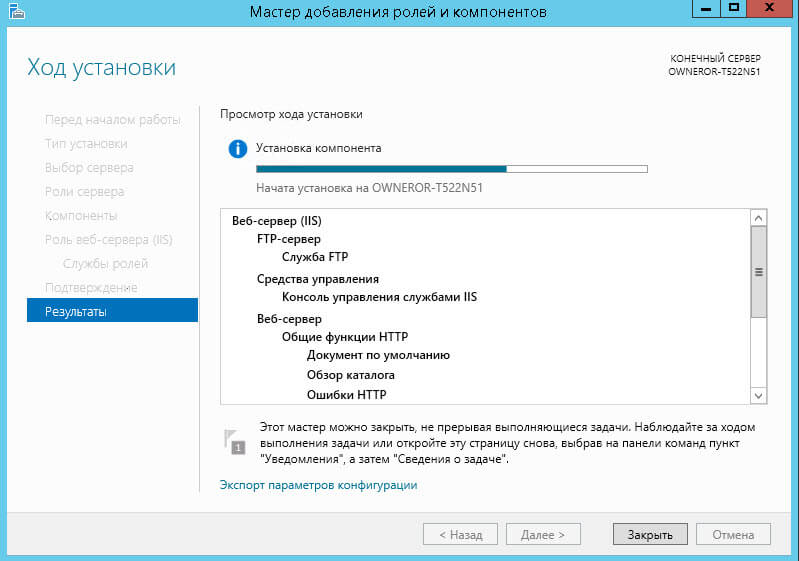
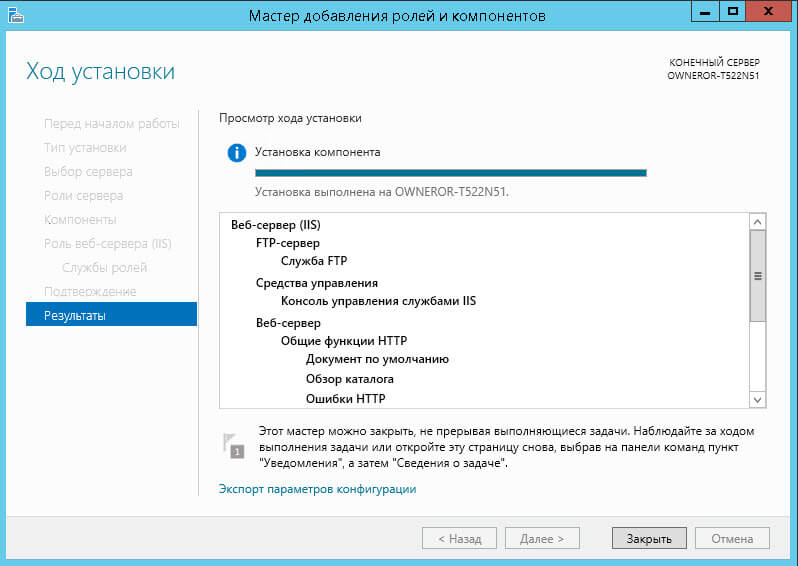
Дожидаемся завершения установки веб-сервера (может произойти перезагрузка сервера) и нажимаем «Закрыть» (Close) для завершения работы мастера.
Возвращаемся в диспетчер серверов, в меню «Средства» (Tools) выбираем появившейся там пункт «Диспетчер служб IIS» (Internet Information Services).

В запустившемся Диспетчере служб IIS, в окне подключений (Connections) увидим только что установленные веб-сервер (соответствует сетевому имени компьютера) а также один веб-сайт, добавленный по умолчанию, с названием Default Web Site.

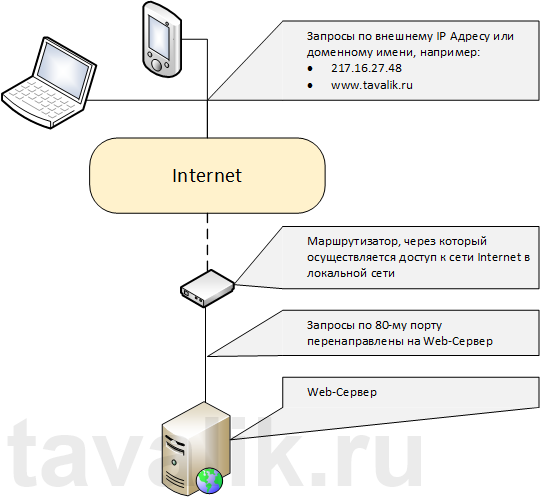
Данный сайт представляет одну веб-страницу с приветствием на различных языках и откликается на все запросы к данному веб-серверу по 80-му порту. Чтобы просмотреть его, достаточно запустить веб-браузер, например Internet Explorer, и ввести в строку адреса http://localhost.

Также этот сайт можно просмотреть с любого другого компьютера в сети, забив в строку адресе IP компьютера где установлен веб-сервер IIS.

Файлы этого сайта, как и файлы всех других добавленных позже сайтов по умолчанию располагаются в каталоге C:interpubwwwroot.

Ну и соответственно, чтобы сайты расположенные на данном веб-сервере были доступны из сети Интернет по внешнему IP-адресу или доменному имени (о том как привязать доменное имя к IP-адресу читайте здесь), необходимо на маршрутизаторе выполнить проброс 80-ого порта на компьютер с установленным веб-сервером IIS.

2. Перезапуск сервера IIS
Иногда требуется перезапустить веб сервер IIS. Сделать это можно как из Диспетчера служб IIS, кликнув правой кнопкой мыши по серверу в окне подключений или из меню «Действия» (Action)

так и из командной строки, выполнив команду
iisreset /noforce
- параметр /noforce необязателен и используется для защиты от потери данных в случае, когда службы IIS не могут быть остановлены в течение одноминутного периода ожидания.
- параметр также необязателен при работе на локальном компьютере. В случае удаленного администрирования сервера IIS в качестве параметра указывается имя NetBIOS компьютера, на котором выполняется перезапуск IIS.

При перезапуске веб сервера IIS происходит перезапуск следующих служб (если они устанавливались при установке компонент IIS):
Служба Описание Служба IIS Admin Эта служба управляет всеми службами IIS, кроме службы WWW (FTP, NMTP и SMTP). Служба WWW Эта служба обеспечивает подключения клиентов к веб-узлам. Служба HTTP SSL Эта служба обеспечивает безопасные подключения клиентов к веб-узлам. Служба FTP Эта служба обеспечивает FTP-подключения и администрирование в диспетчере IIS. Служба SMTP Эта служба обеспечивает передачу электронной почты по сети. Служба NNTP Эта служба обеспечивает передачу электронных новостей по сети. Веб-сервер представляет собой некоторую программу (службу), принимающую HTTP- запросы от клиентов, обычно от веб-браузеров, обрабатывающую данные запросы и выдающую им ответ, как правило, вместе с HTLM-страницей (сайтом), изображением, файлом, медиа-потоком или другими данными. Ниже подробно рассмотрим процесс установки подобной службы, а именно веб-сервера IIS 8 (Internet Information Server) входящего в поставку Microsoft Windows Server 2012 R2.
0. Оглавление
- Установка веб-сервера IIS
- Перезапуск сервера IIS
1. Установка веб-сервера IIS
Запускаем Диспетчер серверов (Server Manager). Его можно запустить с ярлыка на панели задач, или же выполнив команду servermanager.exe (Для этого необходимо нажать комбинацию клавиш Win + R, в появившемся окне в поле «Открыть» (Open) написать имя команды и нажать «ОК» ).

В диспетчере серверов, в меню, расположенном в правом верхнем углу окна, выберем «Управление» (Manage) — «Добавить роли и компоненты» (Add Roles and Features)
Запустится Мастер добавления ролей и компонентов (Add Roles and Features Wizard). Нажимаем «Далее» (Next) на стартовой странице.
Тип установки (Installation Type) отмечаем «Установка ролей или компонентов» (Role-based or feature-based installation) и нажимаем «Далее» (Next).
Выбираем текущий сервер из пула серверов (Select a server from the server pool) и снова жмем «Далее» (Next).
На следующем шаге выбираем роль, которую необходимо установить. В нашем случае это роль «Веб-сервер (IIS)» (Web Server). Отмечаем ее в списке.
При этом мастер предложит нам добавить компоненты, необходимые для Веб-сервера, а именно «Консоль управления службами IIS» (IIS Management Console). Соглашаемся на установку дополнительных компонент нажав «Добавить компоненты» (Add Features) и жмем «Далее» (Next).
Оставляя список компонент без изменений нажимаем «Далее» (Next).
Ознакомившись с информацией о роли веб-сервера снова жмем «Далее» (Next).
Затем необходимо выбрать службы ролей, которые будут установлены для веб-сервера. Этот набор зависит от конкретных задач, которые будет выполнять сервер IIS.
Например, для публикации баз данных «1С:Предприятие» 8 на веб-сервере или для запуска сайта на WordPress, требуется установка компонент:
- Общие функции HTTP (Common HTTP Features)
- Статическое содержимое (Static Content)
- Документ по умолчанию (Default Document)
- Обзор каталогов (Directory Browsing)
- Ошибки HTTP (HTTP Errors)
- ASP
- ASP.NET 3.5
- Расширяемость .NET 3.5 (.NET Extensibility 3.5)
- Расширения ISAPI (ISAPI Extensions)
- Фильтры ISAPI (ISAPI Filters)
- Ведение журнала HTTP (HTTP Logging)
- Монитор запросов (Request Monitor)
- Консоль управления IIS (IIS Management Console)
Для установки FTP-сервера требуются компоненты:
- FTP-Сервер (FTP Server)
- Служба FTP (FTP Service)
- Расширяемость FTP (FTP Extensibility)
и т. д. Если выделить службу в списке, слева доступно ее краткое описание. Выбрав необходимые службы ролей жмем «Далее» (Next).
Устанавливаем флаг «Автоматический перезапуск конечного сервера, если требуется» (Restart the destination server automatically if required) если перезагрузка не помешает работе других пользователей и жмем «Установить» (Install) для начала установки указанных в списке служб.
Дожидаемся завершения установки веб-сервера (может произойти перезагрузка сервера) и нажимаем «Закрыть» (Close) для завершения работы мастера.
Возвращаемся в диспетчер серверов, в меню «Средства» (Tools) выбираем появившейся там пункт «Диспетчер служб IIS» (Internet Information Services).
В запустившемся Диспетчере служб IIS, в окне подключений (Connections) увидим только что установленные веб-сервер (соответствует сетевому имени компьютера) а также один веб-сайт, добавленный по умолчанию, с названием Default Web Site.
Данный сайт представляет одну веб-страницу с приветствием на различных языках и откликается на все запросы к данному веб-серверу по 80-му порту. Чтобы просмотреть его, достаточно запустить веб-браузер, например Internet Explorer, и ввести в строку адреса http://localhost.
Также этот сайт можно просмотреть с любого другого компьютера в сети, забив в строку адресе IP компьютера где установлен веб-сервер IIS.
Файлы этого сайта, как и файлы всех других добавленных позже сайтов по умолчанию располагаются в каталоге C:interpubwwwroot.
Ну и соответственно, чтобы сайты расположенные на данном веб-сервере были доступны из сети Интернет по внешнему IP-адресу или доменному имени (о том как привязать доменное имя к IP-адресу читайте здесь), необходимо на маршрутизаторе выполнить проброс 80-ого порта на компьютер с установленным веб-сервером IIS.
2. Перезапуск сервера IIS
Иногда требуется перезапустить веб сервер IIS. Сделать это можно как из Диспетчера служб IIS, кликнув правой кнопкой мыши по серверу в окне подключений или из меню «Действия» (Action)
так и из командной строки, выполнив команду
iisreset /noforce
- параметр /noforce необязателен и используется для защиты от потери данных в случае, когда службы IIS не могут быть остановлены в течение одноминутного периода ожидания.
- параметр также необязателен при работе на локальном компьютере. В случае удаленного администрирования сервера IIS в качестве параметра указывается имя NetBIOS компьютера, на котором выполняется перезапуск IIS.
При перезапуске веб сервера IIS происходит перезапуск следующих служб (если они устанавливались при установке компонент IIS):
Служба Описание Служба IIS Admin Эта служба управляет всеми службами IIS, кроме службы WWW (FTP, NMTP и SMTP). Служба WWW Эта служба обеспечивает подключения клиентов к веб-узлам. Служба HTTP SSL Эта служба обеспечивает безопасные подключения клиентов к веб-узлам. Служба FTP Эта служба обеспечивает FTP-подключения и администрирование в диспетчере IIS. Служба SMTP Эта служба обеспечивает передачу электронной почты по сети. Служба NNTP Эта служба обеспечивает передачу электронных новостей по сети. Installing IIS 8.5 on Windows Server 2012 R2
This content describes how to install Internet Information Services (IIS) 8.5 on Windows Server 2012 R2 using Server Manager, DISM, or PowerShell.
Installing IIS 8.5 on Windows Server 2012 R2
This document describes how to install Internet Information Services (IIS) 8.5 on Windows Server® 2012 R2. IIS is the Web server role in Windows Server 2012 R2. The Windows Server 2012 R2 operating system has all the IIS features needed to support the hosting of Web content in production environments. Windows 8 also includes IIS features, but feature availability depends on the operating system version.
[!NOTE]
You can use the procedures in this document to install IIS 8.0 or IIS 8.5.The Web server has a modular design that enables you to customize a server by adding or removing modules to meet your specific needs. The Install IIS 8.5 on Windows Server 2012 R2 section describes how to install modules, and the Modules in IIS 8.5 section below describes the functionality that each module provides and which modules are installed by default.
New in IIS 8.5
IIS 8.5 includes several new features not found in IIS 8.0 or lower:
- Enhanced logging. An administrator can enable the logging of additional custom fields from request or response headers, or from server variables.
- Logging to event tracing for Windows. An administrator can enable the sending of logging information to Event Tracing for Windows (ETW).
- Dynamic Website activation. If there are a large number of configured sites (100 or greater, by default), the service will not activate any of the sites when the service is started.
- Idle Worker Process Page-Out. An administrator can enable an idle worker process to be suspended rather than terminated.
For more information on these features, see What’s New in IIS 8.5.
For information on new features in IIS 8.0, see What’s New in IIS 8.0.
Before You Begin
Ensure that you have administrative user rights on the computer on which you plan to install IIS 8.5. Note that by default, you do not have administrative user rights if you are logged on as a user other than as the built-in administrator, even if you were added to the local Administrators group on the computer.
Log on either to the built-in administrator account, or explicitly invoke applications as the built-in administrator by using the runas command-line tool.
[!NOTE]
You can run runas /user:administrator cmd.exe so that every application you run from that command line will be elevated, eliminating the need to use the runas syntax from that command line.If you are logged on to an account other than the built-in local administrator account, you may see the following security alert dialog box.

Install IIS 8.5 on Windows Server 2012 R2
IIS is one of the server roles on Windows Server 2012 R2, named Web Server (IIS). You can use the following to install IIS:
- The Server Manager user interface in Windows Server 2012 R2
- A command-line installation using DISM (Deployment Image Servicing and Management)
- A command-line installation using PowerShell cmdlets
[!NOTE]
IIS can also be installed on Windows 8 through the Turn Windows features on or off dialog box from the Programs and Features settings of the Control Panel.Install IIS 8.5 using the Server Manager
Server Manager provides a single dashboard to install or uninstall server roles, role services, and features. Server Manager also gives an overview of all currently installed roles and features.
When you install IIS 8.5 using the Windows Server 2012 R2 Server Manager, the steps you perform are different when you install IIS for the first time, as opposed to when you add roles, services, or features to an existing IIS installation. The two procedures are provided below. Different procedures are also used to add and remove roles, role services, and features. You cannot add and remove from the same UI
For more information on how to run the installation wizards in Server Manager, see Install or Uninstall Roles, Role Services, or Features.
Install IIS 8.5 for the first time in the Server Manager
When the Web Server (UI) role is chosen for the first time in the Add Roles and Features Wizard in Server Manager, the basic components and services needed for IIS are automatically selected. The following procedure will install Internet Information Services on a running physical server when IIS has not already been installed. To change an existing installation of IIS, perform the next procedure, Install additional role services for IIS. These two procedures involve different steps.
- Open Server Manager by clicking the Server Manager icon on the desktop.
- In the Server Manager window, with the Dashboard and Quick Start selected, click Add roles and features, or click the Manage menu, and then click Add Roles and Features. The Add Roles and Features Wizard will start with a Before You Begin page. The wizard asks for verification of the following:
- The administrator account has a strong password.
- The network settings, such as IP addresses, are configured.
- The most current security updates from Windows® Update are installed.
- On the Before You Begin page, click Next.
- On the Installation Type page, select Role-based or feature-based installation to configure a single server. Click Next.
- On the Server Selection page, select Select a server from the server pool, and then select a server; or select Select a virtual hard disk server, select a server to mount the VHD on, and then select a VHD file. Click Next.
[!NOTE]
To connect to the virtual hard disk, the virtual machine must be turned off and disconnected. If you select a VHD file from a network share, that share must grant Read and Write permissions to the computer (local system) account of the server that you selected to mount the VHD (user-only account access is not sufficient).[!NOTE]
Servers in a server pool will be available only if they have been added by the Add other servers to manage command in Server Manager. - On the Server Roles page, select Web Server (IIS).
- In the Add Roles and Features wizard, click Add Features if you want to install the IIS Management Console. If you do not want to install the Management Console, uncheck Include management tools (if applicable), and then click Continue.
- On the Server Roles page, click Next.
[!NOTE]
The features required for the default role services of Management Tools and IIS Management Console will be preselected in the Features page. - On the Features page, select any features that you would like to install, and then click Next. Note that you do not need to select any features on this page to install IIS. IIS setup will select the features that are required.
- On the Web Server Role (IIS) page, click Next.
- On the Role Services page, select any additional role services that you want to install.
[!NOTE]
When you install IIS for the first time by selecting Web Server (IIS), you will get at least the default installation that includes a minimum set of role services. You can see at this point that those default services are preselected on the Server Roles page. For a list of the server roles available, and which roles are installed by default, see Modules in IIS 8.5. You will have the chance to select more role services later in this procedure.[!NOTE]
You can also deselect role services that were selected by default when you selected Web Server. However, at least one role service must be selected for Web Server to be selected and installed. - If you selected a role service that requires other role services or features to be installed, a page will be opened indicating the role services or features to be installed. Leave Include management tools (if applicable) selected to select the install management tools associated with the server role. You may not need the management tools on the destination server if you plan to manage the role remotely. Click Add Features to add the required role services or features.
- After you have added the role services that you need on the Role Services page, click Next.
- On the Confirmation page, verify the role services and features that are selected. Select Restart the destination server automatically if required to restart the destination server if the settings need to take immediate effect. To save the configuration information to an XML-based file that you can use for unattended installations with Windows PowerShell, select Export configuration settings, move to the appropriate path in the Save As dialog box, enter a file name, and then click Save. When you are ready to start the installation process on the Confirmation page, click Install.
- The Installation Progress page is displayed. You can close the wizard without interrupting running tasks. You can view task progress or open the page again by clicking Notifications in the notification area, and then clicking Task Details.
- On the Results page, verify that the installation succeeds, and then click Close.
- Confirm that the Web server works by opening a Web browser, and verifying that the following default Web page is displayed when you use the http://localhost address.
- Open Server Manager by clicking the Server Manager icon on the desktop.
- In the Server Manager window, with the Dashboard and Quick Start selected, click Add roles and features, or click the Manage menu, and then click Add Roles and Features. The Add Roles and Features wizard will start with a Before You Begin page. The wizard asks for verification of the following:
- The administrator account has a strong password.
- The network settings, such as IP addresses, are configured.
- The most current security updates from Windows® Update are installed.
- On the Before You Begin page, click Next.
- On the Installation Type page, select Role-based or feature-based installation to configure a single server. Click Next.
- On the Server Selection page, select Select a server from the server pool, and then select a server; or select Select a virtual hard disk server, select the server to mount the VHD on, and then select the VHD file. Click Next.
Install additional IIS 8.5 role services in the Server Manager
After you have installed the Web Server role on a running physical server for the first time, you can run through the installation process again to install additional roles, role services, and features.
[!NOTE]
To connect to the virtual hard disk, the virtual machine must be turned off and disconnected. If you select a VHD file from a network share, that share must grant Read and Write permissions to the computer (local system) account of the server that you selected to mount the VHD (user-only account access is not sufficient).[!NOTE]
Servers in a server pool will be available only if they have been added by the Add other servers to manage command in the Server Manager.[!NOTE]
On the Server Roles page, Web Server (IIS) will be selected when IIS 8.0 has already been installed. If Web server (IIS) is not selected, perform the procedure in Install IIS 8.5 for the first time in the Server Manager.On the Server Roles page, open the Web Server (IIS) tree until you see a role service that you want to install. Select the role service.
[!NOTE]
Those roles, services, and features that have already been installed will be identified by «Installed» in parentheses after the name, and the name will be grayed out. To remove a role, service, or feature, see Uninstall IIS 8.5 Using the Server Manager. Note, however, that you can expand the lower-level entries under a node even when the node is grayed out.[!NOTE]
For a list of the server roles that are available, and which roles are installed by default, see Modules in IIS 8.5 below. - If the role service that you selected requires other role services or features to be installed, an Add Features page will be opened listing those required role services or features. Leave Include management tools (if applicable) selected to select the install management tools associated with the server role. You may not need the management tools on the destination server if you plan to manage the role remotely. Click Add Features to add the required role services or features to the installation.
- If you need any additional role services, repeat steps 6 and 7.
[!NOTE]
Add only the modules that are necessary to minimize the IIS installation footprint and the attack surface.When you have selected all required role services, and their dependencies, on the Server Roles page, click Next.
- On the Features page, select any features that you need to be installed. Any features required to be installed for role services that you selected in step 6 will already be selected. Click Next.
- On the Confirmation page, verify the role services and features that are selected. Select Restart the destination server automatically if required to restart the destination server if the settings need to take immediate effect. To save the configuration information to an XML-based file that you can use for unattended installations with Windows PowerShell, select Export configuration settings, move to the appropriate path in the Save As dialog box, enter a file name, and then click Save. When you are ready to start the installation process on the Confirmation page, click Install.
- The Installation Progress page is displayed. You can close the wizard without interrupting running tasks. You can view task progress or open the page again by clicking Notifications in the notification area, and then clicking Task Details.
- On the Results page, verify that the installation succeeds, and then click Close.
- Confirm that the Web server works by opening a Web browser, and verifying that the following default Web page when you use the http://localhost address.
- Open Server Manager by clicking the Server Manager icon on the desktop.
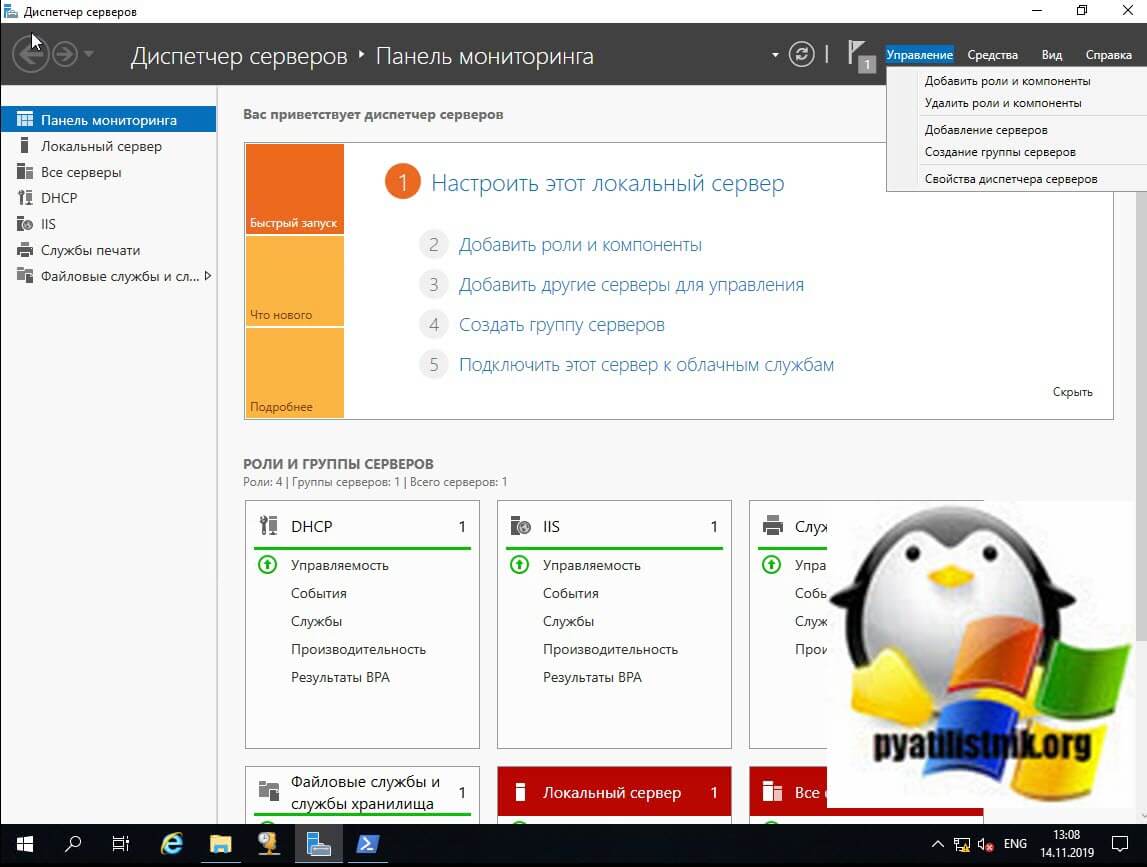
- Click Manage at the top of the Server Manager, and then click Remove Roles and Features.
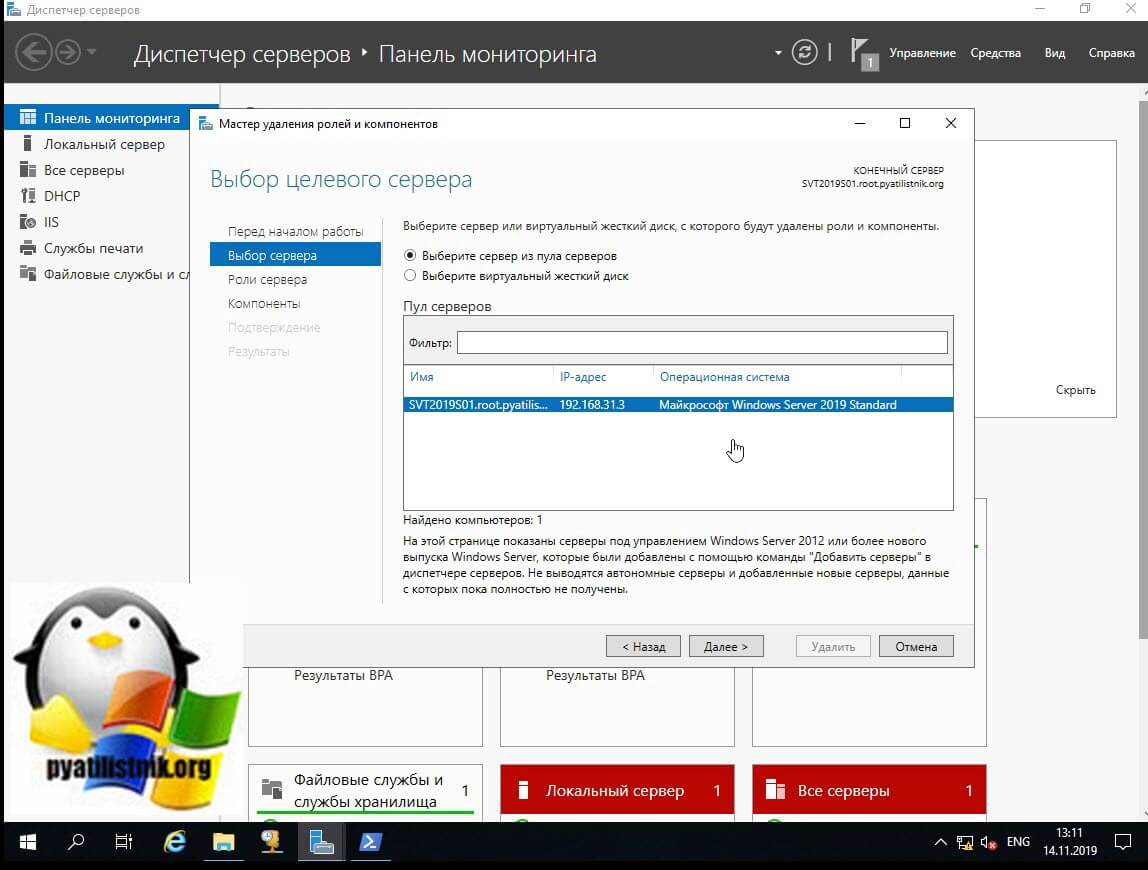
- On the Before you begin page, click Next.
- On the Server Selection page, select the server from the server pool, and then click Next.
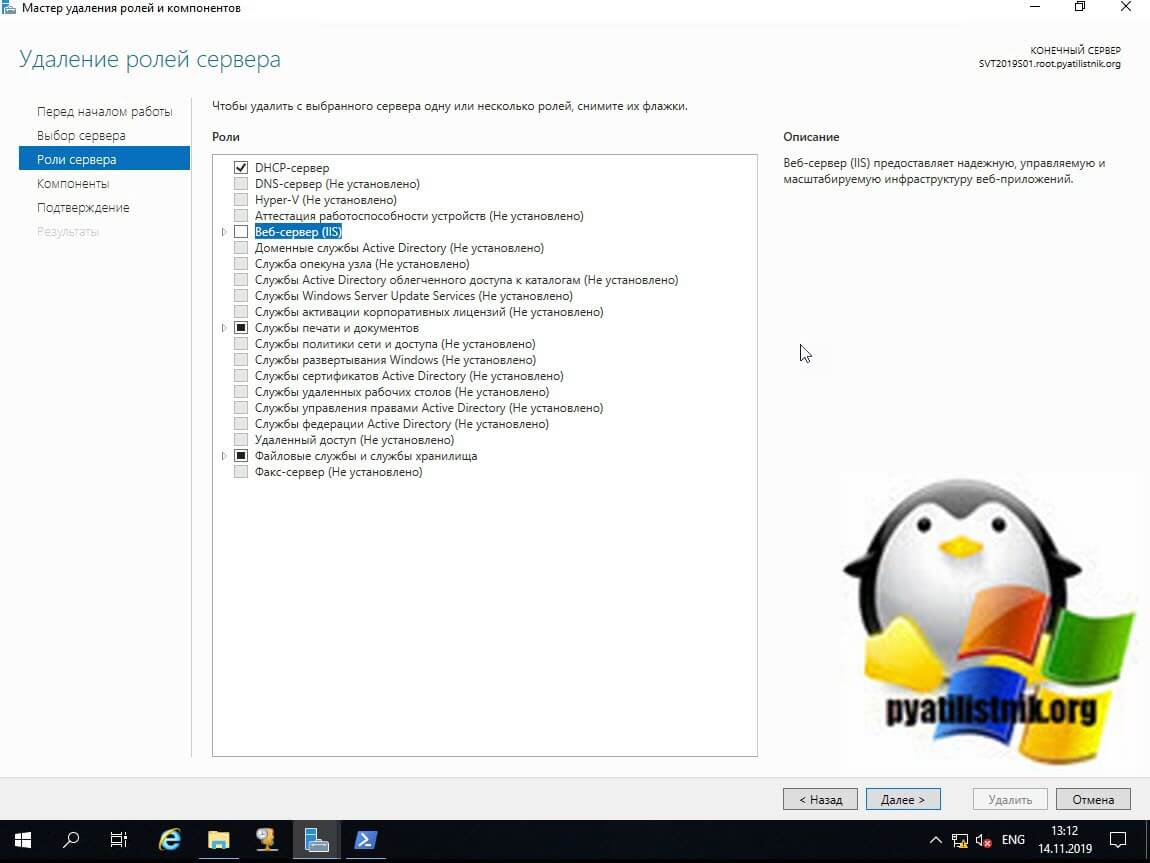
- On the Remove Server Roles page, clear the check box of any server role or role service that you would like to remove.
- If you uncheck a role service that has feature dependencies, the Remove Features dialog box will be displayed showing the dependencies. Click Remove Features to remove them. You can remove all of IIS by unchecking Web Server (IIS).
- On the Remove Server Roles page, select any other role or role service that you want to remove, and then click Next.
- On the Features page, uncheck any feature that you would like to remove. If you uncheck a feature that has feature dependencies, a dialog box will be displayed showing the dependencies. Click Remove Features to remove them. On the Features page, click Next.
- On the Confirmation page, verify that the roles, role services, and features to be removed are correct, and then click Remove.
Uninstall IIS 8.5 using the Server Manager
In the Add Roles and Features wizard of Server Manager, you cannot delete existing features that have already been installed. To delete roles and features, use the Remove Roles and Features wizard of Server Manager. You can remove an individual role, role service, or feature by unchecking it in the wizard, or you can uninstall all of IIS by unchecking the IIS Web Server Role.
[!NOTE]
It is recommended that you do a restart if you are prompted to do so, unless you have other activities that you want to do before the restart takes place. A restart is especially important when you remove roles, role services, or features. - The Removal Progress page is displayed. You can close the wizard without interrupting running tasks. You can view task progress or open the page again by clicking Notifications in the notification area, and then clicking Task Details.
- On the Results page, click Close.
- Restart the destination server to finish removing features.
- The cmdlet requires elevation. You must be running a Windows PowerShell session as an administrator to run the cmdlet.
- The cmdlet does not install management tools for roles, role services, and features by default. You must add the IncludeManagementTools parameter to the cmdlet to do so.
- Web-Server
- Web-WebServer
- Web-Security
- Web-Filtering
- Web-Cert-Auth
- Web-IP-Security
- Web-Url-Auth
- Web-Windows-Auth
- Web-Basic-Auth
- Web-Client-Auth
- Web-Digest-Auth
- Web-CertProvider
- Web-Common-Http
- Web-Http-Errors
- Web-Dir-Browsing
- Web-Static-Content
- Web-Default-Doc
- Web-Http-Redirect
- Web-DAV-Publishing
- Web-Performance
- Web-Stat-Compression
- Web-Dyn-Compression
- Web-Health
- Web-Http-Logging
- Web-ODBC-Logging
- Web-Log-Libraries
- Web-Custom-Logging
- Web-Request-Monitor
- Web-Http-Tracing
- Web-App-Dev
- Web-Net-Ext
- Web-Net-Ext45
- Web-ASP
- Web-Asp-Net
- Web-Asp-Net45
- Web-CGI
- Web-ISAPI-Ext
- Web-ISAPI-Filter
- Web-WebSockets
- Web-AppInit
- Web-Includes
- Web-Ftp-Server
- Web-Ftp-Service
- Web-Ftp-Ext
- Web-Mgmt-Tools
- Web-Mgmt-Console
- Web-Mgmt-Compat
- Web-Metabase
- Web-WMI
- Web-Lgcy-Mgmt-Console
- Web-Lgcy-Scripting
- Web-Scripting-Tools
- Web-Mgmt-Service
- The cmdlet requires elevation. You must be running a Windows PowerShell session as an administrator to run the cmdlet.
- The cmdlet does not uninstall management tools for roles, role services, and features by default. You must add the IncludeManagementTools parameter to the cmdlet to do so.
- Install or Uninstall Roles, Role Services, or Features
- IIS.NET Install
- What’s New in IIS 8.5
- DISM Overview
- Editing Configuration Files
- Extending IIS Configuration
- About
- Latest Posts
Install IIS 8.5 from the Command Line
You can install IIS 8.5 from the command line using DISM or PowerShell. Note that DISM and PowerShell have different namespaces for installation parameters, so the parameter names used in their commands will be different. For more information, see Modules in IIS 8.5.
[!NOTE]
Pkgmgr.exe has been deprecated. Use DISM instead for scripts installing IIS 8.5.Install IIS 8.5 using DISM
Automating the installation of IIS by using unattended scripts is very useful if you need to deploy multiple Web servers and want to ensure that each of the Web servers is set up with identical components and services. In Windows Server 2012 R2, DISM is used for unattended scripts, letting you install or uninstall optional features from a command prompt or scripts. To use DISM, you must make sure you have administrative user rights on the computer. For more information about DISM, see DISM Overview
If you do not explicitly include in the DISM code a feature that the IIS installation has a dependency on, the installation will fail, and will not generate an error message. For a list of dependencies required, see Feature Dependencies.
For a full list of the DISM parameters corresponding to IIS roles, services, and features, see Modules in IIS 8.5.
The following script will install all roles, role services, and features of IIS 8.5, getting the full IIS installation that includes all available feature packages. If there are roles, role services, or features that you do not need, you should edit the script to include only those that you require. The order of the commands in the DISM script does not matter. The entire script will be handed off to the engine and treated as one transaction. To install IIS 8.5 with a script, type the following on one line in an elevated command prompt.
Install IIS 8.5 using PowerShell
You can use the following PowerShell cmdlets to install all of IIS 8.5:
To install only specific features, list them in the PowerShell cmdlet, as in the following example:
The following points apply to running the PowerShell cmdlets:
For a full list of the PowerShell parameters corresponding to IIS 8.5 roles, services, and features, with more information, see Modules in IIS 8.5. The following lists all these parameters.
Uninstall IIS 8.5 using PowerShell
You can use the PowerShell cmdlet UnInstall-WindowsFeature to uninstall IIS 8.5. Run get-help Install-WindowsFeature at a PowerShell command line to see the syntax of the cmdlet. The following points apply to running the cmdlet:
Modules in IIS 8.5
IIS modules are individual role services that the server uses to process requests. The following table shows which modules are available to be installed in the Web server, which are installed by default, which role the role service is included in, the parameter used in DISM or PowerShell to install them, and a brief description of the functionality that they provide.
[!NOTE]
An asterisk (*) in the table below denotes a role or role service that is installed by default when the Web Server (IIS) role is installed.Role Role Service DISM Parameter PowerShell Parameter Functionality Web Server Role IIS-WebServerRole Web-Server Provides support for HTML Web sites and optional support for ASP.NET, ASP, and Web server extensions, enabling you to host an internal or external Web site or create Web-based applications. Web Server* IIS-WebServer Web-WebServer Provides support for HTML Web sites and optional support for ASP.NET, ASP, and Web server extensions, enabling you to host an internal or external Web site or create Web-based applications. Common HTTP Features* IIS-CommonHttpFeatures Web-Common-Http Supports basic HTTP functionality, such as delivering standard file formats and configuring custom server properties. Default Document* IIS-DefaultDocument Web-Default-Doc Enables you to configure a default file for the Web server to return when users do not specify a file in a request URL. Directory Browsing* IIS-DirectoryBrowsing Web-Dir-Browsing Enables users to see the contents of a directory on a Web server when they do not specify a file in a request URL and default documents are either disabled or not configured. HTTP Errors* IIS-HttpErrors Web-Http-Errors Enables you to customize the error messages that are returned to the users’ browsers when the Web server detects a fault condition, improving the user experience. Static Content* IIS-StaticContent Web-Static-Content Enables the Web server to publish static Web file formats, such as HTML pages and image files that can be viewed using a Web browser. HTTP Redirection IIS-HttpRedirect Web-Http-Redirect Enables the Web server to redirect user requests that are sent to a specific destination. WebDAV Publishing IIS-WebDAV Web-DAV-Publishing Web Distributed Authoring and Versioning. Enables you to publish files to and from a Web server by using the HTTP protocol, working through most firewalls without modification. Health and Diagnostics* IIS-HealthAndDiagnostics Web-Health Provides an infrastructure to monitor, manage, and troubleshoot the health of Web servers, sites, and applications. HTTP Logging* IIS-HttpLogging Web-Http-Logging Provides logging of Web site activity for the server, in addition to the logging provided by the operating system. Custom Logging IIS-CustomLogging Web-Custom-Logging Enables you to create a custom logging module that performs logging of Web server activity in a format that differs from the logging normally performed by IIS. Logging Tools IIS-LoggingLibraries Web-Log-Libraries Provides an infrastructure to manage Web server logs and automate common logging tasks. ODBC Logging IIS-ODBCLogging Web-ODBC-Logging Provides an infrastructure that supports logging Web server activity to an ODBC-compliant database, enabling you to programmatically display and manipulate logging data on an HTML page. Request Monitor IIS-RequestMonitor Web-Request-Monitor Provides an infrastructure to monitor Web application health by capturing information about HTTP requests. Tracing IIS-HttpTracing Web-Http-Tracing Provides an infrastructure to diagnose and troubleshoot Web applications, including poor performance and authentication-related failures. Performance* IIS-Performance Web-Performance Provides an infrastructure to enable more efficient use of bandwidth by performing compression of static and/or dynamic content. Static Content Compression* IIS-HttpCompressionStatic Web-Stat-Compression Provides an infrastructure to configure HTTP compression of static content. Dynamic Content Compression IIS-HttpCompressionDynamic Web-Dyn-Compression Provides an infrastructure to configure HTTP compression of dynamic content. Security* IIS-Security Web-Security Provides an infrastructure for securing the Web server from users and requests, using one of multiple authentication methods. Request filtering* IIS-RequestFiltering Web-Filtering Enables screening of all incoming requests to the server, and filters the requests based upon rules set by the administrator. Basic Authentication IIS-BasicAuthentication Web-Basic-Auth An authentication method in which users are prompted to supply credentials that are transmitted unencrypted across the network. Centralized SSL Certificate IIS-CertProvider Web-CertProvider An authentication method that uses SSL server certificates that are managed centrally using a file share. Client Certificate Mapping Authentication IIS-ClientCertificateMappingAuthentication Web-Client-Auth An authentication method that uses client certificates to authenticate users, using Active Directory to offer one-to-one certificate mappings across multiple Web servers. Digest Authentication IIS-DigestAuthentication Web-Digest-Auth An authentication method that sends a password hash to a Windows domain controller to authenticate users, especially useful if users who must be authenticated will access the Web site from behind firewalls and proxy servers. IIS Client Certificate Mapping Authentication IIS-IISCertificateMappingAuthentication Web-Cert-Auth An authentication method that uses client certificates to authenticate users, using IIS to offer one-to-one or many-to-one certificate mapping. IP and Domain Restrictions IIS-IPSecurity Web-IP-Security An authentication method that enables you to enable or deny content based upon the originating IP address or the domain name of the request. URL Authorization IIS-URLAuthorization Web-Url-Auth An authentication method that enables you to create URL authorization rules that restrict access to Web content. Windows Authentication IIS-WindowsAuthentication Web-Windows-Auth An authentication method that enables administrators in a Windows domain to take advantage of the domain infrastructure for authenticating users, a low-cost authentication solution for internal Web sites. Application Development IIS-ApplicationDevelopment Web-App-Dev Provides an infrastructure for developing and hosting Web applications, useful for creating Web content and extending the functionality of IIS. .NET Extensibility 3.5 IIS-NetFxExtensibility Web-Net-Ext Enables managed code developers to change, add, and extend Web server functionality in the entire request pipeline, the configuration, and the UI. .NET Extensibility 4.5 IIS-NetFxExtensibility45 Web-Net-Ext45 Enables managed code developers to change, add, and extend Web server functionality in the entire request pipeline, the configuration, and the UI. Application Initialization IIS-ApplicationInit Web-AppInit Enables you to perform expensive Web application initialization tasks before serving Web pages. ASP IIS-ASP Web-ASP Provides a server-side scripting environment for building Web sites and Web applications, especially for existing applications. ASP.NET 3.5 IIS-ASPNET Web-Asp-Net Provides a server-side object-oriented programming environment for building Web sites and Web applications using managed code. ASP.NET 4.5 IIS-ASPNET45 Web-Asp-Net45 Provides a server-side object-oriented programming environment for building Web sites and Web applications using managed code. CGI IIS-CGI Web-CGI Defines how a Web server passes information to an external program. ISAPI Extensions IIS-ISAPIExtensions Web-ISAPI-Ext Internet Server Programming Interface Extensions. Provides support for dynamic Web content development. ISAPI Filters IIS-ISAPIFilter Web-ISAPI-Filter Internet Server Programming Interface Filters. Enables you to extend or change the functionality provided by IIS, reviewing every request made to the Web server and processing the appropriate requests. Server Side Includes IIS-ServerSideIncludes Web-Includes A scripting language used to dynamically generate HTML pages, using script that is run on the server before the page is delivered to the client. WebSocket Protocol IIS-WebSockets Web-WebSockets Provides communication channels for server applications created with IIS 8.x and ASP.NET 4.5. FTP Server IIS-FTPServer Web-Ftp-Server Enables the transfer of files between a client and a server, using either an FTP client or an FTP-enabled Web browser. FTP Service IIS-FTPSvc Web-Ftp-Service Enables FTP publishing on a Web server. FTP Extensibility IIS-FTPExtensibility Web-Ftp-Ext Enables support for FTP extensibility features such as customer providers, ASP.NET users, or IIS Manager users. IIS Hostable Web Core (IIS 8.0, not IIS 8.5) IIS-HostableWebCore Web-WHC Enables you to write custom code that will host core IIS functionality in your own application that serves HTTP requests and uses its own applicationHost.config and root Web.config configuration files. Management Tools* IIS-WebServerManagementTools Web-Mgmt-Tools Provides an infrastructure for managing a Web server that runs IIS 7.0 or later. IIS Management Console* IIS-ManagementConsole Web-Mgmt-Console Provides an infrastructure for managing an IIS 7.0 or later Web server, local or remote, using a user interface. IIS 6 Management Compatibility IIS-IIS6ManagementCompatibility Web-Mgmt-Compat Provides forward compatibility for applications and scripts that use the IIS 6 APIs, Admin Base Object (ABO) and Active Directory Service Interface (ADSI). IIS 6 Metabase Compatibility IIS-Metabase Web-Metabase Provides an infrastructure for querying and configuring the Metabase, so that you can run applications and scripts migrated from earlier versions of IIS that use Admin Base Object (ABO), and Active Directory Service Interface (ADSI). IIS 6 Management Console IIS-LegacySnapIn Web-Lgcy-Mgmt-Console Provides an infrastructure for administration of remote IIS 6.0 servers. IIS 6 Scripting Tools IIS-LegacyScripts Web-Lgcy-Scripting Enable you to continue to use scripts built to manage IIS 6 in IIS 7.0 or later, especially if your applications and scripts use ActiveX Data Objects (ADO) or Active Directory Service Interface (ADSI). IIS 6 WMI Compatibility IIS-WMICompatibility Web-WMI Provides Windows Management Instrumentation (WMI) scripting interfaces to programmatically manage and automate tasks for an IIS 8.0 or later Web server. IIS Management Scripts and Tools IIS-ManagementScriptingTools Web-Scripting-Tools Provides an infrastructure to programmatically manage an IIS 7.0 or later Web server by using commands in a command window or by running scripts. Management Service IIS-ManagementService Web-Mgmt-Service Enables the Web server to be managed remotely from another computer using IIS Manager. Feature Dependencies
The following table shows which role services and features must be installed for the role service or features in the table row to be installed.
The Add Roles and Features Wizard and Remove Roles and Features Wizard of Server Manager take care of dependencies by prompting you to add dependencies when adding a role service or feature, or to remove dependencies when removing a role service or feature. However, when you install IIS using DISM, you need to include in the DISM code any dependency that a role service or feature being installed has, or the installation will fail, and you may not receive an indication why it failed.
When you remove a role service or feature, make sure that you do not remove a service or feature that another service or feature has a dependency on. There can be an intersection of dependencies, for example between ASP and ASP.NET. So if you were to remove ASP, and remove its feature dependencies, you could remove dependencies for ASP.NET, as well.
Role Role Service Dependency Web Server Role None Web Server* None Common HTTP Features* None Default Document* None Directory Browsing* None HTTP Errors* None Static Content* None HTTP Redirection None WebDAV Publishing Static Content Health and Diagnostics* None HTTP Logging* None Custom Logging None Logging Tools None ODBC Logging None Request Monitor None Tracing None Performance* None Static Content Compression* None Dynamic Content Compression None Security* None Request filtering* None Basic Authentication None Centralized SSL Certificate None Client Certificate Mapping Authentication None Digest Authentication None IIS Client Certificate Mapping Authentication None IP and Domain Restrictions None URL Authorization None Windows Authentication None Application Development None .NET Extensibility 3.5 — .NET Framework 3.5 (includes .NET 2.0 and 3.0) — ASP.NET 4.5 — .NET Framework 4.5 — Application Development — Request Filtering .NET Extensibility 4.5 — ASP.NET 4.5 — .NET Framework 4.5 — Application Development — Request Filtering Application Initialization None ASP — Web Server (IIS)-Web Server- Application Development- ISAPI Extensions — Request Filtering ASP.NET 3.5 — .NET Framework 3.5 (includes .NET 2.0 and 3.0) — ASP.NET 4.5 — .NET Framework 4.5 — ISAPI Extensions — ISAPI Filters — .NET Extensibility 3.5 — Request Filtering ASP.NET 4.5 — ASP.NET 4.5 — .NET Framework 4.5 — ISAPI Extensions — ISAPI Filters — .NET Extensibility 3.5 — Request Filtering CGI None ISAPI Extensions None ISAPI Filters None Server Side Includes None WebSocket Protocol None FTP Server None FTP Service None FTP Extensibility FP Service IIS Hostable Web Core (IIS 8.0, not IIS 8.5) None Management Tools* — .NET Framework 4.5 — Graphic Management Tools and Infrastructure — Windows PowerShell 3.0 IIS Management Console* — .NET Framework 4.5 — Graphic Management Tools and Infrastructure — Management Tools — Windows PowerShell 3.0 IIS 6 Management Compatibility None IIS 6 Metabase Compatibility None IIS 6 Management Console — .NET Framework 4.5 — Graphic Management Tools and Infrastructure — IIS 6 Metabase Compability — Windows PowerShell 3.0 IIS 6 Scripting Tools — IIS 6 Metabase Compatibility — IIS 6 WM Compatibility IIS 6 WMI Compatibility IIS 6 Metabase Compatibility IIS Management Scripts and Tools None Management Service — ASP.NET 4.5 — .NET Framework 4.5 — Management Tools See also

Всем привет сегодня хочу рассказать как установить IIS 8.5 и FTP в Windows Server 2012 R2. Ранее я уже рассказывал Как установить IIS 7 и FTP сервер в Windows Server 2008 R2-1 часть. Так что, если у вас более старая версия Операционной системы, то советую ознакомится. В самом процессе инсталляции отличий не очень много, но так же присутствуют дополнительные моменты, которые следует разобрать. Еще удобно, то что все можно сделать с помощью powershell. Думаю, данный материал вам будет очень полезен.
Установка microsoft iis 8.5
Заходим на ваш Windows Server 2012 R2, открываем диспетчер сервера и жмем «Управление-Добавить роли и компоненты»

Как установить IIS и FTP в Windows Server 2012 R2-02
Пропускаем первое вводное окно мастера, оно несет в себе чисто ознакомительный характер.

Как установить IIS и FTP в Windows Server 2012 R2-03
Оставляем пункт «Установка ролей или компонентов», жмем далее

Как установить IIS и FTP в Windows Server 2012 R2-04
Выбираем наш сервер из пула, если в пуле их несколько

Как установить IIS и FTP в Windows Server 2012 R2-05
Выбираем пункт «Веб-сервер IIS»

Как установить IIS и FTP в Windows Server 2012 R2-06
нажимаем «Добавить компоненты»

Как установить IIS и FTP в Windows Server 2012 R2-07
Пропускаем компоненты и жмем далее

Как установить IIS и FTP в Windows Server 2012 R2-08
далее на странице «Роль веб-сервера IIS», жмем далее

Как установить IIS и FTP в Windows Server 2012 R2-09
Добавляем компонент FTP и жмем далее

Как установить IIS и FTP в Windows Server 2012 R2-10
Установить, сам процесс инсталляции не занимает много времени.

Как установить IIS и FTP в Windows Server 2012 R2-11
Видим, что IIS 8.5 и FTP установились успешно, жмем закрыть

Как установить IIS и FTP в Windows Server 2012 R2-12

Как установить IIS и FTP в Windows Server 2012 R2-13
Установка с помощью Powershell
Если вы планируете автоматизировать данный процесс, или произвести его на удаленной площадке, где нет достаточно квалифицированного персона, то вы можете использовать оболочку powershell и ее командлеты для нашей задачи. Открываем окно от имени администратора и вводим вот такую команду:
Install-WindowsFeature –Name веб-Server –IncludeManagementTools
Установка FTP делается вот так:
Install-WindowsFeature -Name «Web-Ftp-Service»
Средства управления фтп, если не нужна служба
Install-WindowsFeature -Name «Web-Mgmt-Console»
Вот так вот просто установить IIS и FTP в Windows Server 2012 R2. Читайте далее как настроить ftp сервер в Windows Server 2012 R2.
Материал сайта pyatilistnik.org
In this blog, I will discuss on how to install and configure IIS on Windows Server 2012 R2 and what is a web server and IIS. There’s no much difference between the two procedures. The installation is quick and easy. Don’t believe me? Well, don’t worry! Below is a step-by-step guide to make things sound easy and sorted…
Step one: Install the Web Server (IIS) role.
Open the Server Manager and click Add Roles and Features as shown below:
Go on until you reach the Server Roles tab.
Now select the Web Server (IIS).
After selection of web server, click Add Features.
Ignore the Features tab and go on.
The default configuration will be fine. Click Next.
Step two: Configure IIS.
Go back to the Server Manager. Select Internet Information Services (IIS) Manager from the Manage menu.
Click Add Website.
Specify at least the site name and path. Click Ok.
What is Web Server?
IDE, Vs integrated ASP.Net Engine, is responsible for executing every time of asp.net request and response whenever we run our ASP.net web application. The process name is “WebDev.WebServer.Exe” which takes care of all request and response of a web application which is running from Visual Studio IDE.
When we want to host the application on a centralized location the name “Web Server” comes into the picture and wanted to access from many places. The web server is responsible for handling all the requests that are coming from clients, process them and provide the responses.
What is IIS?
One of the most powerful web servers from Microsoft that is used to host your ASP.NET Web application it is called Internet Information Services (IIS). IIS has its own ASP.NET Process Engine to handle the ASP.NET request. Now, IIS took the coming request and it processes the request on server and send response back to clients
Request Processing in web server
So far it’s clear to you that what is the Web server and IIS is and what is the use of them. Now let’s have a look how the request is processing internally. Moving ahead, you have to know about two main concepts:
1. Worker Process
2. Application PoolWorker Process:
The asp.net application in IIS is used to run by the Worker Process (w3wp.exe). For all the request and response that are coming from the client system, This w3wp.exe process is responsible for managing. All the ASP.Net functionality runs under the scope of the worker process. Whenever the client request generates to the server from a client worker process is responsible for generating the request and response. In simple words, we can say worker process is the heart of ASP.NET Web Application which runs on IIS.
Application Pool:
This is the container of the worker process. These application pools are used to separate sets of IIS worker processes that share the same configuration. Application pools provide a better security, reliability and availability for any web application.
When multiple worker processes with Application Pool it is called “Web Garden.”
Till now, I have covered all the basics of the Web server, Application Pool, Worker process. Now we move to, how IIS process the request when a new request comes up from a client.
Now I move to IIS 6.0 Architecture, basically, IIS 6.0 Architecture divide them into Two-Layers:
1. Kernel Mode
2. User ModeHTTP.SYS
HTTP.SYS contains in kernel mode and this kernel mode introduced with IIS6.0. So the client makes a request from Client to Server, then HTTP.SYS hit First.
Now, HTTP.SYS is Responsible for pass the request to the particular Application pool. Here the big question arises that how HTTP.SYS does come to know where to send the request. Whenever we create new Application Pool, the Application Pool is being generated own ID, and it’s registered with the HTTP.SYS.
So, it is the first step of IIS Request Processing architecture.
The second step of IIS Request Processing architecture:
So far, Client Requested for some information and request came to the Kernel level of IIS means at HTTP.SYS. HTTP.SYS has been identified the name of the application pool where to send. Now, we move to the next, how this request moves from HTTP.SYS to Application Pool.
In the user level IIS have Web Admin Services (WAS) and WAS takes the request from HTTP.SYS and pass to the application pool.
After above process Application pool receives the request, it just passes the request to worker process (w3wp.exe). The “w3wp.exe” looks up the URL of the request to load the correct ISAPI extension. The ISAPI extensions are the IIS way to handle requests for different resources. When ASP.NET is installed, it is installed the own ISAPI extension (aspnet_isapi.dll) and its mapping adds into IIS.
When aspnet_isapi.dll loads using worker process, the HTTP Runtime start automatically, which is known as the entry point of an application. HTTP Runtime is a class which calls the Process Request method to start Processing.
When this method called, a new instance of HTTP Context is created. Which is accessible using HTTP Context.Current Properties. This object always remains same at the end of this object request life. We can access some other objects using Http Context.Current like Request, Response, Session, etc.
After that Http Runtime load, an Http Application object with the help of Http Application Factory class.
HTTP Pipeline
Now, the new concept is introduced called “HTTP Pipeline.” this concept is called a pipeline because it contains a set of Http Modules that intercept the request on its way to the Http Handler. The incoming request that has access to classes HTTP Modules. We can also create our HTTP Module if we need to handle anything during upcoming request and response.
Concluding Words
When the user creates the request the web page from a web server, the first request reaches to HTTP.SYS of IIS. Then HTTP.SYS send the request to the particular Application Pool. Then Application Pool forwards the request to worker process to load the ISAPI Extension which will create an HTTP Runtime Object to Process the request via HTTP Module and HTTP handler. After the process, the ASP.NET Page Life Cycle event starts!
A technologist, speaker, educator, writer, and a Data Visualization Jedi .
I excel when it comes to making bespoke data dashboards and visualizations that users and clients absolutely love. Sharing about things I enjoy doing is my hobby, whether it’s about a project, collaboration, feedback, or just simple how-to guides about visualization.
If you have something to ask or share, I’d love to hear from you!Обычно, когда говорят о web-сервере, подразумевают решения на базе платформы Linux. Но если ваша инфраструктура развернута на основе Windows Server то логично будет использовать веб-сервер IIS. Вопреки распространенному мнению, это весьма популярная платформа, которая позволяет работать как с большинством популярных CMS, так и имеет широкий спектр систем, предназначенных для работы именно на Windows и IIS.
Научиться настраивать MikroTik с нуля или систематизировать уже имеющиеся знания можно на углубленном курсе по администрированию MikroTik. Автор курса, сертифицированный тренер MikroTik Дмитрий Скоромнов, лично проверяет лабораторные работы и контролирует прогресс каждого своего студента. В три раза больше информации, чем в вендорской программе MTCNA, более 20 часов практики и доступ навсегда.
Несомненным достоинством IIS является его тесная интеграция с другими технологиями и средствами разработки Microsoft. В частности веб-решения для IIS могут использовать богатые возможности .NET и легко взаимодействовать с настольными приложениями на этой платформе. Если же вас это пока не интересует, то к вашим услугам богатый выбор готовых CMS, в том числе написанных специально для IIS. Сегодня мы рассмотрим как установить и настроить IIS для работы с веб-решениями на базе ASP.NET и установим одну из популярных CMS для этой платформы.
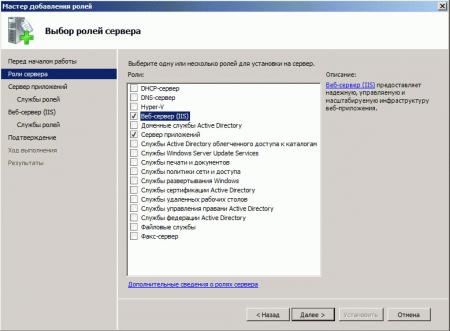
Для установки веб-сервера на платформе Windows перейдем в оснастку Роли в Диспетчере сервера и выберем установку ролей Веб-сервер (IIS) и Сервер приложений.

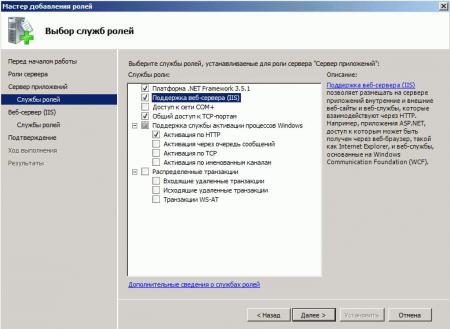
Но не спешите нажимать Далее, слева, под названием каждой роли, доступна опция Службы ролей, перейдем на нее и установим для Сервера приложений следующие опции: Поддержка веб-сервера (IIS), Общий доступ к TCP-портам и Активация через HTTP.

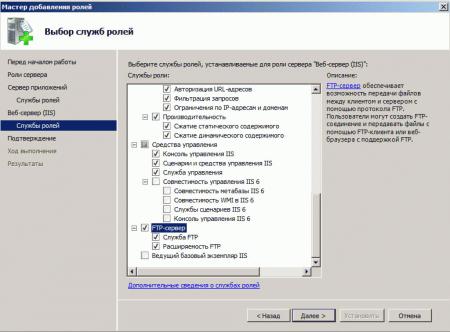
А для веб-сервера установите службу FTP-сервер.

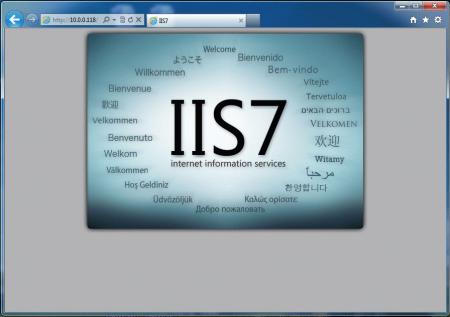
После чего установите выбранные роли. Для проверки работоспособности IIS наберите в браузере IP-адрес вашего сервера, вы должны будете увидеть стандартную страницу-заглушку веб-сервера.

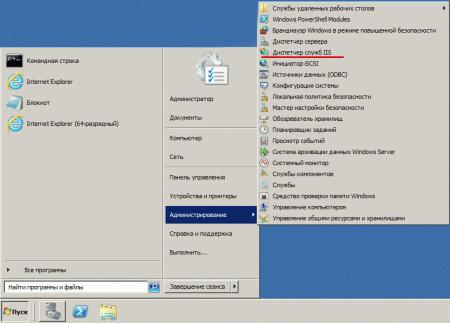
Теперь перейдем в к настройке сервера, для этого откроем Диспетчер служб IIS (находится в Пуск — Администрирование).

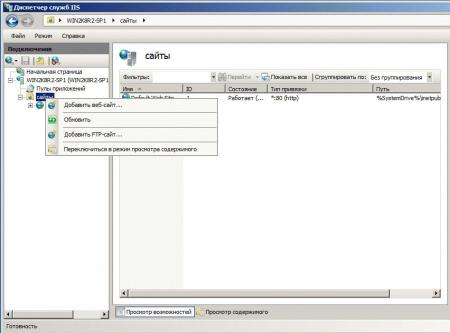
Первым делом создадим новый сайт, для этого щелкните правой кнопке на пункте Сайты в боковом меню Диспетчера IIS и выберите Создать новый сайт.

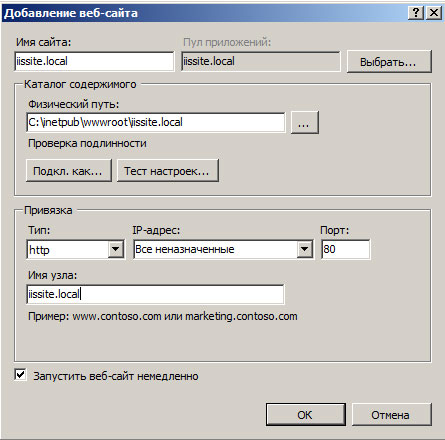
В открывшемся окне укажите имя сайта, путь к корневой папке (по умолчанию сайты пользователей располагаются в C:inetpubwwwroot), которую следует предварительно создать и укажите имя узла (доменное имя сайта), в нашем случае iissite.local

Не забудьте добавить A-запись с именем вашего сайта на DNS-сервер или пропишите необходимые строки в файлы hosts тех рабочих станций, откуда будете обращаться к сайту
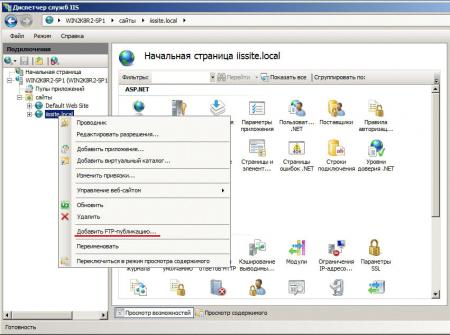
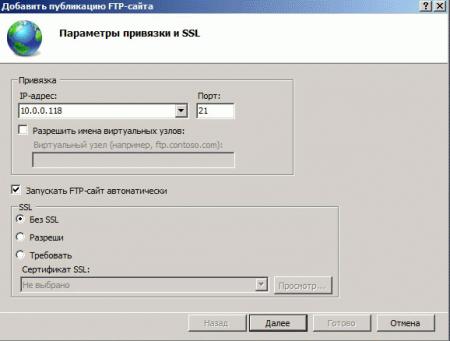
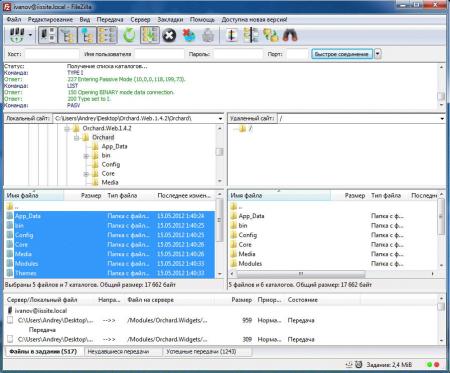
В принципе вы уже можете размещать в папке сайта web-страницы и получать к ним доступ через браузер, но для полноценной работы с сайтом не помешает FTP-доступ к нему. Для этого щелкните правой кнопкой по названию вашего сайте в боковом меню и выберите Добавить FTP-публикацию

Далее укажите привязку FTP-cлужбы к сетевым интерфейсам и портам, а также настройте параметры безопасности. Если вы собираетесь использовать SSL, то учтите что вам потребуется сертификат, хотя если вы будете использовать FTP-доступ только для собственных нужд, то можно обойтись самоподписанным сертификатом. Не забудьте поставить галочку для автоматического запуска FTP-сайта.

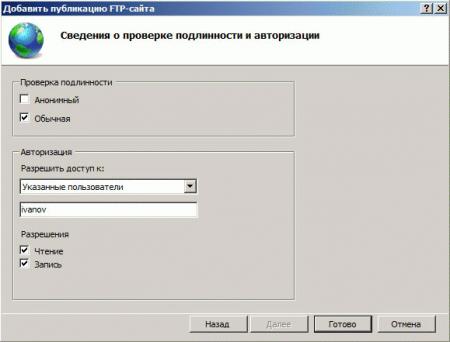
На следующей странице укажите параметры доступа к серверу, мы советуем указывать конкретных пользователей, которые будут работать с данным сайтом.

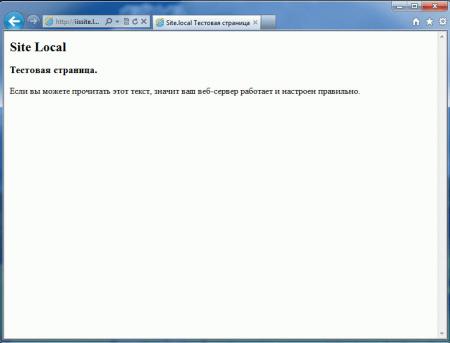
Попробуйте подключиться через FTP используя любой клиент и загрузите проверочную html страницу с именем index.html, пример такой страницы мы приводили здесь. Если все сделано правильно, то, набрав в браузере имя нашего сайта, вы увидите такую страницу:

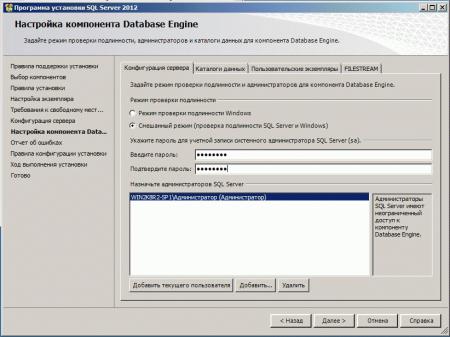
Веб-сервер настроен и вы можете использовать его для размещения HTML-страниц, однако современные сайты используют для хранения своих данных СУБД, поэтому следующим шагом установим MS SQL Express 2012, возможностей которого с лихвой хватит для наших задач. Установка производится со значениями по умолчанию, кроме Режима проверки подлинности, который следует переключить в Смешанный режим и задать пароль суперпользователю SQL-сервера sa.

Теперь попробуем установить какую либо популярную CMS созданную на базе технологии ASP.NET, обширный выбор таких решений представлен в галерее web-приложений Microsoft. Обратите внимание, что по кнопке скачать вы получите пакет для установки через Web PI, для установки на IIS вам потребуется перейти на сайт разработчика и скачать полный пакет с CMS
Мы будем устанавливать Orchard CMS, для получения пакета пройдите по ссылке и выберите Загрузить как zip, распакуйте полученный архив и закачайте в корень сайта содержимое папки Orchard.

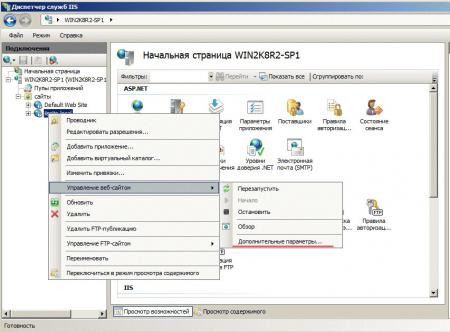
Данная CMS создана на базе ASP.NET 4, поэтому настроим наш сайт на использование необходимых технологий. Для этого щелкните правой кнопкой на имени сайта в боковом меню и выберите Управление веб-сайтом — Дополнительные параметры
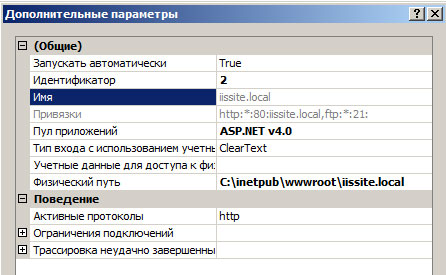
В открывшемся окне измените параметр Пул приложений, указав там ASP.NET v.4

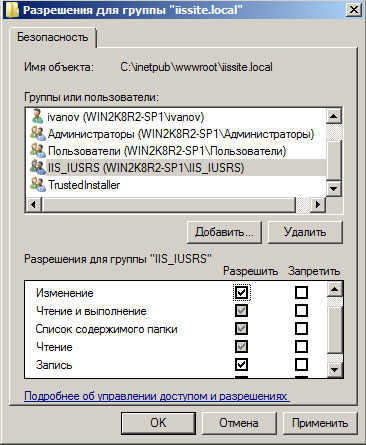
Затем установите необходимые права на папку с сайтом, вам нужно добавить пользователю IIS_IUSRS возможность записи и изменения содержимого данной папки.

Также не забудьте создать базу данных для сайта, для этого зайдите в SQL Server Management Studio и, щелкнув правой кнопкой на пункте Базы данных в боковом меню, создайте новую базу.
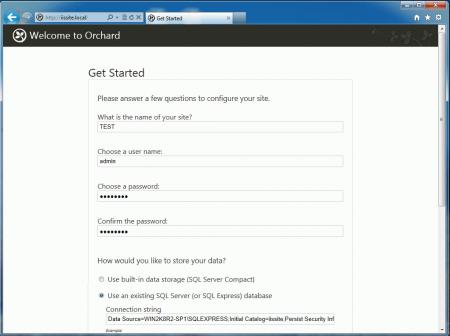
Для установки CMS наберите в браузере адрес сайта и следуйте указаниям скрипта установки. Никаких сложностей там нет, единственное затруднение может вызвать правильное указание параметров подключения к SQL-серверу. Укажите что вы используете SQL Server (или SQL Express)

В строке подключения ниже укажите следующее:
server=SERVERNAMESQLEXPRESS;database=iissite;user=sa;password=sapasswd;- server=SERVERNAMESQLEXPRESS — имя сервера, на котором установлен SQL-сервер, и экземпляра SQL-сервера.
- database=iissite — имя базы данных (в нашем случае iissite)
- user=sa — пользователь СУБД (в нашем случае sa)
- password=sapasswd — пароль пользователя sa.
Так как наш сайт предназначен для внутреннего использования и использует изолированный экземпляр SQL, то мы использовали для доступа к серверу параметры пользователя sa, если же вы собираетесь размещать на веб-сервере несколько сайтов и администрировать их будут разные пользователи, то заведите на SQL сервере дополнительных пользователей и для подключения используйте их учетные данные, не забыв ограничить им доступ только к «своим» базам.
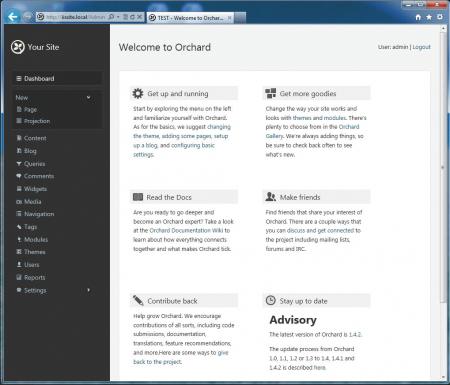
Спустя некоторое время, необходимое для установки CMS, в вашем браузере отобразиться страница сайта с тестовым содержимым. Можете переходить в админ-панель и настраивать сайт согласно ваших потребностей.

Несмотря на то, что мы рассмотрели установку только одного «движка», установка других CMS производится аналогичным образом и сложностей вызвать не должна
В следующей части нашей статьи мы расскажем как добавить нашему серверу поддержку PHP для запуска на нем популярных CMS написанных на этом языке.
Научиться настраивать MikroTik с нуля или систематизировать уже имеющиеся знания можно на углубленном курсе по администрированию MikroTik. Автор курса, сертифицированный тренер MikroTik Дмитрий Скоромнов, лично проверяет лабораторные работы и контролирует прогресс каждого своего студента. В три раза больше информации, чем в вендорской программе MTCNA, более 20 часов практики и доступ навсегда.
Сегодня мы покажем, как на базе Windows 8 / Windows Server 2012 развернуть собственный веб-сервер IIS с поддержкой языка PHP. Впоследствии на данной платформе можно будет запустить большинство современных CMS, написанных на этом самом популярном (но далеко не самом лучшем) на данный момент языке разработки веб-приложений.
Установка IIS в Windows 8

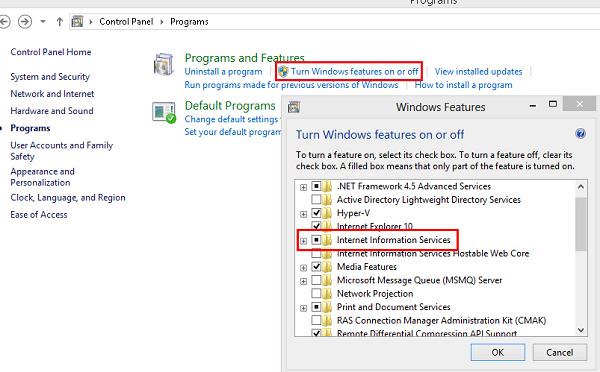
В Windows 8 веб-сервер IIS 8 поставляется в качестве отдельной функции и по умолчанию он не установлен. Чтобы установить IIS в Windows 8, откройте Панель управления и в разделе Program and Features (appwiz.cpl) нажмите на кнопку Turn Windows features on or off.
В открывшемся окне поставьте чекбокс у пункта Internet Information Service и нажмите ОK.
Примечание. По умолчанию IIS устанавливается в минимальной конфигурации.
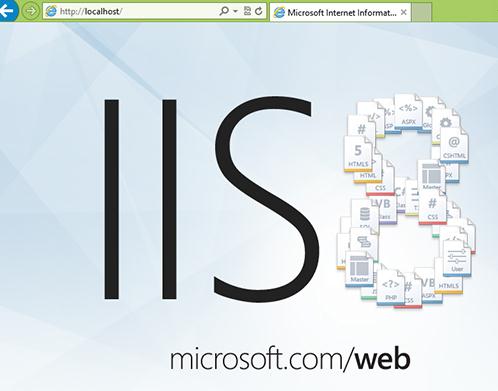
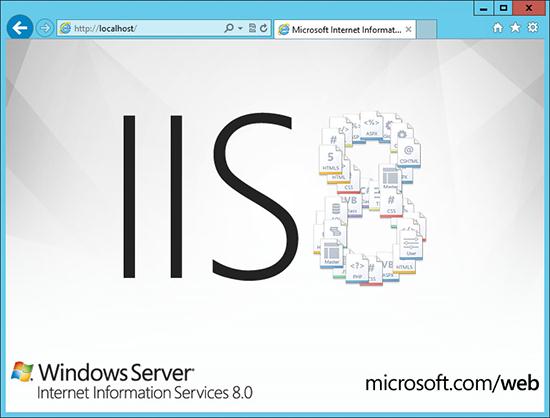
После окончания установки, проверим что наш веб-сервер работает. Для этого запустите Internet Explorer (или любой другой браузер) и в его адресной строке наберите http://localhost (или ).

Если IIS функционирует корректно, должна отобразиться такая страница:
Установка IIS в Windows Server 2012
В Windows Server 2012 веб-сервер Internet Information Services можно установить из консоли Server Manager, выбрав для установки роль Web Server IIS.

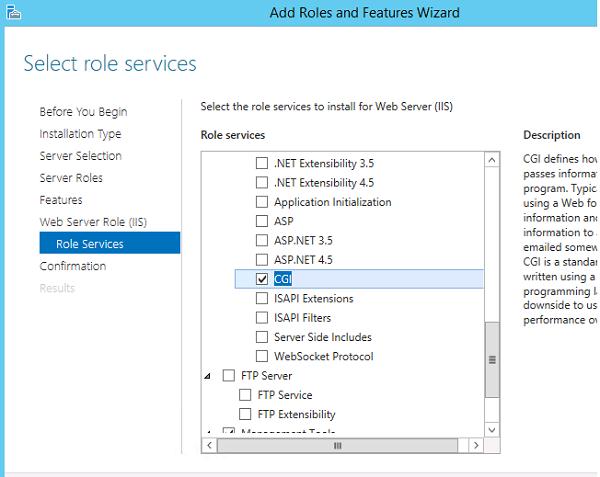
Согласимся с предложенными по-умолчанию компонентами, установив дополнительно только CGI (находится в разделе Application Deployment ролей IIS).

Далее запустим установку роли, после окончания которой, сервер потребуется перезагрузить.
Протестируем работу IIS, открыв в браузере страницу http://localhost .

Установка PHP на Windows 8 / Windows Server 2012
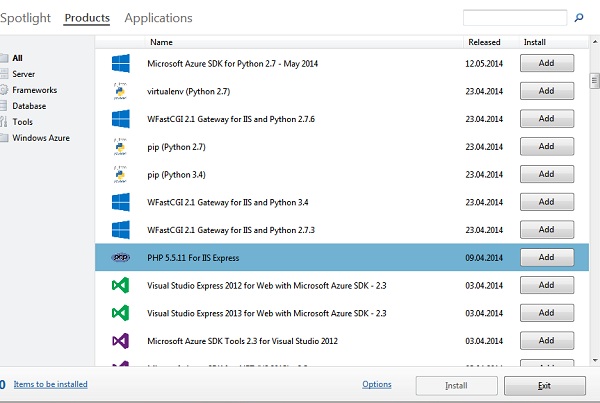
Для установки PHP нам понадобится установщик Microsoft Web Platform Installer 5.0 (WPI), скачать который можно по этой ссылке: http://www.microsoft.com/web/downloads/platform.aspx (wpilauncher.exe.)
Совет. Преимущество использования установщика PHP в составе Microsoft Web Platform перед ручной установкой PHP заключается в следующем:
- WPI сам определяет необходимую версию PHP и устанавливает актуальную на данный момент версию
- WPI сам настраивает интеграцию с IIS, позволяет установить расширения PHP без необходимости вручную настраивать конфигурационные файлы
- WPI в дальнейшем позволяет легко обновить PHP без потери конфигурационных файлов
Запустим скачанный файл wpilauncher.exe. и в появившемся окне установщика Web Platform Installer перейдем на вкладку Products и в списке доступных продуктов найдите строчку PHP 5.5.11.

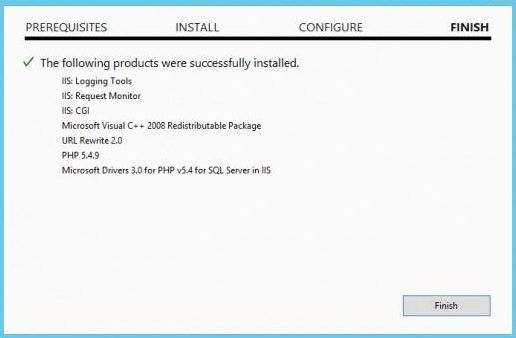
Нажмем кнопку Add и затем Install. Перед началом установки WPI проверит вашу систему на соответствие требованиям ( в случае необходимости будет предложено установить недостающие компоненты), после чего запустится установка PHP.

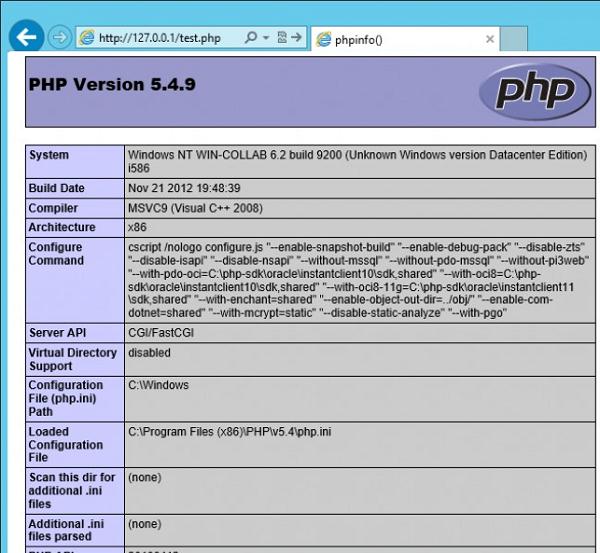
Тестируем работу PHP на IIS
После того, как PHP установлен, проверим, что он работает корректно. Для этого перейдем в корневой каталог веб-сервера (по умолчанию C:inetpubwwwroot) и создадим новый текстовый файл с расширением PHP (например, test.php).
Откроем его в любом текстовом редакторе и вставим в него такой код:
Далее в браузере в адресной строке укажем такой url-адрес: . Если все настроено верно, в окне должна появится о версии и основных конфигурационных настройках установленной версии PHP (PHP Info).

Совет. Конфигурационные настройки PHP хранятся в файле php.ini, который находится в корне каталога установки.
На этом все! Итак, мы рассмотрели самый простой способ развернуть полноценный веб-сервер IIS с поддержкой PHP 5.x на базе Windows Server 2012 / Windows 8.