How to Enable the Optimal Audio Codec for Your Bluetooth Headphones in macOS
How good your digital music sounds often comes down to which file format it’s encoded in. Be that as it may, every Mac audio setup is only as strong as it’s weakest link, and if your Bluetooth connection isn’t up to scratch, even the best BT headphones will fail to deliver a decent wireless listening experience.
By design, all Bluetooth devices support the low-power SBC audio compression codec as standard. Fortunately, modern Macs also support AAC (Apple’s preferred iTunes codec) and aptX, which Android devices often use. These two codecs offer higher quality audio and generally lower latency than SBC, which is why most third-party wireless headphones on the market support one or the other, and sometimes both.
Yet for whatever reason, despite their AAC/aptX support, some headphones fall back to the bog-standard SBC codec when connected to a Mac. This can lead to a particularly underwhelming audio experience, not to mention latency-related sync issues, which will be a distinct concern if you use your headphones while gaming or watching movies. Thankfully, it’s possible to force macOS to connect to your headphones using one of the two superior codecs. In this article, we’ll show you how to do so using Apple’s Bluetooth Explorer utility. (And if you’re comfortable opening a Terminal window, we’ve included a couple of commands at the end that do the same thing.)
But first, it’s worth checking which codecs your brand of headphones actually supports: Look for codec logos on the box, and make sure to check for references to codecs in the manual and any accompanying/online spec sheets.
Once you’ve established that your headphones support aptX and/or AAC, you’ll want to identify which codec is being activated when you connect the headphones to your Mac. Follow these steps to find out.
How to Identify Which Bluetooth Codec is Active
- Establish a Bluetooth connection between your Mac and headphones in the normal manner.
Play some audio on your Mac so that it’s streaming to the headphones.
Now hold down the Option (Alt) key and click on the Bluetooth symbol in the menu bar. (If you don’t see it there, you need to check Show Bluetooth in menu bar in System Preferences -> Bluetooth.)
If your headphones are using AAC or aptX, you don’t need to do anything. Without going into the technical details, both standards provide relatively stable wireless connections and – as far as Bluetooth goes – comparably decent sound quality. However, if the codec shown is SBC, you’ll probably want to change it. Here’s how.
How to Force-Enable aptX and AAC Codecs in macOS
- Open a web browser, navigate to Apple’s developer downloads page, and download Additional Tools for Xcode 9 [Direct Link] which contains Apple’s Bluetooth Explorer utility. Note that to access the page you’ll need to register for a free Apple developer account if you don’t already have one. Alternatively, use Google to find the Bluetooth Explorer utility hosted elsewhere and skip to step 5, but if you’re not downloading from Apple, be sure to screen the file for malware.
Once downloaded, double-click the Additional Tools dmg file to mount it on your desktop.
Open the Additional Tools drive and navigate to the Hardware folder.
Open your Mac’s Applications folder in another Finder window or tab.
Drag Bluetooth Explorer into your Mac’s Applications folder and launch the app from there.
From the Bluetooth Explorer menu bar, select Tools -> Audio Options.
In the Codecs section, tick the checkboxes alongside Enable AAC and/or Force use of aptX (depending on your issue). Make sure Disable AAC and Disable aptX are left unchecked.
Click Close to finish.
When your Mac reboots, you can confirm that the codec change has been applied by following the first series of steps in this article.
Terminal commands for enabling AAC and aptX Codecs
To enable aptX, input the following command, press Enter, and type your user password if prompted:
sudo defaults write bluetoothaudiod «Enable AptX codec» -bool true
Alternatively, to enable AAC, input the following and press Enter:
sudo defaults write bluetoothaudiod «Enable AAC codec» -bool true
To disable either codec via Terminal, simply replace -bool true with -bool false at the end of the command.
Mac: How to force aptX/AAC on supported Bluetooth headphones
— Aug. 31st 2018 12:00 am PT
While iOS won’t support the standard, macOS officially supports aptX (not to be confused with aptX HD) as a Bluetooth audio codec. However, macOS will likely favor AAC as Apple’s apps such as iTunes prefer the codec.
All Bluetooth headphones support the pretty terrible, widely available SBC audio codec. But, the codec is pretty terrible and compresses your audio more than most would like.
Generally, more modern headphones support AAC (which iPhones support), and aptX (the codec that most Android devices use). Regardless, some headphones fall back to SBC for no explainable reason. Aside from quality, this could add more latency, causing for a subpar audio experience.
Luckily, on macOS, users are able to force AAC and aptX via a few easy steps. Follow along to learn how…
Mac: How to force aptX/AAC on supported Bluetooth headphones
You’ll first need to know which codec your headphones are currently using. To do this:
- Connect your Bluetooth headphones to your Mac and start playing some audio.
- Hold down the Option key and click on the Bluetooth icon in the menu bar.
- Click on your headphones to expand the menu. You should see the headphone’s Active Codec shown in grey.
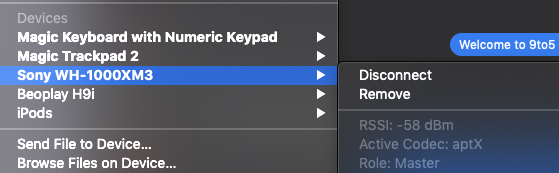
If your headphones are already using AAC or aptX, no further action is required. Both standards are relatively good for wireless and are superior to the old SBC codec. However, if you see that your headphones are using SBC, continue reading.
- You’ll need to download Additional Tools for Xcode, which can be found here. It contains Apple’s Bluetooth explorer utility. Downloading will require a free Apple Developer account.
- Once downloaded, open the Additional Tools dmg and mount it.
- Open the Additional Tools drive and get to the Hardware folder.
- Drag the Bluetooth Explorer app to the Applications folder.
- Launch the app and navigate to Tools >Audio Options in the menubar.
- In the newly opened window, tick Force use of aptX and Enable AAC (if applicable). Make sure Disable AAC and disable aptX is unticked.
- Click Close to finish and either reboot your Mac or disconnect and re-connect your headphones.
- Verify that your headphones are now using either AAC or aptX with the initial steps above.
For more help getting the most out of your Apple devices, check out our how to guide as well as the following articles:
FTC: We use income earning auto affiliate links. More.
Enabling AAC and AptX over Bluetooth on MacOS
I recently purchased a pair of Sony MDR-1000X Bluetooth noise-cancelling headphones. Although I usually prefer Sennheiser headphones (my previous pair of NC headphones was the Sennheiser Momentum Wireless 2 (aka HD-1)), I went with the Sony due to their support of the AAC codec, as my primary devices are all Apple.
By default on OS X and MacOS, the headphones will connect with the SBC codec when playing audio. (And occasionally a fallback to the low-quality SCO streaming codec for some voice-chat apps like Cisco Jabber) The OS does support aptX and AAC over bluetooth, but you have to jump through some hoops to enable them. Why? who knows. My best guess is that it is becuase SBC is the universally supported (and required) codec for the A2DP Bluetooth audio profile, and using that maximizes compatibility and minimizes customer complaints. If you can’t reliably detect what a headset supports, then the lowest common denominator is the safe choice.
AirPods however do automatically use the AAC codec without the user having to set any options.
Thanks to Anders Carling in the comments, looks like there is a much easier way to check and update these settings.
Open Terminal and enter “sudo defaults read bluetoothaudiod” and type in your password when prompted. You should then see the current settings:
«AAC Bitrate» = 128;
«AAC CBR» = 0;
«Apple Bitpool Max» = 64;
«Apple Bitpool Min» = 2;
«Apple Initial Bitpool» = 40;
«Disable HFP» = 0;
«Enable AAC codec» = 1;
«Enable AptX codec» = 0;
If you get an error “Domain bluetoothaudiod does not exist”, that means none of these settings have been set before, update the setting as shown below and you’ll be able to read the setting as outlined above.
To update these settings in the Terminal:
sudo defaults write bluetoothaudiod «Enable AptX codec» -bool true
sudo defaults write bluetoothaudiod «Enable AAC codec» -bool true
To disable either one, just change “-bool true” to “-bool false” at the end of the command.
Here’s the original method, still handy in case you want a GUI to toggle the settings:
To enable aptX or AAC support, you need to get a copy of Apple’s Bluetooth Explorer development utility.
Go to the Apple developer downloads page – you will need to register a developer account if you don’t already have one.
Search for “Additional Tools for Xcode” – at the time of this writing, the latest released version is for Xcode 9.0. This will download a .dmg file that contains “Bluetooth Explorer.app” – this is the only file you need, move it anywhere, and you can delete the rest.
If you’re already logged in to the developer site, you can also use this direct link for the 9.0 version:


For older versions you’ll get “Hardware IO Tools for Xcode 7.3”
Run Bluetooth Explorer, then go to Tools>Audio Options. Select “Enable AAC”. If you have an aptX-only device you can enable that here as well. If your headset is already connected, disconnect and reconnect. You don’t need to re-pair the device.

Once you’re reconnected, you can verify which codec you’re connecting with by enabling the Bluetooth menu bar icon (System Preferences >Bluetooth>Show Bluetooth in menu bar), then holding down option and clicking the Bluetooth menu bar icon and navigating to the headphones entry.

That’s it. You’ll be running the improved wireless codec, and should notice a definite improvement.